
Subscribe to Our Youtube Channel
Related Manuals for Eaton Smart Home Controller 2.0


Summary of Contents for Eaton Smart Home Controller 2.0
- Page 1 Smart Home Controller 2.0 Quick Installation Manual with MRF Release 2.0.x version 1.3...
-
Page 2: Table Of Contents
Quick Installation Manual with MRF Table of contents Introduction ......................... 4 1.1. Safety instructions ......................4 1.2. Intended use ......................... 4 1.3. About this document ..................... 4 1.3.1. How to start ......................4 1.3.2. Troubleshooting ..................... 4 1.3.3. Feedback ....................... 4 Quick installation ........................ - Page 3 Quick Installation Manual with MRF Appendix B Feedback form ....................24 Page 3 of 24...
-
Page 4: Introduction
Quick Installation Manual with MRF 1. Introduction 1.1. Safety instructions This document contains important warnings and safety instructions which must be observed and followed by users. Failure to follow these warnings and safety instructions will put the fault- free operation of the Smart Home Controller at risk. 1.2. -
Page 5: Quick Installation
Use the MRF xComfort Network Configuration Tool to create and setup a new project or copy an existing project and replace devices (Project copy). ATTENTION! Use MRF tool version or higher: Eaton RF-System V2.42 Good to know: Use the MRF Project-topology to define Rooms/Zones. This can be directly used to define the SHC Zones. - Page 6 Quick Installation Manual with MRF Connect and control Shutters or Shading if present. Control the temperature of a room if possible. Make use of cameras if needed. Check which vendors are supported. The SHC Device Names, configurations and Interfaces (ECIs) can be directly configured in MRF (SHC Settings screen).
- Page 7 Quick Installation Manual with MRF 6. Install the Devices and turn them On. B. Via Device network scan: 1. Install the Devices and turn them On. 2. Scan the network for available devices: Click: 3. Specify a clear name for each Device. 4.
- Page 8 Quick Installation Manual with MRF B. Select Tab: Interfaces C. Activate needed ECIs and check their IP addresses: D. Click: OK ECIs connected to the SHC are indicated by a light blue dashed line: 7. SHC settings: A. Right click on the SHC Icon and select: Settings B.
- Page 9 Quick Installation Manual with MRF E. Per Device set the parameters if needed: Parameters: 1. Name: End-user meaningful device name used in SHCs user interfaces (Per default: Name in MRF) 2. Function: Light, Heating, Window, Door, Consumption, … 3. Extra (1): Contact-type, Unit, … 4.
-
Page 10: Quick Shc Setup
Quick Installation Manual with MRF 2.3. Quick SHC setup Follow the instructions in this section to do a quick setup of the Smart Home Controller with the MRF SHC Configuration created in the previous section. ATTENTION! The Smart Home Controller should already been activated and checked for updates. - Page 11 Quick Installation Manual with MRF 3. Select Tab: Users Remark!: Change always the admin password the first time: A. Specify User credentials (right side): - Username: <Username> - Password: <Password> - Retype Password: <Password> B. Select: Language C. Click: Add D.
- Page 12 Quick Installation Manual with MRF F. Select: Country G. Select: City H. Select: Date and Time Save settings: save 6. Now the main functionality is already available and usable. Check the SHC Help file to enable some additional features like: A.
-
Page 13: Quick App Setup (Ios Iphone Example)
This example is based on the iPhone. Figure 1: Download App Open the App Store: Search for: Eaton Install and open the App Figure 2: Connect to Smart Home Controller when in the same local network (LAN) the first time... -
Page 14: Start The Temperature Control
Quick Installation Manual with MRF 2.4.2. Start the Temperature Control Select the Climate Function Figure 3: Start the Temperature Control Click: Edit Select: Heating Select a predefined mode And: Close The question mark indicates that no temperature value has been received yet. Start the Temperature Control in every Zone with a Climate Function. -
Page 15: Create Light Scenes
Quick Installation Manual with MRF 2.4.3. Create Light Scenes To create a Light Scene, select the Status & Control Function to set the preferred light settings. Figure 4: Create a Light Scene 1 Select Status & Control Select Scene Function Click: And click: Edit Set preferred Lights... -
Page 16: Save Shc Configuration In Original Mrf Project
Quick Installation Manual with MRF 3. Save SHC Configuration in original MRF Project Note!: The original MRF project is the MRF project which is currently active for the configuration. Normally this project is created during the initial installation of the SHC and maintained after that. -
Page 17: Troubleshooting
Power LED is orange: Wait until the SHC is started (> 1hours) Power LED stays orange after one hour: Replace the SHC! Network Icon is green: Eaton Server connected. Go to step 4 Network Icon is orange: Internet ok. Activate SHC. Go to step 3 ... -
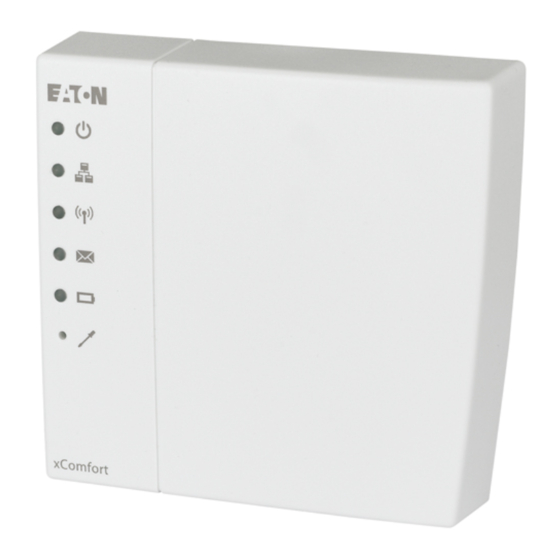
Page 18: Led Indicators On The Smart Home Controller Box
Provide the Smart Home Controller Issue report (contact check www.eaton.eu/xcomfort your supplier or the local Eaton organization) 4.3. LED Indicators on the Smart Home Controller Box Power LED: Green: Power ON, the System is operational. Orange: The System is booting. -
Page 19: How To Restore The Shc Network Settings
Quick Installation Manual with MRF 4.5. How to restore the SHC network settings This symbol indicates the recovery button on the Smart Home Controller Box. Use a small pin to access this button. Press the button on the Smart Home Controller for 15 seconds (power LED flashes green and will finally change to orange), system will reboot. -
Page 20: Via Upnp (Windows)
Quick Installation Manual with MRF 4.7.3. Via UPnP (Windows) 1. Open My Network Places: 2. Double click link: Smart Home Controller 3. The browser opens with the login page 4.7.4. Via MRF 1. Open MRF and right-click on the SHC: 2. - Page 21 Quick Installation Manual with MRF Red: One or more Interfaces are down New Messages available in the System Log: Green: No new messages after the last check Yellow: New Warning messages Red: New Error messages Battery status battery powered Devices: Green: All batteries are good Yellow: One or more batteries are weak Red:...
-
Page 22: Appendix A Activate And Check For Updates
Quick Installation Manual with MRF Appendix A Activate and check for updates A.1. Activate the Smart Home Controller Activate the SHC for remote access and new software updates. Admin Console navigation: SHC Software version 1.x: 1. System -> Remote Access SHC Software version 2.x: 1. - Page 23 Quick Installation Manual with MRF d. Please wait until the popup shows the process is ready! The download and update could take more than 30 minutes based on size of the project and the download speed. e. Click: OK 2. After the SHC 2.x SW update a new version of the RF module firmware should become available.
- Page 24 Quick Installation Manual with MRF Appendix B Feedback form Use this feedback form below to send us your comments. We read all feedback carefully, but please note that we cannot respond to the comments you submit. Please send your feedback to your local sales contact. ……………………………………………..
Need help?
Do you have a question about the Smart Home Controller 2.0 and is the answer not in the manual?
Questions and answers