Advertisement
Advertisement
Table of Contents

Related Manuals for Gardenline 63187


Summary of Contents for Gardenline 63187
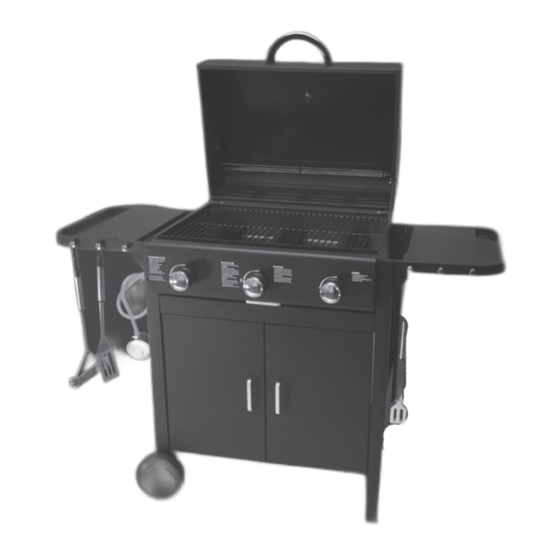
- Page 1 3 Burner Gas Barbecue User Manual and Assembly Instructions...
- Page 2 PRECAUTIONS READ THIS MANUAL FIRST • PLEASE READ INSTRUCTIONS CAREFULLY BEFORE ASSEMBLY AND USING THE APPLIANCE • RETAIN THIS MANUAL FOR FUTURE REFERENCE. • DO NOT MODIFY THE APPLIANCE. FOR OUTDOOR USE ONLY • DO NOT USE THIS DEVICE INDOORS. BE CAREFULL WITH GAS •...
-
Page 3: List Of Parts
LIST OF PARTS Please check parts against the list below before assembling your Barbecue Grill. Take a few moments to familiarise yourself with the contents. Check that all holes are clear of paint before assembly. REF. NAME NUMBER ILLUSTRATION REF. NAME NUMBER ILLUSTRATION... - Page 4 STEP 1: ASSEMBLY TUBE LEGS Attach 2pcs long leg (18+19) to right side of pre-assembled body (1) using 4pcs M5 *50mm bolts. In the same way, Attach 2pcs short leg (16+17) to left side of pre-assembled body (1) using 4pcs M5 *50mm bolts(C) as shown. Pay attention that the welded part on the legs are facing the inside of the body.
- Page 5 STEP 3: ASSEMBLY BOTTOM SHELF & WHEELS Attach bottom shelf (14) to the bottom of tube legs (16+17+18+19) using 4pcs M5*12 bolts(D). Insert wheel axle (20) through big holes in the bottom of short legs(16+17), put one wheel cap (23) in one end of the axle (20), install another side in the same way, as shown.
- Page 6 STEP 5: ASSEMBLY DOOR HANDLES Use 4 pcs. M4*5 bolt (E) install handles (7) in the door (11, 12); then install bottom pivot (G) as shown: STEP 6: ASSEMBLY DOORS After install bottom pivot (G), then use top pivot (F) fit door (11) into traverse (10). Repeat for door (12):...
- Page 7 STEP 7: ASSEMBLY LID HANDLE, OIL COLLECTOR AND OIL COLLECTOR HANDLE Attach oil collector handle (7) to the oil collector (6) using 2pcs M4*5 bolts (E), as arrow shown. Attach lid handle (2) to the lid using 2pcs M6*12 bolts (A), as shown. STEP 8: ASSEMBLY SIDE TABLE Assembly side table (8+9) to top of legs(16+17+18+19) by using 4pcs M6*12 shoulder bolts(B) as shown.
- Page 8 STEP 9: PLACE REFLECTOR& COOKING GRIDS AND WARMING RACK Place reflector (5) above gas burner. Place cooking grids (4) onto body. Attach warming rack (3). ASSEMBLED FOR FREQUENTLY ASKED QUESTIONS AND FOR TIPS PLEASE HAVE A LOOK AT OUR SUPPORT WEBSITE: WWW.BESTBUYINGSUPPORT.COM IMPORTANT INFORMATION •...
-
Page 9: Installation
INSTALLATION SELECTING A LOCATION This barbecue is for outdoor use only and should be placed in a well-ventilated area. Take care to ensure that it is not placed under any combustible surface. The sides of the barbecue should NEVER be closer than 1metre from any combustible surface. Keep this barbecue away from any flammable materials! PRECAUTIONS Do not obstruct any ventilation openings in the barbecue body. -
Page 10: Care And Maintenance
• After the RIGHTMOST burner is lit, light the middle burner and then the LEFTMOST burner. • Confirm that RIGHTMOST burner is alight before lighting the other burners. • If rightmost burner fails to ignite, contact your local dealer for assistance. •... -
Page 11: Troubleshooting
TROUBLESHOOTING PROBLEM POSSIBLE CAUSE SOLUTION Burners will not light using the ignition sys- LP gas cylinder is empty Faulty regulator Ob- Replace with full cylinder Have regulator structions in burner Obstructions in gas jets checked or replace Clean burner Clean jets or gas hose Electrode wire loose or discon- and gas hose Reconnect wire Change electro- nected on electrode or ignition unit Electrode... -
Page 12: Technical Specifications
TECHNICAL SPECIFICATIONS MODEL HA2417G Manufacturer Yangjiang Guanglong Industrial Co.,Ltd. Appliance Category I3+(28-30/37) Type of gas Gas Pressure (mbar ) 28-30 Orifice Diameter (mm) 0.84 0.84 Destination countries BE, CH, CY, CZ, ES, FR, GB, GR, IE, IT, LT, PT, SI, SK, TR Nominal Heat input (Hs) 9 kW Gas consumption...
Need help?
Do you have a question about the 63187 and is the answer not in the manual?
Questions and answers