Table of Contents
Advertisement
Quick Links
Advertisement
Table of Contents

Related Manuals for HITEC power peak D7


Summary of Contents for HITEC power peak D7
- Page 1 Operating Instructions...
-
Page 2: Table Of Contents
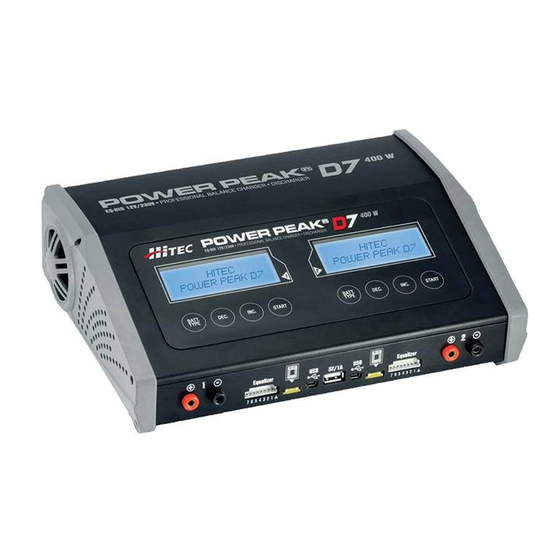
400 W charging / discharging station for the demanding modeler. Two outputs, each with 200 watts of power and up to 20 amps of charge current in a single case. The Power Peak D7 charger has the ability to charge or discharge your batteries on the move or at home, and very quickly. -
Page 3: Warning And Safety Notes
OPERATOR AND MAY NEGATE ANY CLAIMS FOR DAMAGES INCURRED. Hitec RCD USA will not be held responsible for any damages or injuries that may occur by persons who fail to follow these warnings or who fail to properly follow the instructions in this manual. - Page 4 WARNINGS and SAFETY NOTES (CONT.) Never place a charger on a car seat, carpet or similar surface. Keep all flammable volatile materials away from the operating area. Make sure you know the specifications of the battery to be charged or discharged to ensure it meets the requirements of this charger.
- Page 5 Before charging your batteries, it is critical that you determine the maximum allowable charge rate for your batteries. The Power Peak D7 is capable of charging at high rates that may not be suitable or safe for your particular batteries. For example, Lithium cells are typically safe to charge at 1C, or the total mAh÷1000. A 1200mAh battery would have a 1C charge rate of 1.2 amps.
-
Page 6: Product Layout
BID chip / key Output 2 Equalizer port: socket socket socket Output 2 Output 1 Output 1 SET CONTENTS POWER PEAK D7 Charger DC Power Cord XT60 Charge Cords Balancing Board Connectors 2-pin T-type Charge Cords Universal Balancing Boards AC Power Cord... -
Page 7: Specifications
BID chip or key which stores all the relevant data for charging and discharging the battery. When the BID chip or key is connected to the Power Peak D7, it defines the parameters for the charger. -
Page 8: Getting Started
GETTING STARTED BATTERY AND SUPPLY CONNECTIONS 1. CONNECTING TO A POWER SOURCE 12VDC Battery Connection The Hitec Power Peak D7 features a built- in switching power supply. You can connect the AC power cord directly to an AC socket BALANCE... -
Page 9: Operations
OPERATIONS STOP/ESC button “-” button “+” button START/ENT button This button is used to stop a process or back out of a parameter setting, it STOP/ESC is also used to scroll through the Battery Selection, User Settings, Data, button and Cycle menus. This button is used to scroll down in the menus or to increase the value “+”... -
Page 10: Menu Structure
MENU STRUCTURE Once plugged in, turn on the power switch, the charger briefly displays Hitec Power Peak D7 then the Memory screen appears. Use the STOP/ESC button to scroll through the menus. The Memory Name menu is where the parameters [01] Memory Name... - Page 11 STOP/ESC button The Cycle Data display shows the charged-in and [ Cycle Data ] discharged capacity, as well as the maximum battery voltage Capacity Voltage reached during charging, and the average battery voltage 0mAh 11.358 V during discharging of all completed cycles. Data for up to ten 0mAh 0.000 V cycles can be viewed;...
- Page 12 Warning AND POSSIBLE EXPLOSION OR FIRE. The following is a step-by-step guide for setting the battery parameters on the Power Peak D7. The screen shots and operation templates shown are for the operation of a Li-Po BALANCE CHARGE program. Refer to the Available Operations chart on page XX to setup your specific type of battery.
- Page 13 CHARGE CURRENT (Chg Current) [ 01 ] Memory Name... Press the + button to move the arrow to the charge current LiPo 7.4 V 200mAh prompt. Press the START/ENT button to highlight the value Chg Current 2.0mA prompt. Use + or – to increase or decrease the charge dChg Current 1.0mA current.
-
Page 14: Starting The Charge/Discharge Process
TERMINAL VOLTAGE CONTROL (TVC) [ 01 ] Memory Name... This is used to set the upper voltage limit during the charge LiPo 7.4 V 200mAh process, the value is set per cell. Press the + buttont to move Chg Current 2.0mA the arrow to the discharge voltage prompt. -
Page 15: Operating The Charger
BATTERY TYPE OPERATION OPERATION DESCRIPTION Charge The charge mode is for charging LiPo/LiFe/LiIon/ LiHV batter- ies in normal mode. Discharge This mode is for discharging LiPo/LiFe/LiIon batteries. LiPo, This program is for charging or discharging a lithium battery LiFe, Storage which will not be used again for an extended period of time. - Page 16 Press and hold the START/ENT button until the charge selection screen is displayed like one of the examples [ 03 ] Memory Name... shown on the left. 6Cell 200mAh Charge Discharge Pb Process Screen If you are working with a NiMH or NiCd battery and choose the Re-Peak charge mode, you will be prompted to enter [ 02 ] Memory Name...
-
Page 17: Starting The Process
STARTING THE PROCESS Press and hold the START/ENT button until you hear a confirmation beep and see BATTERY CHECK WAITING, if everything is setup correctly the process will begin. LITHIUM BATTERIES MUST ALWAYS BE CHARGED WITH THE BALANCE LEAD CONNECTED. Note PROGRAM STOP: During the charging process, press STOP/ESC to stop the process. -
Page 18: User Setup Menu
USER SETUP MENU When powered on for the first time, the Power Peak D7 charger will load with default values in the programmable user settings. The screen displays the following information in sequence and the user can change the value of the parameters on each screen. - Page 19 Item Selection Description Language English, German, Menu language Italian and French Pause setting between charge / discharge cycles Pause 1 - 60 Minutes 1 -60 minutes. This setting is typically only used with NiMH or NiCd batteries Activates the time limit safety function. The default is ON, it is not rec- Time Cut-off ON/OFF ommended to change this.
- Page 20 (Chips and Keys sold seperately) When a programmed BID chip or key is connected to the Power Peak D7, it defines the parameters for the charger. All you need to do is press the Start button, and the charge or discharge process commences. Since all the essential information is stored on the BID chip, the battery always carries its own data with it, and the data can easily be displayed on the charger.
-
Page 21: Warning And Error Messages
WARNING AND ERROR MESSAGES The Power Peak D7 is equipped with special safety features to ensure safe and reliable charging and discharging operations. As soon as a fault occurs, a corresponding error message will appear on the screen, and the buzzer emits a warning sound. After eliminating the cause, you can clear this message by pressing the STOP/ESC button. -
Page 22: Conformity Declarations
USB PORTS The Power Peak D7 has two mini USB sockets in the front. A USB cord can be connected to either socket and connected to your PC. Additionally there is a 5VDC 1.0A USB output port that can be used for charging accessories. -
Page 23: Liability Exclusion
ONE YEAR LIMITED WARRANTY For a period of one year from the date of purchase HITEC RCD USA, INC. shall REPAIR OR REPLACE, at our option, defective equipment covered by this warranty, otherwise the purchaser and/or consumer is responsible for any charges for the repair or replacement of the charger. - Page 24 Hitec RCD USA, Inc | 12115 Paine St., Poway CA 92064 | (858) 748-6948 | www.hitecrcd.com...
Need help?
Do you have a question about the power peak D7 and is the answer not in the manual?
Questions and answers