Table of Contents
Advertisement
WARNING: THE CHARGING AND DISCHARGING OF RC HOBBY BATTERIES CAN BE DANGEROUS. FAILURE TO FOLLOW
THE INSTRUCTIONS AND WARNINGS IN THIS MANUAL MAY RESULT IN PROPERTY DAMAGE AND/OR LOSS OF LIFE.
INSTRUCTION MANUAL
INSTRUCTION MANUAL
INSTRUCTION MANUAL
AC/DC INPUT,
PROFESSIONAL
BALANCE CHARGER
/ DISCHARGER
MULTICHARGER
1
Advertisement
Table of Contents

Related Manuals for HITEC RDX1 PRO


Summary of Contents for HITEC RDX1 PRO
- Page 1 INSTRUCTION MANUAL INSTRUCTION MANUAL INSTRUCTION MANUAL AC/DC INPUT, PROFESSIONAL BALANCE CHARGER / DISCHARGER MULTICHARGER WARNING: THE CHARGING AND DISCHARGING OF RC HOBBY BATTERIES CAN BE DANGEROUS. FAILURE TO FOLLOW THE INSTRUCTIONS AND WARNINGS IN THIS MANUAL MAY RESULT IN PROPERTY DAMAGE AND/OR LOSS OF LIFE.
-
Page 2: Table Of Contents
Table of Contents Introduction ....................3 Warnings and Safety Notes ................. 4 Charger Layout .................... 8 Speci cations ....................9 Features ...................... 10 Charger Connections ................. 12 Getting Started ..................13 Operating the Charger ................14 Charging Your Battery ................18 System Settings .................. -
Page 3: Introduction
Introduction Congratulations on your choice of the RDX1 Pro charger from Hitec RCD, USA. The RDX1 Pro is a high-performance, microprocessor-controlled charger/ discharger with battery management capabilities that are suitable for use with most popular battery types. The RDX1 Pro also features integrated balancing for six-cell, Lithium-Polymer (LiPo), Lithium-Ferrite (LiFe) and Lithium-Ion (LiIon), as well as the latest high voltage Lithium-Polymer (LiHV) batteries. -
Page 4: Warnings And Safety Notes
Warnings and Safety Notes Warning: Be sure to read this section for your own safety. Caution: Be sure to read this section to prevent accidents and damage to your charger. Warning Tip: This section will help you maximize the performance of your charger. - Page 5 Warnings and Safety Notes Never attempt to charge or discharge the following types of batteries: • A battery tted with an integral charge circuit or a protection circuit • A battery pack which consists of di erent types of cells (including di erent manufacturer’s cells) •...
- Page 6 Connect the battery’s main leads to the charger output: red is positive and black is negative. Keep in mind that the gauge or thickness of your charging leads from the RDX1 Pro to your battery must be of an acceptable current rating to handle the applied charge current. For maximum safety and charging e ectiveness, always match or exceed the main battery lead rating when assembling or selecting your charging leads.
- Page 7 10 charge/discharge cycles. We do not recommend you use the RDX1 Pro charger to do this; normal use and recharging will achieve the same results. If you wish to perform a Lithium break-in on the bench with the RDX1 Pro discharging to minimum acceptable voltages and performing a balance charge at 1C maximum rate is recommended.
-
Page 8: Charger Layout
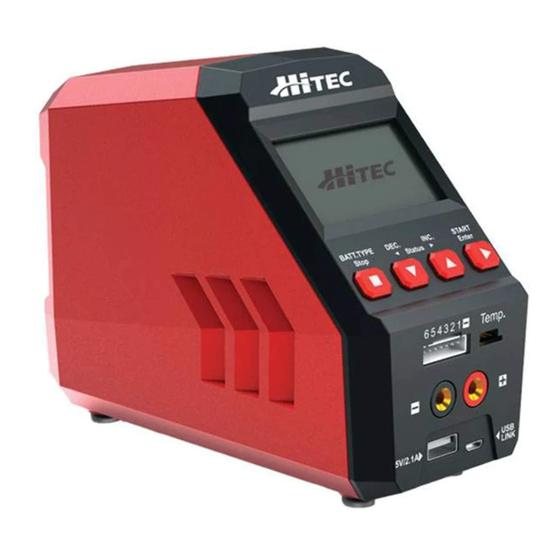
Charger Layout 1. RDX1 Pro Charger 4. 1 x XT-60 Charge Connector 2. Power Cord 5. 1 x 2 Pin T-Type Charge Connector 3. 1 x XH Balance Board 6. 1 x XT-60 DC Power Connector Input Buttons BATT. Type/Stop Button DEC. -
Page 9: Speci Cations
Charger Layout DC Input (11-18V) Balance Port 3.2” SCREEN Temperature Sensor Port USB 5V/2.1A AC Input (100-240V) 4mm Battery USB LINK Sockets Speci cations AC Input Voltage 100 - 240V DC Input 11 - 18V Maximum Charge Power 100W Charge Current Range 0.1 ~ 10.0A Maximum Discharge Power Discharge Current Range... -
Page 10: Features
Users can call out this data at any time without setting any additional programming. Internal Independent Lithium Battery Balancer The RDX1 Pro features a built-in cell voltage balancer so you don’t need to fuss with external balancers while charging. Balancing Individual Cells During Discharging When used with a balancing board the RDX1 Pro can monitor and balance each cell in the pack individually while discharging. - Page 11 Input Power Monitoring The RDX1 Pro input voltage is monitored to protect the battery from becoming damaged. The process ends automatically if it drops below the limit. Capacity and Temperature Limits The charge process will terminate if either the charging capacity or battery temperature exceeds the limit set by the user.
-
Page 12: Charger Connections
Charger Connections 1.) Connecting to a power source The Hitec RDX1 Pro features a built-in switching power supply. You can connect the AC power cord directly to an AC socket (100-240V AC) or use an 11-18V DC power source (such as an automotive battery or 12 Volt power supply). -
Page 13: Getting Started
AND POSSIBLE EXPLOSION. Available Operations Depending on battery type, di erent operations will be available. This chart shows which operations are available for the di erent types of batteries the RDX1 Pro is capable of working with. Battery Type Operation Operation Description... -
Page 14: Operating The Charger
This mode is for discharging a Pb battery. Operating the Charger The following is a step-by-step guide for operating the RDX1 Pro. The screen shots and operation templates shown below are for the operation of a LiPo BALANCE CHARGE program . Refer to the Available Operations chart on... - Page 15 Whenever a parameter value in the program needs to be adjusted, highlight the value by pressing the START/Enter button to make it blink; to change the value press the DEC or INC buttons. The new value will be stored by re- pressing the START/Enter button.
- Page 16 Operating the Charger (continued) C. Current (Charge Current) PROGRAM SELECT(01) The charger supports a maximum 10.0A Battery Type: LiPo charge current, but a current suitable for your Battery Cells: battery should be set. It is inappropriate to Mode: Balance set a high charge current for a low capacity C.
- Page 17 Operating the Charger (continued) The following functions are available when working with NiMH or NiCd batteries: Cycle Mode PROGRAM SELECT(01) In Cycle Mode, users can choose Battery Cells: between charging>discharging or Mode: Cycle discharging>charging. There are two C.Current 3.0A requirements for making the Cycle Mode D.
-
Page 18: Charging Your Battery
Charging Your Battery Now that you have set all the parameters for your battery you are ready to execute the operation. Now would be a good time to check to make sure the charge settings are correct and within the battery manufacturers recommendations. -
Page 19: System Settings
System Settings When powered on for the rst time, your RDX1 Pro charger will load with default values in the programmable user settings. The screen displays the following information in sequence and the user can change the value of the parameters on each screen. - Page 20 Item Selection Description When starting a charge process, the built-in safety timer automatically runs at the SYSTEM SETUP same time. This is programmed DC Input: 11.0V to prevent the battery from OFF / Cut Caps: 5000mAh overcharging if it proves to be (1 - 720 Min) faulty or if the termination circuit Cut Time:...
- Page 21 Item Selection Description Delta-peak sensitivity for NiMH/ SYSTEM SETUP NiCd battery: The automatic Unit: Celsius charge termination program based Resting: 10 Min 3 - 15mV on the principle of the Delta- Delta Peak: peak voltage detection. When cuit the battery’s voltage exceeds the Bal.
- Page 22 Item Selection Description SYSTEM SETUP 89 - 109 Choose the LCD de nition best Key Beep: suited to your preference Buzzer: LCD Contrast: Factory Reset SYSTEM SETUP Press the Start/Enter button to Key Beep: make “Reset” blink; then, press and Buzzer: hold the Start/Enter button to load LCD Contrast:...
-
Page 23: Battery Meter
Battery Meter The user can check the battery’s total voltage, the highest voltage, the lowest voltage and each cell’s voltage. Connect the battery via the charger’s main battery lead to battery socket and balance wires to the balance socket best as shown below. -
Page 24: Warnings And Error Messages
Warnings and Error Messages WARNING Incorrect polarity connected. REVERSE POLARITY WARNING The battery connection has been interrupted. CONNECTION BREAK WARNING CONNECT ERROR The battery connection is wrong. CHECK MAIN PORT WARNING DC IN TOO LOW The input voltage is less than 11V. WARNING The input voltage is higher than 18V. -
Page 25: Using The Charge Control Software - "Charge Master
The cable must end on one side with an “A” plug and the opposite side with a “micro-B” plug to connect to the charger directly. Download the latest Charge Master Software at: http://hitecrcd.com/support/software-downloads, the RDX1 Pro uses the Charge Master 2 software. -
Page 26: Warranty And Service
ONE YEAR LIMITED WARRANTY For a period of one year from the date of purchase, HITEC RCD USA, INC. shall REPAIR OR REPLACE, at our option, defective equipment covered by this warranty. -
Page 27: Disposal And Proposition 65 Warning
Use caution when handling this product and avoid exposure to any electronic components or internal assemblies. Regulatory Compliance Hitec's RDX1 Pro satis es all relevant and mandatory CE directives and complies with FCC Part 15 Subpart B: 2010. service@hitecrcd.com | 858.748.6948... - Page 28 Hitec RCD USA, Inc. | 12115 Paine St., Poway CA 92064 | www.hitecrcd.com...
Need help?
Do you have a question about the RDX1 PRO and is the answer not in the manual?
Questions and answers