Table of Contents
Advertisement
Available languages
Available languages
Quick Links
Download this manual
See also:
User Manual
Advertisement
Table of Contents

Related Manuals for Scansonic d100


Summary of Contents for Scansonic d100
- Page 1 User Manual Brugervejledning Bedienungsanleitung Guide d’instructions Manuale di istrusioni...
- Page 2 Contents CONTENTS INFORMATION FRONT AND REAR PANEL OVERVIEW CONNECTING YOUR RADIO OPERATING YOUR RADIO – DAB SELECTING A STATION – DAB INFORMATION SERVICES – DAB OPERATING YOUR RADIO – FM DISPLAY MODES – FM MANUAL CLOCK SETTING SETTING THE ALARM SLEEP TIMER SNOOZE SETTING, EQ SETTING CONTRAST SETTING, RESETING THE RADIO SPECIFICATION...
- Page 3 Information Congratulations on your new DAB+ adaptor. Please take a moment to read this manual. Safety Instructions. Please store this instruction manual for future reference. • Place the adaptor on a solid surface. • Do not expose Scansonic D100 to high humidity, direct sunlight, dirt, heavy vibration or extreme temperatures. • Do not open the cabinet. Only qualified technicians are allowed to handle this Scansonic adaptors internal parts. • If service or repair is required, this must also be done by qualified technicians. • Use a duster or a slightly damp, soft and Non-fluffy rag to clean the cabinet, Do not use corrosive or strong cleaning agents. • Make sure no liquids or moisture penetrates the adaptor during cleaning. Unplug the adaptor before cleaning it. Unplug the adaptor in following cases: • Foreign objects or liquids has penetrated the adaptor. • The adaptor cannot be operated properly. • The cabinet has been damaged. • The mains plug or the mains cable is defective. • If the adaptor is not to be used for a long time. Disclaimer Despite our best efforts we cannot guarantee that the technical data indicated are correct, complete and updated, We, Scansonic, reserve the right to make technical changes without prior notice.
-
Page 4: Remote Control
Front panel Rear panel Remote control... - Page 5 01 Display 02 IR window 03 Line out 04 Antenna 05 DC socket 06 On/off 07 Mute Volume turn off 08 0-10 Numeric buttons for Store and Recall functions 09 Alarm 1 Press to set the alarm 10 Press it to scroll the previous station or frequency or option 11 Select Press it to confirm the operation 12 Mode Press it to shift DAB or FM mode 13 Info Press it to browse over the information 14 Scan Press it to scan FM or DAB station 15 Power Enter the standby mode...
-
Page 6: Getting Startet
Getting startet 01 Connect the radio to mains power using an adaptor, and switch on the main switch on the back cabinet, it will show: Then enter into standby mode with original clock “00:00”. 02 When the radio is powered on for the first time by RC, it will start for available Digital Radio stations. When the scan is completed, the first station (alphabetically) will begin to play. 03 Press the “POWER” button once, the radio will change from operation mode to standby mode and the backlight will turn off. Tips: 1. The backlight will automatic turn off after 20s without any operation also. User needs to active the radio device by press any button before operating. 2. If you have used the DAB Radio before, and do the Factory reset, the first state will be stayed at the last mode what you used. -
Page 7: Dab Radio Mode Operation
Mode 01 The DAB Radio has two modes of operation: { DAB radio { FM radio 02 Press the “Mode” button to select FM/DAB. DAB radio mode operation 01 Press the “Mode” button until a DAB Station display. 02 If there is no DAB station has been listened to before, it will automatically begin “full scan” for DAB radio stations. 03 When completed scanning and if there are stations have been scanned, the radio of the stations will list in alphanumeric order and the first one will be played. If you have used the DAB Radio before, the most recently selected DAB Radio station will be heard when you change back to DAB mode. Menu button The menu allows you to configure the settings for the DAB Radio Press the ‘Menu’ button to select follow options, you can press “” and “” key to select: { Manual tune { Contrast Settings { System reset { Software version... -
Page 8: Manual Tune
z Full scan 01 It performs a station scan from channel 5A to 13F. 02 Press and hold “Scan” button to do “Full scan”. z Manual tune 01 Press the ‘Menu’ button to “Manual tune”. 02 Press the “Select” to confirm and the DAB radio will start “Manual tune”, it will display on the screen. 03 Press “” and “” key to scroll through the frequency. 04 The device can receive the stations automatic in the available frequency band. 05 If the radio received station at that frequency channel, the radio will show the stations. Then you can press “select” to enter the station list. 06 Press “Select” to select a desired station to listen to. 07 Repeat 1-6 for tune other Channel frequency. Settings There are 3 options for selection: { Contrast { System reset { Software version... -
Page 9: System Reset
z Contrast 01 It performs a station scan from channel 5A to 13F. 02 Press and hold “Scan” button to do “Full scan”. z System reset The DAB Radio can be reset to the factory defaults at any time, once a reset has been performed, the DAB Radio will automatically begin Full scan. 01 Select “System reset”. 02 Press “Select” to perform the reset. Note: once you do this operation, some of store information will be missed like as preset station, Alarm etc, will be emptied. z Software version 01 Press “” or “” key you can see the software version directly. Note: To exit setup, press ‘Menu’ button. Sleep button It allows you to set the sleep time. 01 Press ‘Sleep’ button to check how long it reserve. 02 If you want to set the period of this sleep, you need press and hold the “Sleep” key to use the “” or “” to set as (OFF 10 30 60 90) and then press the ‘Select’ to confirm. -
Page 10: Alarm Buttons
03 If you want to cancel the sleep time, you can set the sleep again and select (OFF). Alarm Buttons It allows you to set and check the alarm time. 01 Press ‘Alarm1/2’ button to verify the sets as. Please be advised for beep sound, you can use two tone sound with “TONE 1” and “TONE 2”. 02 And you can set the Alarm sets if you press and hold “alarm ½”. 03 You can press “” or “” key to select “OFF/Beep/DAB/FM”. You can select “Beep tone type 1 or 2” or “DAB/FM preset station” to act as the alarm sound. Note: if you select DAB sound source but no any DAB stations you received, it will alarm the Beep tone default. -
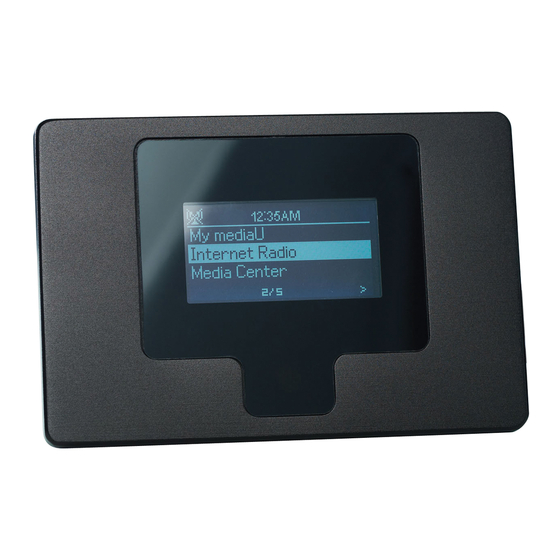
Page 11: Information Display
04 After you select the sound type, then you can set Alarm period as below: Daily – alarm everyday Weekday: Monday –> Friday – alarm from Monday to Friday Weekend: Saturday –> Sunday – alarm for weekend Once – only once 05 You can set “Hour” Digit will fresh for set up, Set the “Hour” by press “” or “” key then press the ‘Select’ to confirm, Then set the “Minute”. 06 Set the “Hour” by press “” or “” key to set the desire minute and press the ‘Select’ to confirm. 07 To set the alarm volume by pressing “” or “” key. 08 When you finish the sets, the alarm will be active. 09 To mute the alarm, please press the Alarm button again. Information display When listening to a DAB radio station you can change the information that will appear on the second line on the LCD Display. There are several types or information that are sent by broadcasters which can be displsyed. You can change the information shown on the displsy by perssing the ‘INFO’ when the radio is under DAB mode or FM RDS station mode. z Dynamic Label Segment (DLS) – This is scrolling text information supplied by the broadcaster. Information could be the name of an artist or music title, the DJ’s name or the contact details for the radio station z Channel frequency – e.g.: 174.928 MHz z Assemble name z Time and Date –... -
Page 12: Loading Preset Stations
Preset stations The Preset function stores favorite stations for easy access. It can preset up to 10 DAB radio stations in the radio memory. 01 Select the desired station to store. 02 Press and hold the preset number (1-10) button to store the select radio station you would like to save into memory. 03 The LCD Display will show “Preset X Saved”. The station is now successfully saved against the selected preset number. Loading preset stations To retrieve the Preset station from stored memory. 01 Press the preset number (1-10) button to select the stations you would like to listen to and the DAB radio will re-tune to the selected preset station. 02 If you have not preset any station, ‘Preset X Free’ will be displayed on the LCD Display. FM Radio Mode Operation 01 Turn on the radio. 02 If it is already in standby mode, just press the Standby button. 03 Press the Mode button until a FM mode is shown on the LCD Display. -
Page 13: Manual Tune Buttons
Menu Button The menu allows you to configure the settings for the DAB Radio. Press the ‘Menu’ button to select follow options: { Contrast Setting { System reset { Software version User can press “Select” key to select Mono or Auto format. If the radio received stereo signal, it will play the stereo sound. Otherwise it will play the mono sound. z Software version and System reset, same as above DAB chapter. Manual tune buttons They allow you to change the station. 01 Press “” or “” button. 02 Press “” to tune the frequency increasingly by 0.05 MHz. 03 Press “” to tune the frequency decreasingly by 0.05 MHz. Auto scan buttons It allows the radio to scan FM station automatically. 01 Press “Scan” button, the radio will scan the stations by 0.05 MHz until it finds a station. 02 To stop during auto scan, you can press “” or “” button once again. -
Page 14: Presetting Stations
Information Display Pressing the ‘INFO’ button to change the information that will appear on the second line of the LCD display when listen to a FM radio station. In FM mode, the Radio will receive Radio Data System (RDS) information. RDS information includes: z Information z Audio format z Program Type (PTY) – displays the station program type, for example ‘POP Music’ z Radio text – This is scrolling text information supplied by the broadcaster Information could be the name or an artist or music title, the DJ’s name or the contact details for the radio station z Current Date and Time Presetting stations The preset function stores favorite station for easy access. It can perset up to 10 FM radio stations in the radio memory. Same as the “Presetting stations” in function under DAB mode. Loading preset stations Same as the “Loading preset stations” in function under DAB mode. - Page 15 Brugervejledning...
- Page 16 Indhold INDHOLD INFORMATION OVERSIGT OG FRONT- OG BAGPANEL TILSLUTNING AF DIN RADIO BETJENING AF DIN RADIO – DAB VALG AF EN STATION – DAB INFORMATIONSTJENESTER – DAB BETJENING AF DIN RADIO – FM VISNINGSTILSTANDE – FM MANUEL URINDSTILLING INDSTILLE VÆKKEURET SLEEP TIMER SNOOZE INDSTILLING, EQ INDSTILLING KONTRAST INDSTILLING, NULSTILLING AF RADIOEN SPECIFIKATION...
- Page 17 Information Tillykke med din nye DAB+ clockradio. Giv dig venligst god tid til at læse denne vejledning. Sikkerhedsvejledninger. Gem venligst denne vejledning for fremtidig reference. • Placer clockradioen på en stabil overflade. • Udsæt ikke Scansonic D100 for høj fugtighed, direkte sollys, snavs, store vibrationer og ekstreme temperaturer. • Åbn ikke kabinettet. Kun kvalificerede teknikere må håndtere de indre dele i denne Scansonic clockradio. • Hvis service eller reparation er nødvendig, skal denne også udføres af kvalificerede teknikere. • Brug en støveklud eller en let fugtet, blød og fnugfri klud til rengøring af kabinettet, brug ikke korroderende eller stærke rengøringsmidler. • Sørg for, at ingen væske eller fugt får adgang til clockradioens indre under rengøringen. Tag stikket ud af stikkontakten inden rengøring. Tag stikket til clockradioen ud af stikkontakten hvis: • Et fremmedlegeme eller væske er trængt ind i clockradioen. • Clockradioen ikke reagerer korrekt på betjening. • Kabinettet er beskadiget. • Stikket eller kablet er defekt. • Hvis du ikke skal bruge clockradioen i længere tid.
- Page 18 Frontpanel Bagpanel Fjernbetjening...
- Page 19 01 Display 02 IR vindue (fjernbetjening) 03 Line Out 04 Antenne 05 Strøm-stik 06 On/Off 07 Mute Tryk for at dæmpe lyden 08 0-10 Numerisk tastatur 09 Alarm 1 Tryk for at indstille alarm 10 Tryk for forrige station, frekvens eller valgmulighed 11 Select Tryk for at bekræfte 12 Mode Tryk for at skifte mellem DAB og FM 13 Info Tryk for at se stationens informationer 14 Scan Tryk for at skanne FM eller DAB stationer 15 Power Tryk for at skifte mellem ON/OFF 16 Alarm 2...
-
Page 20: Kom Godt I Gang
Kom godt i gang 01 Tilslut til lysnettet via den eksterne strømforsyning og tænd på hovedafbryderen på bagsiden, displayet viser: Og derefter gå i standby og vise ur “00:00”. 02 Når enheden tændes med fjernbetjeningen, første gang scannes: for tilgængelige Digital Radio stationer. Når scanningen er færdig, vil den første station afspilles (sorteret alfabetisk). 03 Tryk på “POWER” en gang, enheden vil skifte fra ON til standby og baggrundslyset slukkes. Tip: 1. Baggrundslyset slukker automatisk efter 20 sekunder og tænder igen ved betjening. Slukkes enheden vil den starte I same tilstand, som den blev slukket. 2. Hvis du har anvendt DAB Radio før og udfører en nulstilling, vil radioen herefter starte op i den senest anvendte tilstand. - Page 21 Modus 01 Radioen har 2 betjeniningsfunktioner (Modes): { DAB radio { FM radio 02 Tryk på “Mode” for at skifte mellem FM/DAB. Betjening af radioen i DAB modus 01 Tryk på “Mode” indtil en DAB Station vises. 02 Hvis der ikke tidligere er indstillet DAB stationer, vil der automatisk starte en scanning med “full scan” for at finde DAB stationer. 03 Når scanningen er udført, vil stationerne sorters alfabetisk og den første station vil afspilles. Hvis der tidligere er gemt DAB stationer, vil den sidst brugte station afspilles. Menu I menuen kan du konfigurere indstillingerne for DAB Radio. Tryk på knappen ‘Menu’ for at få adgang til følgende muligheder, tryk på knapperne “” og “” for at vælge: { Manual tune { Contrast Settings { System reset { Software version...
- Page 22 z Fuld kanalsøgning 01 Scanner stationer fra kanal 5A til 13F. 02 Tryk og hold “Scan” for at udføre “Full scan”. z Manuel kanalsøgning 01 Tryk på ‘Menu’ og vælg “Manuel tune”. 02 Tryk “Select” og enheden vil nu starte “Manuel tune”, og vise i display. 03 Benyt “” og “” til at skifte frekvens. 04 Stationer i det valgte frekvensområde findes automatisk. 05 Findes en station på den valgte frekvens, vises stationen. Tryk “select” for at vælge stationen. 06 Tryk “Select” for at lytte til den ønskede station. 07 Gentag 1-6 for at søge efter andre kaneler/frekvenser. Indstillinger Du har 3 valgmuligheder: { Contrast { System reset { Software version...
- Page 23 z Kontrast 01 Scanner stationer fra kanal 5A til 13F. 02 Tryk og hold “Scan” for at udføre “Full scan”. z Nulstilling af systemet Enheden kan nulstilles til fabriksindstillingerne på ethvert tidspunkt. Når nulstillingen er udført, vil DAB radioen automatisk begynde “Full scan”. 01 Vælg “System reset”. 02 Tryk på “Select” for at starte nulstilling. Bemærk: Ved reset/nulstilling slettes alle indstillinger og gemte stationer. z Software version 01 Tryk “” eller “” for at vise software version. Bemærk: For at afslutte MENU tryk på ‘MENU’ knappen. Sleep/Slumre Giver dig mulighed for at indstille sleep-tid. 01 Tryk ‘Sleep’ for at se indstillingerne for sleep/slumre. 02 Ønskes tiden for sleep/slumre funktionen ændret; tryk og hold “Sleep” og brug “” eller “” til at skifte mellem (OFF 10 30 60 90) og tryk ‘Select’ for at bekræfte/gemme.
- Page 24 03 Hvis sleep-tiden ønskes annulleret, vælges (OFF). Alarm knapper Giver mulighed for at indstille alarmtidspunktet. 01 Tryk ‘Alarm1/2’ for at se status. Det er muligt at vælge mellem 2 forskellige lyde, “TONE 1” og “TONE 2”. 02 Alarmen kan indstilles ved at trykke og holde “Alarm ½”. 03 Brug “” eller “” til at vælge mellem “OFF/Beep/DAB/FM”. Der kan vælge mellem “Beep tone 1 eller tone 2” eller “DAB/FM preset station”, til lydkilde for alarm. Bemærk: Vælges DAB som lydkilde, men ingen station modtages, benyttes Beep tone som standard.
- Page 25 04 Efter valg af lyd, indstilles alarm-periode: Daglig – samme tid hver dag Ugedag: Mandag -> Fredag – samme tid hver dag mandag til fredag Weekend: Lørdag -> Søndag – samme tid hver dag for weekend Enkelt – en gang, gentages ikke 05 “Hour” tallet er nu klar til indstilling. Indstil “Hour” ved at trykke på “” eller “”. Tryk dernæst ‘Select’ for at bekræfte. Indstil herefter “Minute”. 06 Herefter indstilles “Hour” med “” eller “”. Tryk ‘Select’ for at bekræfte. 07 Når tiden er valgt, indstilles lydstyrken med “” eller “”. 08 Efter endt indstilling vil alarmen være aktiveret. 09 Alamren slukkes ved at trykke på “Alarm” igen. Informationsdisplay Når der lyttes til en DAB station, kan man ændre I den information, der vises på den 2. linje i LCD displayet. Der er flere typer af informationer, som sendes af stationerne, som kan vises. Tryk på ‘INFO’ for at ændre ændre visning af info, ved modtagelse af DAB eller FM RDS. z Dynamisk Label Segment (DLS) – Dette er en rulletekst med oplysninger, som leveres fra senderen. Informationen kan være navnet på en sanger, musiktitlen eller lignende z Kanal/frekvens – fx.: 174,928 MHz z Gruppenavn z Tid og dato –...
- Page 26 Forudindstillede stationer Preset funktionen gemmer foretrukne stationer for en nem adgang. Der kan gemmes op til 10 DAB stationer i preset hukommelsen. 01 Vælg den ønskede station, som skal gemmes. 02 Hold knappen for en forudindstillede stationer (1-10) inde for at gemme den valgte radiostation i radioens hukommelse. 03 LCD Displayet viser “Preset X Saved”. Stationen er nu gemt på den valgte faste programplads. Hente forudindstillede stationer For at hente forudindstillede stationer fra hukommelsen. 01 Tryk på nummeret for en forudindstillede stationer (1-10) for at lytte til stationen, hvorefter DAB radioen stiller ind på den valgte forudindstillede stationer. 02 Hvis du ikke har gemt en station på programpladsen, viser LCD Displayet ‘Preset X Free’. FM Radio betjening 01 Tænd for radioen. 02 Hvis den I standby, tændes på STANDBY ON/OFF. 03 Tryk på “Mode” indtil der vises en FM funktion på display.
-
Page 27: Manual Tune
Menu I menuen kan du konfigurere indstillingerne for DAB Radio. Tryk på knappen ‘Menu’ for at vælge blandt følgende muligheder: { Contrast Setting { System reset { Software version Tryk “Select” for at vælge mellem Mono eller Auto format. Hvis radioen modtager signalet i stereo, afspilles lyden i stereo. Ellers afspilles lyden i mono. z Software version og System reset udføres på samme måde som beskrevet i afsnittet om DAB. Manual tune Giver mulighed for manuelt at søge FM stationer. 01 Tryk “” eller “”. 02 Tryk “” for at tune frekvensen op med 0,05 MHz. 03 Tryk “” for at tune frekvensen ned med 0,05 MHz. Automatisk kanalsøgning Giver mulighed for automatisk at søge FM stationer. 01 Tryk “Scan”, radioen vil scanne I step på 0,05 MHz, indtil der findes en station. 02 For at stoppe under auto scan, tryk “” eller “” igen. - Page 28 Informationsdisplay Tryk ‘INFO’ for at ændre informationen, som vises i linje, når der lyttes til FM. Informationer vil kun være tilgængelige når der lyttes til en FM station med RDS. RDS information omfatter: z Information z Audioformat z Program Type (PTY) – viser stationerne efter programtype, f.eks. ‘POP Musik’ z Radio tekst – Dette er en rulletekst, som leveres fra sender Informationen kan være navnet på en sanger, musiktitlen eller lignende z Tid og dato Forudindstillede stationer Preset funktionen gemmer foretrukne stationer for en nem adgang. Der kan gemmes op til 10 FM stationer i preset hukommelsen. Som beskrevet i afsnittet “Forudindstillede stationer” under DAB. Hente forudindstillede stationer Som beskrevet i afsnittet “Hente forudindstillede stationer” under DAB.
- Page 29 Bedienungsanleitung...
- Page 30 Inhalt INHALT INFORMATIONEN GERÄTEFRONT UND -RÜCKSEITE ÜBERSICHT ANSCHLUSS IHRES RADIOS BEDIENUNG IHRES RADIOS – DAB AUSWAHL EINES SENDERS – DAB INFORMATIONSDIENSTE – DAB BEDIENUNG IHRES RADIOS – UKW ANZEIGEMODI – UKW MANUELLE UHREINSTELLUNG WECKEINSTELLUNG EINSCHLAFFUNKTION SCHLUMMER-EINSTELLUNG, EQ-EINSTELLUNG KONTRAST-EINSTELLUNG, ZURÜCKSETZEN DES RADIOS SPEZIFIKATION...
- Page 31 Informationen Herzlichen Glückwunsch zu Ihrem neuen DAB+ Radio. Bitte nehmen Sie sich eine Moment Zeit und lesen Sie dieses Handbuch. Sicherheitshinweise. Bitte bewahren Sie diese Hinweise für den späteren Gebrauch auf. • Stellen Sie das Radio auf einer ebenen Standfläche auf. • Setzen Sie Scansonic D100 nicht hoher Luftfeuchtigkeit, direktem Sonnenlicht, Schmutz, starken Erschütterungen oder extremen Temperaturen aus. • Öffnen Sie nicht das Gehäuse. Lassen Sie Reparaturen am Scansonic Radio nur von einem autorisierten Kundendienst durchführen. • Ebenso gilt dies für Wartung und Reparatur, sofern erforderlich. Auch hierzu ist nur Fachpersonal befugt. • Benutzen Sie ein trockenes oder nur leicht angefeuchtetes flusenfreies Tuch zum Reinigen des Gehäuses. Benutzen Sie keine starken oder aggressiven Reinigungsmittel. • Achten Sie darauf, dass keine Flüssigkeiten in den Radio eindringen. Ziehen Sie vor dem Reinigen den Netzstecker. Ziehen Sie in folgenden Fällen den Netzstecker: • Fremdkörper oder Flüssigkeiten sind in den Radio eingedrungen. • Der Radio funktioniert nicht wie gewöhnlich. • Wenn das Gehäuse beschädigt wurde. • Wenn Schäden am Stecker oder am Netzkabel vorliegen. • Wenn das Radio für längere Zeit nicht benutzt wird.
- Page 32 Gerätefront Geräterückseite Fernbedienung...
- Page 33 01 Bildschirm 02 IR-Sensorfenster 03 Line-Ausgang 04 Antenne 05 Netzteileingang 06 ON/OFF 07 Mute Stummschaltung 08 0-10 Zifferntasten für Senderspeicher 09 Alarm 1 Alarm einstellen 10 Vorherigen Sender, Frequenz oder Option aufrufen 11 Select Auswahl- und Bestätigungstaste 12 Mode DAB und UKW umschalten 13 Info Informationen anzeigen 14 Scan Sendersuche DAB und UKW 15 Power Ein- und ausschalten (Standby) 16 Alarm 2 Alarm einstellen 17 ...
-
Page 34: Erste Schritte
Erste Schritte 01 Schließen Sie das Radio über das Netzteil an der Steckdose an und schalten Sie es mit dem Hauptschalter auf der Rückseite ein, folgende Anzeige erscheint im Display: Im Standby-Modus zeigt die Uhr „00:00“ an. 02 Beim ersten Einschalten des Radios wird nach allen verfügbaren DAB-Sendern gesucht. Nach der automatischen Sendersuche wird der erste Sender (in alphabetischer Reihenfolge). 03 Mit „Power“ schalten Sie das Radio aus (Standby-Modus), die Hintergrundbeleuchtung erlischt. Tipps: 1. Die Hintergrundbeleuchtung erlischt ebenfalls nach 20 Sekunden, wenn keine weitere. Schalten Sie das Radio ein, bevor Sie andere Tasten drücken. 2. Hatten Sie das DAB-Radio zuvor bereits benutzt, so stellen Sie es mit der Rückstellung zu den Werkseinstellungen zurück. - Page 35 Modus 01 Das Radio hat zwei Betriebsmodi: { DAB radio { FM radio 02 Mit „Mode“ schalten Sie zwischen UKW und DAB um. DAB-Radio 01 Drücken Sie „Mode“, bis im Display ein DAB-Sender angezeigt wird. 02 Hatten Sie noch keine DAB-Sender gespeichert, so erfolgt automatisch ein „Full Scan“ nach DAB-Sendern. 03 Nach der automatischen Sendersuche wird der erste Sender (in alphanumerischer Reihenfolge) wiedergegeben. Waren bereits DAB-Sender gespeichert, so wird der zuletzt eingestellte Sender wiedergegeben. Menütaste Das Menü ermöglicht Ihnen die Konfiguration der Einstellungen für das DAB-Radio. Drücken Sie „Menu“ und dann „“ oder „“ zur Auswahl einer der folgenden Optionen: { Manual tune { Contrast Settings { System reset { Software version...
- Page 36 z Automatische Sendersuche 01 Alle Kanäle von 5A bis 13F werden durchsucht. 02 Halten Sie „Scan“ für einen „Full Scan“ gedrückt. z Manuelle Sendersuche 01 Drücken Sie „Menu“ zum Aufrufen der „Manual tune“. 02 Drücken Sie „Select“ zur Bestätigung, das DAB-Radio beginnt mit der „Manual tune“ und zeigt sie im Display an. 03 Drücken Sie „“ oder „“, um die Frequenzen zu durchlaufen. 04 Die Sender werden automatisch im Frequenzband empfangen. 05 Wird ein Sender empfangen, so wird er angezeigt. Drücken Sie „Select“, um die Senderliste aufzurufen. 06 Drücken Sie „Select“, um den gewünschten Sender einzustellen. 07 Wiederholen Sie die Schritte 1-6, um einen anderen Sender einzustellen. Einstellungen Ihnen stehen 3 Optionen zur Auswahl: { Contrast { System reset { Software version...
- Page 37 z Kontrast 01 Alle Kanäle von 5A bis 13F werden durchsucht. 02 Halten Sie „Scan“ für einen „Full Scan“ gedrückt. z Rückstellung Das DAB-Radio kann jederzeit zu den Werkseinstellungen zurückgestellt werden. Nach der Rückstellung erfolgt automatisch eine automatische Sendersuche. 01 Wählen Sie „System reset“. 02 Drücken Sie „Select“, um die Rückstellung zu bestätigten. Hinweis: Alle personalisierten Einstellungen werden gelöscht, einschließlich Senderspeicher und Alarm. z Softwareversion 01 Drücken Sie „“ oder „“ zur Anzeige der Softwareversion. Hinweis: Zum Verlassen des Einstellungsmenüs drücken Sie erneut „MENU“. Sleep Hier stellen Sie den Sleeptimer ein. 01 Drücken Sie „Sleep“ zur Anzeige der automatischen Abschaltzeit. 02 Zum Einstellen des Sleeptimers halten Sie „Sleep“ gedrückt, dann drücken Sie „“ oder „“, um die Zeit einzustellen (AUS, 10, 30, 60, 90 Minuten). Anschließend drücken Sie „Select“ zur Bestätigung.
- Page 38 03 Zum Ausschalten der automatischen Abschaltung wählen Sie OFF (AUS). Alarmtasten Hier stellen Sie die Weckzeit ein oder Sie überprüfen die eingestellte Weckzeit. 01 Drücken Sie „Alarm ½“ zur Anzeige von. Als Weckton stehen Ihnen „TONE 1“ und „TONE 2“ zur Verfügung. 02 Halten Sie „Alarm ½“ gedrückt, um den Alarm einzustellen. 03 Drücken Sie „“ oder „“ zur Auswahl von „OFF/Beep/DAB/FM“. Sie können „Beep tone type 1 or 2“ oder „DAB/FM preset station“ als Weckalarm wählen. Hinweis: Bei Auswahl von DAB als Weckalarm, jedoch keinem gespeicherten DAB-Sender, werden Sie mit dem Summer geweckt.
-
Page 39: Informationen Anzeigen
04 Nach der Auswahl des Weckalarms wählen Sie die Weckfrequenz: Täglich: Sie werden täglich geweckt Wochentags: Sie werden an jedem Wochentag (montags bis freitags) geweckt Wochenende: Sie werden samstags und sonntags geweckt Einmal: Sie werden nur einmal geweckt 05 Stellen Sie die „Hour“ ein. Zum Einstellen der „Hour“ drücken Sie „“ oder „“ und dann Select zur Bestätigung. Dann stellen Sie die „Minute“ ein. 06 Stellen Sie die „Hour“ mit „“ oder „“ ein und drücken Sie „Select“ zur Bestätigung. 07 Zum Einstellen der Alarmlautstärke drücken Sie „“ oder „“. 08 Nach Beendigung der Einstellungen ist der Alarm aktiviert. 09 Zum Deaktivieren des Alarms drücken Sie wieder die Alarmtaste. Informationen anzeigen Während des Hörens von DAB-Sendern können Sie auf der unteren Displayzeile Informationen anzeigen. Diese werden vom Sender übertragen. Mit „Info“ durchlaufen Sie die Anzeigen im DAB-Modus oder UKW-Modus mit RDS-Empfang. z Dynamic Label Segment (DLS) – Dies ist der Lauftext des Senders. Informationen können der Sendername, Interpret oder Musiktitel sein, auch der Name des DJs oder Kontaktinformationen zum Sender z Frequenz: z.B. 174,928 MHz z Sendername z Uhrzeit und Datum: durch Sender übertragen z Program Type (PTY): Anzeige der Art des Programms, beispielsweise „Popmusik“... -
Page 40: Senderspeicher Aufrufen
Senderspeicher einstellen Hier werden Sender für einfachen Zugriff gespeichert. Bis zu 10 DAB- Sender können gespeichert werden. 01 Stellen Sie den gewünschten Sender ein. 02 Halten Sie die Nummer des Senderspeichers (1-10) für den Sender gedrückt. 03 Im Display wird „Preset X Saved“ angezeigt. Der Sender wurde erfolgreich unter dem gewählten Senderspeicher abgelegt. Senderspeicher aufrufen Zum Aufrufen eines gespeicherten Senders gehen Sie wie folgt vor. 01 Drücken Sie die Senderspeichernummer (1-10) des gewünschten Senders, damit ruft das DAB-Radio den entsprechenden Sender auf. 02 Ist in diesem Senderspeicher keine Frequenz abgelegt, so wird im LCD-Display, „Preset X Free“ angezeigt. UKW-Radio 01 Schalten Sie das Radio ein. 02 Ist es bereits im Standby-Modus, so drücken Sie einfach „Power“. 03 Drücken Sie „Mode“, bis der UKW-Modus im LCD-Display angezeigt wird. -
Page 41: Manuelle Sendersuche
Menütaste Mit dem Menü konfigurieren Sie die Einstellungen des UKW-Radios. Drücken Sie „Menu“, dann drücken Sie oder zur Auswahl von: { Contrast Setting { System reset { Software version Drücken Sie „Select“ zum Umschalten zwischen „Mono“ und „Auto“. Bei Empfang eines Stereosignals wird der Sender in Stereo wiedergegeben, anderenfalls in Mono. Anderenfalls wird der Ton in Mono wiedergegeben. z Software-Version und Systemrückstellung entsprechen Kapitel DAB. Manuelle Sendersuche Zur manuellen Sendersuche gehen Sie wie folgt vor. 01 Drücken Sie „“ oder „“. 02 Drücken Sie „“, um im Frequenzband mit 0,05-MHz-Schritten abwärts zu suchen. 03 Drücken Sie „“, um im Frequenzband mit 0,05-MHz-Schritten aufwärts zu suchen. Automatische Sendersuche Hier können Sie UKW-Sender automatisch suchen. 01 Drücken Sie „Scan“, damit durchsucht das Radio das Frequenzband in 0,05-MHz-Schritten, bis ein Sender gefunden wurde. 02 Zur Unterbrechung der automatischen Sendersuche drücken Sie erneut „“ oder „“. - Page 42 Informationen anzeigen Mit „INFO“ ändern Sie die Anzeige der Informationen auf der zweiten Zeile des Displays, wenn Sie einen UKW-Sender hören. Im UKW-Modus empfängt das Radio RDS-Informationen. RDS-Informationen umfassen: z Informationen z Audioformat z Program Type (PTY): Anzeige der Art des Programms, beispielsweise „Popmusik“ z Radiotext: Informationen in Laufschrift, die vom Sender übertragen werden Informationen können der Sendername, Interpret oder Musiktitel sein, auch der Name des DJs oder Kontaktinformationen zum Sender z Uhrzeit und Datum Senderspeicher einstellen Hier werden Sender für einfachen Zugriff gespeichert. Bis zu 10 UKW- Sender können gespeichert werden. Die Einstellung erfolgt, wie unter DAB-Radio beschrieben. Senderspeicher aufrufen Die Einstellung erfolgt, wie unter DAB-Radio beschrieben.
-
Page 43: Guide D'instructions
Guide d’instructions... - Page 44 Table des matières TABLE DES MATIERES INFORMATIONS PRÉSENTATIONS DES PANNEAUX AVANT ET ARRIÈRE BRANCHEMENT AU SECTEUR UTILISATION DE LA RADIO – DAB SÉLECTION D'UNE STATION – DAB SERVICES D'INFORMATIONS – DAB UTILISATION DE LA RADIO – FM MODES D'AFFICHAGE – FM RÉGLAGE MANUEL DE L'HEURE RÉGLAGES DE L'ALARME VEILLE AUTOMATIQUE REGLAGE RAPPEL D'ALARME ET ÉGALISEUR RÉGLAGE DU CONTRASTE, RÉINITIALISATION DE LA RADIO SPÉCIFICATIONS...
- Page 45 Informations Nous vous félicitons pour votre nouvel adaptateur DAB+. Prenez le temps de lire attentivement ce guide afin d'apprécier au mieux toutes ses fonctions. Instructions de sécurité. Conservez ces instructions pour toute référence ultérieure. • Placez l'adaptateur sur une surface solide. • Évitez d'exposer votre D100 à une forte humidité, aux rayons directs du soleil, à la poussière, à de fortes vibrations et à des températures extrêmes. • N'ouvrez pas le boîtier. Seul un technicien qualifié est habilité à nettoyer les pièces internes des adaptateurs Scansonic. • Faites appel à un technicien qualifié pour toute réparation. • Utilisez un essuie-meubles ou un chiffon doux non pelucheux légèrement humidifié pour nettoyer le boîtier ; n'utilisez jamais de produits corrosifs ou détergents forts. • Veillez à ce qu'aucun liquide ni buée ne pénètre dans l'adaptateur lors du nettoyage. Débranchez l'adaptateur avant de le nettoyer. Débranchez l'adaptateur dans les cas suivants : • Des objets étrangers ou liquides ont pénétré dans l'adaptateur. • L'adaptateur ne fonctionne pas correctement. • le boîtier est endommagé. • le cordon d'alimentation ou sa prise est défectueuse. • Si l'adaptateur n'a pas été utilisé pendant une longue période.
- Page 46 Panneau avant Panneau arrière Télécommande...
- Page 47 01 Écran 02 Capteur IR 03 Line out 04 Antenne 05 Prise CC 06 On/off 07 Mute Pour couper le son 08 0-10 Touches numériques pour mémoriser et rappeler des fonctions 09 Alarm 1 Appuyez dessus pour régler l'alarme 10 Appuyez dessus pour atteindre la station, fréquence ou option précédente 11 Select Appuyez dessus pour confirmer l'opération 12 Mode Appuyez dessus pour passer en mode DAB ou FM 13 Info Appuyez dessus pour parcourir les informations 14 Scan Appuyez dessus pour rechercher les stations FM ou 15 Power Pour passer en mode veille...
-
Page 48: Mise En Route
Mise en route 01 Branchez la radio au secteur à l'aide d'un adaptateur et mettez l'interrupteur principal situé à l'arrière du boîtier sur marche, l'écran s'allume : Vous passez en mode de veille avec l'heure initiale “00:00”. 02 Lorsque la radio est allumée pour la première fois avec la télécommande, elle commence par rechercher les stations radio numériques disponibles. Une fois la recherche terminée, la première station (par ordre alphabétique) sera syntonisée. 03 Appuyez une fois sur le bouton “POWER”, la radio passe du mode marche en mode de veille et le rétroéclairage s'éteint. Remarque : 1. Le rétroéclairage s'éteint également automatiquement après 20 s si aucune opération n'est effectuée. On doit appuyer sur un bouton quelconque pour activer la radio avant de l'utiliser. 2. Si vous avez déjà utilisé la radio DAB, et rétabli les paramètres par défaut, le premier état sera le dernier mode utilisé. -
Page 49: Bouton Menu
Mode 01 La radio DAB fonctionne selon deux modes : { DAB radio { FM radio 02 Appuyez sur le bouton “Mode” pour sélectionner FM ou DAB. Utilisation de la radio en mode DAB 01 Appuyez sur le bouton “Mode” jusqu'à l'affichage d'une station DAB. 02 Si aucune station DAB n'a déjà été écoutée, la radio effectue automatiquement une “full scan” des stations radio DAB. 03 Une fois la recherche terminée, les stations radio seront listées par ordre alphanumérique et la première sera syntonisée. Si vous avez déjà écouté la radio DAB, la dernière station radio DAB sélectionnée sera syntonisée lorsque vous revenez au mode DAB. Bouton Menu Le menu vous permet de configurer la radio DAB Appuyez sur le bouton ‘Menu’ pour sélectionner les options suivantes, appuyez sur “” et “” pour sélectionner : { Manual tune { Contrast Settings { System reset { Software version... - Page 50 z Recherche complète 01 Il s'agit d'une recherche des stations du canal 5A au canal 13F. 02 Maintenez appuyé le bouton “Scan” pour effectuer une recherche complète “Full scan”. z Recherche manuelle 01 Appuyez sur le bouton ‘Menu’ pour atteindre “Manual tune”. 02 Appuyez sur le bouton “Select” pour confirmer ; la radio DAB effectuera une recherche commencer manuelle “Manual tune”, le résultat s'affiche à l'écran. 03 Appuyez sur “” et “” pour faire défiler les fréquences. 04 La radio peut recevoir les stations automatiquement dans la bande de fréquences disponible. 05 Si la radio reçoit des stations à la fréquence de ce canal, elle affichera les stations. Appuyez sur “select” pour accéder à la liste des stations. 06 Appuyez sur “Select” pour sélectionner une station à écouter. 07 Répétez les étapes 1-6 pour rechercher d'autres fréquences de canaux. Options Il y a 3 options disponibles : { Contrast { System reset { Software version...
-
Page 51: Touche Veille Automatique
z Contraste 01 Il s'agit d'une recherche des stations du canal 5A au canal 13F. 02 Maintenez appuyé le bouton “Scan” pour effectuer une recherche complète “Full scan”. z Réinitialisation du système La radio DAB peut être réinitialisée à tout moment aux paramètres par défaut, une fois une réinitialisation a été effectuée, la radio DAB effectue automatiquement une recherche complète. 01 Sélectionnez “System reset”. 02 Appuyez sur “Select” pour effectuer la réinitialisation. Remarque : une fois cette opération effectuée, certaines informations mémorisées seront effacées telles stations préréglées, Alarme, etc. z Version du logiciel 01 Appuyez sur le bouton “” ou “” pour afficher la version du logiciel. Remarque : Pour quitter la configuration, appuyez sur le bouton ‘Menu’. Touche veille automatique Elle permet de définir le temps de veille automatique. 01 Appuyez sur le bouton ‘Sleep’ pour connaître de temps. 02 Si vous souhaitez définir la durée, vous devez appuyer sur le bouton “Sleep” pour utiliser “” ou “” pour choisir parmi (OFF 10 30 60 90), puis appuyez sur le bouton ‘Select’ pour confirmer. - Page 52 03 Pour désactiver la veille automatique il faut sélectionner (OFF). Bouton d'alarme Il permet de régler et vérifier l'heure de l'alarme. 01 Appuyez sur le bouton ‘Alarm1/2’ pour vérifier le réglage. Vous pouvez choisir deux tonalités d'alarme avec “TONE 1” et “TONE 2”. 02 Maintenez appuyé le bouton “alarm ½” pour régler l'alarme. 03 Appuyez sur le bouton “” ou “” pour choisir parmi “OFF/Beep/DAB/ FM”. Vous pouvez sélectionner “Beep tone type 1 or 2” ou “DAB/FM preset station” comme tonalité d'alarme. Remarque : si vous sélectionnez la source DAB, mais aucune station DAB ne peut être reçue, le bip sera utilisé.
-
Page 53: Affichage Des Informations
04 Après avoir sélectionné le type de tonalité, vous pouvez définir le mode d'alarme comme ci-dessous : Quotidien - alarme tous les jours Jours de la semaine : Lundi -> Vendredi - alarme du lundi au vendredi Fin de semaine : Samedi -> Dimanche - alarme de fin de semaine Une fois - une seule fois 05 Vous pouvez régler “Hour” ; les chiffres des heures se mettent à clignoter, réglez “Hour” en appyant sur le bouton “” ou “” puis appuyez sur ‘Select’ pour confirmer, puis réglez “Minute”. 06 Réglez “Hour” en appuyant sur le bouton “” or “”pour régler les minutes, appuyez sur ‘Select’ pour confirmer. 07 Appuyez sur le bouton “” ou “” pour régler le volume de l'alarme. 08 Une fois le réglage terminé, l'alarme sera activée. 09 Appuyez à nouveau sur le bouton Alarm pour désactiver l'alarme. Affichage des informations Lorsque vous écoutez une station radio DAB, vous pouvez changer les informations qui apparaissent sur la deuxième ligne de l'écran LCD. Il existe plusieurs types d'informations qui sont envoyées par les diffuseurs et qui peuvent être affichées. En mode DAB ou RDS FM, vous pouvez changer les informations affichées sur l'écran en appuyant sur le bouton ‘INFO’. z Segment d'étiquetage dynamique (DLS - Dynamic Label Segment) - Ce sont des informations texte déroulant fournies par le diffuseur. Ces informations peuvent comprendre le nom de l'artiste, le titre du morceau, le nom du DJ, les coordonnées de la station radio etc. z Fréquence du canal –... -
Page 54: Rappel Des Stations Préréglées
Stations préréglées La fonction de préréglage mémorise des stations préférées pour en faciliter l'accès. La radio peut mémoriser jusqu'à 10 stations radio DAB. 01 Sélectionnez la station à mémoriser. 02 Maintenez appuyé le bouton de préréglage (1-10) pour mémoriser la station radio. 03 L'écran LCD affiche “Preset X Saved”. La station est maintenant mémorisée avec succès dans le numéro de préréglage sélectionné. Rappel des stations préréglées Pour rappeler une station préréglée. 01 Appuyez sur le bouton de préréglage (1-10) pour sélectionner la station que vous souhaitez écouter ; la radio DAB ré-syntonise la station préréglée sélectionnée. 02 Si vous n'avez pas de stations préréglées, ‘Preset X Free’ sera affiché sur l'écran LCD. Mode radio FM 01 Allumez la radio. 02 Si elle est déjà en mode veille, il suffit d'appuyer sur le bouton Standby. 03 Appuyez sur le bouton Mode jusqu'à ce que FM soit affiché sur l'écran LCD. -
Page 55: Boutons De Réglage Manuel
Bouton Menu Le menu permet de configurer les paramètres de la radio DAB. Appuyez sur le bouton ‘Menu’ pour sélectionner l'une des options suivantes : { Contrast Setting { System reset { Software version Appuyez sur le bouton “Select” pour sélectionner le format Mono ou Auto. Si le signal radio reçu est stéréo, le son reproduit sera stéréo. Autrement, c'est un son mono qui sera reproduit. z “Version du logiciel” et “réinitialisation du système” sont similaires à DAB. Boutons de réglage manuel Ils permettent de changer de station. 01 Appuyez sur le bouton “” ou “”. 02 Appuyez sur “” pour augmenter la fréquence d'un pas de 0,05 MHz. 03 Appuyez sur “” pour diminuer la fréquence d'un pas de 0,05 MHz. Bouton Recherche automatique Il permet de rechercher automatiquement les stations FM. 01 Appuyez sur le bouton “Scan” pour que la radio recherche des stations par pas de 0,05 MHz jusqu'à ce qu'elle trouve une station. 02 Pour arrêter la recherche, appuyez à nouveau sur le bouton “” ou “”. -
Page 56: Préréglages Des Stations
Affichage des informations Appuyez sur le bouton ‘INFO’ pour chaner les informations qui apparaissent sur la deuxième ligne de l'écran LCD lorsque vous écoutez une station radio FM. En mode FM, la radio reçoit des informations “Système de Données Radio (RDS - Radio Data System)”. Les informations RDS contiennent : z Informations z Format Audio z Type de programme (PTY - Program Type) - affiche le type de programme de la station, par exemple “Pop music” z Texte Radio – C'est un texte d'informations déroulant fourni par l'émetteur Ces informations peuvent comprendre le nom de l'artiste, le titre du morceau, le nom du DJ, les coordonnées de la station radio etc. z Date et Heure actuelles Préréglages des stations La fonction de préréglage mémorise des stations préférées pour en faciliter l'accès. La radio peut mémoriser jusqu'à 10 stations radio FM. Similaire à la fonction “Préréglage des stations” en mode DAB. Rappel des stations préréglées Similaire à la fonction “Rappel des stations préréglées” en mode DAB. - Page 57 Manuale di istrusioni...
- Page 58 Contenuti CONTENUTI INFORMAZIONI PANORAMICA DEL PANNELLO FRONTALE E POSTERIORE COLLEGAMENTO DELLA VOSTRA RADIO FUNZIONAMENTO DELLA VOSTRA RADIO - DAB SELEZIONE DI UNA STAZIONE - DAB SERVIZI DI INFORMAZIONE - DAB FUNZIONAMENTO DELLA VOSTRA RADIO - FM MODALITA' DISPLAY - FM IMPOSTAZIONI MANUALI OROLOGIO IMPOSTARE L'ALLARME TIMER SPEGNIMENTO IMPOSTAZIONI SONNELLINO, IMPOSTAZIONI EQ IMPOSTAZIONE CONTRASTO, RESET DELLA RADIO SPECIFICHE...
- Page 59 Informazioni Complimenti per il vostro nuovo adattatore DAB+. Vi preghiamo di prendervi un momento per leggere questo manuale. Istruzioni di sicurezza. Conservate questo manuale per un riferimento futuro. • Posizionare l'adattatore su di una superficie solida. • Non esporre lo Scansonic D100 ad elevata umidità, luce diretta del sole, sporco, forti vibrazioni o alte temperature. • Non aprire la struttura. Solo tecnici specializzati possono maneggiare le parti interne degli adattatori Scansonic. • Se si necessita di manutenzioni o riparazioni le stesse dovranno essere eseguite da personale qualificato. • Utilizzare un piumino o un panno soffice non abrasivo leggermente inumidito per pulire l'involucro; Non usare agenti abrasivi o corrosivi. • Assicurarsi che nessun liquido o umidità penetrino nell'adattatore durante la pulizia. Scollegate l'adattatore prima di ogni pulizia. Scollegate l'adattatore nei seguenti casi: • Oggetti estranei o liquidi sono penetrati all'interno dell'adattatore. • L'adattatore non funziona correttamente. • La struttura è stata danneggiata. • La spina principale o il cavo sono difettosi. • Se l'adattatore non viene usato per un lungo periodo di tempo. Scarico di Responsabilità...
- Page 60 Pannello anteriore Pannello posteriore Telecomando...
- Page 61 01 Display 02 Finestra IR 03 Line out 04 Antenna 05 Presa DC 06 On/Off 07 Mute Spegnimento Volume 08 0-10 Tasti numerici per le funzioni di Salvataggio e Richiamo 09 Alarm 1 Premere per impostare l'allarme 10 Premere per scorrere alla stazione precedente frequenza o opzione 11 Select Premere per confermare l'operazione 12 Mode Premere per passare da modalità DAB a FM 13 Info Premere per navigare tra le informazioni 14 Scan Premere per scansionare le stazioni FM o DAB 15 Power Accesso alla modalità standby...
- Page 62 Avvio all'uso 01 Collegare la radio all'alimentazione principale utilizzando un alimentatore, e accendere l'interruttore principale sul retro della struttura, mostrerà: Quindi accedere alla modalità standby con l'ora iniziale “00:00”. 02 Quando la radio è accesa per la prima volta tramite l'RC, inizierà con le stazioni Radio Digitali disponibili. Quando la scansione è completa, la prima stazione (in ordine alfabetico) inizierà ad essere riprodotta. 03 Premere il tasto “POWER” una volta, la radio cambierà dalla modalità di funzionamento alla modalità standby e la luce di sfondo si spegnerà. Consigli: 1. La luce di sfondo si spegne anche automaticamente dopo 20 secondi senza utilizzo. L'utente dovrà attivare il dispositivo radio premendo un tasto qualsiasi prima del funzionamento. 2. Se avete utilizzato la radio DAB in precedenza, e fatto il ripristino di Fabbrica, il primo stato sarà lasciato all'ultima modalità utilizzata.
- Page 63 Mode 01 La radio DAB possiede due modalità di funzionamento: { DAB radio { FM radio 02 Premere il pulsante “Mode” per selezionare FM/DAB. Funzionamento radio in modalità DAB 01 Premere il pulsante “Mode” fino a che non venga visualizzata la stazione DAB. 02 Se nessuna stazione DAB è mai stata ascoltata prima, inizierà automaticamente un “full scan” per le stazioni radio DAB. 03 Quando la scansione è completata e vi sono stazioni scansionate, le radio delle stazioni verranno elencate in ordine alfanumerico e la prima verrà riprodotta. Se avete utilizzato la radio DAB prima di allora, la stazione radio DAB selezionata più di recente verrà ascoltata quando si ritorna in modalità DAB. Pulsante Menu Il menu permette di configurare le impostazioni per la radio DAB. Premere il pulsante ‘Menu’ per selezionare le seguenti opzioni, potete premere i tasti “” e “” per selezionare: { Manual tune { Contrast Settings { System reset { Software version...
- Page 64 z Scansione Completa 01 Esegue la scansione stazione dal canale 5A a 13F. 02 Premere e tener premuto il pulsante “Scan” per eseguire “Full scan”. z Sintonizzazione manuale 01 Premere il pulsante ‘Menu’ per il “Manual tune”. 02 Premere “Select” per confermare e la radio DAB inizierà il “Manual tune”, e mostrerà sullo schermo. 03 Premere “” e “” per scorrere attraverso la frequenza. 04 Questo dispositivo può ricevere le stazioni automaticamente nella banda di frequenza disponibile. 05 Se la radio ha ricevuto una stazione a frequenza canale, la radio mostrerà le stazioni. Quindi potete premere “select” per accedere alla lista stazione. 06 Premere “Select” per selezionare una stazione desiderata da ascoltare. 07 Ripetere 1-6 per sintonizzare altra frequenza canale. Impostazioni Vi sono 3 opzioni di selezione: { Contrast { System reset { Software version...
- Page 65 z Contrasto 01 Esegue la scansione stazione dal canale 5A a 13F. 02 Premere e tener premuto il pulsante “Scan” per eseguire “Full scan”. z Ripristino del Sistema La radio DAB può essere resettata ai valori predefiniti di fabbrica in ogni momento, una volta che viene fatto un reset, la radio DAB inizierà automaticamente un Full Scan. 01 Selezionare “System reset”. 02 Premere “Select” per eseguire il reset. Nota: una volta eseguita questa operazione, alcune informazioni salvate mancheranno, come le stazioni memorizzate, Allarme ecc, saranno cioè vuote. z Versione Software 01 Premere “” o “” potendo vedere la versione del software direttamente. Nota: Per uscire dal setup premere ‘Menu’. Pulsante Sonno Tener premuto per impostare il tempo di sonno. 01 Premer il pulsante ‘Sleep’ per controllare quanto è il tempo residuo. 02 Se volete impostare il periodo di sonno, dovete premere e tener premuto il tasto “Sleep” per utilizzare “” o “” per impostare come (OFF 10 30 60 90) e quindi premere ‘Select’ per confermare.
- Page 66 03 Se volete cancellare il tempo di sonno, potete impostare nuovamente il tempo di sonno e selezionare (OFF). Pulsanti Allarme Permettono di impostare e controllare il tempo di allarme. 01 Premere ‘Alarm1/2’ per verificare le impostazioni. Si noti che per il suono beep, potete utilizzare il suono a due toni “TONE 1” e “TONE 2”. 02 E potete impostare le impostazioni dall'allarme premendo e tenendo premuto “alarm ½”. 03 Potete premere “” o “” per selezionare “OFF/Beep/DAB/FM”. Potete selezionare “Beep tone type 1 or 2” o “DAB/FM preset station” affinchè agiscano come suono d'allarme. Nota: se selezionate la sorgente suono DAB ma nessuna stazione DAB di vostra ricezione, suonerà il suono Beep predefinito.
- Page 67 04 Dopo che avete selezionato un tipo di suono, quindi potete impostare il tempo d'allarme come qui sotto: Giornaliero - allarme quotidiano Giorno della settimana: Lunedì –> Venerdì – allarme da Lunedì a Venerdì Fine della settimana: Sabato -> Domenica - allarme per il fine della settimana Una volta - Solo una volta 05 Potete impostare le cifre di “Hour” che lampeggerà per l'impostazione, Impostare quindi “Hour” premendo “” o “” e quindi premere ‘Select’ per “Minute”. 06 Impostare “Hour” premere “” o “” per impostare il minuto desiderato e premere ‘Select’ per confermare. 07 Per impostare il volume dell'allarme premere “” o “”. 08 Quando si terminano le impostazioni, l'allarme sarà attivo. 09 Per silenziare l'allarme premere il pulsante allarme nuovamente. Visualizza informazioni Quando si ascolta una stazione radio DAB potete cambiare l'informazione che appare sulla seconda linea del display LCD. Vi sono molti caratteri o informazioni che vengono spediti dalle emittenti che possono essere visualizzate. Potete cambiare l'informazione mostrata sul display premendo ‘INFO’ quando la radio è in modalità DAB o in modalità stazione FM RDS. z Segmento a etichetta dinamica (DLS - Dynamic Label Segment) – Questo testo d'informazione a scorrimento è fornito dall'emittente. L'informazione può essere il nome dell'artista o il titolo della musica, il nome del DJ ed i dettagli di contatto della stazione radio z Frequenza canale –...
- Page 68 Stazioni preimpostate La funzione di preimpostazione memorizza le stazioni favorite per un accesso semplice. Può preimpostare fino a 10 stazioni DAB nella memoria radio. 01 Selezionare la stazione selezionata da salvare. 02 Premere e tenere premuto il tasto di pre-selezione (1-10) per salvare la stazione radio selezionata che volete mettere in memoria. 03 Il display LCD mostrerà “Preset X Saved”. La stazione ora è salvata con successo contro il numero di stazione selezionato. Caricamento delle stazioni preselezionate Per richiamare la stazione preselezionata dalla memoria. 01 Premere il numero di preselezione (1-10) per selezionare le stazioni che volete ascoltare e la radio DAB si risintonizzerà alla stazione preimpostata selezionata. 02 Se non avete impostato nessuna stazione ‘Preset X Free’ verrà mostrato sullo schermo LCD. Funzionamento della Modalità Radio FM 01 Accensione della radio. 02 Se in modalità standby, premere il pulsante Standby. 03 Premere il pulsante Mode fino a che viene visualizzato Modalità FM sul display LCD.
- Page 69 Pulsante Menu Il menu vi permette di configurare le impostazioni per la radio DAB. Premere il pulsante ‘Menu’ per selezionare le seguenti opzioni: { Contrast Setting { System reset { Software version L'utente può premere “Select” per scegliere tra formato Mono o Auto. Se la radio riceve un segnale stereo, riprodurrà il suono stereo. Altrimenti riprodurrà il suono mono. z La versione Software e il reset di sistema identici come il capitolo qui sopra riferito al DAB. Pulsanti di sintonizzazione Manuale Permettono di cambiare stazione. 01 Premere “” o “”. 02 Premere “” per sintonizzare la frequenza in aumento di 0,05 MHz. 03 Premere “” per sintonizzare la frequenza in discesa di 0,05 MHz. Pulsante di scansione automatica Permette alla radio di scansionare automaticamente le stazione FM. 01 Premere il pulsante “Scan” la radio scansionerà le stazioni con passi da 0,05 MHz fino a che trova le stazioni. 02 Per arrestare la scansione automatica, premere “” o “” ancora una volta.
-
Page 70: Stazioni Preselezionate
Visualizza informazioni Premere il pulsante ‘INFO’ per modificare le informazioni che appaiono sulla seconda linea del display LCD quando si ascolta una stazione FM radio. In modalità FM, la Radio riceve le informazioni di Sistema dati radio (RDS - Radio Data System). Le informazioni RDS includono: z Informazioni z Formato Audio z Tipo di programma (PTY - Program Type) – mostra il tipo di programma stazione, per esempio ‘POP Music’ z Testo Radio - E' un testo di informazione a scorrimento fornito dall'emittente L'informazione può essere il nome dell'artista o il titolo della musica, il nome del DJ ed i dettagli di contatto della stazione radio z Ora e Data corrente Stazioni preselezionate La funzione di preimpostazione memorizza le stazioni favorite per un accesso semplice. Può preimpostare fino a 10 stazioni FM nella memoria radio. Identico alla funzione “Stazioni Preselezionate” in modalità DAB. Caricamento delle stazioni preselezionate Identico alla funzione “Loading preset stations” in modalità DAB.
Need help?
Do you have a question about the d100 and is the answer not in the manual?
Questions and answers