Table of Contents
Advertisement
Quick Links
Download this manual
See also:
Operating Manual
QUICK GUIDE
For more product details, please visit
www.surveillance-download.com/user/m521.swf
Installation (Continued)
Step 4: The lens can be adjusted in three ways:
a. Loosen the four screws on the plate, along with which you, in
turn, can pan the camera.
Pan
Package Contents
Before starting to set up your camera, please make sure
items below are in your box:
Standard package:
Camera
Quick Guide
Optional accessories:
Screws, Wall
Desiccants
Plugs,
Wrench
Rubber
(×2)
Rings (×3)
b. Tilt the lens after loosening the two screws on either side of
the lens.
(TURN BACK TO CONTINUE)
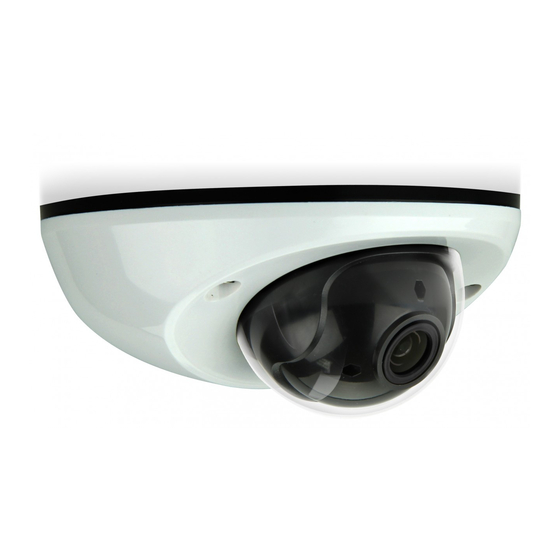
Installation
Step 1: Uncover the dome camera by loosening the three
screws on the housing with the supplied wrench.
Note: The three screws aren't designed to be removed
from the housing.
Step 2: Attach the supplied installation sticker to your
desired installation location.
Step 3: Locate the three deepest holes on the base. (See
Pic 1.) They are where the three supplied screws
belong.
On the sticker, make holes where the three screws
and the cables are supposed to penetrate. However,
if the cables won't go through the surface, you don't
need to make the hole for them in advance.
Next, align the camera with the sticker, putting the
three screws through the holes, as well as the
cables—if necessary. Then, tighten the screws.
metal rings
Note: Put the screws through both the rubber rings and
(×3)
metal rings (optional), then into the holes. (See
Pic 2.) To be on the safe side, it is recommended
that you be assisted with installation, considering
the camera is heavy.
Tilt
c. Remove the protective case by loosening the two screws on it
before rotating the lens from behind.
Rotate
m542a_m542b_quick_V1.1
587Z
Pic 1
Pic 2
Advertisement
Table of Contents

Related Manuals for Avtech avm311


Summary of Contents for Avtech avm311
- Page 1 587Z Package Contents Installation Step 1: Uncover the dome camera by loosening the three Before starting to set up your camera, please make sure screws on the housing with the supplied wrench. items below are in your box: Note: The three screws aren’t designed to be removed ...
- Page 2 Installation (Continued) Focusing the Camera Inserting MicroSD Card Step 5: Be sure to replace the original desiccant(s) with the new ones. Use If you need to adjust the focus, the picture below The data originally saved in the microSD card (if any) will be removed provided double-sided tape to stick the desiccants in place as shows you how: after inserting it to the camera.
- Page 3 583Z PACKAGE CONTENTS Camera Overview Type 1 Type 2 Before starting to set up your camera, please make sure items below are in your box: Standard package: QUICK GUIDE Side View (depending on the model you use ) Camera Quick Guide ...
- Page 4 INSTALLATION (Continued) Insert MicroSD Card (For selected models) Type 2 (Continued) The data originally saved in the microSD card (if any) will be removed after inserting it to the camera. Step 6: Pan, tilt and rotate the lens to adjust the The camera doesn’t support hot-swapping.
- Page 5 621Z Package Content Cable Overview Before starting to set up your camera, please make sure items below in your box: Below is an overview of various cables that can be used with the camera. Besides, it is followed by a table, which offers simple descriptions of cable connection. Line-in (blue)** ...
- Page 6 Installation Focus Adjustment Insert MicroSD Card (Continued) (For Type 1 only) (For Type 1 only) Type 2 If you need to adjust the focus, the picture below shows you how: The data originally saved in the micro SD card (if any) will be removed Step5: Slightly adjust the camera lens to where it’s supposed to after inserting it to the camera.
Need help?
Do you have a question about the avm311 and is the answer not in the manual?
Questions and answers