Table of Contents
Advertisement
Quick Links
Contents
The PX-708A
Contents
1
Introduction
1.1 Contents of the package . . . . . . . . . . . . 3
1.2 System requirements . . . . . . . . . . . . . . . 4
1.3 About DVD technology . . . . . . . . . . . . 4
1.4 CD and DVD reading, writing and
rewriting speeds . . . . . . . . . . . . . . . . . . 5
CD . . . . . . . . . . . . . . . . . . . . . . . . . . . . . . . . . . 5
DVD+R/RW . . . . . . . . . . . . . . . . . . . . . . . . . . 5
DVD-R/RW . . . . . . . . . . . . . . . . . . . . . . . . . . . 6
1.5 CD and DVD types for writing and
rewriting . . . . . . . . . . . . . . . . . . . . . . . . 6
CD-R . . . . . . . . . . . . . . . . . . . . . . . . . . . . . . . . 6
CD-RW . . . . . . . . . . . . . . . . . . . . . . . . . . . . . . 6
DVD+R and DVD-R . . . . . . . . . . . . . . . . . . . . 7
DVD+RW and DVD-RW . . . . . . . . . . . . . . . . 7
Compatibility with various CD and DVD
application technologies . . . . . . . . . . . . . . . . . . 8
1.6 Buffer Underrun Proof Technology . . . 9
Buffer Underrun Errors . . . . . . . . . . . . . . . . . . 9
Buffer Underrun Proof Technology . . . . . . . . . 9
1.7 PoweRec . . . . . . . . . . . . . . . . . . . . . . . . 9
1.8 VariRec . . . . . . . . . . . . . . . . . . . . . . . . 10
1.9 Precautionary measures. . . . . . . . . . . . 10
2
Installation
2.1 Before installing your device . . . . . . . .11
2.2 MASTER/SLAVE setting . . . . . . . . . . .11
2
MASTER setting . . . . . . . . . . . . . . . . . . . . . . 13
SLAVE setting . . . . . . . . . . . . . . . . . . . . . . . . 14
CSEL (Cable Select) setting . . . . . . . . . . . . . 14
2.3 Mounting and connecting the device. . 15
2.4 Installing the software . . . . . . . . . . . . . 20
3
Operation and maintenance
3.1 The control panel . . . . . . . . . . . . . . . . . 21
3.2 Using the disc tray . . . . . . . . . . . . . . . . 22
Loading a disc . . . . . . . . . . . . . . . . . . . . . . . . 22
Removing a disc . . . . . . . . . . . . . . . . . . . . . . 23
Opening the device manually to remove a disc 24
3.3 Maintenance. . . . . . . . . . . . . . . . . . . . . 26
Device maintenance . . . . . . . . . . . . . . . . . . . . 26
Disc maintenance . . . . . . . . . . . . . . . . . . . . . . 26
4
Troubleshooting
4.1 Resolving problems yourself . . . . . . . . 27
Problems during installation . . . . . . . . . . . . . 27
Problems when reading a disc . . . . . . . . . . . . 27
Problems when writing a disc . . . . . . . . . . . . 28
4.2 Technical support. . . . . . . . . . . . . . . . . 29
5
Warranty
11
5.1 Warranty conditions. . . . . . . . . . . . . . . 30
6
Spec sheet
1
21
27
30
31
Advertisement
Table of Contents

Related Manuals for Plextor PX-708A


Summary of Contents for Plextor PX-708A
- Page 1 Contents Contents The PX-708A Introduction MASTER setting ..... . 13 SLAVE setting ......14 1.1 Contents of the package .
-
Page 2: Introduction
1. Introduction The PX-708A is a device, which you can use to read, write and rewrite CDs and DVDs. The device is an internal type ATAPI model, which means it cannot be connected externally, but should be fitted inside your PC and connected to your motherboard via an E-IDE cable. -
Page 3: Contents Of The Package
WARRANTY REGISTRATION CARD Software: Nero + InCD* Please fill in and send by post to Plextor - Prier de remplir et renvoyer à Plextor - Bitte ausfüllen und zurückschicken zu Plextor CD-RW Drive - Lecteur CD-RW - CD-RW Laufwerk Owner - Propriétaire - Besitzer... -
Page 4: System Requirements
Contents Introduction 1.2 System requirements To install the PX-708A and to guarantee stable operation, your system must meet the following minimum requirements: • IBM/AT-compatible PC with a 700 MHz processor or faster • 128 MB of RAM • Windows 98SE, Windows Me, Windows 2000, Windows XP installed •... -
Page 5: Rewriting Speeds
For DVD devices, single speed corresponds to 1.321 MB/s, which means that a single speed DVD reader is roughly 9 times as fast as a single speed CD reader. The PX-708A features the following maximum speeds for DVD reading, and for DVD+R/RW writing and rewriting: •... -
Page 6: Dvd-R/Rw
Contents Introduction DVD-R/RW The PX-708A features the following maximum speeds for DVD reading, and for DVD-R/RW writing and rewriting: • Read: 12x speed • Write: 4x speed • Rewrite: 2x speed You can calculate the maximum transfer speed of your device by multiplying the specified figures by 1.321 MB/s. -
Page 7: Dvd+R And Dvd-R
DVD+R and DVD-R At this point, there are two different formats writing DVDs, called DVD-R and DVD+R. The PX-708A can read and write DVDs in both formats, but notice that the maximum writing speed is two times higher in DVD+R than in DVD-R. - Page 8 Contents Introduction Compatibility with various CD and DVD application technologies The PX-708A is compatible with the technologies listed here. Remember also that, depending on the manufacturing quality and the software used, some CDs and DVDs cannot be written to. Type...
-
Page 9: Buffer Underrun Proof Technology
The PX-708A continuously checks the status of the data buffer. As soon as a risk of a buffer underrun is detected, the recording process is suspended at a suitable point. The drive continues prompting the computer for data, in order to refill the data buffer. -
Page 10: Precautionary Measures
To gain maximum, long-term benefit of the PX-708A you should take the following precautionary measures: • Keep the packaging for the device. If you ever have to return your device to Plextor, you can reuse the original protective packaging. •... -
Page 11: Installation
Contents Installation 2. Installation Follow the steps set out below to simply and safely install your device. 2.1 Before installing your device • Switch off your PC and any peripheral equipment and remove the plugs from the wall socket. • Discharge any static electricity from your PC by touching the enclosure. - Page 12 Contents Installation A maximum of two devices can be connected to each of the two connectors using a 40 pin flat ribbon cable. You can therefore connect a total of four E-IDE devices to your PC. Master Master Master Master Slave Slave Slave...
-
Page 13: Master Setting
Contents Installation A jumper switch consists of two metal pins across which a metal cover can be placed. By placing the cover across the two pins, the pins are interconnected and the current bridge circuit is closed. The hard disk is usually installed as the MASTER to the primary connector. If you now wish to connect a second device to the same connector (and therefore to the same cable), this device must be set up as the SLAVE. -
Page 14: Slave Setting
Contents Installation SLAVE setting Place the cover over the two second right-hand pins. CSEL (Cable Select) setting If you use this setting, the MASTER/SLAVE setting is made automatically. If another device is connected to the same connector, this also has to be set up to Cable Select. Moreover, you must ensure that you use an E-IDE cable, which supports Cable Select. -
Page 15: Mounting And Connecting The Device
Contents Installation 2.3 Mounting and connecting the device Step 1: Remove the cover from your computer. In most instances the system case is secured with screws at the rear. Sometimes screws are also located on the side or the bottom. Use a crosshead screwdriver to loosen the screws. Make sure that when doing this you only undo the screws securing the cover. - Page 16 Contents Installation Step 2: Remove the front plate from a free 5.25 inch bay. The front plates are usually secured by means of a click system. For further details consult your PC manual. Step 3: Place the device into the free 5.25 inch bay. Slide the device into the front of the bay.
- Page 17 Contents Installation Step 4: Connect the 40-pin E-IDE cable to the rear of the CD-R/RW device. Two E-IDE connectors are located on the cable. Although you are not obliged to do so, we advise you to connect the device to the end of the cable. The ribbon cable also has a red line on it. Make sure that the red line is located at pin 1 (on the right-hand side).
- Page 18 Contents Installation If your sound card supports digital sound and is fitted with an SPDIF connector, you can also connect your CD-R/RW device to it here. To do this use the 2-pin SPDIF cable, which is supplied with your sound card. Connect the other end of the cable to your CD-R/RW device.
- Page 19 Contents Installation Step 7: Secure the device in position using the supplied screws. Step 8: Replace the cover on the computer and screw it back into position. Step 9: Reconnect all cables, plug in the plugs into the wall socket and switch the computer on.
-
Page 20: Installing The Software
PlexTools Professional: CD/DVD Utility software To install an application, insert the CD into the CD reader (or the PX-708A) on your PC. The installation program will be launched automatically. Refer to the documentation available on the software installation CD to get more... -
Page 21: Operation And Maintenance
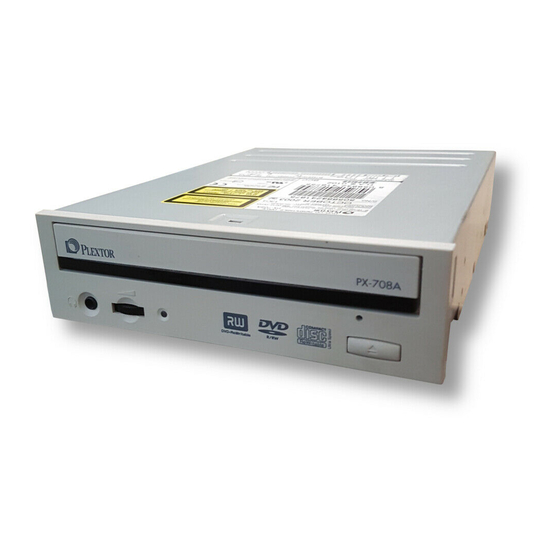
3. Operation and maintenance 3.1 The control panel The control panel at the front of the PX-708A consists of the following elements: 1. Disc tray This disc tray is used to insert discs into the device (see “Loading a disc” on page 22). Press the eject button to open and close the disc tray. -
Page 22: Using The Disc Tray
Contents Operation and maintenance 6. Emergency eject hole This opening may only be used to remove a disc if it is no longer possible to remove it in the usual way (using the eject button). To do this use the supplied eject pin (see “Opening the device manually to remove a disc”... -
Page 23: Removing A Disc
Contents Operation and maintenance Step 3: Gently press against the front edge of the disc tray or press the eject button again to close the disc tray. Removing a disc Step 1: Press the eject button on the control panel to open the disc tray. Step 2: Hold the disc by its edges and carefully remove it from the disc tray. -
Page 24: Opening The Device Manually To Remove A Disc
Contents Operation and maintenance Step 3: Gently press against the front edge of the disc tray or press the eject button again to close the disc tray. Never leave the disc tray open for long periods of time. Dust or dirt, which gets into the device, can cause read or write errors. - Page 25 Contents Operation and maintenance Step 3: Carefully continue to slide the disc tray open. Step 4: Hold the disc by its edges and carefully remove it from the disc tray. Step 5: Carefully push the disc tray shut.
-
Page 26: Maintenance
Contents Operation and maintenance 3.3 Maintenance Device maintenance Use a soft, dust-free cloth to maintain your device. Never use water or cleaning products to clean your device. Some solvents may damage the enclosure of your device. Disc maintenance You can clean your discs using a commercially available CD/DVD anti-static spray or CD/DVD cleaning kit. Make sure that you do not scratch the discs while cleaning them. -
Page 27: Troubleshooting
Contents Troubleshooting 4. Troubleshooting 4.1 Resolving problems yourself Problems during installation • Press the eject button to check whether or not the device is getting any power. If this is not the case, then check that the power connector is correctly connected. •... -
Page 28: Problems When Writing A Disc
Panel. Then double-click in the Control Panel on System and select the Device Manager tab. Select the PX-708A in the CD-ROM group and click on Properties. Then select the Settings tab and make a note of the number stated in the Firmware Revision field. -
Page 29: Technical Support
Area Contact Europe, Middle-East and Africa Opening hours: 8:00 - 18:00 M-F For local telephone numbers: check www.plextor.be Tel.: +32 2 718 03 99, Fax: +32 2 718 03 90 E-mail: support@plextor.be U.S.A. and Canada Opening hours: 6:30 A.M. - 5:30 P.M., PST, M-F Tel.: +1 510 440 2000, Toll Free (US/Canada): 1 800 886 3935... -
Page 30: Warranty Conditions
If a Plextor product shows signs of a defect during the warranty period, it can be returned to Plextor for repair or exchange. The following options are available to you with respect to this service: Return for repair (the returned product is repaired and sent back to you) or Return for exchange (the product is exchanged and sent to you). -
Page 31: Spec Sheet
Contents Spec sheet 6. Spec sheet Disc CD-DA, CD EXTRA, CD-ROM Mode 1, CD-ROM Mode 2, CD-ROM XA, Recordable CD Format Multisession, Photo CD, VideoCD, CD TEXT, CD+G, UDF, CD-I Recordable DVD Formats DVD-ROM, DVD-Video, Multisession, Multiborder, DVD+VR Recording Disc type CD-R, CD-RW, DVD-R, DVD-RW, DVD+R, DVD+RW Disc at Once, Track at Once, Session at Once, Multisession, Packet writing, CD-R/RW Recording Method... - Page 32 Contents Spec sheet Front Panel Disc/Busy Indicator Disc Loading Auto, Disc Tray Headphone jack Stereo Mini-jack: 0.8 V 32 Ohm Volume Control Wheel knob Rear Panel DC +5V 1.5A Power Supply +12V 2.5A Power Consumption Interface Connector IDE Bus 40 Pin Header Type Audio Output Analog Output, SPDIF Jumper Switches...
Need help?
Do you have a question about the PX-708A and is the answer not in the manual?
Questions and answers