Advertisement
Quick Links
English
Thank you for your purchase of a 1 NIKKOR VR 70-300mm f/4.5-5.6
1 NIKKOR VR 70-300mm f/4.5-5.6
lens. Before using this product, please carefully read both these in-
structions and the camera manual.
Note: 1 NIKKOR lenses are exclusively for Nikon 1 interchangeable
En
Tc
使用說明書
User's Manual
lens format digital cameras. The angle of view is equivalent to a
Fr
Manuel d'utilisation
Id
Manual bagi Pengguna
35 mm format lens with a focal length about 2.7 × longer.
ﺩﻟﻴﻞ ﺍﳌﺴﺘﺨﺪﻡ
使用说明书
Sc
Ar
For Your Safety
For Your Safety
CAUTIONS
Printed in Japan
• Do not disassemble. Touching the internal parts of the camera or lens
SB4B01(6C)
could result in injury. In the event of malfunction, the product should be
7MVA206C-01
repaired only by a qualifi ed technician. Should the product break open
as the result of a fall or other accident, remove the camera battery and/
or disconnect the AC adapter and then take the product to a Nikon-
authorized service center for inspection.
q
w
e
r
t
y u
i
o
• Turn the camera off immediately in the event of malfunction. Should you
notice smoke or an unusual smell coming from the equipment, imme-
diately unplug the AC adapter and remove the camera battery, taking
care to avoid burns. Continued operation could result in fi re or injury.
After removing the battery, take the equipment to a Nikon authorized
service center for inspection.
• Do not use in the presence of fl ammable gas. Operating electronic equip-
ment in the presence of fl ammable gas could result in explosion or fi re.
• Do not look at the sun through the lens or the camera viewfi nder. Viewing
!3
!2
!1
!0
the sun or other bright light source through the lens or viewfi nder could
cause permanent visual impairment.
• Keep out of reach of children. Failure to observe this precaution could
result in injury.
• Observe the following precautions when handling the lens and camera:
!6
!5 !4
- Keep the lens and camera dry. Failure to observe this precaution could
result in damage to the product, fi re, or electric shock.
- Do not handle the lens or camera with wet hands. Failure to observe
this precaution could result in electric shock.
- Keep the sun well out of the frame when shooting backlit subjects.
Sunlight focused into the camera when the sun is in or close to the
frame could cause a fi re.
- If the lens will not be used for an extended period, be sure that the cover
is closed or that the lens is stored out of direct sunlight. If left in direct sun-
light, the lens could focus the sun' s rays onto fl ammable objects, causing
fi re.
Figure 1/Figure 1/图1
• Do not carry tripods with a lens or camera attached. You could trip or ac-
cidentally strike others, resulting in injury.
• Do not leave the product where it will be exposed to extremely high tem-
peratures, such as in an enclosed automobile or in direct sunlight. Failure
to observe this precaution could cause damage or fi re.
Notice for customers in Canada
Notice for customers in Canada
CAN ICES-3 B / NMB-3 B
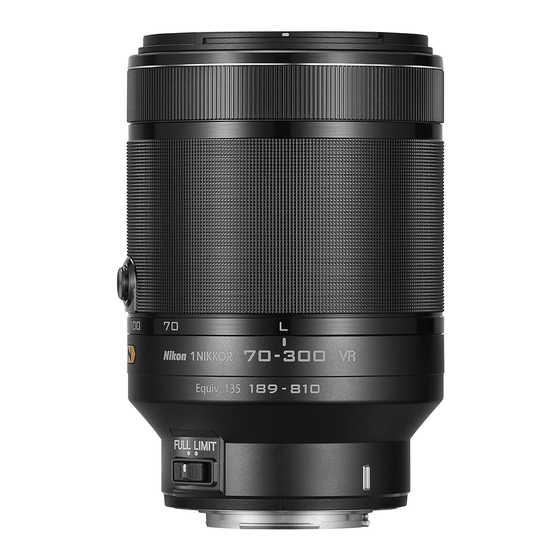
Parts of the Lens (Figure 1)
Parts of the Lens (Figure 1)
q
Lens hood
o
CPU contacts
w
Lens hood lock mark
!0
Focus limit switch
Figure 2/Figure 2/图2
e
Lens hood alignment mark
!1
Focal length scale
r
Lens hood mounting mark
!2
Retractable lens barrel button
t
Focus ring
!3
Tripod mount attachment socket
y
Zoom ring
!4
Tripod mount (optional)
u
Focal length mark
!5
Tripod mount attachment screw
i
Lens mounting mark
!6
Tripod socket
Attachment and Removal
Attachment and Removal
See the camera manual. When attaching or removing the lens, be
sure the camera is off and be careful not to press the retractable
lens barrel button.
Before Use
Before Use
The lens features a retractable barrel. Before using the camera, unlock and
Figure 3/Figure 3/图3
extend the lens to the shooting position by pressing the retractable lens
barrel button (Figure 2-q) while rotating the zoom ring as shown (Fig-
ure 2-w).
• To retract the lens, keep the retractable lens barrel button pressed and
rotate the zoom ring in the opposite direction until it locks.
• Pictures can not be taken when the lens is retracted; if an error message
is displayed as a result of the camera having been turned on with the lens
retracted, rotate the zoom ring until the message is no longer displayed.
Zoom
Zoom
Use the zoom ring to zoom in and out. Photographs can be tak-
en only when the focal length scale is between 70 and 300 mm
Figure 4/Figure 4/图4
(Figure 3).
The Focus Limit Switch
The Focus Limit Switch
This switch determines the focus distance limits for autofocus.
FULL: Select this option to use the entire focus range.
LIMIT: Recommended if your subject will always be at a
distance of at least 7 m (23 ft).
Note that some cameras will not restrict the focus range when
LIMIT is selected, while others may require a fi rmware update be-
fore the focus limit switch can be used. For more information, visit
the following website:
Figure 5/Figure 5/图5
• For users in the U.S.A.: http://www.nikonusa.com/
• For users in Europe and Africa: http://www.europe-nikon.com/support/
• For users in Asia, Oceania, and the Middle East: http://www.nikon-asia.com/
Using a Lens Hood
Using a Lens Hood
Lens hoods protect the lens and block stray light that would other-
wise cause fl are or ghosting.
■Attaching a Lens Hood (when in use)
• Attach the hood as shown in Figure 4. Align the lens hood lock mark
(—) with the focal length mark (
) on the lens (Figure 4-
• When attaching or removing the hood, hold it near the (
its base and avoid gripping it too tightly.
• Vignetting may occur if the hood is not correctly attached.
■Attaching a Lens Hood (when storing)
• The hood can be reversed and mounted on the lens when not in use
(Figure 5).
Figure 6/Figure 6/图6
Using the Flash
Using the Flash
Vignetting (shadows created where the lens hood or lens obscures
the fl ash) or loss of peripheral illumination may occur at some focus
or shooting distances in photographs taken with a fl ash.
Other Settings
Other Settings
Use the camera to:
• Adjust aperture
• Control focus
• Choose a vibration reduction mode (NORMAL/ACTIVE/OFF). If the cam-
era optical vibration reduction menu off ers a choice of NORMAL and
ACTIVE, choose NORMAL to increase the stability of the image in the
monitor or viewfi nder during shooting (for information on the options
available, see the camera manual). In general, both NORMAL and ACTIVE
can be used when the product is mounted on a tripod, but OFF may be
preferred in some cases depending on shooting conditions and the type
of tripod.
Français
Manual Focus
Manual Focus
Nous vous remercions d'avoir acheté un objectif 1 NIKKOR VR 70-300 mm
To focus manually, select manual focus
f/4.5-5.6. Avant d'utiliser ce produit, veuillez lire attentivement à la fois ces
Focus indicator
(MF) mode on the camera and rotate the
instructions et le manuel de l'appareil photo.
lens focus ring. A magnifi ed manual fo-
Remarque : Les objectifs 1 NIKKOR sont destinés exclusivement aux appa-
cus display will appear in the monitor (still
reils photo numériques à objectif interchangeable Nikon 1. Son angle de
photography only; see the camera manual
champ est équivalent à celui d'un objectif 24 × 36 mm doté d'une focale
for details). Rotate the focus ring clockwise
environ 2,7 × plus longue.
to increase the focus distance, counter-
Pour votre sécurité
Pour votre sécurité
Navigation window
clockwise to decrease. The focus indicator
ATTENTION
shows the approximate focus distance, the
• Ne pas démonter. Toucher les parties internes de l'appareil photo ou de
navigation window the portion of the frame visible in the display.
l'objectif peut provoquer des blessures. En cas de dysfonctionnement,
Normal magnifi cation is restored if no operations are performed for
le produit devra être réparé par un technicien qualifi é uniquement. Si
a set period.
le produit s'ouvre à cause d'une chute ou de tout autre accident, retirez
■Focusing in Autofocus Mode
l'accumulateur de l'appareil photo et/ou débranchez l'adaptateur sec-
Even in autofocus mode, focus can be adjusted manually by rotat-
teur et confi ez le produit à un centre Nikon agréé pour le faire vérifi er.
ing the focus ring (M/A; autofocus with manual override). One ex-
• Mettre immédiatement l'appareil hors tension en cas de dysfonctionne-
ample of how manual override can be used is to make fi ne adjust-
ment. Si vous détectez de la fumée ou une odeur inhabituelle prove-
ments to focus while recording movies.
nant de l'équipement, débranchez immédiatement l'adaptateur secteur
To focus the camera for still photography, press the shutter-release
et retirez l'accumulateur de l'appareil photo, tout en prenant soin de ne
button halfway to focus using autofocus, then adjust focus by keep-
pas vous brûler. Poursuivre son utilisation peut provoquer un incendie
ing the shutter-release button pressed halfway while rotating the
ou des blessures. Après avoir retiré l'accumulateur, confi ez l'équipement
focus ring. Press the shutter-release button the rest of the way down
à un centre Nikon agréé pour le faire vérifi er.
to take the picture.
• Ne pas utiliser en présence de gaz infl ammable. L'utilisation d'équipement
électronique en présence d'un gaz infl ammable peut provoquer une
Manual focus is available only if supported in the current shooting
explosion ou un incendie.
mode; see the camera manual for details.
• Ne pas regarder le soleil avec l'objectif ou le viseur de l'appareil photo. Re-
garder le soleil ou toute autre source lumineuse intense avec l'objectif
Some cameras may require a fi rmware update before the focus ring
ou le viseur peut provoquer des troubles de la vision irréversibles.
can be used. For more information, visit the following website:
• Tenir éloigné des enfants. Le non-respect de cette précaution peut pro-
• For users in the U.S.A.: http://www.nikonusa.com/
voquer des blessures.
• For users in Europe and Africa: http://www.europe-nikon.com/support/
• Suivre les précautions ci-dessous lors de la manipulation de l'objectif et de
• For users in Asia, Oceania, and the Middle East: http://www.nikon-asia.com/
l'appareil photo :
■Using a Tripod
- Tenir l' o bjectif et l'appareil photo au sec. Le non-respect de cette précaution
Attach an optional TR-N100 tripod mount when using a tripod. Attach
peut endommager le produit, provoquer un incendie ou un choc électrique.
the tripod to the tripod mount, not to the camera.
- Ne pas manipuler l' o bjectif ou l'appareil photo avec des mains mouillées.
z
Le non-respect de cette précaution peut provoquer un choc électrique.
Align the tripod mount attachment screw with the lens tripod
- Ne pas inclure le soleil dans le cadrage lors de la prise de vue de sujets
mount attachment socket (Figure 6-
q
).
en contre-jour. La concentration de la lumière du soleil dans l'appareil
x
Securely tighten the tripod mount attachment screw with a coin
photo lorsque le soleil est dans ou à proximité du champ de l'image
or other object (Figure 6-
).
w
peut provoquer un incendie.
c
Attach the tripod to the tripod socket on the tripod mount (Fig-
- Si vous n'avez pas l'intention d'utiliser l'objectif avant longtemps, véri-
ure 6-
e
).
fi ez que son volet de protection est fermé ou que l'objectif est rangé
✔ IMPORTANT
à l'abri du soleil. Si l'objectif est laissé en contact direct avec la lumière
du soleil, les rayons peuvent toucher des objets infl ammables, provo-
Be sure the tripod mount attachment screw is secure before mounting
quant ainsi un incendie.
the product on a tripod. Injury could result if the product comes loose
• Ne pas porter un trépied sur lequel un objectif ou l'appareil photo est fi xé.
accidentally.
Vous risqueriez de trébucher ou de frapper accidentellement des per-
Lens Care
Lens Care
sonnes, provoquant ainsi des blessures.
• When using a lens hood, do not pick up or hold the lens or camera using
• Ne pas laisser le produit là où il serait exposé à des températures élevées,
only the hood.
comme dans une voiture fermée ou à la lumière directe du soleil. Le non-res-
• Keep the CPU contacts clean.
pect de cette précaution peut provoquer des dommages ou un incendie.
• Use a blower to remove dust and lint from the lens surfaces. To remove
Avis pour les clients au Canada
Avis pour les clients au Canada
smudges and fi ngerprints, apply a small amount of ethanol or lens clean-
CAN ICES-3 B / NMB-3 B
er to a soft, clean cotton cloth or lens-cleaning tissue and clean from the
Parties de l'objectif (Figure 1)
Parties de l'objectif (Figure 1)
center outwards using a circular motion, taking care not to leave smears
q
Parasoleil
or touch the glass with your fi ngers.
w
Repère de verrouillage du paraso-
• Never use organic solvents such as paint thinner or benzene to clean the lens.
leil
• The lens hood or NC fi lters can be used to protect the front lens element.
e
Repère d'alignement du parasoleil
• Attach the front and rear caps when the lens is not in use.
r
Repère de montage du parasoleil
• If the lens will not be used for an extended period, store it in a cool, dry
t
Bague de mise au point
location to prevent mold and rust. Do not store in direct sunlight or with
y
Bague de zoom
naphtha or camphor moth balls.
u
Repère de l'échelle des focales
• Keep the lens dry. Rusting of the internal mechanism can cause irrepa-
i
Repère de montage de l'objectif
rable damage.
o
Contacts du microprocesseur
• Leaving the lens in extremely hot locations could damage or warp parts
Fixation et retrait
Fixation et retrait
made from reinforced plastic.
Reportez-vous au manuel de l'appareil photo. Lorsque vous fi xez ou retirez
Supplied Accessories
Supplied Accessories
l'objectif, vérifi ez que l'appareil photo est hors tension et veillez à ne pas
• 62 mm snap-on Front Lens Cap LC-N62
appuyer sur la commande de déverrouillage de l'objectif rétractable.
• Rear Lens Cap LF-N1000
Avant toute utilisation
Avant toute utilisation
• Bayonet Hood HB-N110
Cet objectif dispose d'un barillet rétractable. Avant d'utiliser l'appareil photo,
Compatible Accessories
Compatible Accessories
déverrouillez l' o bjectif et déployez-le en position de prise de vue en ap-
• 62 mm screw-on fi lters (we recommend removing the supplied
puyant sur la commande de déverrouillage de l' o bjectif rétractable (Figure
HB-N110 bayonet hood when operating the rotating ring on the Circular
2-q) tout en tournant la bague de zoom comme le montre l'illustration
Polarizing Filter II 62mm)
(Figure 2-w).
• Lens soft case CL-N102
• Pour rétracter l'objectif, maintenez appuyée la commande de déver-
• Tripod mount TR-N100
rouillage de l'objectif rétractable et tournez la bague de zoom dans le
Specifi cations
Specifi cations
sens inverse jusqu'à ce qu'elle se verrouille.
• Type: 1 mount lens
• Il n'est pas possible de prendre des photos lorsque l'objectif est rétracté ;
• Focal length: 70–300 mm
si un message d'erreur s'affi che suite à la mise sous tension de l'appareil
• Maximum aperture: f/4.5–5.6
photo alors que l'objectif est rétracté, tournez la bague de zoom jusqu'à
• Lens construction: 16 elements in 10 groups (including 1 super ED lens
ce que le message disparaisse.
element, and lens elements with a Nano-Crystal coating)
Zoom
Zoom
• Angle of view: 13°–3°
Utilisez la bague de zoom pour eff ectuer des zooms avant et arrière. Il n'est
• Vibration reduction: Lens shift using voice coil motors (VCMs)
possible de prendre des photos que lorsque l'échelle des focales est entre
• Minimum focus distance:
70 et 300 mm (Figure 3).
• 70 mm focal length: 1.0 m (3.3 ft) from focal plane
Commutateur de la limite de mise au point
Commutateur de la limite de mise au point
• 150 mm focal length: 1.6 m (5.2 ft) from focal plane
Ce commutateur permet de défi nir les limites de la distance de mise au
• 300 mm focal length: 1.6 m (5.2 ft) from focal plane
point en mode autofocus.
• Diaphragm blades: 7 (rounded diaphragm opening)
FULL: Sélectionnez cette option afi n d'utiliser l'intégralité de
• Diaphragm: Fully automatic
la plage de mise au point.
• Aperture range:
LIMIT: Option recommandée si votre sujet reste toujours à
• 70 mm focal length: f/4.5–f/16
une distance de 7 m minimum.
• 300 mm focal length: f/5.6–f/16
e
).
• Focus limit switch positions: FULL and LIMIT (∞ – approx. 7 m)
Veuillez noter que certains appareil photo ne limitent pas la plage de
) symbol on
• Filter-attachment size: 62 mm (P=0.75 mm)
mise au point même si LIMIT est sélectionné, tandis que d'autres peuvent
• Dimensions: Approx. 73 mm diameter × 108 mm (distance from camera
nécessiter une mise à jour de fi rmware pour que vous puissiez utiliser le
lens mount fl ange when lens is retracted)
commutateur de la limite de mise au point. Pour en savoir plus, consultez
• Weight: Approx. 550 g (19.4 oz)
le site Web suivant :
Nikon reserves the right to change the specifi cations of the hardware de-
• Pour les utilisateurs résidant aux États-Unis : http://www.nikonusa.com/
scribed in this manual at any time and without prior notice.
• Pour les utilisateurs résidant en Europe et en Afrique :
http://www.europe-nikon.com/support/
• Pour les utilisateurs résidant en Asie, en Océanie et au Moyen-Orient :
http://www.nikon-asia.com/
Parasoleil
Parasoleil
Le parasoleil protège l'objectif et bloque la lumière diff use pouvant causer
de la lumière parasite ou une image fantôme.
■Fixation d'un parasoleil (utilisation)
• Fixez le parasoleil comme indiqué dans la Figure 4. Alignez le repère de
verrouillage du parasoleil (—) sur le repère de l'échelle des focales (
sur l'objectif (Figure 4-e).
• Lors de la fi xation ou du retrait du parasoleil, tenez-le près du symbole
(
) sur sa base, et évitez de le serrer trop fermement.
• Un vignettage peut se produire si le parasoleil n'est pas correctement
attaché.
■Fixation d'un parasoleil (rangement)
• Le parasoleil peut être retourné et monté sur l'objectif lorsqu'il n'est pas
utilisé (Figure 5).
Utilisation du fl ash
Utilisation du fl ash
Un phénomène de vignettage (ombres créées lorsque l' o bjectif occulte le
fl ash) ou une perte de luminosité périphérique peut se produire à certaines
distances de mise au point ou de prise de vue sur les photos prises au fl ash.
Autres réglages
Autres réglages
Utilisez l'appareil photo pour :
• Régler l'ouverture
感谢您购买
• Contrôler la mise au point
用本产品前,请仔细阅读这些指南和照相机说明书。
• Choisissez un mode de réduction de vibration (NORMAL/ACTIVE/OFF).
注意 :
Si le menu VR optique de l'appareil photo off re les options NORMAL et
景数字照相机。其视角相当于焦距约为该镜头
ACTIVE, choisissez NORMAL pour améliorer la stabilité de l'image affi chée
35mm
sur le moniteur ou dans le viseur pendant la prise de vue (pour en savoir
plus sur les options disponibles, reportez-vous au manuel de l'appareil
photo). En règle générale, les deux réglages NORMAL et ACTIVE peuvent
être utilisés lorsque l'appareil photo est installé sur un trépied, mais le
réglage OFF peut être plus adapté dans certains cas, selon les conditions
请在使用前仔细阅读 "安全须知" , 并以正确的方法使用。 本 "安
de prise de vue et le type de trépied utilisé.
全须知"中记载了重要的内容,可使您能够安全、正确地使
Mise au point manuelle
Mise au point manuelle
用产品,并预防对您或他人造成人身伤害或财产损失。请在
Pour eff ectuer la mise au point manuelle-
Indicateur de mise
ment, sélectionnez le mode de mise au point
au point
阅读之后妥善保管,以便本产品的所有使用者可以随时查阅。
manuelle (MF) sur l'appareil photo et tournez
本节中标注的指示和含义如下。
la bague de mise au point de l'objectif. Une
image agrandie s'affi che sur le moniteur (pho-
tos uniquement ; reportez-vous au manuel de
l'appareil photo pour en savoir plus). Tournez
la bague de mise au point dans le sens des
Fenêtre de navigation
aiguilles d'une montre pour augmenter la dis-
本节使用以下图示和符号对必须遵守的内容作分类和说明。
tance de mise au point, dans le sens inverse
pour la réduire. L'indicateur de mise au point représente la distance de
mise au point approximative et la fenêtre de navigation indique la portion
de l'image visible sur le moniteur. L'affi chage revient à la normale si aucune
opération n'est eff ectuée pendant une période donnée.
■Mise au point en mode autofocus
Même en mode autofocus, il est possible de régler manuellement la mise
au point en tournant la bague de mise au point (M/A ; autofocus à priorité
manuelle). L'autofocus à priorité manuelle permet notamment de régler
précisément le point lors de l'enregistrement vidéo.
Pour eff ectuer la mise au point en mode photo, appuyez d'abord sur le déclen-
cheur à mi-course pour activer l'autofocus, puis ajustez le point en maintenant
le déclencheur à mi-course tout en tournant la bague de mise au point. Ap-
puyez sur le déclencheur jusqu' e n fi n de course pour prendre la photo.
La mise au point manuelle n'est disponible que si elle est permise
par le mode de prise de vue sélectionné : reportez-vous au manuel
de l'appareil photo pour en savoir plus.
Certains appareils photo peuvent nécessiter une mise à jour de fi rmware
(microprogramme) pour que vous puissiez utiliser leur bague de mise au
point. Pour en savoir plus, consultez le site Web suivant :
• Pour les utilisateurs résidant aux États-Unis : http://www.nikonusa.com/
• Pour les utilisateurs résidant en Europe et en Afrique :
http://www.europe-nikon.com/support/
• Pour les utilisateurs résidant en Asie, en Océanie et au Moyen-Orient :
http://www.nikon-asia.com/
■Utilisation d'un trépied
Installez la fi xation pour trépied TR-N100 lorsque vous utilisez un trépied.
Raccordez le trépied à la fi xation pour trépied et non à l'appareil photo.
z
Insérez la vis de fi xation dans le fi letage situé sur l'objectif (Figure
6-
q
).
!0
Commutateur de la limite de
x
Serrez à fond la vis de fi xation à l'aide d'une pièce ou d'un autre
mise au point
objet (Figure 6-
w
).
!1
Échelle des focales
c
Raccordez le trépied au fi letage situé sur la fi xation pour trépied
!2
Commande de déverrouillage
(Figure 6-
e
).
de l'objectif rétractable
✔ IMPORTANT
!3
Filetage destiné à la fi xation pour
trépied
Vérifi ez que la vis de fi xation est bloquée avant de monter le matériel sur
!4
Fixation pour trépied (en option)
un trépied. Vous risquez sinon de vous blesser si le matériel se détache
!5
Vis de fi xation
accidentellement.
!6
Filetage destiné au trépied
Entretien de l'objectif
Entretien de l'objectif
• Ne prenez pas ou ne tenez pas l'objectif ou l'appareil photo en saisissant
uniquement le parasoleil.
• Maintenez les contacts du microprocesseur propres.
• Utilisez une souffl ette pour enlever la poussière et les peluches sur la sur-
face de l'objectif. Pour eff acer les taches et les traces de doigt, imprégnez
un morceau de tissu propre en coton avec une petite quantité d'éthanol
ou de nettoyant pour objectif ou utilisez une lingette de nettoyage d'ob-
jectif, et nettoyez avec un mouvement circulaire à partir du centre vers
l'extérieur, tout en prenant soin de ne pas laisser de taches, ni de toucher
le verre avec vos doigts.
• N'utilisez jamais de solvants organiques comme un diluant à peinture ou
du benzène pour nettoyer l'objectif.
• Le parasoleil ou les fi ltres NC peuvent être utilisés pour protéger la lentille
frontale.
• Fixez les bouchons avant et arrière si vous n'utilisez pas l'objectif.
• Si vous n'avez pas l'intention d'utiliser l'objectif pendant une longue pé-
riode, rangez-le dans un endroit frais et sec pour éviter la moisissure et la
rouille. Ne le rangez pas à la lumière directe du soleil ou avec des boules
镜头部件(图
antimites de naphtaline ou de camphre.
q
• Tenez l'objectif au sec. La formation de rouille sur le mécanisme interne
peut causer des dégâts irréparables.
w
• Laisser l'objectif dans des endroits extrêmement chauds peut endomma-
e
ger ou déformer les éléments composés de plastique renforcé.
r
Accessoires fournis
Accessoires fournis
t
• Bouchon avant d'objectif encliquetable 62 mm LC-N62
y
• Bouchon arrière d'objectif LF-N1000
u
• Parasoleil à baïonnette HB-N110
i
Accessoires compatibles
Accessoires compatibles
• Filtres à vis 62 mm (nous vous recommandons de retirer le parasoleil à
安装与拆卸
baïonnette HB-N110 (fourni) lorsque vous utilisez la bague rotative du
fi ltre polarisant circulaire II 62 mm)
请参阅照相机说明书。安装或取下镜头时,请确保已关
• Étui souple CL-N102
闭照相机并小心不要按下可伸缩镜头镜筒按钮。
• Fixation pour trépied TR-N100
使用之前
Caractéristiques
Caractéristiques
• Type : Objectif à monture 1
• Lamelles de diaphragme : 7
本镜头配备有一个可伸缩镜筒。使用照相机之前,请先
• Focale : 70–300 mm
(diaphragme circulaire)
通过按住可伸缩镜头镜筒按钮(图
• Ouverture maximale : f/4.5–5.6
• Diaphragme : Intégralement auto-
示旋转变焦环(图
• Construction optique : 16 lentilles en
matique
10 groupes (dont 1 lentille en verre
• Plage des ouvertures :
位置。
super ED et des lentilles bénéfi ciant
• Focale 70 mm : f/4.5 à f/16
•
d'un traitement nanocristal)
• Focale 300 mm : f/5.6 à f/16
• Angle de champ : 13°–3°
• Positions du commutateur de la limite
•
• Réduction de vibration : Décentrement
de mise au point : FULL et LIMIT (∞ –
avec voice coil motors (VCMs)
environ 7 m)
• Distance minimale de mise au point :
• Diamètre de fi xation pour fi ltre : 62 mm
)
• Focale 70 mm : 1,0 m à partir du plan
(P=0,75 mm)
focal
• Dimensions : Environ 73 mm de
变焦
• Focale 150 mm : 1,6 m à partir du
diamètre × 108 mm (distance à
使用变焦环进行放大或缩小。仅当焦距刻度位于
plan focal
partir du plan d'appui de la monture
• Focale 300 mm : 1,6 m à partir du
d'objectif de l'appareil photo
300mm
plan focal
lorsque l'objectif est rétracté)
• Poids : Environ 550 g
Nikon se réserve le droit de modifi er les caractéristiques du matériel décrit
dans ce manuel à tout moment et sans préavis.
中文版(简体)
对焦限制切换器
使用产品前请仔细阅读本使用说明书。
该切换器决定自动对焦的对焦距离极限值。
1
尼克尔
VR 70-300mm f/4.5-5.6
镜头。在使
FULL
: 选择该选项可使用整个对焦范围。
:若拍摄对象总是位于至少
LIMIT
尼克尔镜头专用于
可更换镜头电子取
1
Nikon 1
离处,推荐选择该选项。
倍的
2.7
请注意,某些照相机在选择了
LIMIT
格式镜头的视角。
围,而某些其他照相机可能需要先更新固件才可使用对
焦限制切换器。有关详细信息,请访问以下网站 :
中国大陆的用户 :
•
http://www.nikon.com.cn/
安全须知
美国用户 :
•
http://www.nikonusa.com/
欧洲与非洲用户 :
•
http://www.europe-nikon.com/support/
亚洲、大洋洲和中东用户 :
•
http://www.nikon-asia.com/
镜头遮光罩
表示若不遵守该项指示或操作不当,则有可能
A
警告
镜头遮光罩可保护镜头并阻挡可能导致杂光或鬼影的
造成人员死亡或负重伤的内容。
散射光线。
表示若不遵守该项指示或操作不当,则有可能造
A
注意
成人员伤害、以及有可能造成物品损害的内容。
■ 安装镜头遮光罩(使用时)
•
请如图
4
所示安装遮光罩。将镜头遮光罩锁定标记
图示和符号的实例
(—)与镜头上的焦距标记(
L
安装或取下遮光罩时,请在其底部的(
符号表示唤起注意(包括警告)的内容。在图示中或
•
I
图示附近标有具体的注意内容(左图之例为当心触电) 。
近将其握住,并避免握得太紧。
F
符号表示禁止(不允许进行)的行为。在图示中或
若未正确安装好遮光罩,则可能会产生渐晕。
•
E
图示附近标有具体的禁止内容 (左图之例为禁止拆解) 。
■ 安装镜头遮光罩(存放时)
D
符号表示强制执行(必需进行)的行为。在图示中或图
K
•
不使用时,可将遮光罩反转并固定在镜头上(图
示附近标有具体的强制执行内容(左图之例为取出电池) 。
使用闪光灯
A
警告
E
在某些对焦距离或拍摄距离下使用闪光灯拍摄的照片
切勿自行拆解、修理或改装。
中可能会出现渐晕(因镜头遮挡闪光灯光线所产生的阴
禁止拆解
否则将会造成触电、发生故障并导致受伤。
影)或边缘照度损失。
G
当产品由于跌落而破损使得内部外露时,切勿
其他设定
禁止触碰
用手触碰外露部分。
C
否则将会造成触电、或由于破损部分而导致受
请使用照相机进行以下操作 :
伤。取出照相机电池,并委托经销商或尼康授
立即委托
调整光圈
控制对焦
•
•
权的维修服务中心进行修理。
修理
选 择 减 震 模 式(
•
NORMAL/ACTIVE/OFF
当发现产品变热、冒烟或发出焦味等异常时,
光学减震菜单提供
NORMAL
和
K
请立刻取出照相机电池。
择
可在拍摄过程中增加显示屏或取景器中
NORMAL
取出电池
若在此情况下继续使用, 将会导致火灾或灼伤。
图像的稳定性(有关可用选项的信息,请参阅照相机
C
取出电池时,请小心勿被烫伤。取出电池,并
的说明书) 。一般情况下,当将本产品固定于三脚架
立即委托
委托经销商或尼康授权的维修服务中心进行修
时,
NORMAL
和
ACTIVE
都可以使用, 但在某些情况下,
修理
理。
根据拍摄环境和三脚架类型的不同,
切勿浸入水中或接触到水,或被雨水淋湿。
的选择。
J
否则将会引起火灾或触电等事故,或导致产品
手动对焦
禁止接触水
受损。
若要手动对焦,请在照相机上选择
切勿在有可能起火、爆炸的场所使用。
手动对焦(
)模式并旋转镜头
F
MF
在有丙烷气、汽油、可燃性喷雾剂等易燃性气
对焦环。显示屏中将出现放大的手
禁止使用
体、粉尘的场所使用产品,将会导致爆炸或火
动对焦显示(仅限于静态拍摄 ; 有
灾。
关详细信息,请参阅照相机的说明
F
切勿用镜头或照相机直接观看太阳或强光。
书) 。顺时针旋转对焦环可增加对
否则将会导致失明或视觉损伤。
禁止观看
焦距离,逆时针旋转则缩小。对焦
A
注意
指示显示近似对焦距离,导航窗口
则显示显示屏中可视画面部分的位置。若在设定的时间
I
切勿用湿手触碰。
内未执行任何操作,将取消放大显示。
当心触电
否则将有可能导致触电。
F
■ 在自动对焦模式下对焦
切勿在婴幼儿伸手可及之处保管产品。
禁止放置
否则将有可能导致受伤。
即使在自动对焦模式下,对焦也可通过旋转对焦环进行
进行逆光拍摄时, 务必使太阳充分偏离视角。
手动调整(
; 手动优先的自动对焦) 。在动画录制
M/A
A
阳光会在照相机内部聚焦, 并有可能导致火灾。
过程中微调对焦就是运用手动优先的一个例子。
太阳偏离视角的距离微小时,也有可能会导致
小心使用
若要在静态拍摄时使照相机对焦,请半按快门释放按钮
火灾。
使用自动对焦进行对焦,然后通过在半按住快门释放按
若在较长时间内不使用镜头,请确保盖好镜头
钮的同时旋转对焦环来调整对焦。完全按下快门释放按
A
盖并将其存放在没有阳光照射处。
钮即可拍摄照片。
妥善保存
阳光会聚焦,并有可能导致火灾。
手动对焦仅在当前拍摄模式支持时才可用 ; 有关详细
进行移动时,切勿将照相机或镜头安装在三脚
A
信息,请参阅照相机的说明书。
架上。
小心移动
摔倒、碰撞时将有可能导致受伤。
某些照相机可能需要进行固件升级才可使用对焦环。有
切勿放置于封闭的车辆中、直射阳光下或其他
关详细信息,请访问以下网站 :
F
异常高温之处。
•
中国大陆的用户 :
http://www.nikon.com.cn/
禁止放置
否则可能会导致产品受损或引起火灾。
•
美国用户 :
http://www.nikonusa.com/
•
欧洲与非洲用户 :
)
1
http://www.europe-nikon.com/support/
o
•
亚洲、大洋洲和中东用户 :
镜头遮光罩
CPU
接点
镜头遮光罩锁定标记
!0
对焦限制切换器
http://www.nikon-asia.com/
镜头遮光罩对齐标记
!1
焦距刻度
■ 使用三脚架
镜头遮光罩安装标记
!2
可伸缩镜头镜筒按钮
!3
使用三脚架时,请安装另购的
TR-N100
对焦环
三脚架固定座安装连接孔
变焦环
!4
三脚架固定座(另购)
请将三脚架安装至三脚架固定座而不是照相机。
焦距标记
!5
三脚架固定座安装螺丝
z 将三脚架固定座安装螺丝与镜头三脚架固定座安
镜头安装标记
!6
三脚架连接孔
装连接孔对齐(图
q) 。
6-
x 使用硬币或其他物体将三脚架固定座安装螺丝牢
牢旋紧(图
w) 。
6-
c 将三脚架安装至三脚架固定座上的三脚架连接孔
(图
e) 。
6-
✔ 重要事项
将本产品安装于三脚架之前,请先确认三脚架固定座
q)并同时如图所
2-
安装螺丝已牢固旋紧。若本产品意外松脱,将可能导
2-
w)以解除锁定并伸出镜头至拍摄
致受伤。
若要缩回镜头,请按住可伸缩镜头镜筒按钮并同时按
相反方向旋转变焦环直至其锁定。
镜头缩回时无法拍摄照片 ; 若因在镜头缩回时开启照
相机而导致屏幕中出现一条错误信息,请旋转变焦环
直至该信息消失。
70
至
之间(图
)时才可拍摄照片。
3
镜头保养
拿起或持握镜头或照相机时,切勿仅持拿镜头遮光罩。
•
保持
接点清洁。
•
CPU
的距
7m
用吹气球去除镜头表面的灰尘和浮屑。若要去除污点
•
和指纹,可使用一块滴有少许乙醇或镜头清洁剂的干
时不会限制对焦范
净软棉布或镜头清洁纸,以圆周运动方式从里向外进
行清洁。注意不要留下污渍,也不要用手指碰触玻璃。
切勿使用涂料稀释剂或苯等有机溶剂清洁镜头。
•
镜头遮光罩或
滤镜可用于保护前部镜头元件。
•
NC
不使用镜头时,请盖上镜头前后盖。
•
•
若在较长时间内不使用镜头,请将其存放在阴凉干燥
的地方以防止发霉和生锈。切不可存放在直射阳光下,
也不可与石脑油或樟脑丸一起存放。
保持镜头干燥。内部构造生锈将导致无法挽回的损坏。
•
将镜头放置在过于炎热的地方将会使强化塑料部件受
•
损或变形。
•
运输产品时,请在包装箱内装入足够多的缓冲材料,
以减少(避免)由于冲击导致产品损坏。
随附配件
• 62mm
搭扣式镜头前盖
LC-N62
)对齐(图
e) 。
4-
•
镜头后盖
LF-N1000
)符号附
•
卡口式镜头遮光罩
HB-N110
兼容的配件
旋入式滤镜(操作圆形偏振滤镜
上的
• 62mm
II 62mm
旋转环时,建议您取下附送的
卡口式镜头遮
HB-N110
5
) 。
光罩)
镜头软套
•
CL-N102
三脚架固定座
•
TR-N100
技术规格
类型 :
卡口镜头
•
1
焦距 :
•
70–300mm
最大光圈 :
•
f/4.5–5.6
•
镜头结构 :
10
组
16
片(包括
1
枚超级
ED
镜片组件以
及带纳米结晶涂层的镜片组件)
) 。 若 照 相 机
视角 :
ACTIVE
供您选择,选
•
13
°
–3
°
减震 : 使用音圈马达(
)的镜头位移
•
VCM
•
最近对焦距离 :
焦距 :
(至焦平面)
• 70mm
1.0m
焦距 :
(至焦平面)
• 150mm
1.6m
可能是更好
焦距 :
(至焦平面)
OFF
• 300mm
1.6m
•
光圈叶片 :
7
片(圆形光圈孔)
光圈 : 全自动
•
光圈范围 :
•
对焦指示
焦距 :
至
• 70mm
f/4.5
f/16
• 300mm
焦距 :
f/5.6
至
f/16
对焦限制切换器位置 :
和
(∞至约
)
•
FULL
LIMIT
7m
滤镜附件尺寸 :
(
)
•
62mm
P=0.75mm
尺寸 : 约
(直径)×
(缩回镜头时,从
•
73mm
108mm
照相机镜头卡口边缘开始的距离)
导航窗口
重量 : 约
•
550g
尼康公司保留可随时更改说明书内载之硬件技术规格
的权利,而无须事先通知。
三脚架固定座。
Advertisement

Related Manuals for Nikon 1 NIKKOR VR 70-300mm f/4.5-5.6


Summary of Contents for Nikon 1 NIKKOR VR 70-300mm f/4.5-5.6
- Page 1 Indicateur de mise 亚洲、大洋洲和中东用户 : 也不可与石脑油或樟脑丸一起存放。 teur et confi ez le produit à un centre Nikon agréé pour le faire vérifi er. • • Turn the camera off immediately in the event of malfunction. Should you ing the focus ring (M/A; autofocus with manual override). One ex- ment, sélectionnez le mode de mise au point...
- Page 2 • ×2.7 35 mm 用吹氣球去除鏡頭表面的灰塵和浮屑。若要去除污點和指紋,可使 • Catatan: Lensa 1 NIKKOR adalah khusus diperuntukkan bagi Nikon 1 kamera cincin fokus lensanya. Tampilan fokus manual 安全須知 用一塊滴有少許乙醇或鏡頭清潔劑的乾淨軟棉布或鏡頭清潔紙,以 digital dengan format lensa yang bisa dipertukarkan. Sudut gambar perbesaran akan muncul di monitor (fotografi...
Need help?
Do you have a question about the 1 NIKKOR VR 70-300mm f/4.5-5.6 and is the answer not in the manual?
Questions and answers