Table of Contents

Related Manuals for Burmester 089


Summary of Contents for Burmester 089
- Page 1 OWNER´S MANUAL TOP LINE CD PLAYER HIGH END MADE IN GERMANY BURMESTER AUDIOSYSTEME GMBH • KOLONNENSTR. 30G • 10829 BERLIN • GERMANY TEL +49/(0)30/78 79 68 – 0 • FAX +49/(0)30/78 79 68 – 68 • E-MAIL: mail@burmester.de • www.burmester.de...
- Page 2 VERSION 1.0 from 4/6/2009...
- Page 3 Dear Audiophile, Thank you for choosing this Burmester audio component. We sincerely appreciate your trust in us. You have purchased a unit which excels in musical fidelity and combines uncompromising manufacturing quality with technical innovation and the highest degree of operating flexibility.
-
Page 4: Table Of Contents
T A B L E O F C O N T E N T S UNPACKING AND SETTING UP FUNCTIONAL OVERVIEW OF CD PLAYER UNIT FRONT PANEL REAR PANEL FIRST STARTUP CONNECTIONS HOOKUP TO AN ANALOG AMPLIFIER HOOKUP TO A DIGITAL AMPLIFIER HOOKUP OF A DIGITAL SOURCE COMPONENT HOOKUP OF AN ANALOG SOURCE COMPONENT ADDITIONAL CONNECTIONS... -
Page 5: Unpacking And Setting Up
UNPACKING AND SETTING UP CAUTION: The CD player 089 is shipped inside a plastic protective cover. Make sure that children do not play with it to avoid the danger of suffocation. Unpacking To avoid damaging the housing, please do not use pointed or sharp tools to open the box. -
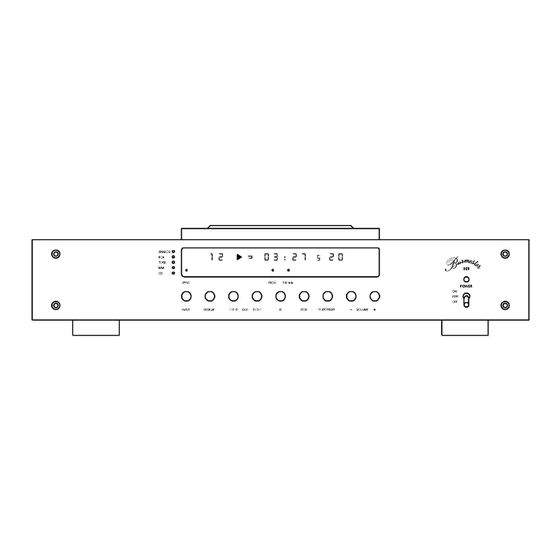
Page 6: Functional Overview Of Cd Player Unit
FUNCTIONAL OVERVIEW OF CD PLAYER UNIT FRONT PANEL Sliding cover (13) SKIP >>| button for selecting the next INPUT LEDs indicate the selected input tracks SYNC LED indicates a correct data stream input (14) PROGRAM LED illuminates when a music TRACK display indicates the current track program has been selected and saved OPERATING MODE display... -
Page 7: Rear Panel
FUNCTIONAL OVERVIEW OF CD PLAYER UNIT REAR PANEL (23) BURLINK interface RS-232 with check LEDs (33) Digital audio output RCA (75 ) (24) BURLINK interface USB with check LEDs (34) Digital audio input TORX (25) MMI slot for future upgrades for optical fiber cables (26) Analog audio input right channel (bal.) -
Page 8: First Startup
FIRST STARTUP CAUTION: Before connecting the unit, please check if the input voltage data on the rear panel, underneath the AC mains terminal (29) is equal to the local voltage of your wall outlet. Make sure the ground lead in your power outlet is working correctly. -
Page 9: Connections
CAUTION: Before connecting the unit, please check if the input voltage of the 089 is equal to the local voltage of your wall outlet. Make sure the ground lead in your power outlet is working correctly. A missing or faulty ground is extremely dangerous! In case of doubt contact a licensed electrician. -
Page 10: Hookup Of A Digital Source Component
REMOTE Connecting DC OUT (30) to the corresponding DC IN jack of another BURMESTER-unit offers to switch on or off this other unit simultaneous by the 089. In this case, the 089 has the master function. Connecting DC IN (31) to the corresponding DC OUT jack of another BURMESTER-unit offers to switch on or off the 089 simultaneous by the other unit. -
Page 11: Operating Controls
In operating mode (ON) the POWER LED (22) lights up red and all functions of the CD player are activated. PLEASE NOTE: Always switch off the 089 with the POWER switch first before bringing the AC mains switch into OFF position. -
Page 12: The Function Indicators
THE FUNCTION INDICATORS POWER LED The POWER LED (22) of the CD player lights up orange, if the CD player is in standby mode. The LED lights up red, when the unit is switched on. AUDIO LED The AUDIO LED (16) illuminates, when the internal sample rate of the D/A converter is switched to 192kHz. -
Page 13: System Setup
SYSTEM SETUP The SYSTEM SETUP menu of the CD player 089 allows the easy programming of certain basic settings. All settings of the SYSTEM SETUP will be saved automatically after leaving the SETUP and remain after switching off the unit. -
Page 14: Short Description Of The Menu Items
SHORT DESCRIPTION OF THE MENU ITEMS MENU ITEM SHAORT DESCRIPTION DEFAULT The CD player automatically starts playback of the CD AUTO after switching on (ON) or not (OFF) You can choose between defined (FIX) or adjustable OUTPUT VARIABLE (VARIABLE) output level of the analog outputs. After switching on it shows the type and the serial SERIAL-NR. -
Page 15: Description Of The Menu Items Of The System Setup
OUTPUT is set to VARIABLE. The setting range is between volume level 01 to the maximum of 20. If set to LAST, the 089 remembers the last volume right before turning off the device, limiting the value to 20 for safety reasons. -
Page 16: Remote Control
REMOTE CONTROL POWER The POWER button switches the CD player on or off, provided the Mains switch is set to ON and the power switch on the front panel is set to STBY. Pressing the DIM button varies the brightness of the alphanumeric display in four steps between “max. - Page 17 CD. Confirming the SETUP DEFAULT item resets the device to factory setting. CLEAR With the button CLEAR you can delete a favorite track program. All other buttons of the remote control have no functions in respect to the 089.
-
Page 18: Programming A Favourite Track Selection Of A Cd
PROGRAMMING A FAVOURITE TRACK SELECTION OF A CD A total of 50 tracks from a CD can be programmed for playback in a selected order. Programming can only be done using the remote control. The program plays the tracks in the selected order. Activating the To start the program function, press the PROGR. -
Page 19: Burlink
WINDOWS 2000 or WINDOWS XP operating system. COMMANDS Following are listed the possible commands to control the CD player 089. All commands needs to be sent in capital letters finished with a “carriage return“ \r . POWON\r... -
Page 20: General Instructions
For the cleanest power supply we recommend our triple-shielded power cord BURMESTER- POWER. IR receiver The IR receiver receives signals from the BURMESTER remote control and must not be covered up by objects. Heat development Be careful when touching the housing – it may get quite warm during operation. - Page 21 Lightening strikes During the summer months, malfunctions often occur due to voltage spikes in the power lines after lightning strikes. Completely unplugging the power cord offers the only effective protection. Merely switching the unit off does not suffice since voltage spikes are able to arc over separated contacts.
-
Page 22: Technical Specifications
TECHNICAL SPECIFICATIONS Dimensions (W x H x D) 482 x 112 x 331 mm (17.7 x 6.3 x 13.4 inches) with opened sliding cover 482 x 112 x 376 mm (17.7 x 6.3 x 14.8 inches) Weight app. 11,5kg (app. 25.3 lbs) Mains voltage and fuses for 200V - 240V 50/60Hz 1 x slow 50mA E, 1 x slow 1A E...
Need help?
Do you have a question about the 089 and is the answer not in the manual?
Questions and answers