Table of Contents
Advertisement
Quick Links
Advertisement
Table of Contents

Related Manuals for TOWA SX-590


Summary of Contents for TOWA SX-590
- Page 1 SX-590 Instruction Manual...
- Page 2 NOTICE NOTICE The information and specifications in this manual are subject to change without notice. While every precaution has been taken to make this manual accurate, the Manufacturer shall not be liable for any errors or omissions, not for any damages resulting from the use of the information herein. This manual may not be copied or transmitted by any means, in whole or in part, without prior written consent from the Manufacturer.
- Page 3 INTRODUCTION INTRODUCTION We very much appreciate your purchase of this cash register. This cash register is equipped with function keys which allow you to program and use various functions and with numeric keys for entering numbers. This manual explains the methods for programming and entering transactions with this cash register and it describes precaution and accessory items necessary to use it.
-
Page 4: Table Of Contents
CONTENTS CONTENTS 1. BEFORE STARTING OPERATIONS.........................1 1.1 GENERAL SPECIFICATIONS ......................1 1.2 PRECAUTIONS ..........................1 1.3 PART NAMES AND FUNCTIONS ...................... 2 1) EXTERNAL VIEW ........................... 2 2) THE CONTROL LOCK ..........................3 3) CONTROL KEYS............................. 3 4) CASH DRAWER WITH LOCK ........................ 3 5) KEYBOARD............................. - Page 5 CONTENTS TO USE CLERK NUMBERS........................28 3.10 ROUNDING METHOD FOR FINALIZING AMOUNT................ 29 3.11 MANAGER PASSWORDS....................... 29 TO PROGRAM THE "X" MANAGER PASSWORD.................. 29 TO PROGRAM THE “P/Z” MANAGER PASSWORD ................30 TO USE THE MANAGER PASSWORD....................30 3.12 TRAINING MODE AND TRAINING PASSWORD................31 TO PROGRAM THE TRAINING PASSWORD..................
- Page 6 CONTENTS MULTIPLYING BY A FRACTION....................70 MULTIPLICATION SALE ........................ 70 REGISTERING A DEPARTMENT UNIT PRICE ................71 MULTIPLICATION OF A DEPARTMENT UNIT PRICE..............71 DEPARTMENT ..........................71 RECEIVED-ON-ACCOUNT SALE ....................71 PAID-OUT SALE..........................71 RETURN SALE ..........................72 MINUS [ - ] SALE: ........................... 72 MINUS PERCENTAGE DISCOUNT SALE: ...................
- Page 7 CONTENTS TO TAKE A FULL REPORT........................89 TO TAKE A WEEKLY OR MONTHLY FULL REPORT ................89 TO TAKE A TRAINING FULL REPORT ....................90 TO TAKE A TRAINING WEEKLY OR MONTHLY FULL REPORT............90 6. MAINTENANCE..............................92 CLEANING YOUR CASH REGISTER ....................92 OPENING THE DRAWER MANUALLY ....................
-
Page 8: Overview Of Steps Required To Use This Cash Register
OVERVIEW OF STEPS REQUIRED TO USE THIS CASH REGISTER OVERVIEW OF STEPS REQUIRED TO USE THIS CASH REGISTER 1) UNDERSTAND YOUR CASH REGISTER. Before using your cash register, check the specifications and part names, and confirm the precautions for using it. 1 : BEFORE STARTING OPERATIONS 2) INITIALIZE THE CASH REGISTER. -
Page 9: Before Starting Operations
GENERAL SPECIFICATIONS 1. BEFORE STARTING OPERATIONS 1.1 GENERAL SPECIFICATIONS Item Description Power source AC100~117VAC,220~240VAC±10% Power consumption 35W(maximum) 0°C to 40°C ( 32°F to 104°F ) Ambient operating temperature Memory C-MOS RAM Memory back-up time Approx. 700 hours Printer 2 station Thermal Printer Printing speed Approx. -
Page 10: Part Names And Functions
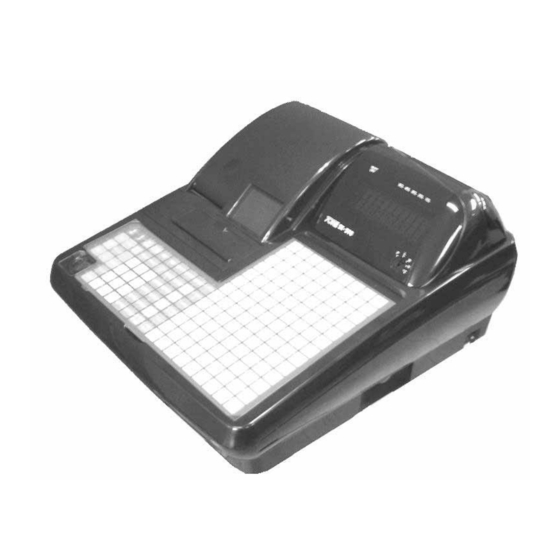
EXTERNAL VIEW 1.3 PART NAMES AND FUNCTIONS This section shows part names and describes the function of each part of the cash register. 1) EXTERNAL VIEW Part name Functions 1. Printer Cover This cover protects the printer. 2. Receipt Dispenser This is where the receipt comes out. -
Page 11: The Control Lock
CONTROL LOCK 2) THE CONTROL LOCK Located at the right of the operating area, the Control Lock is a switch that places the cash register into its several operating modes. These modes are: Program Mode (P): The position is used to set and change your individualized programming for register operations. -
Page 12: Keyboard
KEYBOARD 5) KEYBOARD The figures below show the standard keyboards for this cash register. FLAT KEYBOARD 28 24 6) KEYBOARD FUNCTIONS The following key functions are primarily for cash register entries in R mode. Several keys also have other functions in the P, X and Z modes which are explained further in the manual. Receipt Feed Key [RF] is used to advance the receipt paper. - Page 13 KEYBOARD Paid-Out Key [PO] is used to register dollar amounts taken out of the cash drawer that are not part of a sales transaction; i.e., petty cash. Received-On-Account Key [RA] is used to register dollar amounts placed in the cash drawer that are not part of a sales transaction or used to register payments made to a customer's charge account or to declare the starting amount of cash in the drawer for the day.
- Page 14 KEYBOARD Minus Key [–] is used to subtract a specific amount from an individual item. This is also known as A Mark-Down key. Charge Key [CHRG] is used to finalize a transaction paid by a credit card or can be used to denote an in-house charge.
-
Page 15: Display
DISPLAY 7) DISPLAY Operator Displays Your cash register provides two (10-digit capacity) displays, 1 line alpha and 1 line numeric which feature large, easy to read fluorescent digits for easy operator viewing. The operator display is located at the top front of the machine and is your visual guide to the inner workings of the cash register. -
Page 16: Printer
PRINTER 9) PRINTER The figure below shows the printer with the printer cover removed. Part Names Functions Journal location The paper roll for record keeping (the journal) is located here. Receipt location The paper roll for receipts is located here. Prints the characters and graphic logos on the receipt and Print-head unit Journal. -
Page 17: Setting Up
INTIALIZING 2. SETTING UP 2.1 INITIALIZING 1. Locate on level surface – Before operating the cash register, be sure it is placed on a level surface to permit smooth operation of the register cash drawer. 2. This cash register operates on any standard electrical outlet . It is recommended that the cash register be connected to an electrical circuit where no other electrical device or appliance is connected which may overload the circuit or cause electrical interference with the cash register. -
Page 18: Installing The Paper Roll
INSTALLING THE PAPER ROLL 2.2 INSTALLING THE PAPER ROLL Your cash register features a thermal printer which uses two rolls of 58mm standard thermal paper; one roll (left side) is for the customer receipt and the other roll is for the journal record (right side). If a customer receipt is not required, a paper saving option is available by pressing the [ON/OFF] key on the keyboard. - Page 19 INSTALLING THE PAPER ROLL 7.Load the take-up reel into the support. 8.Press the JF (Journal feed) key (See Fig. 4). 9.Close the printer cover. Fig.4 2.5 REMOVING THE PAPER ROLL FOR THE RECEIPT 1. Open the printer cover. 2. Push the platen release button (left). (See Fig. 2) 3.
-
Page 20: Programming
IPROGRAMMING 3. PROGRAMMING 3.1 DATE / TIME / MACHINE NUMBER TO PROGRAM THE DATE The Date is designed to roll over automatically every day and prints in a specific format. Extra Option: If desired, a procedure is offered to eliminate the date from printing on the transaction receipts, for details see Flag 24. -
Page 21: Transaction Number Preset
TRANSACTION NUMBER PRESET 3.2 TRANSACTION NUMBER PRESET Transaction Number Preset allows you to choose a beginning transaction number of your own. The Transaction Number normally begins with the number 000001 and counts up consecutively until a "Z" Report is taken; thereafter it resets back to 000001. Transaction Number Preset can also be used to re- enter the last transaction number in the event information is lost. -
Page 22: To Program Department By Using Ent Key & Dpt# Key
DEPERTMENT PROGRAMMING TO PROGRAM DEPARTMENT BY USING ENT KEY & DPT# KEY Flag (N1) (N2) (N3) (N4) (N5) (N6) (N7) (N8) (N9) TTL. digits (Preset Price) ENT RLS 8 digits ( n n ) DPT# 2 digits (Department Name) CHECK STUB characters (Max.) NOTE: *... - Page 23 DEPERTMENT PROGRAMMING N4: Gallonage Mode 1 digit Each department can be set for either Standard Mode or Gallonage Mode. Gallonage Mode allows the entry of a price with 3 decimal places, representing the cost per gallon, i.e., 1.419 per gallon. Standard Mode enters the price using the normal 2 decimal place setting.
- Page 24 DEPERTMENT PROGRAMMING Tax Status Number Condition Non-Taxable (used when you do not wish to charge tax) Taxable by Tax 1 Taxable by Tax 2 Taxable by Tax 1 and Tax 2 Taxable by Tax 3 Taxable by Tax 1 and Tax 3 Taxable by Tax 2 and Tax 3 Taxable by TAX 1, TAX 2 and TAX 3 Taxable by Tax 4...
-
Page 25: Price Look-Up (Plu)
PRICE LOOK-UP (PLU) 3.4 PRICE LOOK-UP (PLU) A TOTAL of 8000 Price Look Up codes (PLUs) are available on this cash register. Each PLU can be programmed with a 16 character description that will print on the tape. The Price-Look Up system allows for fast, accurate entry of an item and automatically records the number of items sold. -
Page 26: To Search A Vacant Plu Number
PRICE LOOK-UP (PLU) Bar Code The maximum of 14-digit Bar Code can be registered by inputting through K/B and depressing RA key, or, by reading it using the Bar Code Reader and then you can proceed to the next step. If you do not use a barcode reader for registration, in other words, if you use PLU number (from 1 to 8000) only, the steps of (barcode) and RA key can be skipped. -
Page 27: To Delete Plu Data
PRICE LOOK-UP (PLU) “PLU 101” is displayed. Continuously, PLU 101 can be programmed. TO DELETE PLU DATA To delete the data of designated PLU number (in 1 – 8000) that has been programmed. Control Lock: P position ( PLU # ) ENT RLS ( 0 ) DPT#... -
Page 28: Tax Programming
TAX PROGRAMMING Price change xx PLU aaaaaaaa DPT# CLR (xx: absolute number, bar code # or scan the product) Name change xx PLU DPT# nnnnnnnnnnnnnnnn CHECK CLR If the department key to which you want to link is not located on keyboard, press PLU/ENT In put the Department number. -
Page 29: To Program The Add-On Tax Rate
TAX PROGRAMMING ( Tax Rate ) 6 digits (Max.) ( Tax Limit Amount ) 6 digits (Max.) TO PROGRAM THE ADD-ON TAX RATE Control Lock: P position ( TAX # ) ( TAX MODE ) CHRG 1 digit 1 digit Add on TAX 1 : Add on TAX 2 : Add on TAX 3 :... -
Page 30: To Program Tax Table Rate
TAX PROGRAMMING ( Tax Limit Amount ) 6 digits (Max.) Example: To program the TAX2 VAT of tax rate 10% . CHRG. TTL. ( Tax Limit Amount ) 6 digits (Max.) * Tax Limit Amount : If Tax Limit Amount is not necessary , press 2 nd TOTAL key directly. TO PROGRAM TAX TABLE RATE Control Lock: P position... -
Page 31: Minus [ - ]
MINUS [ - ] 3.6 MINUS [ - ] The Minus [ - ] key is used to subtract a specific amount from an individual item. This function can be performed in the middle of a transaction or by itself in a transaction. The programming of the Minus key consists of two steps;... - Page 32 MINUS [ - ] Taxable by TAX1 Used to charge the TAX 1 rate on the discounted amount of an item (the amount after the coupon is deducted). Taxable by TAX 2 Used to charge the TAX 2 rate on the discounted amount of an item (the amount after the coupon is deducted).
-
Page 33: Plus Percentage
PLUS PERCENTAGE Example: Preset: HDLO # ( 7 digits ) Tax Status # : 01 ( TAX1 ) Preset Discount Amount : $ 2.50 Control Lock: P position 3.7 PLUS PERCENTAGE Plus Percentage +% is used to add a percentage rate such as a service charge or gratuity to an individual item. -
Page 34: Minus Percentage Discount
MINUS [-] PERCENTAGE Taxable Tax 1 and Tax 4 Taxable Tax 2 and Tax 4 Taxable Tax 1 and Tax 2 and Tax Rate 4 Taxable Tax 3 and Tax 4 Taxable Tax 1 and Tax 3 and Tax 4 Taxable Tax 2 and Tax 3 and Tax 4 Taxable Tax 1 and Tax 2 and Tax 3 and Tax 4 Percentage Rate:... -
Page 35: Clerk Numbers
CLERK NUMBERS Taxable Tax 1 Taxable Tax 2 Taxable Tax 1 and Tax 2 Taxable Tax 3 Taxable Tax 1 and Tax 3 Taxable Tax 2 and Tax 3 Taxable Tax 1 and Tax 2 and Tax 3 Taxable Tax 4 Taxable Tax 1 and Tax 4 Taxable Tax 2 and Tax 4 Taxable Tax 1 and Tax 2 and Tax Rate 4... -
Page 36: To Program A Clerk Name
CLERK NUMBERS Example: For Clerk #1, Password # is 234: CASH TEND CLK ID. TO PROGRAM A CLERK NAME Control Lock: P position ( Clerk # ) RET. ( Clerk Name ) CHECK STUB 24 characters ( Max.) Example: For Clerk #1, program name as SALLY SMITH: RET. -
Page 37: Rounding Method For Finalizing Amount
ROUNDING METHOD FOR FINALIZING AMOUNT 3.10 ROUNDING METHOD FOR FINALIZING AMOUNT Your cash register allows you to select the method used for rounding when a sales transaction is finished. There are five methods for rounding: rounding up, rounding (If the 0.00 is displayed and printed, 0.01 to 0.04 becomes 0.00, 0.05 to 0.09 becomes 0.10).round down, the Swiss method and the Danish method. -
Page 38: To Program The "P/Z" Manager Password
MANAGER PASSWORD Control Lock: P position CASH TEND. (Manager Password #) TTL. 4 digits Example: If the "X" password is 1212 : CASH TEND. TTL. TO PROGRAM THE “P/Z” MANAGER PASSWORD CAUTION: Please write your passwords down in a safe place. If the passwords are forgotten, a SYSTEM CLEAR procedure will be necessary. -
Page 39: Training Mode And Training Password
TRAINNING MODE 3.12 TRAINING MODE AND TRAINING PASSWORD The optional Training Mode is designed to help you become better acquainted with the register mode and offers an ideal place for "beginners" and new employees to practice transaction examples. Once the Training Mode is activated, there is no access to any operations in the "P", "X", or "Z"... -
Page 40: Password For The Operation Of The Void, Ret
PASSWORD : Enter “the training password number “ and press the CHRG key. : Turn the Control Lock to the “R” position. : Resume the normal operation. NOTE: The Training Mode indicator (a small arrow point) will be lost lighting. To take a training report, enter the training password number at “X”... -
Page 41: Grand Total Preset
GRAND TOTAL PRESET 3.14 GRAND TOTAL PRESET The Grand TOTAL is located at the bottom of your "Z" Report. The Grand TOTAL is the only figure that does not reset back to zero after taking a "Z" Report. It is commonly known as the "running grand TOTAL". However, if you wish, you can reset the Grand TOTAL to zero or assign it a specific value. -
Page 42: To Program The X1 Counter Number
X1 AND X2 /Z1and Z2 COUNTER PRESETPRESET procedure is performed (which resets all data to zero), the "X" Counter Preset feature will also allow you to re-enter the previous "X" Counter Number. TO PROGRAM THE X1 COUNTER NUMBER Control Lock: P position ( X1 COUNTER # ) 6 digit # Example: To program the X1 Counter for the number 000098:... -
Page 43: To Program The Z2 Counter Number
DRAWER OPEN ALAM TIMER DELAY TO PROGRAM THE Z2 COUNTER NUMBER Control Lock: P position ( Z2 COUNTER # ) 6 digit # Example: To program the Z2 Counter for the number 000100: 3.17 DRAWER OPEN ALARM TIMER DELAY Programming second until an alarm is given when the drawer is kept open after the transaction. (Unit : second, max. -
Page 44: Age Verification
AGE VERRIFICATION 3.19 AGE VERIFICATION This Age Verification is to verify the full age or non-age of the customer to buy the item, by entering his (her) birth date. At the time with setting of Age Table, you can preset a Age Flag: N1 to necessary Departments. Age Table can be categorized to 3 kinds, and be numbered from 1 to 3. -
Page 45: Programming Alphanumeric Descriptions
PROGRAMMING ALPHANUMERIC DESCRIPTIONS 3.21 PROGRAMMING ALPHANUMERIC DESCRIPTIONS General Information: When programming the alpha descriptions for Departments, PLUs, Clerks and the Store Name/Logo Message and Commercial Messages, it is recommended to use the Alpha keyboard (shown below). The department keys are clearly labeled with all the letters needed to program these descriptions. -
Page 46: Wide Characters
SPORTSWEAR CHECK STUB key to finalize. PROGRAMMING ALPHANUMERIC DESCRIPTIONS HE FOLLOWING OUTLINES THE MAXIMUM NUMBER OF CHARACTERS THAT CAN BE PROGRAMMED FOR EACH ITEM DESCRIPTION DEPERTMENT - 16 Characters - 16 Characters CLERK NAME - 24 Characters STORE LOGO/HEADER - 24 Characters each COMMERCIAL MESSAGE - 24 Characters SCROLL MESSAGE... - Page 47 PROGRAMMING ALPHANUMERIC DESCRIPTIONS ALPHANUMERIC CODE CHART Character Code # Character Code # Character Code # Space Wide Character & , (comma) ; (semi-colon) > '(apostrophe) " < Special Language Characters ¡ ¿ á é í ó ú Ä Û Ö Ï...
- Page 48 PROGRAMMING ALPHANUMERIC DESCRIPTIONS In addition to Alphanumeric Code Chart in the previous page, the following chart is also available for programming. You may have some difficulty to display the characters in the chart because of special characters though there is no problem in printing. Character Code # Character Code #...
-
Page 49: Program Store Logo/Commercial Message
PROGRAM STORE LOGO/COMMERCIAL MESSAGE 3.22 PROGRAM STORE LOGO/COMMERCIAL MESSAGE The following outlines the maximum number of characters that can be programmed for each item description. STORE LOGO/HEADER 9 Lines (24 Characters* each) COMMERCIAL MESSAGE 9 Lines (24 Characters* each) LOGO MESSAGE A 9 line store header can be programmed to print on customer receipts. - Page 50 PROGRAM STORE LOGO/COMMERCIAL MESSAGE 2nd: [ YOUR RECEIPT ( space x 5times YOUR space x 2 times RECEIPT space x 6times ) CHECK STUB 3rd: [ T h a n k Y o u ( Wide Character : Code 01 ) ] ( space x 3times , 01, T , 01 , h , 01 , a , 01 , n , 01 , k , space x 2 times, 01 , Y , 01 , o , 01 , u , space x 3times ) CHECK...
-
Page 51: Scroll Messages
SCROLL MESSAGE 1) Total Line: 2 Lines is selected. Message: : [ TUESDAY IS 10% OFF DAY! ] ( TUESDAY IS 10% OFF DAY! ) CHECK STUB STOCK UP AND SAVE ( STOCK UP AND SAVE CHECK STUB 3.23 SCROLL MESSAGES The following outlines the types of scrolling messages that can be programmed: OFF message –... -
Page 52: Program Scroll Display Settings
SCROLL MESSAGE ( Message ) CHECK STUB 42 characters (max) To program the IDLE(Scroll Message #4 or 5) message: ( Message ) CHECK STUB 42 characters (max) PROGRAM SCROLL DISPLAY SETTINGS: Control Lock: P position ( n ) CHRG. 1 - 4 : 01 - 99 5, 6, 7 : 0 - 9... -
Page 53: Scroll Messages Pattern
SCROLL MESSAGE Idle message 2: SCROLL FLAG(Selection of idle message patterns.) Setting to 0 will run Idle message 1 in the AM and Idle message 2 in the PM. Setting to 1 will combine the two Idle messages and run both in AM and PM. Settings: 0 –... -
Page 54: Programmable Keyboard
PROGRAMMABLE KEYBOARD 3.24 PROGRAMMABLE KEYBOARD All the keys except the feed key can be changed their functions. The change can be done according to the following steps: Control Lock: P position 1) Input the location number of the key to be changed. 2) Input the code of function to be installed to the location number. - Page 55 PROGRAMMABLE KEYBOARD KEY CODE FUNCTION NO.1 Code Function Code Function Code Function Code Function PLU21 PLU22 PLU23 PLU24 PLU25 PLU26 PRICE PLU27 PLU28 PLU29 PLU30 PLU31 PLU SHIFT PLU32 ・ CANCEL PLU33 CLEAR PLU34 PLU ENT PLU35 PLU36 CASH PLU37 CHECK PLU38 CHARGE...
- Page 56 PROGRAMMABLE KEYBOARD NO.2 Code Function Code Function Code Function Code Function PLU71 PLU86 PLU 101 PLU 116 PLU72 PLU87 PLU 102 PLU 117 PLU73 PLU88 PLU 103 PLU 118 PLU74 PLU89 PLU 104 PLU 119 PLU75 PLU90 PLU 105 PLU 120 PLU76 PLU91 PLU 106...
-
Page 57: Transaction Words
TRANSACTION WORDS 3.25 TRANSACTION WORDS Transaction words are linked to the function keys and they are printed on receipts and reports. The length of transaction word is limited up to eight regular size characters or four double size characters. They can be changed to desired words very easily. TO PROGRAM THE TRANSACTION WORDS Control Lock: P position ( Transaction Word # ) - Page 58 TRANSACTION WORDS Transaction Words (English) Transaction Word Function DEPT TTL Department TOTAL NOTXBL Non-taxable TXBL-1 Taxable 1 TXBL-2 Taxable 2 TXBL-3 Taxable 3 TXBL-4 Taxable 4 TAX-1 Tax 1 Amount TAX-2 Tax 2 Amount TAX-3 Tax 3 Amount TAX-4 Tax 4 Amount (Not used.
- Page 59 TRANSACTION WORDS TAXTOTAL Tax TOTAL NET-TAX Net Amount – Tax DEPT GRP Department Group RPRT CNT Report Counter SUB-TTL Sub-TOTAL CHANGE Change -VOID- Void RETURN Return ITEM CT Item Count Net Sales Received on account Paid out (Not used. Do not change.) Foreign Currency # Foreign Currency 1 Foreign Currency 2...
-
Page 60: Foreign Currency
FOREIGN CURRENCY 3.26 FOREIGN CURRENCY This function is used to enable sales of merchandize in Foreign Currency. (Refer to 3.27 Flag Options.) REQUIRED FLAG SETTINGS TO USE FOREIGN CURRENCY FUNCTION a) Set Flag 91 to 1 [= Enable to change the Key Layout (programmable keyboard)]. b) Set the following Flags according to your needs: Flag 94 through 101 PROGRAMMING FC EXCHANGE RATE Key operation: (9) (n) (p) (x x x x x x x x) -
Page 61: Flag Options
FLAG OPTIONS 3.27 FLAG OPTIONS A TOTAL of 116 system programming options (known as FLAGS) are offered on this cash register. They are preset at the factory to accommodate the most commonly used selections. Each flag option can be changed or updated at any time as needed. NOTE: Bold writing FLAGS have been factory preset as default settings. - Page 62 FLAG OPTIONS Rounding Position For Tax Calculations Select the first digit in the decimal to be rounded in tax calculations. Select the last digit in the decimal to be rounded in tax calculations. First enter the quantity, and then enter the price. First enter the price, and then enter the quantity.
- Page 63 FLAG OPTIONS 0 Line 1 Line 2 Line 3 Line 4 Line 5 Line 6 Line 7 Line 8 Line 9 Line Print the time on the receipt / journal. Do not print the date on the journal at Registration mode. Print the date on the receipt / journal at Registration mode.
- Page 64 FLAG OPTIONS Print the grand total amount on the reports. Do not print the grand total amount on the reports. Print the total sales for departments on the reports. Do not print the total sales for departments on the reports. Non - Taxable total Print non-taxable total on reports.
- Page 65 FLAG OPTIONS Price zero entry causes an error. Price zero entry can be accepted. Do not require the amount received from a customer and the calculation of the change. Require the amount received from a customer to be registered. Prohibit tendering. Enable registering transactions which more than one media is received, for example, cash and a check (split tendering).
- Page 66 FLAG OPTIONS Transaction Counter does not count up while in the Training Mode. Transaction Counter does count up while in the Training Mode. SI/O 1 ( COMA ) Chosen option numbers of Flag # 73 and # 77 must be different each other. SI/O 1 Peripheral Barcode Scanner SI/O 1 Parity Check...
- Page 67 FLAG OPTIONS Add tax 2 to tax 1 Add tax 3 to tax 1 Add tax 4 to tax 1 Food Stamp for USA Enable Food Stamp Function Food Stamp Account Food Stamp Debit (Food stamp account less than $ available) Food Stamp Non Taxable Taxable...
- Page 68 FLAG OPTIONS Do not print the tax amount exchanged to FC1. Print the tax amount exchanged to FC1. Do not print the exchanged amounts to FC1 on reports Print the exchanged amounts to FC1 on reports. Use ‘FC2’ and ‘FC3’ as is. Use ‘FC2’...
- Page 69 FLAG OPTIONS Amount received by charge/card 0 = Disable entering an amount received from a customer by Charge/Card which is more than the total amount. 1 = Enable entering an amount received from a customer by Charge/Card which is more than the total amount.
-
Page 70: Program Confirmation List
PROGRAM CONFIRMATION LIST 3.28 PROGRAM CONFIRMATION LIST The Program Confirmation Report allows you to check your programming results. A BASIC PRESET PROGRAM LIST Control Lock: P position CASH TEND The following illustrates the Program Confirmation List. ************************ YOUR RECEIPT Thank You Call again ************************ BASIC PRESET... - Page 71 PROGRAM CONFIRMATION LIST LOGO LINE 5 # OF LOGO LINE LOGO PROGRAMMED ************************ 1st LOGO LINE LOGO Y O U R R E C E I P T 2nd LOGO LINE LOGO Thank You 3rd LOGO LINE Logo Call Again 4th LOGO LINE Logo ************************...
- Page 72 PROGRAM CONFIRMATION LIST A CLERK CONFIRMATION LIST Control Lock: P position ENT RLS CLK ID. Important: A Clerk Reading must be closed out in the "Z" position. CLERK PRESET CLERK NUMBER CLERK 01 1111 CLERK NAME CLERK 02 2222 JOAN CLERK 03 3333 MARY...
- Page 73 PROGRAM CONFIRMATION LIST A DEPARTMENT CONFIRMATION LIST Control Lock: P position ENT RLS DPT#. DEPARTMENT NAME NOTE: If a description has been DEPT PRESET programmed, the name will DEPT01 print instead of the Dept. # DEPARTMENT NUMBER PRICE 1.99 PRE-SET PRICE FLAG 000000001 DEPARTMENT FLAG OPTIONS...
- Page 74 PROGRAM CONFIRMATION LIST A PLU CONFIRMATION LIST Control Lock: P position ENT RLS PLU. The following illustrates the PLU Confirmation Report. The figures shown in this example are randomly chosen: PLU PRESET PLU CODE NUMBER PLU NUMBER 0001 APPLE PLU DESCRIPTION PRICE 1.99 PLU PRICE...
-
Page 75: The Cash Register Operation
TRANSACTION EXAMPLES FOR OPERATING THE CASH REGISTER 4. THE CASH REGISTER OPERATION 1) SAMPLE RECEIPT Control Lock: R position The sample receipt below illustrates general transaction information you will see printed on a receipt: TAX RATE APPLIED DEPT01 Ⅰ 1.00 DEPT02 2.99 DEPARTMENT #... -
Page 76: The Cash Register Operation
TRANSACTION EXAMPLES FOR OPERATING THE CASH REGISTER 3) THE CASH REGISTER OPERATION CASH SALE WITHOUT TENDERING CHANGE - (Ring up a $1.00 item in Department 1): DPT1 DEPT01 Ⅰ 1.00 SUB-TOTAL 1.00 #/NS SUB ITEM CT 0.06 CASH TEND CASH 1.06 CASH SALE WITH TENDERING CHANGE - (Ring up a $1.00 item in Department 1 and compute change from $5.00 cash tendered):... -
Page 77: 5: Check Sale
TRANSACTION EXAMPLES FOR OPERATING THE CASH REGISTER CHARGE SALE - (Ring up a $1.00 item in Department 1 and finalize the sale with the CHARGE key): DPT1 DEPT01 Ⅰ 1.00 ITEM CT CHRG 0.06 CHARGE 1.06 CHECK SALE - (Ring up a $1.00 item in Department 1 and finalize the sale with the CHECK key): DEPT01 1.00 DPT1... -
Page 78: 8: Registering A Reference Number
TRANSACTION EXAMPLES FOR OPERATING THE CASH REGISTER REGISTERING A REFERENCE NUMBER - (Used to print a number, up to 8 digits, to identify an invoice number, credit card number or any other number on receipts. Ring up the number 12345678 in a standard sale): 12345678# DEPT01 Ⅰ... -
Page 79: 11: Registering A Department Unit Price
TRANSACTION EXAMPLES FOR OPERATING THE CASH REGISTER REGISTERING A DEPARTMENT UNIT PRICE - (Assume Department 1 is pre-programmed for $1.00.Ring up this price): DEPT01 Ⅰ 1.00 DPT1 CASH TEND ITEM CT 0.06 CASH 1.06 MULTIPLICATION OF A DEPARTMENT UNIT PRICE - (Assume the Department 1 key is pre-programmed for $1.00. -
Page 80: 16: Return Sale
TRANSACTION EXAMPLES FOR OPERATING THE CASH REGISTER NOTE: A Paid-Out sale can also be finalized with the CHRG and CHECK STUB keys. This function cannot be performed in the middle of a sales transaction. RETURN SALE - (Refund a $1.00 item in Department 1 and refund a $1.50 item three times in Department 1): RETURN DPT1 DEPT01 Ⅰ... -
Page 81: 18: Minus Percentage Discount Sale
TRANSACTION EXAMPLES FOR OPERATING THE CASH REGISTER If you want to charge the tax rate on the discounted amount of an item (the amount after the coupon is deducted), ring up a $1.00 item in Department 1 and then deduct the 20¢ coupon: DEPT01 Ⅰ... -
Page 82: 19: Plus Percentage Sale
TRANSACTION EXAMPLES FOR OPERATING THE CASH REGISTER If the Minus Percentage Discount Rate is NOT pre-programmed, type in the discount rate before pressing the -% key. CASH TEND. PLUS PERCENTAGE SALE: There are various methods of ringing up a Plus Percentage Sale based on the option selected for the flag settings. -
Page 83: 20: Use Of The Error-Correct Ec Key
TRANSACTION EXAMPLES FOR OPERATING THE CASH REGISTER If the Plus Percentage Rate is NOT pre-programmed, type in the plus percentage rate before pressing the +% key. CASH TEND USE OF THE ERROR-CORRECT KEY: Corrects the last entry rung up during a sale Ring up DEPT01 Ⅰ... -
Page 84: 24: Voiding A Minus Percentage Discount Sale
TRANSACTION EXAMPLES FOR OPERATING THE CASH REGISTER VOIDING A MINUS PERCENTAGE DISCOUNT SALE - (Void a $1.00 item in Department 1 and void a pre-programmed Minus Percentage Discount Rate of 10%): VOID DPT1 -VOID- DEPT01 Ⅰ 1.00 10 -%N -0.10 If the Minus Percentage Discount Rate is not pre-programmed, ITEM CT type in the discount rate before pressing the -% key. -
Page 85: 28: Voiding A Department Preset Price With A Minus Percentage Discount
TRANSACTION EXAMPLES FOR OPERATING THE CASH REGISTER VOIDING A DEPARTMENT PRESET PRICE WITH A MINUS PERCENTAGE DISCOUNT (Assume Department 1 is programmed for $1.00, Department 2 is programmed for $2.00, and the [-%] key is pre-programmed for 10%. Ring up Department 1 and deduct 10%, ring up Department 2 and deduct 10%, then void the Department 1 entry with the 10% discount): DPT1 DEPT01 Ⅰ... -
Page 86: Voiding A Plu Sale
TRANSACTION EXAMPLES FOR OPERATING THE CASH REGISTER NOTE1: PLUs follow the same procedure for ringing up Coupons, Refunds, Minus Percentage Discounts, Plus Percentages, etc. as described throughout the section for Transaction For Examples Operating ECR. NOTE2: Temporarily overriding a PLU PRICE: If you would like to enter a different price than what is programmed into a PLU # : (DESIRED PRICE) ENT RLS... -
Page 87: 34: Voiding A Plu Sale With A Minus [ - ]
TRANSACTION EXAMPLES FOR OPERATING THE CASH REGISTER VOIDING A PLU SALE WITH A MINUS [ - ] - (Assume PLU #1 is preset for the price of $1.00 in Department 1 and deduct a 20¢ coupon. Void this entry): VOID -VOID- PLU 0001 Ⅰ... -
Page 88: 38: Age Verification
TRANSACTION EXAMPLES FOR OPERATING THE CASH REGISTER AGE VERIFICATION The function to verify the full age or non-age of the customer to buy the item, by entering his (her) birth date. 1) The message of “ AGE- “ is displayed when Department or PLU , that the age table has been programmed for, are registered without the operation of the AGE key at the beginning of ringing up : Department 1 : Age Table #1 ( 15 year old up ) -
Page 89: 40: Automatic Plu Programming Function
TRANSACTION EXAMPLES FOR OPERATING THE CASH REGISTER Operation: Hold operation by HOLD Key : Hold operation DEPT01 1.00 CLK ID DEPT02 2.00 HOLD 24-10-2005 PM 03:49 DPT1 1001 CLERK01 DPT2. HOLD. : Releasing Hold and continuing registration DEPT01 1.00 CLK ID DEPT02 2.00 DEPT03... -
Page 90: 41: Foreign Currency
TRANSACTION EXAMPLES FOR OPERATING THE CASH REGISTER FOREIGN CURRENCY Tendered Amount and TOTAL Amount are in FC. - (Ring up a £1.00 item in Department 1, £2.00 in Department 2 and compute change from 5.00 FC1 (Euro) cash tendered : the euro as FC1 : (FC1)1=£0.6981 ) DPT1... -
Page 91: Z Management Reports
X / Z MANAGEMENT REPORTS 5. X / Z MANAGEMENT REPORTS The cash register is designed to maintain totals of all transaction data. Transaction data is maintained in the memory of the cash register as long as the system is plugged in and/or the battery back-up system is in effect. - Page 92 X / Z MANAGEMENT REPORTS SUMMARY OF MANAGEMENT REPORTS Report Operation X Report Weekly/Periodic Reset Weekly/Periodic Training Description X Report * Report Reset Report * Report Full Report ○ ○ ○ ○ CASH TEND As left PLU Report ○ ○ ○...
-
Page 93: To Take A Cash In-Drawer / Check-In-Drawer Report
X / Z MANAGEMENT REPORTS In addition to the printed reports, the following totals can be displayed for quick reference at any time but not printed by turning the key to the "X" position and pressing the appropriate keys. To Display Press The Following Keys in the "X"... -
Page 94: To Take A Department Range Report
X / Z MANAGEMENT REPORTS TO TAKE A DEPARTMENT RANGE REPORT Control Lock: "X" position. ( Department Start # ) ENT RLS ( End Department # ) DPT#. 99 ( 2 digits) 1 - 99 ( 2 digits) INDIVIDUAL DEPT DEPT01 15.25Q 38.24... -
Page 95: To Take An Individual Clerk Report
X / Z MANAGEMENT REPORTS TO TAKE AN INDIVIDUAL CLERK REPORT Control Lock: "X" or “Z” position. ENT RLS ( the Clerk Number 4 digits INDIVIDUAL CLERK CLERK02 NETOTAL 8.10 AMOUNT OF SALES 0.12 TOTAL TAX CHARGES TO TAKE A PLU REPORT Control Lock: "X"... - Page 96 X / Z MANAGEMENT REPORTS Example: Declare the following money in the drawer: 3 five dollar bills, 7 one dollar bills and 4 quarters: Control Lock: “Z” position. X / TIME X / TIME X / TIME CASH TEND ( to finalize.) NOTE: The cash register will automatically produce a "Z1"...
-
Page 97: To Take A Department Group Report
X / Z MANAGEMENT REPORTS TO TAKE A DEPARTMENT GROUP REPORT Departments can be linked together to form up to nine groups for the purpose of keeping a summary TOTAL. This is done when programming the Department Statuses. For example, if Department 1, 2 and 3 represent beverage sales, i.e., DEPT 1; tea, DEPT 2; coffee, DEPT 3;... -
Page 98: To Take A Training Full Report
X / Z MANAGEMENT REPORTS TO TAKE A TRAINING FULL REPORT Control Lock: “X” position. Enter “the training password number” and press CHRG key. Control Lock: “X” or “Z” position. CASH TEND. TO TAKE A TRAINING WEEKLY OR MONTHLY FULL REPORT Control Lock: “X”... - Page 99 X / Z MANAGEMENT REPORTS "Z1" READING – FULL REPORT ILLUSTRATION FULL REPORT DEPT01 22.25Q DEPARTMENT ACTIVITY COUNTER 46.24 DEPARTMENT TOTAL DEPT02 54.21 DEPT03 8.00 DEPT99 3.00 DEPT TOTAL 52.25Q DEPARTMENT TOTAL COUNTER 111.45 ALL DEPARTMENT TOTALS NOTXBL NON-TAXABLE COUNTER 65.01 NON-TAXABLE AMOUNT TXBL-1...
-
Page 100: Maintenance
MAINTENANCE 6. MAINTENANCE This chapter explains the maintenance operations you can perform yourself. CLEANING YOUR CASH REGISTER Clean the cash register with a dry, soft cloth. If it cannot be cleaned with a dry cloth, use a damp cloth after wringing it out well. Do not use any volatile chemicals such as benzine, thinner or a chemically treated cloth. -
Page 101: Interface
INTERFACE 7. INTERFACE The connectors (RJ 45 type) for RS232C interface are equipped regularly. The right (from outside) connector is “COM A “(Com. Port A), and the left one is “COM B “(Com. Port B). COM A connector: FLAG 73, 74, 75, 76 COM B connector: FLAG 77, 78, 79, 80 COM B... -
Page 102: Troubleshooting
TROUBLESHOOTING 8. TROUBLESHOOTING Please select and follow the procedure which best describes the cash register condition: IN CASE OF AN ERROR TONE OR IF "ERR" DISPLAYS: a. Press the CLR key. b. Turn the key to the last position (P, R, X or Z) you were in prior to receiving the error. If the last position you were in was "R", turn the key to the "R"... -
Page 103: Error Message
ERROR MESAGE 9. ERROR MESSAGE As the factory default setting, the following messages are installed, but it is possible to change such messages to better ones by programming. DISPLAY CAUSE CHECK POINT KEY OP ERR You made a wrong key operation. Depress [C] key and operate again correctly. - Page 104 Z1AE-1122X 0707...
Need help?
Do you have a question about the SX-590 and is the answer not in the manual?
Questions and answers