Table of Contents
Advertisement
Quick Links
18 V NI-CD CORDLESS IMPACT DRIVER
Battery:
Speed:
Impact speed:
Torque:
Hex drive:
Charger:
Charger input:
Charger output:
Replacement battery:
Weight:
Need Assistance?
Call us on our toll free customer support line:
1-800-689-9928
Technical questions
Replacement parts
Parts missing from package
Imported by Mastercraft Canada Toronto, Canada M4S 2B8
PRODUCT SPECIFICATIONS
18 V, 1.7 Ah Ni-Cd
0–2,600 RPM (no load)
0–3,200 BPM
1,150 in/lbs (maximum)
1/4" Quick release
1 hour diagnostic, Class 2
120 V AC, 60 Hz
18 V DC, 2.2 A
054-3168-6 Ni-Cd
2 lb 10 oz (1.19 kg) without battery
054-3167-8
Owner's Manual
Advertisement
Table of Contents

Related Manuals for MasterCraft 054-3167-8


Summary of Contents for MasterCraft 054-3167-8
-
Page 1: Product Specifications
Weight: 2 lb 10 oz (1.19 kg) without battery Need Assistance? Call us on our toll free customer support line: 1-800-689-9928 Technical questions Replacement parts Parts missing from package Imported by Mastercraft Canada Toronto, Canada M4S 2B8... -
Page 2: Table Of Contents
TABLE OF CONTENTS Product specifications ………….………………………………………………………………... Table of contents ……………………………………………………………………....General safety warnings ………………………………………………………………………… 3–4 Eye, ear & lung protection ………………………………………………………………………. 3–4 Electrical safety …………………………………………………………………………………... Power tool safety ……………………………………………………………………....5–6 General safety rules ……………………………………………………………………………... Work area ………………………………………………………………….……………………... Electrical safety …………………………………………………………………………………... Personal safety …………………………………………………………………………………... -
Page 3: General Safety Warnings
GENERAL SAFETY WARNINGS WARNING: Before using this tool or any of its accessories, read this manual and follow all Safety Rules and Operating Instructions. The important precautions, safeguards and instructions appearing in this manual are not meant to cover all possible situations. It must be understood that common sense and caution are factors which cannot be built into the product. -
Page 4: Electrical Safety
GENERAL SAFETY WARNINGS WEAR A DUST MASK THAT IS DESIGNED TO BE USED WHEN OPERATING A POWER TOOL IN A DUSTY ENVIRONMENT. WARNING: Dust that is created by power sanding, sawing, grinding, drilling, and other construction activities may contain chemicals that are known to cause cancer, birth defects, or other genetic abnormalities. -
Page 5: Power Tool Safety
POWER TOOL SAFETY If operating a power tool in a damp location WARNING: Read all safety warnings is unavoidable, use a residual current device and instructions. Failure to follow the warnings (RCD) protected supply. Use of a ground fault and instructions may result in electric shock, fire circuit interrupter (GFCI) reduces the risk of and/or serious injury. -
Page 6: Power Tool Use And Care
POWER TOOL SAFETY PERSONAL SAFETY – cont’d Battery tool use and care Power tool use and care Recharge only with the charger specified by the manufacturer. A charger that is suitable for Do not force the power tool. Use the correct one type of battery pack may create a risk of fire power tool for your application. -
Page 7: Specific Safety Rules
SPECIFIC SAFETY RULES WARNING: After installing any accessory in the hex drive, Know your cordless impact pull outward on the accessory to ensure it is driver. Do not plug in the charger or install properly installed and cannot be pulled out of the battery in the tool until you have read the hex drive. -
Page 8: Battery & Charger Safety
BATTERY & CHARGER SAFETY WARNING: Do not use the charger to charge any batteries Only use the charger other than the cordless drill/driver batteries. supplied with this kit to charge the 18V Other batteries may explode. battery. Charging any other batteries may damage the charger and possibly cause Do not operate charger if the cord or plug is serious injury. -
Page 9: Symbols
SYMBOLS WARNING: Some of the following symbols may appear on the cordless impact driver. Study these symbols and learn their meaning. Proper interpretation of these symbols will allow for more efficient and safer operation of this tool. Volts Direct current Amperes No load speed Hertz... -
Page 10: Know Your Cordless Impact Driver
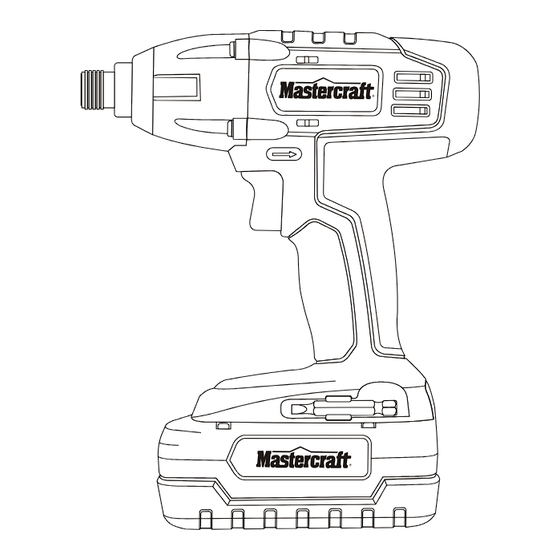
KNOW YOUR CORDLESS IMPACT DRIVER Quick release hex drive Air vents Forward / Variable speed reverse switch trigger switch Single ended screwdriver bits #2 & Battery #054-3168-6 Battery charge indicator LED’s Battery charge test button Battery charger Green... -
Page 11: Assembly And Operating
ASSEMBLY AND OPERATING CHARGING THE BATTERY PACK Place the battery charger (1) in a dry location near a 120 V 60 Hz electrical outlet (Fig. 1) Turn the battery pack up side down and slide it onto the charger (2). NOTE: Make sure the battery pack is fully engaged with the charger. -
Page 12: Installing A Battery Pack In The Impact Driver
ASSEMBLY AND OPERATING INSTALLING THE BATTERY PACK IN THE INSTALLING DRIVER BITS IMPACT DRIVER WARNING: Use only screwdriver bits, Remove the discharged battery pack (1) sockets and accessories that are designed from the tool by pressing the battery for use with an impact driver. Do not use release button (2) on the rear of the battery chrome plated sockets and accessories. -
Page 13: Forward/Reverse Switch
ASSEMBLY AND OPERATION FORWARD/REVERSE SWITCH This impact driver is equipped with a forward/reverse button (1) (Fig. 7). To operate the impact driver in the forward direction, press the forward/reverse button to the LEFT for driving screws or tightening nuts. Fig. 8 To operate the impact driver in the reverse direction, press the forward/reverse button WARNING... -
Page 14: Preparing Screw Holes
ASSEMBLY AND OPERATING PREPARING SCREW HOLES It is important to prepare screw holes before attempting to fasten two pieces of wood together. Proper preparation will make screws drive easier and prevent misaligned components, stripped screw heads, splitting and separating of wood components. Clamp the components that are to be screwed together in their desired position (Fig. -
Page 15: Installing Nut Drivers
ASSEMBLY AND OPERATING DRIVING SCREWS – cont’d INSTALLING NUT DRIVERS FOR 3/16" to 3/8" NUTS NOTE: As the screw is driven into the wood, the Select the correct nut driver size. torque required to completely drive the screw into the wood will increase. The impact function Insert the hex end (1) into the hex drive (2) will allow you to continue driving the screw until (Fig. -
Page 16: Removing Nuts
ASSEMBLY AND OPERATING REMOVING NUTS Press the forward/reverse button to the RIGHT for removing nuts (Fig. 7). Place the socket fully onto the nut. Hold the nut driver socket and impact driver firmly against the nut with both hands. With the nut driver aligned with the nut, squeeze the trigger switch to start the impact driver and remove the nut. -
Page 17: Maintenance
MAINTENANCE GENERAL BATTERY PACK REMOVAL AND PREPARATION FOR RECYCLING WARNING: When servicing, use only To preserve our natural resources, please identical replacement parts. The use of any recycle or dispose of batteries properly. other part may create a hazard or cause product damage. -
Page 18: Nickel-Cadmium Battery Maintenance
MAINTENANCE NICKEL-CADMIUM BATTERY Every two months or after 30 MAINTENANCE charge/discharge cycles, whichever comes first, fully discharge your battery. Nickel-cadmium batteries are powerful, rugged To fully discharge the battery, place it in and provide hundreds of charge/discharge the tool that it came with and work with the cycles if properly maintained and periodically tool until it nearly stops and no longer "exercised". -
Page 19: Exploded View
EXPLODED VIEW... -
Page 20: Parts List
PARTS LIST ® WARNING: When servicing, use only Mastercraft replacement parts. The use of any other parts may create a safety hazard or cause damage to the tool. Any attempt to repair or replace electrical parts on this tool may create a safety hazard unless repairs are performed by a qualified technician. -
Page 21: Warranty
3-Year Limited Warranty This Mastercraft® product is guaranteed for a period of three (3) years from the date of original retail purchase against defects in workmanship and materials, except for the following components: Component A: Batteries, chargers and carrying cases, which are guaranteed for a period of two (2) years from the date of original retail purchase against defects in workmanship and materials;... - Page 22 Mastercraft® is a superior line of products selected for their workmanship and materials. These products are designed to meet rigorous quality and performance standards, and are approved by our Quality Assurance laboratory.
Need help?
Do you have a question about the 054-3167-8 and is the answer not in the manual?
Questions and answers