Table of Contents
Advertisement
harman/kardon
harman/kardon
BDP 1/120
BDP 10/230
Blu-ray players
BDP 10 SPECIFICATIONS..............................2
BDP 1 SPECIFICATIONS................................3
BDP 10 SAFETY INFORMATION......................4
BDP 1 SAFETY INFORMATION........................6
FRONT PANEL CONTROLS............................8
MESSAGE DISPLAY.....................................10
BDP 10 REAR-PANEL CONNECTIONS............11
BDP 1 REAR-PANEL CONNECTIONS..............13
REMOTE CONTROL FUNCTIONS..................15
BDP 10 INSTALLATION.................................17
BDP1 INSTALLATION...................................19
Released 2010
Discontinued XXXX
CONTENTS
PACKAGING..........................................22
EXPLODED VIEW...................................23
BDP 10 PARTS LIST...............................24
BDP 1 PARTS LIST.................................25
TROUBLE SHOOTING CHARTS...............26
PCB DRAWINGS....................................32
BLOCK DIAGRAM...................................38
SCHEMATIC DIAGRAMS.........................39
TECH TIP HKTT2010-01...........................54
Northridge, CA. 91329
BDP 1 / BDP 10 Service Manual
Service Manual
Rev0 8/2010
Advertisement
Table of Contents

Related Manuals for Harman Kardon BDP 1/120


Summary of Contents for Harman Kardon BDP 1/120
-
Page 1: Table Of Contents
BDP 1 / BDP 10 Service Manual harman/kardon Service Manual BDP 1/120 BDP 10/230 Blu-ray players CONTENTS BDP 10 SPECIFICATIONS…………………………2 SOFTWARE UPGRADE INSTRUCTIONS….21 BDP 1 SPECIFICATIONS…………………………..3 PACKAGING……………………………………22 BDP 10 SAFETY INFORMATION………………….4 EXPLODED VIEW……………………………..23 BDP 1 SAFETY INFORMATION…………………...6 BDP 10 PARTS LIST………………………….24 FRONT PANEL CONTROLS……………………….8... -
Page 2: Bdp 10 Specifications
All features, specifications and apperance are subject to change without notice. SACD is a trademark of Sony Corporation. Harman Kardon and Logic 7 are trademarks of Harman International Industries, Incorporated, registered in the United States and/or other countries. Designed to Entertain is a trademark of “x.v.Color”... -
Page 3: Bdp 1 Specifications
Features, specifications and appearance are subject to change without notice. SACD is a trademark of Sony Corporation. Harman Kardon and Logic 7 are trademarks of Harman International Industries, Incorporated, registered in the United States and/or other countries. Designed to Entertain is a trademark “x.v.Color”... -
Page 4: Bdp 10 Safety Information
harman/kardon BDP 1 / BDP 10 Service Manual SAFETY INFORMATION for BDP10 Important Safety Instructions 15. Do not expose this apparatus to dripping or splashing and ensure that no objects filled with liquids, such as vases, are placed on the 1. - Page 5 Under some circumstances, a fan may be required. The unit should be placed on its Should the unit require maintenance or repair, please contact your local Harman Kardon service center. Refer servicing to qualified personnel only.
-
Page 6: Bdp 1 Safety Information
harman/kardon BDP 1 / BDP 10 Service Manual SAFETY INFORMATION for BDP1 Important Safety Instructions 1. Read these instructions. 2. Keep these instructions. 3. Heed all warnings. 4. Follow all instructions. 5. Do not use this apparatus near water. 6. Clean only with a dry cloth. 7. -
Page 7: Important Safety Information
Owner’s Manual carefully and retain it for future use. Should the • Avoid installation in extremely hot or cold locations, or in an area that is exposed unit require maintenance or repair, please contact your local Harman Kardon service center. to direct sunlight or heating equipment. -
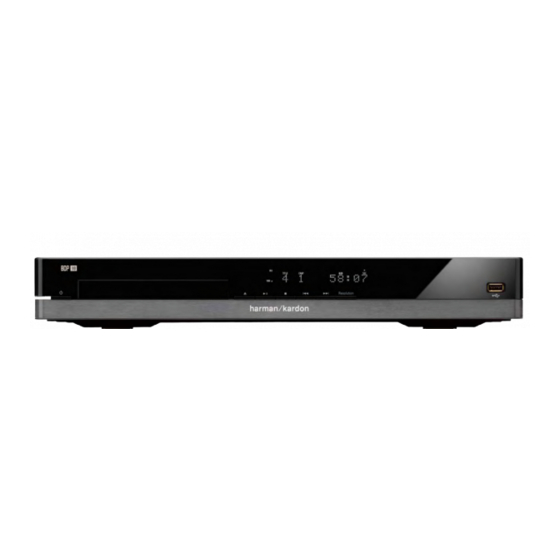
Page 8: Front Panel Controls
harman/kardon BDP 1 / BDP 10 Service Manual FRONT-PANEL CONTROLS... - Page 9 harman/kardon BDP 1 / BDP 10 Service Manual FRONT-PANEL CONTROLS Power Indicator: Turns amber when the BDP 10 is plugged in and BDP 10 is in Standby mode and may be turned on using either the front-panel or remote Power switch. Turns white when the BDP 10 is turned on.
-
Page 10: Message Display
harman/kardon BDP 1 / BDP 10 Service Manual MESSAGE DISPLAY Disc Type Network ParentalLock Repeat Video OutputResolution Title Track / Chapter Time NOTE: To make it easier to follow the instructions that refer to the controls and connectors in this illustration, a larger copy may be downloaded from the Product Support section for this product at www.harmankardon.com. -
Page 11: Bdp 10 Rear-Panel Connections
harman/kardon BDP 1 / BDP 10 Service Manual REAR-PANEL CONNECTIONS for BDP10... - Page 12 AC Power Input: Connect the supplied AC power cord to this socket first, and then to an unswitched AC outlet. Should the cord become damaged, contact your authorized Harman Kardon dealer for a replacement. Fan Vents: This area contains vents used by the BDP 10’s fan to cool...
-
Page 13: Bdp 1 Rear-Panel Connections
harman/kardon BDP 1 / BDP 10 Service Manual REAR-PANEL CONNECTIONS for BDP1... - Page 14 AC Power Input: Connect the supplied AC power cord to this socket first, and then to an unswitched AC outlet. Should the cord become damaged, contact your authorized Harman Kardon dealer for a replacement. Fan Vents: This area contains vents used by the BDP 1’s fan to cool the system.
-
Page 15: Remote Control Functions
harman/kardon BDP 1 / BDP 10 Service Manual REMOTE CONTROL FUNCTIONS IR Transmitter Lens Open/Close Power On Power Off Dimmer Status Return Find Navigation Previous Next/Step Search/Slow Forward Search Reverse Play Setup Stop Pause Soft Keys Repeat Subtitle Audio A-B Repeat Angle Numeric Keys PIP Audio... - Page 16 harman/kardon BDP 1 / BDP 10 Service Manual REMOTE CONTROL FUNCTIONS IR Transmitter Lens: When buttons are pressed on the remote, Pause: Press to momentarily pause playback. Press again to resume. While paused, press the Next Step Button for frame-by-frame toward the BDP 10.
-
Page 17: Bdp 10 Installation
Connect the BDP 10’s Remote IR Input to the compatible IR output of another product, or to an IR receiver or controller, such as the optional Harman Kardon HE 1000. When daisychaining devices to allow for remote control up and down the chain, connect the Remote IR Output to the next product’s IR input. - Page 18 harman/kardon BDP 1 / BDP 10 Service Manual for BDP10 INSTALLATION Point the remote toward the front panel of the BDP 10. The IR receiver no objects are blocking the remote’s path. Bright lights, fluorescent lights and plasma video displays may interfere with the remote’s functioning.
-
Page 19: Bdp1 Installation
Connect the BDP 1’s Remote IR Input to the compatible IR output of another product, or to an IR receiver or controller, such as the optional Harman Kardon HE 1000. When daisychaining devices to allow for remote control up and down the chain, connect the Remote IR Output to the next product’s IR input. - Page 20 harman/kardon BDP 1 / BDP 10 Service Manual for BDP1 INSTALLATION Point the remote toward the front panel of the BDP 1. The IR receiver is located immediately to the right of the Message Display. Make sure no objects are blocking the remote’s path. Bright lights, fluorescent lights for BDP1 and plasma video displays may interfere with the remote’s functioning.
-
Page 21: Software Upgrade Instructions
harman/kardon BDP 1 / BDP 10 Service Manual Software upgrade Preparation to upgrade software 1) Start the CD Burning software and create a new CD B. Read out the software versions to confirm upgrading project (Data Disc) Power on the set and press <Setup> button on the remote control. -
Page 22: Packaging
harman/kardon BDP 1 / BDP 10 Service Manual Packaging/accessories Item Description Part Number Outer Carton BDP1 76-982790-0ATB2 Outer Carton BDP10 76-982790-0ATB1 Front Protector Plastic Bag BDP1 BDP 1 BDP10 BDP 10 Foam End, Right Corner Protectors Corner Protectors HDMI cable 46-HDI015-19G 3-conductor analog audio/video cable 41-UH1500-0KKCD... -
Page 23: Exploded View
harman/kardon BDP 1 / BDP 10 Service Manual Exploded View for BDP10 & BDP1: It's a general mechanical exploded view for BDP10 & BDP1, please refer to the model set for detailed information. ASSY 1 includes components:3.7.25.26.28.30.31... -
Page 24: Bdp 10 Parts List
harman/kardon BDP 1 / BDP 10 Service Manual PARTS LIST: BDP10 Location No. TCL P/N. Description Q'ty ASSY-FB BD 08-00BDP1-FB0 ASSY-IR BD 08-00BDP1-IR0 ASSY-MAIN BD 08-00BDP1-MA0 ASSY-SW BD 08-00BDP1-SW0 ASSY-PW BD 08-0BDP10-PW0 ASSY-FRONT PANEL ASSY1 02-BDP1F1-XXOB2 ASSY-DECORATIVE ALUMINIUM-BAR 08-00BDP1-XXO 05-BLURAY-BP04 LOADER BP-04 (later changed, see below AVCABLE 41-UH1500-0KKCD... -
Page 25: Bdp 1 Parts List
harman/kardon BDP 1 / BDP 10 Service Manual PARTS LIST: BDP1 Location No. TCL P/N. Description Q'ty ASSY-FB BD 08-00BDP1-FB0 ASSY-IR BD 08-00BDP1-IR0 ASSY-MAIN BD 08-00BDP1-MA1 ASSY-SW BD 08-00BDP1-SW0 ASSY-PW BD 08-00BDP1-PW0 ASSY-FRONT PANEL ASSY1 02-BDP1F1-XXOB1 ASSY-DECORATIVE ALUMINIUM-BAR 08-00BDP1-XXO 05-BLURAY-BP04 LOADER BP-04 (later changed, see below) AVCABLE 41-UH1500-0KKCD... -
Page 26: Trouble Shooting Charts
harman/kardon BDP 1 / BDP 10 Service Manual Trouble shooting chart No display on VFD, and buttons do not work No display on VFD, and buttons do not work Check every supply voltage on main board is Refer to Power supply board part normal Check-28V,5V,+12V Fix the connection XP1 on front board... - Page 27 harman/kardon BDP 1 / BDP 10 Service Manual Trouble shooting chart No audio output No audio output Check whether the audio signal is right from the U22 and Check the U19,U20, U22,u24 U24,U19,U20 power supply Replace U22,U24,U20,U19 Check whether the audio signal is right from the U19.1 U19.7 and U201, U20.7and...
- Page 28 harman/kardon BDP 1 / BDP 10 Service Manual Trouble shooting chart Remote control does not work Remote control does not work Check whether the remote Replace the battery for remote controller’s battery controller exhausted or not. Check the IR1 power Check the VCC net no front board supply is vcc,vcc is about Replace IR1...
- Page 29 harman/kardon BDP 1 / BDP 10 Service Manual Trouble shooting chart Can’t read disc or can’t open the disk door Can’t read disc or can’t open the disk door Check whether Check the connection of the 4PIN cable he DVD loader running is Power Board.
- Page 30 harman/kardon BDP 1 / BDP 10 Service Manual Trouble shooting chart No VFD display No VFD display Check whether the voltage Fix the connection power board +5Vstb on the front board is CN502 front board XP1 normal work or not. Check whether the voltage Check DC5V to AC 3V switch circuit between VFD F+&VFD F- is...
- Page 31 harman/kardon BDP 1 / BDP 10 Service Manual Trouble shooting chart Fan don’t work Fan don’t work Check on Power board Check U506.8 on Power board whether CN503.1 +11V Check cable Replace the cable connection fan to Power board CN503 Replace Fan...
-
Page 32: Pcb Drawings
harman/kardon BDP 1 / BDP 10 Service Manual Front Board Print-layout (Top side):... - Page 33 harman/kardon BDP 1 / BDP 10 Service Manual Front Board Print-layout (Bottom side):...
- Page 34 harman/kardon BDP 1 / BDP 10 Service Manual IR Board Print-layout (Bottom side):...
- Page 35 harman/kardon BDP 1 / BDP 10 Service Manual Power Board Print-layout (Bottom side):...
- Page 36 harman/kardon BDP 1 / BDP 10 Service Manual Main Board Print-layout (Top side):7-20...
- Page 37 harman/kardon BDP 1 / BDP 10 Service Manual Main Board Print-layout (Bottom side):...
-
Page 38: Block Diagram
harman/kardon BDP 1 / BDP 10 Service Manual Harman BDP 10/BDP 1 Block Diagram CVBS-L-R S/PDIF Ethernet HDMI Component TOSLINK USB0 (Header) DC/DC 3.3V CN504 5VSTBY P.11 Sil9134 IR IN IR OUT Video buffer Video buffer DC/DC 1.2V +12V +12V +12V 4PIN,PICH=2.0 PICH=2.0... -
Page 39: Schematic Diagrams
harman/kardon BDP 1 / BDP 10 Service Manual Main Board Electric Diagram: BLOCK +1V2 1.5K PCB_SV_REF BBS_SCL BBS_SDA 100MW 9134_~INT +3V3 AUD0_SPDIF PCB_REV_-1 R538 1.5K 100MW PCB_REV_-2 R537 VDAC0_RBIAS R539 1.5K VDAC0_RB R540 100MW VDAC1_RBIAS VDAC1_RB PCB_REV_2 change to 47UF 0805,add C 0.1UF 4.64K VDAC0_0 100MW... - Page 40 harman/kardon BDP 1 / BDP 10 Service Manual Front Board Electric Diagram: MCU+VFD(FUTABA) 3V3-FB 10/0.125W K EY 0/NC 1.2K 1.5K 2.2K 3.3K 10/0.125W 1N4002 220p/NC 1N4002 1N4002 4.7k BCM7440_IR VD IN VCLK 100 ohm VSTB R55 10 RESET R66 33K 47pF 0.1u 0.1uF...
- Page 41 harman/kardon BDP 1 / BDP 10 Service Manual Switch Board Electric Diagram: LED1 LED2 PICH=2.0 SWITCH BOARD...
- Page 42 harman/kardon BDP 1 / BDP 10 Service Manual Power Board Electric Diagram: CE511 U504 47uF/25V KA278R12 R542 R518 +12V 3.3k R544 CY504 U506A 100k 102/400Vac LM358 U506B CN503 LM358 R538 R512 2x2.0mm R545 D503 CE503 R516 ZD508 R511 SR306 1000uF/16V CE504 R519 BD501...
- Page 43 harman/kardon BDP 1 / BDP 10 Service Manual Main Board Electric Diagram: Audio & VDAC Audio & VDAC +5VA R511 100MW C521 C522 470UF/16V 0.1UF 0.1UF +12VA 25.5K +12VA -12VA -12VA 100MW 47PF 5 0V A_MUTE C523 +12VA 0.1UF 1 6V 16.5K 24.9K AUD0_L_P...
- Page 44 harman/kardon BDP 1 / BDP 10 Service Manual DDR2 BANK-0 Main Board Electric Diagram:DDR2 BANK-0 DDR2-0L DDR2-0H (CLUSTER) (CLUSTER) DDR2 DDR2 +1V8 +1V8 32Mx16 32Mx16 FBGA 84 FBGA 84 RFU/A15 VDD5 RFU/A15 VDD5 DDR0_A[13:0] DDR0_A[13:0] RFU/A14 VDD4 C630 C633 C643 C632 C644 C631...
- Page 45 harman/kardon BDP 1 / BDP 10 Service Manual DDR2 BANK-1 Main Board Electric Diagram: DDR2 BANK-1 DDR2-1L DDR2-1H (CLUSTER) (CLUSTER) DDR2 DDR2 +1V8 +1V8 64Mx16 64Mx16 FBGA 84 FBGA 84 RFU/A15 VDD5 RFU/A15 VDD5 DDR1_A[13:0] RFU/A14 VDD4 C656 C653 C652 C654 C655 C657...
- Page 46 harman/kardon BDP 1 / BDP 10 Service Manual NAND EBI_ADDR25 ------- ------- NAND EBI_ADDR24 ------- ------- Main Board Electric Diagram: NAND EBI_ADDR15 ------- PCI_AD31 EBI_ADDR14 ------- PCI_AD30 EBI_ADDR13 ------- PCI_AD29 EBI_ADDR12 ------- PCI_AD28 EBI_ADDR11 ------- PCI_AD27 EBI_ADDR10 ------- PCI_AD26 EBI_ADDR9 ------- PCI_AD25 EBI_ADDR8...
- Page 47 harman/kardon BDP 1 / BDP 10 Service Manual DVO, SIL9134, HDMI Main Board Electric Diagram: DVO, SIL9134, HDMI 9134 (CLUSTER) +1V8 L500 +1V8 100Ohms I2S_T_DATA0 C530 I2S_T_DATA0 CVCC18-1 C500 C501 C527 I2S_T_DATA1 I2S_T_DATA1 CVCC18-2 I2S_T_DATA2 I2S_T_DATA2 0.1UF CVCC18-3 0.1UF 0.1UF 47UF I2S_T_DATA3 I2S_T_DATA3...
- Page 48 harman/kardon BDP 1 / BDP 10 Service Manual Main Board Electric Diagram: BOOT STRAP OPTIONS & BCM7440B BCM7440 Power Boot Strap Options BOOTSTRAP (CLUSTER) 1.5K 100MW (CLUSTER) strap_ebi_invert_addr +3V3 EBI_~RD +3V3 EBI_~RD 4.64K 1: Invert upper bits of EBI address strap_nand_flash strap_ebi_invert_addr 100MW...
- Page 49 harman/kardon BDP 1 / BDP 10 Service Manual Main Board Electric Diagram: DC/DC CONVERTERS DC/DC Converters T P2 T P6 T P7 T P9 T P3 +1V2 +3V3 +1V8 +3V3_BST MBR0520LT1G C556 NTD40N03RT4G 0.1UF +3V3 6.9UH 6.3V +3V3_TG C E1 C563 C565 C566...
- Page 50 harman/kardon BDP 1 / BDP 10 Service Manual Main Board Electric Diagram: RTC, FPANEL, UART, BBS RTC, FPANEL, UART, BBS RESET, CLOCK, GPIO, IRQ CONNECT TO UART BOARD INTERFACE (5V tolerant LVTTL i/o) +3V3 J 10 UART1 _TXD UART1_RXD JTAG _TDO JTAG_ TDI JTAG_TDO JTAG_TDI...
- Page 51 harman/kardon BDP 1 / BDP 10 Service Manual Main Board Electric Diagram: Ethemet, SATA, USB +2V5_ENET +2V5_BCM7440 35MOHMS Ethernet, SATA, IDE 22UF 0.1UF $3N572 $3N576 C685 C686 49.9 49.9 49.9 49.9 0.1UF 0.1UF J0026D21BNL EPHY_RDP E PHY_RDP ETHERNET : Design notes and Layout Guidelines: EPHY_RDN EPHY_RDN 1- Ethernet Data DP/DN traces must be routed as 100 Ohms Differential pairs.
- Page 52 harman/kardon BDP 1 / BDP 10 Service Manual Main Board Electric Diagram:7.1 AUDIO OUTPUTS 7.1 AUDIO OUTPUTS R575 220PF R577 28-BA0106-ZFX mute circuit R576 3 .3K R699 AUO_L_OUT1 C 115 10UF/10V FL_OUT C116 10UF/10V R700 4 .7K A_MUTE 1500pF U1 9A 39 04 NJM4558 OPA +12VA...
- Page 53 harman/kardon BDP 1 / BDP 10 Service Manual Main Board Electric Diagram: MCU R650 100k R651 3 3R MCLK_IN MCLK_OUT 3V3-FB 8MHz C 94 27pF 27pF 3V3-FB 3V3-FB MCLK_IN IR IN1 P10/INT0 IR_SS R729 +3 V3 PP11/INT1 MCLK_OUT R722 XOUT P12/DVO P13/SDA/RXD1 P14/SCL/TXD1...
-
Page 54: Tech Tip Hktt2010-01
harman/kardon BDP 1 / BDP 10 Service Manual TECH TIPS harman/kardon Troubleshooting tips and solutions to common service problems BDP1/BDP10 TIP# HKTT2010-01 Subject: Retrieve a Blu-ray/DVD/CD disc from the tray without power This method will allow you to retrieve a disc without power in the BDP1/10 or pull out the disc tray if needed. Remove all screws holding the top cover on: four screws at the rear and four on the sides.
Need help?
Do you have a question about the BDP 1/120 and is the answer not in the manual?
Questions and answers