Advertisement
AVerMedia
What's in the Package
®
AVerMedia
AVer EZCapture Card
System Requirements
• Pentium 100 MHz PC or higher
• One available PCI 2.1 compliant slot
®
• Windows
XP, ME, 2000, 98, 95 or NT
• VGA card with DirectX 5.0 support (check the
back side of the package box for a list of VGA
cards supported)
• For videoconferencing applications:
- Sound Card required (Sound Blaster 16 or
better recommended)
- CCD Camera or Video Camcorder
- 28.8Kbps or faster Modem
-
CD-ROM Drive
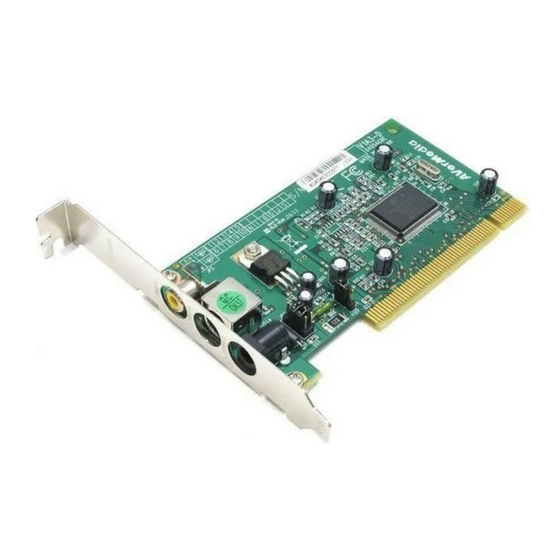
Hardware Installation
CCD Camera Requirements
Use a CCD camera which
has a POWER plug and a
VIDEO jack at the end of
its cable.
Changing Jumper Settings
Before you install AVer EZCapture into your PC and connect
your CCD camera, check first whether or not the card jumper
settings meet the power requirements of the CCD camera.
Check your CCD camera manual or contact your dealer for its
power requirements.
There are two jumper blocks on-board the AVer EZCapture card:
1. "JP4" sets the power output. Follow the diagram below
to properly adjust the jumper setting.
JP4 Jumper Setting
2. "JP3" sets the type of polarity. Make sure that you check the
type of polarity used by the CCD camera before you adjust the
jumper setting and connect the camera.
®
AVer EZCapture
Installation CD
1
Quick Installation Guide
Caution : If "JP3" is configured incorrectly,
this will damage your CCD camera
and/or the AVer EZCapture card.
The figure below shows you how to change the "JP3" jumper
setting.
JP3 Jumper Setting
Note:
If your CCD camera is already provided with a
power adapter, do not connect the camera to
AVer EZCapture. Follow the original hardware
connection of your CCD camera.
Installing the AVer EZCapture Card to the PC
Power off your PC, insert the AVer EZCapture card in an
empty PCI expansion slot on the motherboard, and restart
PC.
How to Connect the CCD Camera
Plug the POWER plug from the CCD camera to the AVer
EZCapture "POWER" port. Then, connect the VIDEO jack to the
"VIDEO" port.
Connecting the Video Source
To capture images or video from an external video source, you
need to connect a composite video or S-video source to the
AVer EZCapture card.
Use a standard AV (audio/video) cable if you have a composite
video source and an S-video cable for an S-video source. The
diagram below shows the cable connections.
To capture audio with video, connect an audio cable to the "LINE
IN" port of your sound card and the "Audio Out" socket of the
video device.
If you want to record your own voice while capturing video,
connect a microphone to the "MIC IN" port of your sound card.
2
Advertisement
Table of Contents

Related Manuals for Avermedia EZCapture


Summary of Contents for Avermedia EZCapture
-
Page 1: Quick Installation Guide
Installing the AVer EZCapture Card to the PC - CCD Camera or Video Camcorder Power off your PC, insert the AVer EZCapture card in an - 28.8Kbps or faster Modem empty PCI expansion slot on the motherboard, and restart... -
Page 2: Installing The Driver For Windows® 2000
Installing the Driver for Windows 1. The Add New Hardware Wizard will appear. Select Automatic After you have properly installed your AVer EZCapture search for a better driver (Recommended). Place the card, turn on your computer. The system will automatically... -
Page 3: Installing The Driver For Windows
Then, type: Your CD-ROM Drive:\Driver\Win98 Click Next to continue. 5. Ignore the warning message and click YES to install the Note: You should always refer to the AVerMedia AVer rest of the file. EZCapture Installation CD to ensure that you are installing the correct drivers. -
Page 4: Installing The Driver For Windows ® Nt
Installation Main Screen, click AVerMedia Capture 4.00.950 and 4.00.950A Application. 1. The first time you install the AVer EZCapture card, you ® 2. A Welcome dialog box will first appear. Click Next. should see the following dialog box as Windows 95 boots: 3. - Page 5 Press the Eject button of your CD-ROM drive and re-insert the Installation CD. The installation main screen will then appear: Click on the AVerMedia Capture Application and follow the on screen instructions or the Windows NT plug and play installation guide.
Need help?
Do you have a question about the EZCapture and is the answer not in the manual?
Questions and answers