Hakko Electronics 373 Instruction Manual
Self feeder
Hide thumbs
Also See for 373:
- Quick start manual (9 pages) ,
- Manual (10 pages) ,
- Instruction manual (16 pages)
Table of Contents
Advertisement
Quick Links
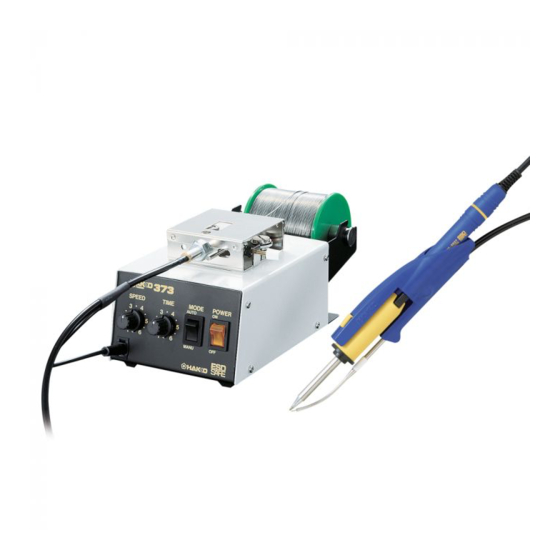
SELF FEEDER
Thank you for purchasing the HAKKO 373 Self Feeder.
Please read this manual carefully before operating the
HAKKO 373. Store the manual in a safe, easily accessible
place for future reference.
CAUTION: You must install the Solder Dia. Adjustment Ring before use.
TABLE OF CONTENTS
Precautions ................................................................. 1
Specifications .............................................................. 1
Names of Parts ........................................................... 2
Setting Up the HAKKO 373 ......................................... 3
Operation .................................................................... 6
Replacement of Parts .................................................. 8
Options & Replacement Parts ..................................... 9
Parts List ................................................................... 11
Troubleshooting Guide .............................................. 13
Advertisement
Table of Contents

Related Manuals for Hakko Electronics 373


Summary of Contents for Hakko Electronics 373
-
Page 1: Table Of Contents
Thank you for purchasing the HAKKO 373 Self Feeder. Please read this manual carefully before operating the HAKKO 373. Store the manual in a safe, easily accessible place for future reference. CAUTION: You must install the Solder Dia. Adjustment Ring before use. -
Page 2: Precautions
Precautions CAUTION Setting up should be done while the soldering iron is cool, or you may get burnt. Do not force the guide pipe bend or turn as this may result in damage. Do not operate with tube bending or holding in sharp angle. It may cause to clogging. Input of switching is no-voltage input. -
Page 3: Names Of Parts
Names of Parts Jack for Switch Feed Speed Control Knob Feed Time Control Knob Mode Switch Power Switch Release Lever Securing Screw Tension Adjustment Knob Tension Gear Guide Shaft Adjustment for the amount of solder return Feed Gear Supply Nozzle Solder Bobbin Shaft Solder Dia. -
Page 4: Setting Up The Hakko 373
Setting Up the HAKKO 373 Setting up should be done while the soldering iron is cool, or you may get burnt. Do not force the guide pipe bend or turn as this may result in damage. Do not operate with tube bending or holding in sharp angle. It may cause to clogging. - Page 5 Setting Up the HAKKO 373 3. Setting the Tube Unit (a) Attach the Tube to Guide Pipe The tube is double structure. Insert the inside tube into the Asse’y. hole of the connection, and the outside black tube should fully cover the screw part of the connection. Be sure that not to bend the tube.
- Page 6 Setting Up the HAKKO 373 6. Setting the Solder Set a new solder after pull the old solder out when the old one left in tube. (a) Remove the tension gear guide shaft. And attach the solder dia. adjustment ring according to the diameter of your desired solder.
-
Page 7: Operation
Operation Solder will be fed by pressing the feed switch (or foot switch). MODE AUTO MODE If you press the feed switch, solder will be fed with set time and speed independently of length of pressing time. MANUAL MODE Solder will be fed with set speed during pressing the feed switch. - Page 8 Operation Usage of Iron Holder • HAKKO 926 If you use HAKKO 926, refer to the following figure to set the iron holder. (As for the HAKKO 926, the setting is available only on it’s left.) Iron Receptacle Spring Iron Holder Thumb screw Holder Mounting Base Set the iron receptacle in the spring iron holder keeping the...
-
Page 9: Replacement Of Parts
Replacement of Parts 1. When you change the Please replace the parts indicated on the following chart when Solder Diameter you change solder diameter. Solder Dia. Guide Tube Changing matter Nozzle Adjustment Ring Pipe Unit From the range of 0.6~1.0mm to the range of 0.6~1.0mm replace replace same... -
Page 10: Options & Replacement Parts
Options & Replacement Parts Part No. Part Name Dia. of Solder Soldering Iron B1626 Solder Dia. Adjustment Ring 0.6, 0.65mm B1627 Solder Dia. Adjustment Ring 0.8mm B1628 Solder Dia. Adjustment Ring 1.0mm B1629 Solder Dia. Adjustment Ring 1.2mm B1630 Solder Dia. Adjustment Ring 1.6mm B1631 Tube Unit A/with Switch... - Page 11 Options & Replacement Parts Part No. Part Name Dia. of Solder Soldering Iron B1694 Guide Pipe Asse’y 0.6, 0.65mm 902, 903, 904 B1695 Guide Pipe Asse’y 0.8mm B1696 Guide Pipe Asse’y 1.0mm B1697 Guide Pipe Asse’y 1.2mm B1698 Guide Pipe Asse’y 1.6mm B2146 Guide Pipe Asse’y...
-
Page 12: Parts List
Parts List Parts List Note: Spare or repair parts do not include mounting screws, if they are not listed on the description. Item No. Part No. Part Name Description Screws must be ordered separately. B1897 Cover for Feeding Unit B1882 Tension Gear Guide Shaft B1626 Solder Dia. -
Page 13: Troubleshooting Guide
Troubleshooting Guide If the solder can not be fed smoothly, please check following points. Are you using proper parts according to the diameter of solder? Did you adjust the tension properly? Isn’t the tube bent or transformed? Isn’t solder adhered at the feed gear or the tension gear? Isn’t the nozzle clogged with flux? Is the mini-plug correctly connected? Isn’t the fuse blown? - Page 15 Æ HEAD OFFICE PENANG BRANCH 4-5, SHIOKUSA 2-CHOME, NANIWA-KU, OSAKA, 556-0024 JAPAN 19,LORONG IKS JURU 3,TAMAN PERINDUSTRIAN RINGAN JURU, TEL:+81-6-6561-3225 FAX:+81-6-6561-8466 14100 SEBERANG PERAI TENGAH,PENANG,MALAYSIA. TEL: (04)507-0888 FAX: (04)507-0999 E-mail:hakkopg@tm.net.my http://www.hakko.com E-mail:sales@hakko.com JOHOR BAHRU BRANCH OVERSEAS AFFILIATES TAIWAN: HAKKO DEVELOPMENT CO., LTD. 45A,JALAN SRI BAHAGIA 5,TAMAN SRI BAHAGIA, U.S.A.: AMERICAN HAKKO PRODUCTS, INC.
Need help?
Do you have a question about the 373 and is the answer not in the manual?
Questions and answers