thomann MILLENIUM MD-90 User Manual
Hide thumbs
Also See for MILLENIUM MD-90:
- User manual (61 pages) ,
- User manual (52 pages) ,
- User manual (36 pages)
Table of Contents
Advertisement
Advertisement
Table of Contents

Related Manuals for thomann MILLENIUM MD-90


Summary of Contents for thomann MILLENIUM MD-90
- Page 1 MD-90 mobile drum user manual...
- Page 2 Musikhaus Thomann Thomann GmbH Hans-Thomann-Straße 1 96138 Burgebrach Germany Telephone: +49 (0) 9546 9223-0 E-mail: info@thomann.de Internet: www.thomann.de 20.07.2015, ID: 275219...
-
Page 3: Table Of Contents
Table of contents Table of contents General notes............................... 5 Safety instructions............................. 7 Features............................... 11 Installation..............................12 Operating elements..........................13 Functions..............................19 In and outputs............................30 Technical specifications........................32 Cleaning............................... 34 Protecting the environment......................35 Appendix..............................37 11.1 Voice list............................37 11.2 Kit list.............................. - Page 4 Table of contents 11.4 MIDI implementation........................54 mobile drum...
-
Page 5: General Notes
General notes General notes This user manual contains important information on safe operation of the device. Read and follow all safety notes and all instructions. Save this manual for future reference. Make sure that it is available to all persons using this device. If you sell the device to other users, be sure that they also receive this manual. - Page 6 General notes Signal word Meaning DANGER! This combination of symbol and signal word indicates an immediate dangerous situation that will result in death or serious injury if it is not avoided. CAUTION! This combination of symbol and signal word indicates a pos‐ sible dangerous situation that can result in minor injury if it is not avoided.
-
Page 7: Safety Instructions
Safety instructions Safety instructions Intended use Use the device only as described in this user manual. Any other use or use under other oper‐ ating conditions is considered to be improper and may result in personal injury or property damage. No liability will be assumed for damages resulting from improper use. This device may be used only by persons with sufficient physical, sensorial, and intellectual abilities and having corresponding knowledge and experience. - Page 8 Safety instructions CAUTION! Possible hearing damage With loudspeakers or headphones connected, the device can produce volume levels that may cause temporary or permanent hearing impairment. Do not operate the device permanently at a high volume level. Decrease the volume level immediately if you experience ringing in your ears or hearing impairment.
- Page 9 Safety instructions NOTICE! External power supply The device is powered by an external power supply. Before connecting the external power supply, ensure that the input voltage (AC outlet) matches the voltage rating of the device and that the AC outlet is protected by a residual cur‐ rent circuit breaker.
- Page 10 Safety instructions NOTICE! Possible damage by leaking batteries Leaking batteries can cause permanent damage to the device. Take batteries out of the device if it is not going to be used for a longer period. mobile drum...
-
Page 11: Features
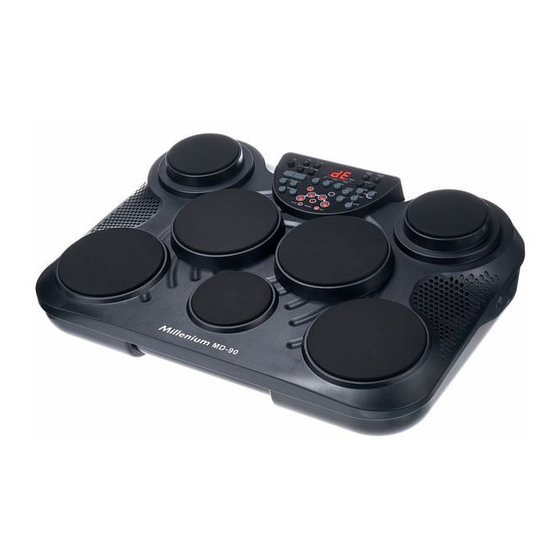
Features Features 7 pressure-sensitive drum pads, connectors for kick and hi-hat pedals Three-digit LED display Headphones (1/4" socket) and USB connection (MIDI IN/OUT) 25 predefined drum kits, 5 user drum kits 215 percussion voices, 128 GM voices, 8 MB voice data 100 songs (80 styles, 20 songs) 1 demo song Recording track... -
Page 12: Installation
Installation Installation Connecting the power adaptor Connect the power adaptor to the 12 V input of the device and then insert the mains plug into a wall outlet. Changing the batteries To insert or replace the batteries flip over the device, press lightly on the battery compartment cover and slide it in arrow direction. -
Page 13: Operating Elements
Operating elements Operating elements Front panel MD-90... - Page 14 Operating elements 1 [POWER] switch To switch the device on or off. 2 [TEMPO –/+] buttons To adjust the playback speed. 3 [MASTER VOLUME –/+] buttons To adjust the overall volume. 4 [ACC.VOLUME –/+] buttons To adjust the volume of the accompaniment tracks. 5 [REC] button with LED indicator To start or stop the recording function.
- Page 15 Operating elements 7 Three-digit LED display The display shows all parameters of the respectively opened menu. 8 [HAND PERC] button with LED indicator To switch to the ‘Hand Percussion’ mode. 9 [DRUM OFF] button with LED indicator To mute the drum track. 10 [KIT] button To open the ‘KIT’...
- Page 16 Operating elements 14 [VOLUME] button To adjust the pad volume. 15 [SELECT –/+] buttons To set the desired values (kit no., voice no., song no., …). 16 [SAVE] button To save the current settings as a user kit. 17 [PAN] button To customize the PAN assignment of each pad.
- Page 17 Operating elements 21 [DEMO] button Playback function for demo songs. 22 [GAIN] button To adjust the pad gain. Rear panel 23 PHONES socket For the connection of headphones. 24 KICK and HI HAT sockets For the connection of the kick and hi-hat pedals. MD-90...
- Page 18 Operating elements 25 USB connector To connect external devices. 26 12V connector for operating voltage supply. Connect the power adaptor here. mobile drum...
-
Page 19: Functions
Functions Functions Selecting a drum kit Upon switching on, the device activates the ‘KIT’ menu by default. The default value is ‘001’ . Press the [KIT] button to open the ‘KIT’ menu. The control LED of the button lights up and the three-digit LED display shows the current kit number. - Page 20 Functions Selecting a pad voice Press the [PAD ASSIGN] button to open the PAD ASSIGN menu. The default value corresponds to the voice number that is assigned to the crash pad in the respective kit, e.g. ‘96’ in kit ‘001’ . The control LED of the button lights up and the three-digit LED display shows the voice number that is assigned to the activated pad (activation by pressing a button or hitting the pad).
- Page 21 Functions Selecting the pad volume Press the [VOLUME] button to open the PAD ASSIGN menu. The control LED of the button lights up and the three-digit LED display shows the volume value of the activated pad (activation by pressing a button or hitting the pad). Then you can adjust the pad volume (0…9, loop) using the jog wheel or the [SELECT –/+] buttons.
- Page 22 Functions Panorama assignment Press the [PAN] button to open the PAD ASSIGN menu. The control LED of the button lights up and the three-digit LED display shows the assignment of the activated pad (activation by pressing a button or hitting the pad). Then you can adjust the position of the pad within the stereo panorama using the jog wheel or the [SELECT –/+] buttons (0…9, loop).
- Page 23 Functions Setting the pad gain Press the [GAIN] button to open the PAD ASSIGN menu. The control LED of the button lights up and the three-digit LED display shows the gain of the activated pad (activation by pressing a button or hitting the pad). Then you can set the desired gain (0…9, loop) using the jog wheel or the [SELECT –/+] buttons.
- Page 24 Functions Saving a kit Press the [SAVE] button to open the SAVE menu. You can now assign the current settings to a user kit number using the jog wheel or the [SELECT –/+] buttons (26…30, loop). During this process the display value flashes on the three-digit LED display. Press the [SAVE] button again to store the setting.
- Page 25 Functions Song playback Press the [SONG] button to open the SONG menu. The default value is ‘001’ . The control LED of the button lights up and the three-digit LED display shows the current song number. Then you can select the desired song (1…100, loop) using the jog wheel or the [SELECT –/+] buttons.
- Page 26 Functions Accompaniment volume In ACC.VOLUME menu, the three-digit LED display shows the accompaniment volume in ‘Axx’ format. Using the jog wheel or the [SELECT –/+] buttons you can adjust the accompaniment volume stepwise from 0…9. The selected value is automatically saved. Muting the drum track Using the [DRUM OFF] button you can mute or unmute the drum track during the playback of songs.
- Page 27 Functions Metronome During song playback, the beat indicator (control LED) is automatically activated. Press the [CLICK] button once to enable a human voice counting. Press twice to enable the click sound. Press the [CLICK] button again to turn the metronome off. Hand percussion Use the [HAND PERC] button to enter the Hand Percussion mode (song no.
- Page 28 Functions Reverb Use the [REVERB] button to enter the REVERB menu. The three-digit LED display shows the cur‐ rently selected reverb level in ‘Rxx’ format. Use the jog wheel or the [SELECT –/+] buttons to adjust the level stepwise as desired from 0…3. The selected value is automatically saved.
- Page 29 Functions When starting the recording, the vocal voice counting of the metronome is automati‐ cally activated but will not be recorded. Tu turn the metronome off press the [CLICK] button. Playback Use the [PLAY/STOP] button to start or stop the playback of recordings. When recording a new song, the previous recording will be overwritten.
-
Page 30: In And Outputs
In and outputs In and outputs Pedals You can connect kick and hi-hat pedals with 1/4" phone jacks to the corresponding sockets. Headphones The headphone output on the rear panel is available to connect headphones with a 1/4" TRS phone jack. mobile drum... - Page 31 In and outputs USB/MIDI interface This device outputs MIDI code via the USB / MIDI interface when you hit pads or press the pedals. Metronome signals and signals within songs will not be transferred. The device also receives MIDI data from other devices. MD-90...
-
Page 32: Technical Specifications
Technical specifications Technical specifications Pads 7 pressure-sensitive drum pads, connections for kick and hi-hat pedals Drum kits 25 predefined drum kits, 5 user drum kits Voices 215 percussion voices, 128 GM voices, 8 MB voice data Songs 100 songs (80 styles, 20 songs), 1 demo song Metronome 2 different sounds Recording... - Page 33 Technical specifications Dimensions (W × D × H) 500 mm × 370 mm × 157 mm Weight 3.3 kg MD-90...
-
Page 34: Cleaning
Cleaning Cleaning Device parts Clean the accessible parts of the device regularly. The frequency of cleaning depends on the operating environment: moist, smoky or particularly dirty environments may cause a higher accumulation of dirt on the components of the device. Use a dry soft cloth for cleaning. -
Page 35: Protecting The Environment
Protecting the environment Protecting the environment Disposal of the packaging mate‐ rial For the transport and protective packaging, environmentally friendly materials have been chosen that can be supplied to normal recycling. Ensure that plastic bags, packaging, etc. are properly disposed of. Do not just dispose these materials with your normal household waste, but make sure that they are fed to a recovery. - Page 36 Protecting the environment Disposal of your old device This product is subject to the European Waste Electrical and Electronic Equipment Directive (WEEE). Do not dispose with your normal household waste. Dispose this device through an approved waste disposal firm or through your local waste facility.
-
Page 37: Appendix
Appendix Appendix 11.1 Voice list Name Name Name Kick kit Rock Kick 001 Acoustic Kick 001 Acoustic Kick 011 Rock Kick 002 Acoustic Kick 002 Rock Kick 003 Acoustic Kick 003 Standard Kick 001 Acoustic Kick 004 Standard Kick 002 Acoustic Kick 005 Standard Kick 003 Acoustic Kick 006... - Page 38 Appendix Name Name Name Pop Kick 002 Acoustic Kick 009 Pop Kick 003 Acoustic Kick 010 Name Name Name Snare kit Standard Snare 001 Standard Stick 002 Acoustic Snare 004 Standard Snare 002 Rock Snare 001 Acoustic Snare 005 Standard Snare 003 Rock Snare 002 Standard Snare 004 Rock Snare 003...
- Page 39 Appendix Name Name Name Brush Snare 002 Acoustic Snare 001 Standard Stick 001 Acoustic Snare 002 Name Name Name Tom kit Standard Tom 001 Room Tom 005 Analog Tom 003 Standard Tom 002 Room Tom 006 Analog Tom 004 Standard Tom 003 Electronic Tom 001 Analog Tom 005 Standard Tom 004...
- Page 40 Appendix Name Name Name Room Tom 002 Electronic Tom 006 Acoustic Tom 004 Room Tom 003 Analog Tom 001 Acoustic Tom 005 Room Tom 004 Analog Tom 002 Acoustic Tom 006 Name Name Hihat kit Standard Hihat Close Rock Hihat Pad Standard Hihat Pad Rock Hihat Open Standard Hihat Open...
- Page 41 Appendix Name Name Shakable Rock Hihat Close Name Name Crash kit Standard Crash001 Rock Crash Standard Crash002 Standard Ride 002 Standard Crash003 Electronic Crash Analog Ride001 Splash002 China Crash Ride Bell Splash001 Standard Ride 001 MD-90...
- Page 42 Appendix Name Name Name Panel kit Vibraslap High Timbale Long Guiro Hand Low Timbale Mute Cuica Tambourine High Agogo Open Cuica Stcowb Low Agogo Mute Surdo Mutecowb Cabasa Open Surdo Mute Hi Conga Shaker Maracas Open Hi Conga Claves HighQ Low Conga Mute Triangle Slap...
- Page 43 Appendix Name Name Panel kit Laugh Metronome1 Three Metronome2 Four Tambourine001 Cartoon001 Tambourine002 Cartoon002 Tambourine003 Cartoon003 Tambourine004 Cartoon004 Tambourine005 Cartoon005 Cartoon006 MD-90...
- Page 44 Appendix Name Name Name SFX kit SFX001 SFX011 SFX021 SFX002 SFX012 SFX022 SFX003 SFX013 SFX023 SFX004 SFX014 SFX024 SFX005 SFX015 SFX025 SFX006 SFX016 SFX026 SFX007 SFX017 SFX027 SFX008 SFX018 SFX028 SFX009 SFX019 SFX029 SFX010 SFX020 SFX030 mobile drum...
- Page 45 Appendix Name Name Name SFX kit SFX031 SFX041 SFX051 SFX032 SFX042 SFX052 SFX033 SFX043 SFX053 SFX034 SFX044 SFX054 SFX035 SFX045 SFX055 SFX036 SFX046 SFX056 SFX037 SFX047 SFX057 SFX038 SFX048 SFX058 SFX039 SFX049 SFX059 SFX040 SFX050 SFX060 MD-90...
- Page 46 Appendix Name SFX kit SFX061 SFX062 SFX063 SFX064 SFX065 SFX066 SFX067 SFX068 SFX069 SFX070 mobile drum...
-
Page 47: Kit List
Appendix 11.2 Kit list Name Name Name Pop1 Rock2 Conga1 Pop2 Boss Conga2 Standard 1 Rock3 Timbales Room Standard 3 Latin Rock 1 Rock4 Funk Electronic Jazz2 User 1 (pop1) Analog Funk User 2 (pop2) Jazz 1 Clave User 3 (Standard1) Brush Drum Bass User 4 (Room) -
Page 48: Song List
Appendix 11.3 Song list Name Beat Name Beat Intro Rock1 Intro Rock2 8 beat Rock3 8 Beat2 Rock4 8 Beat3 Rock5 8 Beat4 Hard Rock1 8 Beat5 Hard Rock2 8 Beat Ballad1 16 Beat 1 8 Beat Ballad2 16 Beat 2 8 Beat Ballad3 16 Beat 3 Soft Rock... - Page 49 Appendix Name Beat Name Beat 16 Beat 5 Dance 16 Beat 6 Dance 1 16 Beat 7 Dance 2 16 Beat Ballad 1 Dance 3 16 Beat Ballad 2 Dance 4 16 Beat Ballad 3 Dance 5 16 Beat Ballad 4 Dance 6 16 Beat Ballad 5 16 Beat Funk 1...
- Page 50 Appendix Name Beat Name Beat Bounce Shuffle 7 Bounce 1 Slow rock Bounce 2 Slow Rock 1 Bounce 3 Slow Rock 2 Shuffle Slow Rock 3 Shuffle 1 Slow Rock 4 Shuffle 2 Latin Shuffle 3 Reggae 1 Shuffle 4 Reggae 2 Shuffle 5 Bossa Nova 1...
- Page 51 Appendix Name Beat Name Beat Samba Swing Salsa Swing 1 Latin Rock Swing 2 Cha-Cha Swing 3 Others Mambo Rhumba 1 Waltz Rhumba 2 3/4 Ballad Rhumba 2 Swing Blues Tango Blues March 1 March 2 MD-90...
- Page 52 Appendix Name Beat Name Beat R&B Hard Rock 3 Hip-Hop Pop Dance 1 Funk Pop Dance 2 Country R&B 16 beat Big Band 8 beat 16 beat 8 Beat 1 Fusion Funk 8 Beat 2 Ballad Funk 1 Hard Rock 1 Funk 2 Hard Rock 2 mobile drum...
- Page 53 Appendix Name Beat Shuffle Shuffle 1 Shuffle 2 16 Beat Shuffle 16 Beat Triplet Others Reggae Bossa Nova Big Band MD-90...
-
Page 54: Midi Implementation
Appendix 11.4 MIDI implementation Function Transmitted Recognised Remarks Basic channel Default Ch 10 Ch 1…16 Changed Mode Default Messages Altered ******** Note number True voice 27…88 0…127 ******** 0…127 Velocity Note ON Yes (9nH, V=1…127) Yes (9nH, V=1…127) No (9nH, V=0) No (9nH, V=0;... - Page 55 Appendix Function Transmitted Recognised Remarks Channels Pitch bender Control change Bank select Modulation Portamento time Data entry Volume Expression Sustain pedal Portamento ON/OFF Sostenuto pedal Soft pedal MD-90...
- Page 56 Appendix Function Transmitted Recognised Remarks Reverb program Chorus program Reverb level Chorus level All Sound Off Reset All Controllers All Notes Off Program change Variable range 0…127 System exclusive ******** System common Song Position Song Select Tune mobile drum...
- Page 57 Appendix Function Transmitted Recognised Remarks System real time Clock Command Aux messages Local ON/OFF All Notes OFF Active Sense System reset Mode 1: OMNI On, Poly Mode 2: OMNI On, Mono Mode 3: OMNI Off, Poly Mode 4: OMNI Off, Mono MD-90...
- Page 58 Notes mobile drum...
- Page 60 Musikhaus Thomann · Hans-Thomann-Straße 1 · 96138 Burgebrach · Germany · www.thomann.de...
Need help?
Do you have a question about the MILLENIUM MD-90 and is the answer not in the manual?
Questions and answers