
Subscribe to Our Youtube Channel
Related Manuals for Uniden UNVR85-4


Summary of Contents for Uniden UNVR85-4
-
Page 1: Network Digital Video Recorder
Network Digital Video Recorder UNVR85-4 UNVR85-8 UNVR165-8 User Guide Please read this guide thoroughly before operation and retain it for future reference. -
Page 2: Customer Care
Note: Images in this manual may differ slightly from your actual product. Uniden surveillance products are not manufactured and/or sold with the intent to be used for illegal purposes. Uniden expects consumer’s use of these products to be in compliance with all local, state and federal law. -
Page 3: Important Safeguards
Important Safeguards WARNING RISK OF ELECTRICAL SHOCK DO NOT OPEN WARNING: TO REDUCE THE RISK OF ELECTRIC SHOCK, DO NOT REMOVE COVER. NO USER SERVICEABLE PARTS INSIDE. REFER SERVICING TO QUALIFIED SERVICE PERSONNEL. The exclamation point within an equilateral triangle is intended to alert the user to the presence of important operating and maintenance (servicing) instructions in the literature accompanying the device. -
Page 4: General Precautions
IMPORTANT SAFEGUARDS This section provides precautions and safety measures to ensure you are using the DVR properly. Please read all information, and refer back to it if needed. GENERAL PRECAUTIONS 1. Follow all instructions and warnings in this manual. 2. Unplug the device from the power source before cleaning it. Do not use liquid aerosol detergents;... - Page 5 11. Attachments - Only use Uniden or Uniden recommended attachments. 12. Water and Moisture - Do not use this device near water - for example, near a bath tub, wash bowl, kitchen sink, or laundry tub, in a wet basement, near a swimming pool, etc.
-
Page 6: Service
3. Replacement Parts - Use only replacement parts verified by Uniden customer care specialists to have the same safety characteristics as the original parts. Use Uniden-specified replacement parts to prevent fire, electric shock, or other hazards. -
Page 7: Table Of Contents
CONTENTS Customer Care ..........ii IMPORTANT SAFEGUARDS . - Page 8 Alarm ............21 File Manager .
-
Page 9: Package Contents
PACKAGE CONTENTS RECEIVER PACKAGE 6 ft Ethernet Cable 6 ft HDMI Cable NVR Receiver 12V Power Supply USB Mouse Receiver Package Contents... -
Page 10: Camera Package
CAMERA PACKAGE Outdoor Cameras (4 or 8) 100ft. Cat5E Cable (4 or 8) Not Shown: Hex Wrench Quick Start Guide InstallerNet Insert Camera Mounting Kit Camera Package Components... -
Page 11: Features
• Upgradeable firmware. • 3-Step remote view. • Supports Internet Explorer, Safari, Chrome, and FireFox. • Free Uniden ProHD iOS and Android compatible apps with live viewing, playback, video recording, and snapshot capability. • Instant email alerts with attached snapshots. -
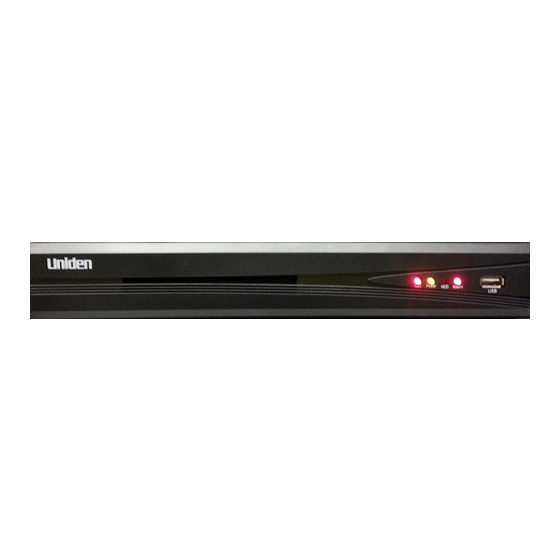
Page 12: Nvr Receiver Front Panel
WAN: Connect the included CAT5E Ethernet cable to your existing router or network for local and remote connectivity. USB port: Connect the included USB mouse. Camera Input: Connect the Uniden 1080P Wired HD cameras. DC IN: Connect the included AC power adapter. -
Page 13: Unvr165X16 Receiver Rear Panel
UNVR165X16 RECEIVER REAR PANEL 1 1 1 1 1 Non-PoE UNVR165x8 Receiver Rear Panel DC IN: Connect the included AC power adapter. Camera Input: Connect PoE (Power over Ethernet) and Non-PoE cameras. Non-PoE cameras require a separate AC adapter for power. WAN: Connect the included CAT5E Ethernet cable to your existing router or network for local and remote connectivity. -
Page 14: Set Up
Connect to PoE Port Note: Although the Uniden NVR system is compatible with other manufacturers’ cameras, only the supplied Uniden bullet camera and the optional Uniden dome camera are plug and play. Refer to the manufacturers’ camera owner’s manuals for installation instructions. -
Page 15: Connect The Mouse
Connect the Mouse Connect the USB mouse to the USB port on the NVR’s rear panel. Connect the USB mouse Connect the Ethernet Cable 1. Connect the Ethernet cable to the LAN port on the NVR’s rear panel. 2. Connect the other end of the Ethernet cable to a router on your network. Connect the Ethernet cable Connect the Monitor Connect the HDMI cable from the HDMI port of the NVR’s rear panel to the HDMI port... -
Page 16: Connect The Power Adapter And Power On The Nvr
Connect the Power Adapter and Power ON the NVR 1. Connect the included power adapter to the DC IN port on the NVR’s rear panel. Then connect the power adapter to a wall socket or a surge protector. Connect Power 2. - Page 17 • In “high-risk” locations, have multiple cameras point in the same area. This provides camera redundancy if a vandal attempts to damage the camera. Installing the Cameras Note: The following installation instructions refer to the cameras included with the UNVR package. If installing another manufacturer’s camera, refer to installation instructions included with that camera.
- Page 18 Connecting Camera Cables CAUTION The extension cable must be a single stretch of cable between the NVR and camera. You cannot connect multiple extension cables to each other. 8-Channel NVR 1. Connect one end of the included CAT5E cable to the camera. 2.
-
Page 19: Mouse Control
MOUSE CONTROL MOUSE FEATURES The mouse is the primary control device for the system. Right Button Left Button Scroll Wheel Mouse Control LEFT BUTTON • In live view, click to open the Navigation Bar. Right-click to close it. • In live view while in a split-screen display mode, double-click an individual channel to view it in full-screen. -
Page 20: Basic Operation
BASIC OPERATION START UP THE UNVR SYSTEM 1. Plug in the power supply. The power indicator lights up, the system emits a single beep, and the preview screen displays. 2. The UNVR’s normal start-up mode is multi-screen. UNVR Multi-Screen • The UNVR system displays live views of any cameras connected. •... -
Page 21: Main Menu
Main Menu The Main Menu allows access to the UNVR’s key functions. Using the mouse, right click the screen during a live view to display the Main Menu. Main Menu The following features are available without having to log in. • 4:3 - Changes the live view screen aspect ratio from 16 X 9 to 4 X 3. - Page 22 During a live view with multiple screens displayed, double click any channel to view it in full screen. Full Screen Log into the System You must log into the system to access all features of the UNVR. 1. Hover the cursor over Start. A sub menu displays: Access Login Screen 2.
-
Page 23: Set The Device Time
Change Password Note: It is strongly recommended that you add a password to your system. 1. Right click the screen to display the Main Menu, then left click Start/Setting. 2. Click Account. 3. Click the admin field. 4. Click Modify User in the lower right corner. Use the on-screen keypad to enter and confirm a password. - Page 24 Setting Screen 3. Scroll to near the bottom of the screen to Device Time and click Setting. The Device Time screen displays. Accessing Device Time 4. To the date and time for your location, click the field and then click the up or down arrows.Click OK when complete.
-
Page 25: Advanced Operation
ADVANCED OPERATION LOG INTO THE SYSTEM To access the Advanced Settings in the Main Menu, log into the system. 1. Hover the cursor over Start. A sub menu displays: Access Login Screen 2. Click Login. The Login screen displays: Login Screen 3. -
Page 26: Advanced Settings In Main Menu
ADVANCED SETTINGS IN MAIN MENU Right-click to access Playback - Play video files stored on the hard disk Main Menu Backup - Backup video and capture files to an external storage device PTZ - Set controls for a camera designed to Pan-Tilt- Zoom Capture - Saves a photo of the image displayed on the screen... -
Page 27: Backup
• Fast: Speed up the playback process(2, 4,8,16 times available). • Snapshot: Take a screen capture of any playback channel. • Frame play: Play recording one frame at a time. • Backup: Make a backup video for any channel. • Full screen: Video image playback on full screen. •... -
Page 28: Ptz (Pan-Tilt-Zoom)
PTZ (Pan-Tilt-Zoom) Note: This function requires a camera with PTZ capability (not included). Set the controls for a camera equipped with Pan-Tilt-Zoom capability. Refer to the PTZ camera manufacturer’s instructions for details on setting the camera’s parameters. PTZ Camera Parameters Menu Presets The UNVR system can move a PTZ camera to a specific angle/point of view and then save that setting as a “preset”... -
Page 29: Capture
2. Click Track Start to set the PTZ camera operation, then click Track Stop to set the track in memory. 3. To recall a track setting, select the track number in the drop down list and click Capture Capture allows you to take snapshots from live view. 1. -
Page 30: Setting
File Manager Screen 1. In the File Manager screen, click Refresh to ensure the latest files display. 2. Double click the file name in the left portion of the screen to display the captured image or file. Setting Main Menu - Setting The Setting screen specifies parameters for several major functions in the UNVR system. - Page 31 Device Setting Screen Note: Set the correct date and time to ensure correct time stamping of recorded video. Device Info Set parameters or get information for the following: • Device Name - Specify a name for the NVR. • Device Number - Assign a number to the device. •...
- Page 32 System Version This tab shows specific system information. System Version Screen • Master Version - Software version assigned to the NVR. • Hardware Version - The hardware version of the NVR. • Device ID - Specific ID number assigned to the NVR PTZ Setting Set parameters for a Pan-Tilt-Zoom (PTZ) camera.
- Page 33 DST Setting This screen sets Daylight Savings Time for the UNVR system. 1. Click the Enable Daylight Saving Time box to activate the DST settings. 2. Set Daylight Saving time to begin on the first Sunday in March and to end on the first Sunday in November.
- Page 34 The term “Channel” refers to each monitoring camera attached to the UNVR system. The Channel screen allows for setting parameters to control several features for each channel. Display Setting Sets parameters for each camera’s screen display. Display Setting Screen • CH - Choose the channel where the camera is connected. •...
- Page 35 • Channel - Select the channel number to change parameters for each channel. • Encoding Type - Choose from Main stream/ Sub stream/ Main stream (Event). • Stream type - Video or Audio/Video optional. Note: The included cameras do not support audio. •...
- Page 36 Motion Detection Setting Screen Video Lost Set up an alarm notification in case a camera loses video. Use the Copy To feature to transfer the settings to other channels. Video Lost Screen Tampering Alarm This screen sets parameters for triggering an alarm caused by tampering with a camera.
- Page 37 Tampering Alarm Screen Video Mask Use Video Mask to block off a portion of the camera’s video. Video Mask Screen...
- Page 38 Network Settings These settings do not require changes. The Uniden NVR system supports a P2P connection directly to the Uniden P2P Cloud Server for remote access to your system via an iPhone, iPad, and Android device using the Uniden ProHD app.
- Page 39 DDNS Server Settings The DDNS server allows for a connection to the Internet a PC with a fixed IP address. DDNS Settings Screen NTP settings NTP Settings Screen...
- Page 40 Email Setting Set up parameters so the NVR can send status messages for motion detection or other events through email. DDNS Setting Screen Management Platform Set parameters management protocol such as iCloud or WebServer. Management Platform Screen...
- Page 41 Alarm The Alarm screen allows configuring alarms for the UNVR system. The NVR alerts you by popping up live video and playing sound alerts for events such as motion detection, video loss, or hard disk drive problems. Alarm Screen Alarm Input Enables alarm processing, sets the alarm schedule, and selects the trigger mode.
- Page 42 Alarm Output Sets the alarm output delay and alarm schedule. Alarm Output Screen Exception Sets parameters for alarm event types and alarm displays on the monitor. Allows you to choose an audio alarm type. Alarm Exception Screen...
-
Page 43: Account
Account Enter details of the user account in this screen. Account Screen Account Setting Enter user name, password, and specify user type. Account Setting Screen... - Page 44 User Online Check the status of an online user’s connection. User Online Screen System The System screen allows for setting up system parameters as needed. Device Log Check the device logs according to the video type and date time. System Screen - Device Log...
- Page 45 Stream Info. View the band width of data streaming for each channel. System Screen - Stream Info. HDD Setting Check the capacity and free space of the HDD (hard Disk Drive), and format the HDD if needed. System Screen - HDD Setting...
- Page 46 Update Update the UNVR system hardware. System Screen - Update System Auto Reboot Enable or disable the UNVR system for rebooting once, daily, or weekly. System Screen - Auto Reboot...
-
Page 47: Record
Recovery Configuration Export or import a recovery configuration file. System Screen - Recovery Confirmation Record Main Menu - Record The Record screen allows for setting the system to record based on a schedule or you can manually turn recording on or off for all channels or individual channels. Record Screen... -
Page 48: Display Setting
Display Setting Main Menu - Display Setting Display Setting Screen Set up the following parameters in the Display screen: • Language - Different kinds of languages for selection (English, French, Spanish, etc.). • Auto Logout - It will logout automatically with no operation during the selected minutes. -
Page 49: Image Setting
Image Setting Main Menu - Image Setting Image Setting Screen Adjust the following items in the Image Setting screen: • Brightness • Contrast • Saturation • Hue IP Channel Setting Main Menu - IP Channel Setting... -
Page 50: Ip Channel Setting - Manual
IP Channel Setting - Manual Note: The IP Channel Settings do not require changing. The system automatically identifies when cameras are attached and assigns the IP addresses. IP Channel Setting - Manual IP Channel Setting Screen This IP Channel Setting screen allows setting up parameters for connecting the UNVR system to the Internet. -
Page 51: Other Main Menu Options
OTHER MAIN MENU OPTIONS Hover the mouse over Start in the Main Menu and these options display: • Quick Setup • Power Off • Reboot • Logout • Device Time • Volume Main Menu Features Under Start QUICK SETUP Click Quick Setup to return to the initial system setup screens. POWER OFF 1. -
Page 52: Reboot
REBOOT Click Reboot to reboot the UNVR system automatically. Main Menu - Reboot LOGOUT Click Logout to exit the advanced feature items in the Main Menu. Main Menu - Logout DEVICE TIME Click Device Time to set the UNVR system time. Main Menu - Device Time VOLUME Click Volume to change the volume of the SELECTED live screen. -
Page 53: Remote Access
REMOTE ACCESS You can also remotely access your UNVR system through Uniden’s ProHD app for iOS or Android devices. Go to the Apple App Store or Google Play to download the free Uniden ProHD app. The app is designed to be self-explanatory. However, you can download the Uniden... -
Page 54: Firmware Update
FIRMWARE UPDATE From time to time, Uniden may update its products' firmware to improve features, fix bugs, or otherwise improve the product. Uniden recommends checking for firmware updates periodically. Note: Check for firmware updates if you have service issues; your firmware may be out of date. -
Page 55: Maintenance
MAINTENANCE Use a damp cloth to wipe down the outside casings of the NVR equipment. Do not use harsh abrasives or chemicals as they could get inside the casings and damage internal componants. Check plugs and cords periodically for wear. RECYCLING AND DISPOSAL INFORMATION Do not dispose of electronic devices or any of their components (especially batteries and •... -
Page 56: Compliance And Warranty
WARRANTOR: Uniden America Corporation (“Uniden”) ELEMENTS OF WARRANTY: Uniden warrants, for one year, to the original retail owner, this Uniden Product to be free from defects in materials & craftsmanship with only the limitations or exclusions set out below. - Page 57 Product. Include evidence of original purchase & a note describing the defect that has caused you to return it. The Product should be shipped freight prepaid, by traceable means, to warrantor at: Uniden America Service C/O Saddle Creek 743 Henrietta Creek Rd., Suite 100...
Need help?
Do you have a question about the UNVR85-4 and is the answer not in the manual?
Questions and answers