Advertisement
Quick Links
Advertisement

Related Manuals for Mantis compact compostumbler


Summary of Contents for Mantis compact compostumbler
- Page 1 C O M P A C T Assembly Instructions...
- Page 2 Tools You Will Need Tools You Will Need Before you start, assemble the following tools: 3/8" wrench 7 /16" wrench Regular pliers Adjustable wrench Regular screwdriver (flat head) Phillips screwdriver (cross head) Everything else you will need is included with your Compact ComposTumbler.
- Page 3 Parts For The Tumbler Drum Parts For The Tumbler Drum PART QUANTITY ITEM NO. DESCRIPTION NEEDED Drum Panel A Drum Panel B Endcap Tie Rod Aerator Base Aerator Cap Latch Hook Latch Door #10 Bolt #10 Flatwasher #10 Lockwasher #10 Nut Acorn Nut Wing Nut Bolt,...
- Page 4 Parts For The Frame Parts For The Frame PART QUANTITY ITEM NO. DESCRIPTION NEEDED Drive Support Drive Handle Brace Frame Leg Strut Drive Gear Cotter Pin Grip Grip Cap #6 Screw Stub Axle " Fender Washer " Locknut Bolt, " x 4” Bolt, / "...
-
Page 5: Drum Assembly
Drum Assembly Drum Assembly STEP 1: Initial Drum Body Assembly Select: 2 Drum Panel A segments (item 1) 5 #10 Bolts (silver) (item 10) 5 #10 Flatwashers (item 11) 5 #10 Lockwashers (item 12) 5 #10 Nuts (item 13) A. Place both Drum Panel A segments on a flat, smooth work surface with the flanged mixing fins facing upright. - Page 6 Drum Assembly Drum Assembly STEP 3: Drum Panel B Assembly Select: 1 Drum Panel B Segment 12 Shoulder Bolts (gold) (item 17) 12 #10 Flatwashers (item 11) 12 #10 Lock Nuts (item 18) A. Carefully fit Drum Panel B into the last open space of the Endcap to complete the Drum Cylinder, overlapping the adjoining segments and lining up the hole patterns along both sides and into the rim of the Endcap.
- Page 7 Door Assembly Door Assembly STEP 4 Continued: C. Thread a second acorn nut onto the exposed end of the Tie Rod. If there is not enough exposed thread to start the nut or if the rod will not go all the way through the drum, double check to make sure the drum edges are fitted all the way into the rim of the Endcaps.
- Page 8 Latch Assembly Latch Assembly STEP 6: Latch Attachment Select: 2 Latches (item 8) 2 Latch Hooks (item 7) 8 #10 Bolts (silver) (item 10) 8 #10 Flatwashers (item 11) 8 #10 Lockwashers (item 12) 8 #10 Nuts (item 13) 1 Drum Assembly 1 Door Assembly A.
-
Page 9: Drive Assembly
Drive Assembly Drive Assembly STEP 7: Drive Handle Assembly Select: 1 Drive Handle (item 20) 1 Grip (item 26) 1 Grip Cap (item 27) 1 #6 Screw (item 28) A. Slide the Grip onto the end of the Drive Handle. B. - Page 10 Leg Assembly Leg Assembly STEP 9: Gear Drive Positioning Select: 1 Gear drive Assembly (from step 8) 1 Drum Assembly Guide the Drive Gear into the Gear recess of one Endcap. It may be necessary to pull the ends or the Drive Support slightly apart to position it correctly.
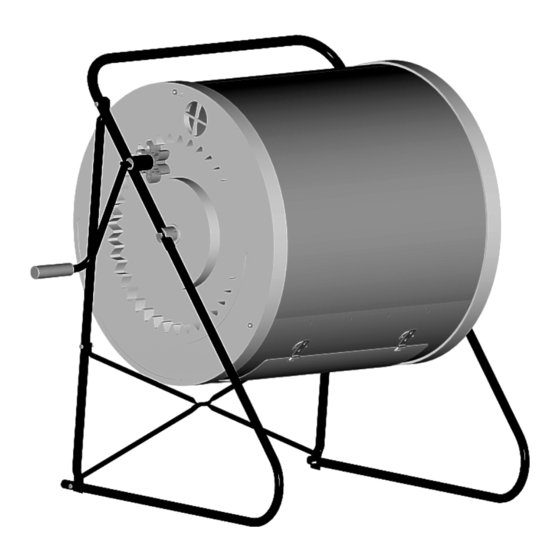
- Page 11 Positioning the Assembly Carefully tip the unit onto its support frame. Then attach the door to the unit. Your Compact ComposTumbler is now completely assembled and ready to use. Read your operating instructions manual, "How to Make Superior Compost," carefully before starting your first batch of compost.
Need help?
Do you have a question about the compact compostumbler and is the answer not in the manual?
Questions and answers