Table of Contents
Advertisement
Available languages
Available languages
Advertisement
Table of Contents

Related Manuals for Weller DS 80 UNC


Summary of Contents for Weller DS 80 UNC
- Page 1 Weller ® DS 80 (UNC) Betriebsanleitung Istruzioni per l'uso Operating Instruction Kullanım açıklamaları Manuel d'Utilisation PK Elektronik Vertriebs GmbH, E-Mail: info@pkelektronik.com, Internet: www.pkelektronik.com...
-
Page 2: Table Of Contents
| ˙ çindekiler Inhaltsverzeichnis Seite Table des matières Page Sayfa 1. Sicherheitshinweise 1. Consignes de sécurité 1. Uyar›lar 2. Anschluss 2. Raccordement 2. Anschluß 3 Inbetriebnahme 3 Mise en route 3. ‹lk çal›flt›rma 4. Fehlerbehebung 4. Dépannage 4. Ar›zan›n giderilmesi Table of contents Page Indice... -
Page 3: Sicherheitshinweise
2. Anschluss Für andere, von der Betriebsanleitung abweichende Verwendung, sowie bei eigen- Weller DS 22 und DS 22 antistatic können an alle elektronisch geregelten Entlötgeräte mächtiger Veränderung, wird von Seiten des Herstellers keine Haftung übernommen. mit 50 W Anschlusstechnik angeschlossen werden. -
Page 4: Inbetriebnahme
Saugdüsen (DS 80 / UNC): Gewinde M 5 / 12 - 24 UNC 2A Platinenebene steht. Das Lot muß ganz flüssig sein (sehr wichtig bei durchkontak- DSX 80: konisches Befestigungssystem tierten Leiterplatten), dann Zinn auf einmal absaugen. Während des Absaugvorgangs Schlüsselweite: 8 mm ist es wichtig, den Anschlußpin des Bauteils in der Bohrung kreisförmig zu bewegen. - Page 5 Stirnflächen des Glaszylinders gewährleisten volle Saugleistung. Verschmutzte Filter 3. Neue Saugdüse mit Anti-Bloc-Paste bestreichen und einschrauben. beeinflussen den Luftdurchsatz durch den Entlötkolben. Zur Reinigung der Saugdüsenbohrung und des Saugrohres das Reinigungswerkzeug (5 13 500 99) Reinigung DSX 80 benutzen. Um gute Entlötergebnisse zu erzielen, ist es wichtig den Entlötkopf regelmäßig zu rei- nigen.
-
Page 6: Fehlerbehebung
Bild: Reinigungswerkzeug, Reinigungsvorgang und Auswechseln der Saugdüse (siehe Seite 24) 4. Fehlerbehebung Fehler: Entlötkolben heizt nicht. Fehlersuche: Entlötkolben ausstecken und mit Ohmmeter am Stecker überprüfen. Stift 1.-2. Heizelement DS 80 = 6,2 ohm / DS 22 = 10,5 ohm 3.-4. Sensor 22 ohm 5. -
Page 7: Safety Instructions
Non-observance of these safety instructions can result The Weller DS 80 (UNC) and DSX 80 antistatic can be connected to all electronically in accidents, injury or risks to health. -
Page 8: Starting Operation
Suction tiplet (DS 80 UNC): Thread M 5 / 12 - 24 UNC 2A cuit boards with contacted through-holes). Suck up the solder in a single operation DSX 80: conical fastening system while circularly moving the connection pin of the component within the hole. If the... - Page 9 ning tool (5 13 500 99). Cleaning DSX 80 To achieve good desoldering results it is important to clean the desoldering head Various suction nozzles solve many desoldering problems. The suction nozzles can regularly. This includes emptying the solder collecting container, replacing the glass be changed easily;...
-
Page 10: Repair Of Defects
4. Repair of Defects Defect: Desoldering iron does not heat. Trouble Shooting: Disconnect iron from power supply and check with ohmmeter at the plug. 1.-2. Heater DS 80 = 6,2 ohm / DS 22 = 10,5 ohm 3.-4. Sensor 22 ohm 5. -
Page 11: Consignes De Sécurité
Le fabricant décline toute responsabilité en cas d'utilisation autre que celle décrite Les Weller DS 22 et DS 22 antistatic peuvent être raccordé à tous les appareils à des- dans les instructions d'emploi de même qu'en cas de modification effectuée sans souder avec régulation électronique possédant une connectique 50 W. -
Page 12: Mise En Route
270°C - 450°C te (occasionnée soit par une mauvaise position de la buse, soit par un temps de Panne à dessouder (DS 80 UNC): filetage M 5 / 12 - 24 UNC 2A chauffe insuffisant de l‘étain), le point de soudure doit être rechargé avant de re-des- 8 mm sur plat souder. - Page 13 sance d’aspiration. L’encrassement des filtres gêne le passage de l’air à travers le fer Nettoyage DSX 80 à dessouder. Utiliser pour nettoyer l’orifice de la buse d’aspiration et le tube d’aspira- Il est important de nettoyer régulièrement la tête de dessoudage pour obtenir un des- tion l’outil de nettoyage (5 13 500 99).
-
Page 14: Dépannage
Illustration : outil de nettoyage, nettoyage et changement de la buse d’aspiration (voir la page 24) 4. Dépannage Défaut: le fer à dessouder ne chauffe pas. Solution: déconnecter le fer et mesurer avec un ohmmètre les plots du connecteur. Plots 1.-2. -
Page 15: Avvertenze Per La Sicurezza
Da parte del produttore non viene assunta alcuna responsabilità per l’uso improprio Gli stili dissaldanti Weller DS 22 e DS 22 antistatici possono essere collegati a tutte le o comunque diverso da quello previsto dalle istruzioni d’uso, nonché in caso di stazioni dissaldanti con controllo elettronico della temperatura e potenza 50 W. -
Page 16: Procedura
Ugello dissaldante (DS 80 / UNC): filettatura M 5 / 12 - 24 UNC 2A completamente rifusa (questo è molto importante soprattutto nel caso di circuiti DSX 80: sistema di fissaggio conico stampati con fori passanti). Aspirare la lega saldante in un‘unica operazione mentre si compie un movimento circolare in maniera da scostare il terminale del componente dai punti di contatto all‘interno del foro. - Page 17 Pulizia DS 22 / DS 80 1. Allargare il foro con una punta da 4 mm di diametro, profondità max. 11 mm. Per ottenere dei buoni risultati di dissaldatura, é molto importante pulire ad intervalli regolari la testa dissaldante. A tale scopo é necessario svuotare il contenitore di rac- 2.
-
Page 18: Soluzione Dei Problemi
foro dell’ugello e del tubo di aspirazione stesso utilizzare l‘apposito utensile di puli- Se il termo-sensore o l‘elemento riscaldante risulatano interrotti, rimuovere il cap- zia. puccio del micro-interruttore, svitare le tre viti sulla flangia e sfilare la testa dissald- ante. In caso di forti depositi di sporco nella sede conica non é... -
Page 19: Uyar›Lar
Kullanım açıklamalarında tasvir olunan kullanım ¸ s ekilleri dı¸ s ında kullanılırsa veya kullanıcı Weller DS 22 ve DS 22 anti statik elektronik s›cakl›k ayarlanan tüm lehim sökme aletlerine tarafından cihazda keyfi de˘ g i¸ s iklikler yapılırsa imalatçı sorumluluk üstlenmez. -
Page 20: Lk Çal›Flt›Rma
3. ‹lk çal›flt›rma Solaklar için de¤ifltirme imkan› Lehim sökme havyas›n› muhafaza ayar›na yerlefltirin. Besleme kablosunu aletin ön 4 Flanfl c›vatas›n›n (sayfa 21'e bak›n) gevfletilmesi sayesinde, lehim sökme havyas› tuta- taraf›ndaki ba¤lant› prizine tak›n ve sabitleyin. Vakum hortumunu ana filtre nipeline tak›n. ma¤a göre 120°... -
Page 21: Ar›Zan›N Giderilmesi
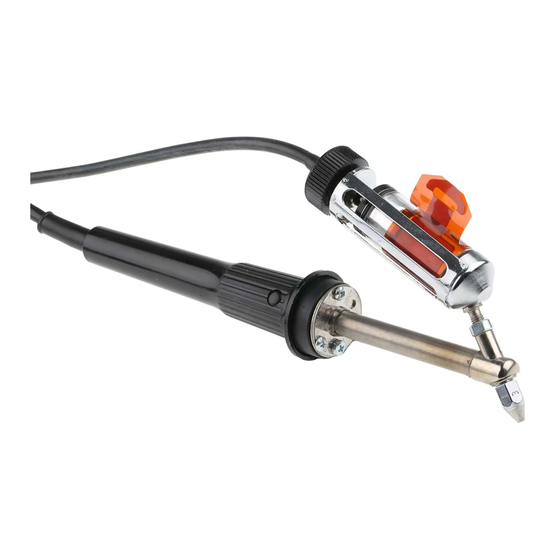
Emme memesi vidas›n›n kaynamas›n› engellemek için, emme memesinin düzenli olarak Konik bölgede çok fazla kir birikimleri oldu¤unda, art›k yeni bir emme memesi kullan›lamaz. sökülmesi ve vidaya "Antiblock-pasta" sürülmesi gerekir. Vida çok kirlendi¤inde veya emme Bu kir birikimleri ›s›t›c› gövde koni¤inin, temizleme setiyle temizlenir. memesi k›r›ld›¤›nda afla¤›da belirtildi¤i gibi onar›m yap›labilir: Resim: Temizleme aleti, temizleme ifllemi ve emme memesinin de¤ifltirilmesi 1. - Page 22 1. Soket ile birlikte ba¤lant› kablosu 2. Emme borusu 3. Vakum oluflturma parmak flalteri 4. Cam-Kalay kolektörü 5. Emme memesi 6. Entegre ›s›t›c›s› ve s›cakl›k sensörü olan lehim sökme kafas› 1. Anschlußleitung mit Stecker 1. Cord with plug 1. Câble d‘alimentation avec connecteur 1.
- Page 23 1-2 Elément chauffant 3-4 Thermosonde PT 20 Equilibre du potentiel Micro-contact Plot de mesure 80 W 1-2 Elemento riscaldante 1-2 Heizkörper 3-4 Termo-sensore PT 20 3-4 Fühler PT 20 Equalizzazione dei potenziale Potentialausgleich Microinterruttore Fingerschalter Identifica gli utensili 80 W Codierstift 80 Watt 4D9R010 1-2 Heating element...
- Page 24 PK Elektronik Vertriebs GmbH, E-Mail: info@pkelektronik.com, Internet: www.pkelektronik.com...
- Page 25 PK Elektronik Vertriebs GmbH, E-Mail: info@pkelektronik.com, Internet: www.pkelektronik.com...
- Page 26 Reinigungswerkzeug Cleaning tool 5 13 500 99 1. Saugrohr ø 0,9 für DS 112, DS 113, DS 116 2. ø 0,5 für DS 110, DS 111, DS 115, DS 118 3. ø 0,4 für DS 114, DS 117 1. Suction tube ø 0,9 for DS 112, DS 113, DS 116 2.
- Page 27 DS-Serie DS-Serie (UNC) Modell Außendurch- Innendurch- Länge Bestell Nr. Modell Außendurch- Innendurch- Länge Bestell Nr. messer messer messer messer DS110 5 13 510 99 DS110 1,15mm/0,060‘‘ 0,63mm/0,025‘‘ 19mm/0,75‘‘ 0151352099 DS111 5 13 511 99 DS111 2,29mm/0,090‘‘ 0,63mm/0,025‘‘ 19mm/0,75‘‘ 0151352199 DS112 5 13 512 99 DS112 1,93mm/0,076‘‘...
- Page 28 DSX-Serie Teilenummer 5 13 140 99 5 13 141 99 5 13 142 99 5 13 143 99 5 13 150 99 5 13 144 99 5 13 145 99 5 13 146 99 5 13 147 99 5 13 148 99 5 13 151 99 5 13 152 99 5 13 153 99...
Need help?
Do you have a question about the DS 80 UNC and is the answer not in the manual?
Questions and answers