Table of Contents
Advertisement
Available languages
Available languages
Quick Links
RC Logger HD
No. 10001RC
1.
iNteNDeD use
The product is intended for taking pictures, recording videos and logging information on a model vehicle. It
can be used as the primary module for connecting up to three additional modules. It is powered by an internal
rechargeable battery or a remote control receiver.
Audio is always recorded at the same time while the video is being recorded. If you do not want the audio to be
played, follow the instructions in the software guide and mute the volume output.
For safety and approval purposes (CE), you must not rebuild and/or modify this product. If you use the product
for purposes other than those described above, the product may be damaged. In addition, improper use can
cause hazards such as short circuiting, fire, electric shock etc. Read the instructions carefully and keep them.
Make this product available to third parties only together with its operating instructions.
2.
DeLiveRy CoNteNt
>
RC Logger HD
>
Mounting bracket
>
USB cable
>
Receiver trigger cable
>
Software CD
>
Operating instructions
3.
safety iNstRuCtioNs
Read the operating instructions carefully and especially observe the safety information. if
you do not follow the safety instructions and information on proper handling in this manual,
we assume no liability for any resulting personal injury or damage to property. such cases
will invalidate the warranty/guarantee.
Persons / Product
>
The device is not a toy. Keep it out of the reach of children and pets.
>
Do not leave packaging material lying around carelessly. These may become dangerous playing material
for children.
>
Protect the product from extreme temperatures, direct sunlight, strong jolts, high humidity, moisture,
flammable gases, vapours and solvents.
>
Do not place the product under any mechanical stress.
>
If it is no longer possible to operate the product safely, take it out of operation and protect it from any
accidental use. Safe operation can no longer be guaranteed if the product:
-
is visibly damaged,
-
is no longer working properly,
-
has been stored for extended periods in poor ambient conditions or
-
has been subjected to any serious transport-related stresses.
>
Handle the product carefully. Jolts, impacts or a fall even from a low height can damage the product.
>
Also observe the safety and operating instructions of any other devices which are connected to the
product.
Batteries
>
Batteries must be kept out of reach of children. Do not leave the battery lying around, as there is risk, that
children or pets swallow it.
>
Batteries must not be dismantled, short-circuited or thrown into fire. Never recharge non-rechargeable
batteries. There is a risk of explosion!
Miscellaneous
>
Consult an expert when in doubt about operation, safety or connection of the device.
>
Maintenance, modifications and repairs are to be performed exclusively by an expert or at a qualified
shop.
>
If you have questions which remain unanswered by these operating instructions, contact our technical
support service or other technical personnel.
4.
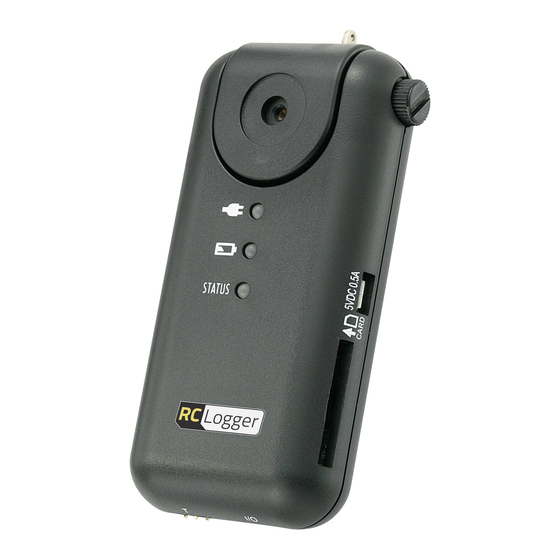
oPeRatiNg eLeMeNts
1
2
3
13
12
11
10
9
8
6
7
1.
Camera Lock
8.
Single shot / auto shot switch
2.
micro USB port
9.
Off / Video mode
Camera mode switch
3.
SD card slot
CARD
10.
Camera
4.
Additional sensor module connection port I/O
11.
Charging status LED
5.
Trigger port / external RC input T
Version 03/11
12.
Low battery LED
6.
Reset pin hole
13.
Status LED
S
7.
Shutter
5.
CHaRgiNg tHe BatteRy
1.
Plug the USB cable into a vacant port of your personal computer. Alternatively, you may use a USB power
supply (not included) to charge the product. Make sure the USB power supply fulfil the charging requirement
specified in technical data.
2.
Plug the other end of the cable to the micro USB port of the logger.
3.
The charging status LED lights up when the battery of the logger is charging. It is red when charging the
battery, and it is green when the battery is fully charged.
6.
Loose attachment of the logger may lead to poor image / video quality and cause damage
to the camera.
1.
Select a location for installing the logger. Make sure the view of the camera is not blocked. If you are going
to install additional modules or connect the trigger port, also consider the location of the modules or the
trigger cable such that the cables are not kinked or pinched.
2.
Screw the camera lock in an anti-clockwise direction, then you can adjust the angle of the camera.
3.
Lock the angle of the camera by screwing the camera lock in a clockwise direction.
You can attach the logger to the model vehicle without using the mounting bracket. Attach the logger
on the model vehicle directly and firmly with cable ties and double sided foam adhesive tape.
4.
Attach the mounting bracket on the helicopter or the aeroplane firmly with cable ties and double sided foam
adhesive tape.
5.
Mount the logger on the bracket firmly.
6.
If you would like to use the trigger port / external RC input, connect the receiver trigger cable to the receiver
on the helicopter or the aeroplane. Connect the other end to the trigger port of the logger. (See chapter
"Trigger port")
Before connecting the trigger port to the helicopter or the aeroplane receiver, check the
output voltage of the receiver. if the output voltage is exceeding of the suitable voltage
range, it may cause damage to the RC Logger HD.
When then trigger port is connected, the RC Logger HD is powered by the receiver instead
of the internal battery. But the internal battery can not be charged by the receiver.
7.
If you would like to use additional modules (maximum three modules can be used at the same time),
connect the logger and the additional module with a logger / module connection cable (not included). When
more than one module is connected, the trigger port must be used to supply adequate power.
8.
Insert an appropriate SD card into the SD card slot.
trigger port
Pin
function
Transmit the trigger signal from the receiver to the RC
1.
Signal pin
Logger HD. Connect this pin if you want to use the remote
control to trigger the RC Logger HD.
Provide power to the RC Logger HD from the receiver.
1 2 3
2.
V+ pin
Connect this pin if you want to use an external power
rather than the internal battery of the RC Logger HD.
Relative ground of the connection. Connect this pin
3.
Ground pin
whenever you use the signal pin or the V+ pin.
7.
oPeRatioN
taking a picture
1.
Switch the "Off / Video mode / Camera mode switch" to
position.
2.
Select the photo taking mode with the "Single shot / auto shot switch".
S
4
-
Single shot mode takes a picture whenever the shutter button
is detected.
-
Auto shot mode takes pictures regularly for a fix time interval (the time interval can be set with the
5
provided software. Refer to the instruction of the software). Press the shutter
an "on" trigger signal to start taking pictures. Press it again or send an "off" trigger signal to stop.
3.
When taking pictures, the status LED blinks.
The logger stops capturing video if the SD card is full.
The LED status may not be easy to read under strong sunlight.
taking video
1.
Switch the "Off / Video mode / Camera mode switch" to
position.
S
2.
Press the shutter
or send the receiver an "on" trigger signal to start capturing video. Press it again or
send an "off" trigger signal to stop.
3.
When taking video, the status LED blinks. Recording stops after the file size has reached 1 GB, and the user
must manually start the recording again to continue recording.
The logger stops capturing video if the SD card is full.
The LED status may not be easy to read under strong sunlight.
/
Charging and connecting to a personal computer
The RC Logger HD can be connected to a computer as a mass storage device or to establish a software
configuration session.
1.
Plug the USB cable into a vacant port on your personal computer. Alternatively, you may use a USB
power supply (not included) to charge the product. Make sure the USB power supply fulfils the charging
requirement specified in the Technical Data.
2.
Plug the other end of the cable to the micro USB port on the logger.
3.
The charging status LED lights up when the battery of the logger is charging. It is red when charging the
battery, and green when the battery is fully charged.
4.
Switch the "Off / Video mode / Camera mode switch" to either
5.
If the status LED lights, the logger is in mass storage mode. The logger can be recognized as a mass
storage device by your personal computer. The files in the SD card can be retrieved.
If the low battery LED lights, the logger is in PC setup mode. The logger can be set via the software
provided. Refer to the instructions with the software.
There are four parameters to be set via the software:
-
Time / clock
-
Photo taking rate
-
GPS data sampling rate for video mode (requires GPS module, not included)
-
Triggering pulse interval
S
6.
Press the shutter
to switch the connection mode.
7.
Make sure the data transfer process or the setup process is completed. Turn the logger off and disconnect
the logger from the computer.
firmware update
1.
Visit http://www.rclogger.com/ to check for the latest firmware release.
2.
Prepare the firmware file, put it in the root directory of an SD card.
3.
Make sure the logger is off.
4.
Insert the SD card into the logger.
S
5.
Press and hold the shutter button
or
position.
6.
Wait until the status LED goes off.
7.
Turn off the logger.
Reset the logger
When the logger stops, you can reset the logger by using a pin to push the pin hole switch. After resetting it,
switch the "Off / Video mode / Camera mode switch" to "OFF" position before the next use.
8.
LeD iNDiCatioN
LeD
Status LED
operation
Low battery LED
Charging LED
Status LED
Low battery LED
PC connection
Charging LED
9.
DisPosaL
general
In order to preserve, protect and improve the quality of environment, protect human health and
utilise natural resources prudently and rationally, the user should return unserviceable product to
relevant facilities in accordance with statutory regulations.
The crossed-out wheeled bin indicates the product needs to be disposed separately and not as
municipal waste.
Batteries / rechargeable batteries
The user is legally obliged (battery regulation) to return used batteries and rechargeable
is pressed or an "on" trigger signal
batteries. Disposing used batteries in the household waste is prohibited! Batteries/
rechargeable batteries containing hazardous substances are marked with the crossed-out
wheeled bin. The symbol indicates that the product is forbidden to be disposed via the domestic
S
or send the receiver
refuse. The chemical symbols for the respective hazardous substances are Cd = Cadmium,
Hg = Mercury, Pb = Lead.
You can return used batteries/ rechargeable batteries free of charge to any collecting point of your
local authority, our stores or where batteries/ rechargeable batteries are sold.
Consequently you comply with your legal obligations and contribute to environmental protection!
10.
teCHNiCaL Data
System requirement:
Supply voltage:
Current consumption:
Additional module connection:
Output voltage (via I
Output current (via I
Battery:
Charging voltage (via USB):
Charging current (via USB):
Resolution:
or
position.
-
Picture
-
Video
Video format:
Video frame rate:
Connection:
Memory card support:
Dimensions (W x H x D):
Weight:
and switch the "Off / Video mode / Camera mode switch" to either
Description
>
Lights up green when the logger is ready to use.
>
Flashes when taking pictures or video.
>
Flashes rapidly when there is no SD card or the SD card
is full.
Lights up red when the battery level is low.
Should not light up.
Lights up green if the logger is in mass storage mode.
Lights up red if the logger is in PC setup mode.
Lights up red if the battery is charging. Lights in green if the
battery is fully charged.
These operating instructions are published by CEI Conrad Electronic International (HK) Limited,
28th Floor & 2903-9, Pacific Plaza, 418 Des Voeux Road West, Hong Kong.
All rights including translation reserved. Reproduction by any method, e.g. photocopy, microfilming, or the
capture in electronic data processing systems require the prior written approval by the editor. Reprinting, also
in part, is prohibited.
The operating instructions reflect the current technical specifications at time of print. We reserve the right to
change the technical or physical specifications.
© 2011 by Cei Conrad electronic international (HK) Limited
Microsoft® Windows 2000 / XP / 7,
Microsoft® Windows Vista™
4.8 to 6.2 V/DC
max. 400 mA (without additional sensor connected)
max. 650 mA (with additional sensor connected)
I
C
2
C):
3.3 to 4.2 V/DC
2
2
C):
max. 250 mA
Rechargeable 800 mAH Li (not replaceable)
5 V/DC
max. 500 mA
1600 x 1200 pixels
1280 x 720 pixels
AVI
25 fps
micro USB
SD / SDHC (max. 8 GB)
98 x 48 x 24 mm
72 g
V1_0311-SB
Advertisement
Table of Contents

Subscribe to Our Youtube Channel
Summary of Contents for RC Logger RC Logger HD
- Page 1 4.8 to 6.2 V/DC Camera Additional sensor module connection port I/O The RC Logger HD can be connected to a computer as a mass storage device or to establish a software Current consumption: max. 400 mA (without additional sensor connected)
- Page 2 Por motivos de seguridad y de autorización (CE) no tiene permiso de desmontar ni modificar el producto. Si Inserte el otro extremo del cable al puerto micro USB del registrador. El RC Logger HD se puede conectar a una computadora como un dispositivo de almacenamiento masivo o máx. 650 mA (con sensor adicional conectado) utiliza el producto para otros fines de los que se han descrito anteriormente, podría dañar el producto.
- Page 3 L’audio est toujours enregistré en même temps que l’enregistrement de la vidéo. Si vous ne souhaitez pas jouer d’alimentation USB (non fourni) pour recharger l’appareil. Assurez-vous que le bloc d’alimentation USB est Le RC Logger peut être raccordé à un ordinateur comme un dispositif de stockage de masse ou pour établir Microsoft® Windows Vista™...
- Page 4 Ricarica e collegamento al personal computer Inserire il cavo USB in una porta USB libera del proprio personal computer. In alternativa, è possibile usare L’RC Logger HD può essere collegato ad un computer in qualità di dispositivo di archiviazione di massa oppure Requisiti di sistema: Microsoft®...
- Page 5 Stecken Sie das andere Kabelende in die Micro USB-Schnittstelle des Loggers. Der RC Logger HD kann als Massenspeichergerät an einen Computer angeschlossen werden oder um eine Falls Sie das Produkt für andere Zwecke verwenden, als zuvor beschrieben, kann das Produkt beschädigt Die Ladestatus-LED leuchtet auf, wenn der Akku des Loggers aufgeladen wird.
- Page 6 RC Logger HD. het product: Schakel de logger uit. Wanneer de startpoort is verbonden, wordt de RC Logger HD van stroom voorzien door zichtbaar is beschadigd, de ontvanger in plaats van de interne batterij. Maar de interne batterij kan niet door de...
Need help?
Do you have a question about the RC Logger HD and is the answer not in the manual?
Questions and answers