
Related Manuals for Belkin F1DN204M-3


Summary of Contents for Belkin F1DN204M-3
- Page 1 Advanced Secure Windowing KVM User Manual F1DN204M-3 – Advanced Secure 4-Port Multi-Display Windowing KVM, PP 3.0 Document Number HDC10388 Rev.C...
-
Page 2: Table Of Contents
Front-Panel Features – F1DN204M-3 ......12 Rear-Panel Features – F1DN204M-3 ......13 Specifications . -
Page 3: Introduction
If through the KVM. The Belkin Advanced Secure Windowing KVM device the unit’s enclosure appears disrupted or if all the port LEDs flash... -
Page 4: Safety Precautions
– The product shows obvious signs of breakage or loose internal parts. – In case of external power supply – If power supply overheats, is broken or damaged, or has a damaged cable. Belkin Advanced Secure Windowing KVM User Manual ®... -
Page 5: User Guidance & Precautions
#1 and default settings will be LED will flash green and video will not work. restored, erasing all user-set definitions. When connecting a non-qualified USB device, CAC LED will flash green and USB device will be inoperable. Belkin Advanced Secure Windowing KVM User Manual ®... -
Page 6: Belkin ® Advanced Secure Windowing Kvm User Manual
12. If you are aware of any potential security vulnerability while installing or operating product, please remove product from service immediately and contact us in one of the ways listed in this manual. Belkin Advanced Secure Windowing KVM User Manual ®... -
Page 7: Overview
All these features contribute to strong isolation between computer interfaces, maintained even when product is powered off. Belkin Advanced Secure Windowing KVM User Manual ®... -
Page 8: Tamper Evident Labels
Common access Card (CaC) intrusion is detected by this system, the Switch will be permanently Belkin Secure Windowing KVM patented CAC Ports enable secure use disabled and LED will blink continuously. of not only CAC or smart-card readers but also biometric readers, face- If product indication tampered state (all LEDs blinking) - please call recognition and iris-recognition devices. -
Page 9: Other Features
SECTIONS Table of Contents other features The Belkin Advanced Secure Windowing KVM was designed with the CaC Port enable/disable functions user in mind for today’s IT environment. The Secure KVM is designed Belkin’s patented Host Detection Function enables simple switching... -
Page 10: Equipment Requirements
Table of Contents equipment requirements Cables Belkin highly recommends the use of Belkin Cable Kits for your product to help ensure superior security and performance. These cables offer the highest quality possible and optimal data transmission. One Cable Kit is required per connected computer. -
Page 11: System Requirements
® keyboards. In any case do not connect wireless keyboard directly (VGA is also supported through the use of a Belkin Smart-Cable). to product. Software installation is not needed on any connected computer. Non-standard keyboards, such as keyboards with integrated... -
Page 12: Belkin ® Advanced Secure Windowing Kvm User Manual
Table of Contents usb Mouse console port user authentication devices The Belkin Advanced Secure Windowing KVM USB mouse console port The Belkin Advanced Secure Windowing KVM is compatible with is compatible with the following types of devices: the following types of user authentication devices plugged into the product’s CAC Port:... -
Page 13: Belkin ® Advanced Secure Windowing Kvm User Manual
SECTIONS Table of Contents dual display Model f1dn204M-3 The F1DN204M-3 model uses two displays. It is preferable that both displays will be the same type and model. Displays must be landscape oriented and installed side by side in close proximity to one another. -
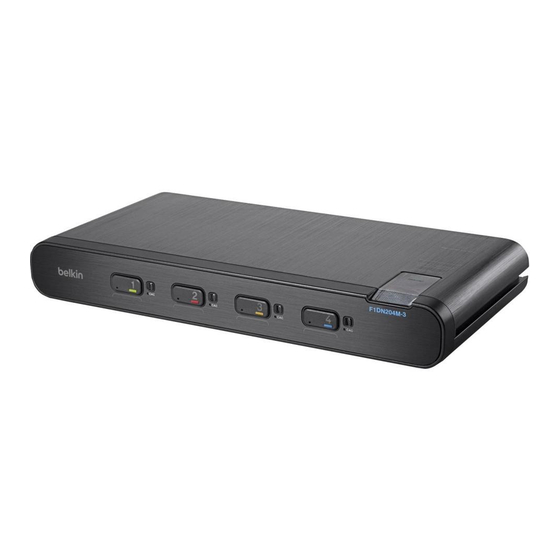
Page 14: Front-Panel Features – F1Dn204M-3
SECTIONS Table of Contents front-Panel features – f1dn204M-3 LED Indicator Tamper-Evident Seal Name Label Guide Port Selector CAC Enable Switch Color Chip Belkin Advanced Secure Windowing KVM User Manual ®... -
Page 15: Rear-Panel Features – F1Dn204M-3
SECTIONS Table of Contents rear-Panel features – f1dn204M-3 12 13 Console USB CAC Reader Port and LED Console PS/2 mouse port Restore to Factory Default DCU port (Non operative, for future use) Computer USB KM port Secondary Display Out port... -
Page 16: Specifications
HDMI interface supported with compatible cable operating Temp 32° to 104° F (0° to 40° C) output (console) video F1DN204M-3 supports up to HD storage Temp -4° to 140° F (-20° to 60° C) resolution (1920 X 1200 pixels) resolutions... - Page 17 SECTIONS Table of Contents output (Console) display resolutions supported Input (Computers) resolutions supported • 800x600 (4:3) SVGA; resolution\Model f1dn204M-3 • 1280x1024 (5:4) SXGA; 1280x800 (16:10) • • 1920x1080 (16:9) HD1080; or 1280x1024 (5:4) • • 1920x1200 (16:10) WUXGA. 1600x1200 (4:3) •...
-
Page 18: Installation
That include special audio processing cards. packaging, inspect the tamper-evident label to assure that the product is properly sealed. If the label is damaged or missing, contact Belkin support and do not use the product. Where to locate the belkin advanced secure Windowing KVM? The enclosure of the product is designed for desktop or under-the-table configurations. - Page 19 InsTallaTIon SECTIONS Table of Contents Consider the following when deciding where to place the Belkin Advanced Secure Windowing KVM: • User access to the front-panel push buttons is typically not required as all user controls are available through the mouse and indications available on screen.
- Page 20 Windowing KVM deployment. The information provided here represents specifications. the information gained during evaluation and deployment projects. • DVI-I to VGA converters cannot be used with The Belkin Advanced • Avoid using old CRT displays. Secure Windowing KVM as it does not support analog video.
-
Page 21: Installation
InsTallaTIon SECTIONS Table of Contents Installation step 1 – Connecting the Console devices to the belkin advanced step 2 – Connecting the Computers secure Windowing KVM Connect the computers to The Belkin Advanced Secure Windowing See figure above for connector locations. - Page 22 Restore Factory Defaults switch (see item 17 in page 12). Pressing • Power up the Belkin Advanced Secure Windowing K VM by this switch momentarily will return the Belkin Advanced Secure connecting the DC power plug.
- Page 23 Color Code Chip Installation Common access Card (CaC) Configuration and operation The Belkin Advanced Secure Windowing KVM port-selector buttons can be color-coded for easier identification. Refer to the installation CAC connection to the computer requires a separate USB cable instructions below.
-
Page 24: F1Dn204M-3 Typical System Installation
InsTallaTIon SECTIONS Table of Contents f1dn204M-3 Typical system Installation Primary Display Secondary Display Computers Channel 2 Channel 3 Channel 1 Channel 4 Audio Setup Channel 1 Channel 2 Channel 3 Channel 4 Scale Tile Mouse Keyboard Belkin Advanced Secure Windowing KVM User Manual... -
Page 25: Setup
InsTallaTIon SECTIONS Table of Contents setup Now that the Belkin Advanced Secure Windowing KVM is connected and Help menu powered-on it is a good opportunity to setup some operational settings. note about input resolution setting: Selection of input resolution that... - Page 26 - The Belkin Advanced Secure Windowing KVM is capable of scaling Check that each window is coupled to the proper keyboard and the image in two possible factors: 2x and 4x allowing the user to fit mouse (no cables are crossed between channels).
- Page 27 Conversion to VGA monitor is not supported. video quality). Primary display secondary display Channel 2 Channel 3 Channel 1 Channel 4 Setup Channel 1 Channel 2 Channel 3 Channel 4 Scale Tile F1DN204M-3 scale mode view Belkin Advanced Secure Windowing KVM User Manual ®...
-
Page 28: Operation
After product boots up, the default active channel will be channel #1. This will be indicated by white color illumination of push-button #1. Product Mapping to sources Product mapping to sources is indicated by stickers/labels specifying which channel is mapped to which computer. Belkin Advanced Secure Windowing KVM User Manual ®... -
Page 29: Operating Modes
Table of Contents operating Modes Now that you have connected your console and computers to the Belkin The use of 5-button mouse enables the user to fully use all standard Advanced Secure Windowing KVM, it is ready for use. Default channel... -
Page 30: List Of Available Actions
In Scale mode click 4 times on primary pane to In System mode Select Tile Move to Tile CTrl | CTrl | Q move to Tile mode button in bottom grey menu Belkin Advanced Secure Windowing KVM User Manual ®... - Page 31 System mode In Full screen mode tap 4 times to move to Tile before enlarging pane to Full Screen mode Connecting secondary display in duplicate CTrl | CTrl | f11| l Mode Belkin Advanced Secure Windowing KVM User Manual ®...
- Page 32 CTrl | CTrl | n To move out of Presentation Mode operate applications in a specific active pane in Normal touch screen behavior Normal keyboard behavior Normal mouse behavior user mode Belkin Advanced Secure Windowing KVM User Manual ®...
- Page 33 KVM to system mode. When the Belkin Advanced Secure Windowing KVM is in User Mode: system Mode • The mouse cursor of the active computer (channel) is controlled The mouse +/- side buttons trigger cyclic toggling between modes.
- Page 34 In System Mode there is also an active channel, indicated by a white top resolution is larger than the window size). left corner but the mouse is controlled by the Belkin Advanced Secure • Pressing and holding the +/- side mouse buttons and moving the Windowing KVM and not mapped to the active channel.
-
Page 35: Functions And Features
Release right mouse button to freeze window size. Toggle Mode note: Window size is limited by the size set for the window under the channel menu. L: Move Window R: Resize Window L + R: Pan Belkin Advanced Secure Windowing KVM User Manual ®... - Page 36 See detailed explanation below. note: When using the Belkin Advanced Secure Windowing KVM, it is possible to maximize a window directly from User Mode. Pressing CTRL | CTRL | f will maximize the window in which the user is working.
- Page 37 In some cases the user may want to deactivate a live channel for maximize at the primary. When it is maximizing, the other 40 percent operational reasons. The Belkin Advanced Secure Windowing KVM will of that window will disappear from the secondary display. The second display instead on that channel a background color.
- Page 38 SECTIONS Table of Contents The Belkin Advanced Secure Windowing KVM includes a scaling scale feature function. The scaling function allows the user to reduce the size of the By pressing the Scale button on the System Mode task-bar, the screen...
-
Page 39: Troubleshooting
• Connect the display directly to the PC to confirm that video output is available and that good image is shown. How do I restore the factory settings of the belkin advanced • Restore to factory defaults using the rear-panel recessed switch secure Windowing KVM? (see item 16 in the figure at page 11 above). - Page 40 • Check that the channel is not deactivated by user. • Check that the video cable connecting the computer and KVM is • Check that video cable is connected properly between The Belkin properly secured at both sides. Advanced Secure Windowing KVM and the attached computer.
- Page 41 Keyboard Caps lock and num lock leds are not working . • Check that computer USB and video cables are not crossed (i.e., • This is a normal behavior. Belkin Secure Windowing KVM blocks computer #1 video is connected to KVM port #1 while USB cable all communications from computers to the keyboard to prevent is connected to the KVM port #2).
- Page 42 KVM due to security policy. • If the computer is coming out of standby mode, allow up to one minute to regain mouse function. • Try a different mouse. Belkin Advanced Secure Windowing KVM User Manual ®...
-
Page 43: Information
Belkin International, Inc. (“Belkin”) warrants to the original purchaser of Vista, CA 90094, declare under our sole responsibility that the this Belkin product that the product shall be free of defects in design, products comply with Part 15 of the FCC Rules. Operation is subject assembly, material, or workmanship. - Page 44 Table of Contents What is not covered by this warranty? All above warranties are null and void if the Belkin product is not Belkin reserves the right to review the damaged Belkin product. All costs provided to Belkin for inspection upon Belkin’s request at the sole...
- Page 45 DIRECT, INDIRECT, CONSEQUENTIAL OR MULTIPLE DAMAGES SUCH AS, BUT NOT LIMITED TO, LOST BUSINESS OR PROFITS ARISING OUT OF THE SALE OR USE OF ANY BELKIN PRODUCT, EVEN IF ADVISED OF THE POSSIBILITY OF SUCH DAMAGES. This warranty gives you specific legal rights, and you may also have other rights, which may vary from state to state.
-
Page 46: Reporting Belkin Product Security Vulnerability
SECTIONS Table of Contents reporting belkin Product security Vulnerability . If you are aware of potential security vulnerability with any Belkin Government product, we encourage you to contact us immediately at the following email address: gov_security@belkin .com or our technical support line at: TOLL FREE 1-800-282-2355 After your communication is received, Belkin Government personnel will contact you to follow up. - Page 47 © 2015 Belkin International, Inc. All rights reserved. All trade names are registered trademarks of respective manufacturers listed. Windows and Windows Vista are either registered trademarks or trademarks of Microsoft Corporation in the United States and/or other countries. Mac OS is a trademark of Apple Inc., registered in the U.S. and other countries.
Need help?
Do you have a question about the F1DN204M-3 and is the answer not in the manual?
Questions and answers