Table of Contents
Advertisement
Quick Links
Advertisement
Table of Contents

Subscribe to Our Youtube Channel
Summary of Contents for Faber Relaxed L
- Page 1 Relaxed L Installation guide...
- Page 2 General 1-1 (Wood set) 1-2 (Twigset) 1-3 (Pebbles) 1 < < < <...
- Page 3 Relaxed L Frameless > > > > 2...
- Page 4 Relaxed L Framed 3 < < < <...
- Page 5 > > > > 4...
-
Page 6: Table Of Contents
Appendix B: Flue restrictor................18 Appendix C: Installation of the flue..............19 Appendix D: Technical specifications ..............20 Appendix E: Dimensions Relaxed L with Frame ............ 21 Appendix F: Dimensions Relaxed L Frameless ............22 Appendix G : Dimensions Ventilation grid............23 Appendix H : Dimensions Service Hatch ............. -
Page 7: Content
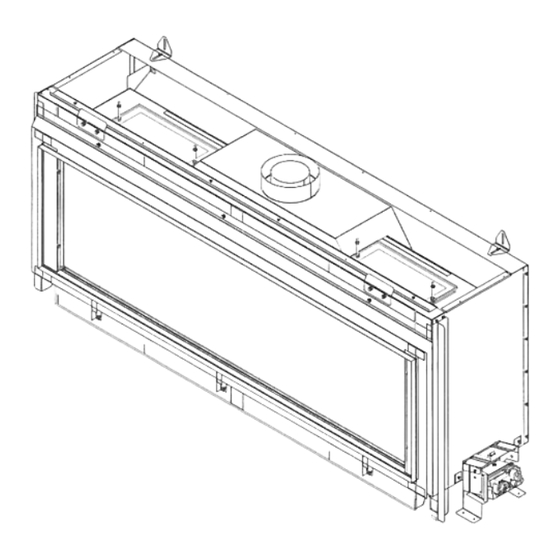
1 Content Note: these instructions should be read carefully and retained for future reference. Please leave these instructions with the user. This guide is concerning the following types of appliances: RELAXED L with frame • • RELAXED L frameless Special features: •... -
Page 8: Safety And General Information
2 Safety and general information Before installation, ensure that the local distribution conditions (identification of the type of gas and pressure) and the adjustment of the appliance are compatible. This gas appliance is factory set and can not be adjusted. This appliance does not contain any component manufactured from asbestos or any asbestos related products. -
Page 9: Installation Requirements
The Relaxed L can be build in a non-combustible fire place or builders opening. This could be either an existing builders opening or a new made prefab builders opening. When you apply your own false chimney breast design to the Relaxed L you have to meet these general requirements: •... -
Page 10: Flue Requirements
3.1.2 False chimney brest RELAXED L with frame • Make a framework of metal studs around building guides A and B (fig. 3-1); keep in mind the thickness of the Promatec you use! • Place metal studs at every corner of the false chimney brest; keep in mind the thickness of the Promatec you use! •... - Page 11 • Terminals located close to shared walkways, footpaths etc. could be subject to legal constraints and this should be pointed out to the customer before installation. If in any doubt about flue location advice should be sought from local building control, or if appliance-related, from the manufacturer including wherever possible a dimensioned sketch •...
-
Page 12: Instruction For Installation
4 Instruction for Installation Gas connection Installation pipes should be in accordance with BS 6891. Pipe work from the meter to the appliance must be of adequate size. The complete installation including the meter must be tested for soundness and purged as described in the above code. -
Page 13: Building The False Chimney Brest With A Frame
• Place metal studs at every corner of the false chimney brest; keep in mind the thickness of the Promatec you use! • Build with Promatec around the steel building guide (fig.2-2) • Build the rest of the false chimney brest Building the False Chimney Brest with a Frame •... -
Page 14: Flue Requirements
Flue requirements The appliance is of the type C11/C31. The appliance will need to be supplied with the approved flue pipes and terminal, it is not possible to supply your own. The minimum effective height of the flue system must be 1 meter! 4.9.1 Flue routing The terminal locations, through the wall as well as through the roof A horizontal extension with elbows is allowed for a maximum of 5 meters (depending... -
Page 15: Commissioning (Functional Checks)
5 Commissioning (functional checks) Pilot ignition check • Ignite the pilot light as described in the user manual • Check if the pilot burner stays alight • Extinguish the pilot burner Check functional burner and pilot burner The appliance is preset to give the correct heat input. No further adjustment is necessary. Always check the inlet pressure and burner pressure: •... -
Page 16: Handing Over (Final Check And Customer Briefing)
6 Handing over (final check and customer briefing) • Instruct the customer on the full operation of the appliance and the remote control, including replacement of batteries • Advise the customer how to clean the appliance including the glass • Hand over these instructions including the user guide to the consumer •... -
Page 17: Cleaning The Combustion Chamber And Burner
Attention: Before placing the glass: check the glass sealing rope is in good condition and makes an effective seal. Be sure that there are no fingerprints on the glass. It is not possible to remove those prints after you burn the appliance for a while (they are burnt in). Place the glass in front of the appliance and fix the glass frame or use the glass clamps. -
Page 18: Appendix A: Example Calculation
Appendix A: Example calculation Example calculation 1: Calculating horizontal extension fig. 2a: Flue length C + E = 1m + 1m Elbows D = 2m Total horizontal extension Measure or calculate effective height (Hvert) Flue length A Roof mounted terminal Total effective height Ex.1 Example calculation 2:... -
Page 19: Appendix B: Flue Restrictor
Appendix B: Flue restrictor Determining of the right flue restrictor: • Calculate the total horizontal- and vertical length of the flue, according to the calculations displayed above • Determine according to the table the right flue restrictor size • When meeting an X, and when the values are outside the table, the combination is not allowed •... -
Page 20: Appendix C: Installation Of The Flue
Appendix C: Installation of the flue Connection with use of concentric duct material Make a hole of ø 153 mm for the wall or roof mounted terminal. The horizontal pipes need to rise away from the appliance at a rate of 3 degrees per metre Build the system starting from the appliance on. -
Page 21: Appendix D: Technical Specifications
Appendix D: Technical specifications Country II 2H3+ II 2H3+ II 2H3+ II 2H3+ Appliance type C11 of C31 C11 of C31 C11 of C31 C11 of C31 Reference gas Input (nett) Efficiency class NOx-rate Inlet pressure mbar Gasrate (Bij 15º C en 1013 mbar) gram/h Working pressure (high) mbar... -
Page 22: Appendix E: Dimensions Relaxed L With Frame
Appendix E: Dimensions Relaxed L with Frame 21 < < < <... -
Page 23: Appendix F: Dimensions Relaxed L Frameless
Appendix F: Dimensions Relaxed L Frameless > > > > 22... -
Page 24: Appendix G : Dimensions Ventilation Grid
Appendix G : Dimensions Ventilation grid 23 < < < <... -
Page 25: Appendix H : Dimensions Service Hatch
Appendix H : Dimensions Service Hatch > > > > 24... - Page 26 25 < < < <...
- Page 27 > > > > 26...
- Page 28 Saturnus 8 NL - 8448 CC Heerenveen Postbus 219 NL - 8440 AE Heerenveen T. +31(0)513 656500 F. +31(0)513 656501 40010636 − 0736...
Need help?
Do you have a question about the Relaxed L and is the answer not in the manual?
Questions and answers