
Related Manuals for Energer ENB542BDS


Summary of Contents for Energer ENB542BDS
- Page 1 350W Band Saw ENB542BDS Barcode: 5052931253678 WARNING! Read the instructions before using the product!
- Page 2 Thank you for choosing a product it will give you full satisfaction in your craft in the work. The band saw is a product easy to use, it comes with accessories. For best use, you must read this noice. It will provide key information on the functions of the device and the rules to follow for maintenance.
-
Page 3: Table Of Contents
ENB542BDS by ENERGER Let’s get started… These instructions are for your safety. Please read through them thoroughly before use and retain them for future reference. Getting started... Your product Technical and legal information Before you start detail... more Product functions... -
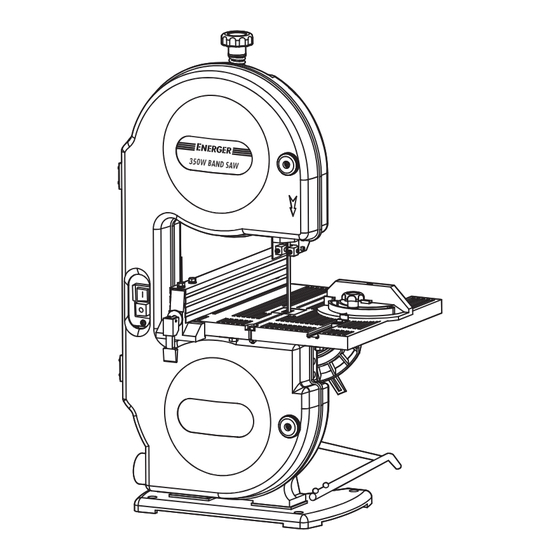
Page 4: Your Product
Your product ENB542BDS by ENERGER Your product 1. On/Off switch 15. Rip fence locking handle 2. Fixing knob 16. Motor 3. Side cover 17. Angle scale pointer 4. Blade tension knob 18. Fixing handle for table 5. Upper band pulley 19. -
Page 5: Technical And Legal Information
Technical and legal ENB542BDS by ENERGER information Technical specifications General > Input Voltage 230-240V~50Hz > Power Input 350W > No load speed 1450min > Max. cutting depth 80mm > Max. cutting width 190mm > Table size 300x300mm > Table tilting range 0°~45°... - Page 6 Technical and legal ENB542BDS by ENERGER information The declared vibration emission been measured in accordance with a standardised test stated above and may be used to compare one tool with another. The declared vibration emission value may also be used in a preliminary assessment of exposure.
-
Page 7: Safety Warnings
Technical and legal ENB542BDS by ENERGER information Symbols On the product, the rating label and within these instructions you will find among others the following symbols and abbreviations. Familiarise yourself with them to reduce hazards like personal injuries and damage to property. - Page 8 Technical and legal ENB542BDS by ENERGER information SAVE THESE INSTRUCTIONS 1. Keep work area clear > Cluttered areas and benches invite injuries. 2. Consider work area environment > Do not expose tools to rain. > Do not use tools in damp or wet locations.
- Page 9 Technical and legal ENB542BDS by ENERGER information > Keep proper footing and balance at all times. 14. Maintain tools with care > Keep cutting tools sharp and clean for better and safer performance. > Follow instruction for lubricating and changing accessories.
- Page 10 Technical and legal ENB542BDS by ENERGER information 23. If the replacement of the supply cord is necessary, this has to be done by the manufacturer or his agent in order to avoid a safety hazard. 24. For tools intended to be connected to a water supply.
- Page 11 Technical and legal ENB542BDS by ENERGER information > Always ensure that the adjustable blade guard is as close to the work piece as possible. > Always ensure that all adjustments are correct and secure before starting the band saw. > Always ensure that the blade tension and tracking are set correctly.
- Page 12 Technical and legal ENB542BDS by ENERGER information > Do not use any guard or protection device as a hand hold when carrying or transporting the band saw. Lift and transport the band saw at position indicated. 4. After use > After use and before storage clean the machine thoroughly and release the blade tension.
-
Page 13: Before You Start
Before you start ENB542BDS by ENERGER Unpack > Unpack all parts and lay them on a flat, stable surface. > Remove all packing materials and shipping devices if applicable. > Make sure the delivery contents are complete and free of any damage. If you find that parts are missing or show damage do not use the product but contact your dealer. - Page 14 Before you start ENB542BDS by ENERGER > When working with wood that has been processed before, watch out for foreign bodies such as nails or screws etc. > Before you actuate the On/Off switch, make sure that the saw blade is correctly fitted and that the machine’s moving parts run smoothly.
- Page 15 Before you start ENB542BDS by ENERGER Fig. 2 > The dial scale (19) of the table (20) must be fitted in the guide on the machine frame. (Fig. 3) > The work table (20) is capable of adjustment. Locate the guide on the machine frame and make sure the work table locates into the guide.
- Page 16 Before you start ENB542BDS by ENERGER > Alternatively you can tighten the fixing handle (18) in a clockwise direction as shown Fig. 5. The fixing handle is spring loaded. Pull the fixing hanlde outward and rotate in a counterclockwise direction. Release the fixing handle and allow it to engage the thread.
-
Page 17: Bench Mounting
Before you start ENB542BDS by ENERGER Fitting the additional support > Put the additional support (26) on the base (9), and align four holes to the holes (32) on the base, then put the flat washers M5 (33) and screws M5 x 20mm (34), then tighten them with the screwdriver. - Page 18 Before you start ENB542BDS by ENERGER > Turn the blade tension knob (4) for tightening the saw blade (23) in a clockwise direction. (Fig. 11) > The correct saw blade tension can be checked by applying pressure to the side of the band with your finger, carry out this check at a point roughly between the two band pulleys .
- Page 19 Before you start ENB542BDS by ENERGER > Slowly turn the upper band pulley (5) clockwise by hand. The saw blade (23) should run in the middle of the pulley. If it does not, you will have to adjust the tilt of the upper blade pulley (5). (Fig. 14) >...
- Page 20 Before you start ENB542BDS by ENERGER > Re-tighten the setting wheel. > Re-tighten the fixing handle. > Check the setting before each cut and re-adjust if necessary. clockwise counterclockwise Fig. 16 Adjusting the work table to 90° > Move the upper blade guide to the top.
- Page 21 Before you start ENB542BDS by ENERGER Dust extraction port > The band saw is equipped with dust extraction port (10) for extracting sawdust and chips. (Fig. 20) > Using the extractor adapter, connection to a range of different sawdust extractors is straightforward.
-
Page 22: In More Detail
ENB542BDS by ENERGER detail… more Product functions Care and maintenance Trouble shooting Recycling and disposal Guarantee EC declaration of conformity... -
Page 23: Product Functions
Product functions ENB542BDS by ENERGER Control elements 1) Rip fence > Push the clip on the rip fence (14) upwards. > Move the rip fence (14) along the table (20), from either the right or left of the blade (23), and position as required. - Page 24 Product functions ENB542BDS by ENERGER 3) Angle cuts To enable you to perform angle cuts parallel to the blade (23); the table (19) can be tilted forwards between 0° - 45°. > Undo the fixing handle (18). > Tilt the work table (20) forward until the pointer (17) coincides with the required angle value on the main scale (19).
- Page 25 Product functions ENB542BDS by ENERGER > Always aim at making a complete cut in one pass rather than in a stop-and-go operation requiring the workpiece to be withdrawn. If you have to withdraw the workpiece, switch off the band saw first and wait for the blade (23) to stop before freeing the workpiece.
-
Page 26: Cross Cuts
Product functions ENB542BDS by ENERGER Cross cuts > Slide the mitre gauge (21) into one of the grooves in the table (20) and adjust to the required angle (see control elements 2). > Lower the upper blade guard (7) to the workpiece (see the previous “adjusting the upper band guide”... - Page 27 Product functions ENB542BDS by ENERGER > In the case of curves which are too tight for the band to cut correctly, it can help to make a series of close-lying cuts at right angles to the curved line. When you saw the radius the material will simply drop off.
-
Page 28: Care And Maintenance
Care and maintenance ENB542BDS by ENERGER The golden rules for care WARNING! Always switch the product off, disconnect it from the power supply and let the product cool down before performing inspection, maintenance and cleaning work! > Keep your machine and its cord clean. The outside of the machine can be cleaned using a damp soft cloth with a mild detergent if required. - Page 29 Care and maintenance ENB542BDS by ENERGER Adjusting the blade guide > Whenever you change the blade you must reset both the support bearings (42+43) and the guide pins (44 + 45). (Fig. 28 & 29) > Undo the fixing knobs (2) to open the left side cover (3). (Fig. 30) >...
- Page 30 Care and maintenance ENB542BDS by ENERGER > The blade (23) is only supported by the support bearings (43) during cutting. > When idle the blade should not touch the ball bearings. 3) Adjusting the upper guide pins (Fig. 28) > Undo the hex screw (48) with 3mm hex key supplied.
-
Page 31: Power Cord
Care and maintenance ENB542BDS by ENERGER Lubrication > The shielded ball bearings are permanently lubricated and require no further lubrication. > Small amounts of machine oil can be applied to belt tension mechanisms and threaded or sliding surfaces. - Occasionally apply a coat of paste wax to tabletop to keep it slick and corrosion free. - Page 32 Care and maintenance ENB542BDS by ENERGER The wire which is coloured blue must be connected to the terminal which is marked with N. The wire, which is coloured brown, must be connected to the terminal, which is marked with the letter L.
-
Page 33: Blade Selection
Care and maintenance ENB542BDS by ENERGER > We recommend using the original package for storage or covering the product with a suitable cloth to protect it against dust. Transportation > Switch the product off and disconnect it from power supply before transporting it anywhere. - Page 34 Care and maintenance ENB542BDS by ENERGER > Fit the new blade (23), aligned centrally on the upper blade pulley (5) and lower blade pulley (8). The teeth of the blade (23) must point down towards the table. (Fig. 33) > Tension the blade by turning the blade tension knob (4) clockwise to tension the blade.
-
Page 35: Trouble Shooting
Care and maintenance ENB542BDS by ENERGER Trouble shooting Suspected malfunctions are often due to causes that the users can fix themselves. Therefore check the product using this section. In most cases the problem can be solved quickly. WARNING! Only perform the steps described within these... - Page 36 Care and maintenance ENB542BDS by ENERGER Problem Possible cause Solution 4. Crooked cuts 4.1 Workpiece not 4.1 Use miter gauge; square adjust tilt of table at 90° 4.2 Rate of feed too 4.2 Reduce rate of feed great 4.3 Blade guides not 4.3 Readjust the blade...
-
Page 37: Recycling And Disposal
Please recycle where facilities exist. Check with your Local Authority or local store for recycling advice. Guarantee This ENERGER product carries a guarantee of 12months. If yourproductdevelops a faultwithinthisperiod, youshould, in the first instance contact the retailerwhere the item waspurchased. -
Page 38: Ec Declaration Of Conformity
EC declaration of conformity ENB542BDS by ENERGER Declaration of Conformity We, Importer Powersmith Ltd., BA22 8RT Declare that the product: Designation: 350W band saw Model: ENB542BDS Complies with the following Directives: 2004/108/EC Electromagnetic Compatibility Directive 2006/42/EC Machinery Directive 2006/95/EC Low Voltage Directive... - Page 39 Powersmith (UK) LTD. Trade House Mead Avenue, BA22 8RT...
Need help?
Do you have a question about the ENB542BDS and is the answer not in the manual?
Questions and answers