
Related Manuals for Radial Engineering PZ-Pre


Summary of Contents for Radial Engineering PZ-Pre
-
Page 1: User Guide
PZ-Pre ™ Acoustic Instrument Preamp User Guide Radial Engineering Ltd. 1588 Kebet Way, Port Coquitlam BC V3C 5M5 Tel: 604-942-1001 Fax: 604-942-1010 email: info@radialeng.com... -
Page 2: Table Of Contents
If after read- ing this manual you have a question, please visit the FAQ in the PZ-Pre section of our web site. This is where we post the latest notes. If you have a question that is not covered, please send your email to info@radialeng.com and we will do our very best... -
Page 3: Introduction
We designed the PZ-Pre from the ground up to work with all types of instruments including violin, cello, contrabass, mandolin, Dobro, bouzouki, harp,... -
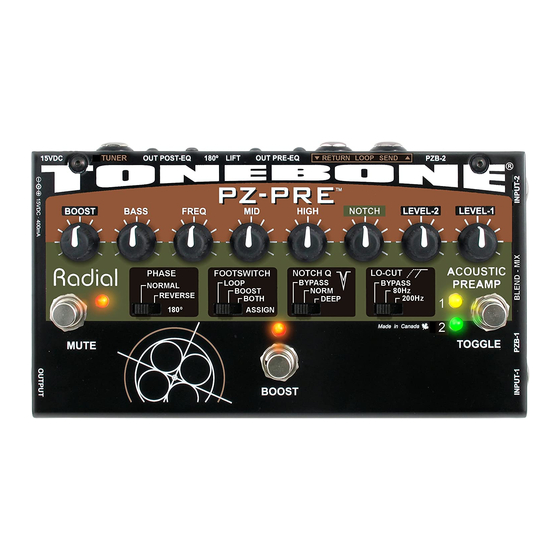
Page 4: Feature Set
20. NOTCH Q: Sets the depth of the notch filter. Select between normal, deep and bypass. 21. LO-CUT: High-pass filter removes low frequencies to eliminate resonant feedback. Select between bypass and two low-cut settings. Radial Engineering Ltd. PZ-Pre ™ User Guide... - Page 5 27. POST-EQ: balanced XLR direct box output sends a wet signal for the monitor system so the player can control their on-stage tone with the PZ-Pre. 28. TUNER: buffered ¼” output to feed an electronic tuner. 29. 15VDC-400mA: power supply connection 15 volts DC, center pin positive.
-
Page 6: Input Section
True to the Music INPUT SECTION Input-1 and 2 The PZ-Pre features two ¼” inputs located on the right side panel. The fl exible dual input design lets a player connect and switch between instruments simply by stomping on the TOGGLE footswitch. - Page 7 TRS jack. A stereo TRS cable will allow you to connect both pickups to separate PZ-Pre inputs with a single cable. From there you can toggle between the two pickup systems or blend them together.
-
Page 8: Filter And Eq Section
The notch filter on the PZ-Pre has two controls: NOTCH sweeps the frequency spectrum of the fi lter from 56Hz to 220Hz while the NOTCH Q switch controls the width and attenuation of the fi lter. - Page 9 Boost and Effects Loop The PZ-Pre is equipped with a power booster and effects loop that can be kicked in to create dynamic solos or avant-garde textures. The power boost...
-
Page 10: Output Section
True to the Music OUTPUT SECTION ¼" Instrument Amp Output The ¼” OUTPUT jack connects to the musician’s on-stage amplifi er. This output is at the end of the PZ-Pre signal path and is affected by all the controls. Send Recv... -
Page 11: Instrument Connection
The PZ-Pre is equipped with a piezo buffer (PZB) on each input to ensure the best possible tone from passive piezo pickups. When connecting a piezo pickup to the PZ-Pre you should engage the PZB for the input you’re connecting to. - Page 12 The preamp controls are usually mounted on the side of the instrument. Active instruments produce a signal that can connect to the PZ-Pre without the need to engage the PZB. The instrument's on-board preamp will buffer the signal and the output can connect directly to the PZ-Pre with an instrument cable.
-
Page 13: Output Connection
Post-EQ and Effects XLR (Wet Direct Box) Output This is primarily designed to feed stage monitors, but is also where you would connect your PZ-Pre to the PA if you do not have a FOH engineer running the PA system. For monitoring, you can... -
Page 14: Setting Up The Pz-Pre
USING THE PZ-PRE EQ CONTROLS Before you head off to your first gig with the PZ-Pre, it is a good idea to familiarize yourself with the controls in your practice room and investigate the various functions. Do this at a low volume level first so that you do not cause feedback. - Page 15 Pre-EQ output for the front of house PA system. The Pre-EQ output will give the house engineer a full-range signal to mix with while the PZ-Pre EQ controls can be adjusted to suit you. However, in any case be careful not to over-EQ your tone! The sweep function of the FREQ control is designed to fi nd the range best suited to your instrument’s natural tone.
-
Page 16: Controlling Feedback
This concept is called gain before feedback. This section of the manual will help you set up the PZ-Pre for maximum gain before feedback. To test for feedback you should be positioned in the area on stage where you will be performing. -
Page 17: Notch Filter
7. If more gain is needed, you can switch the NOTCH Q to DEEP and try increasing the LEVEL control some more. TIP: At some point, turning up the instrument level will cause uncontrollable feedback at many frequencies and is an indication levels should be lowered. Radial Engineering Ltd. PZ-Pre ™ User Guide... -
Page 18: Adding Effects To Your Sound
True to the Music ADDING EFFECTS TO YOUR SOUND For the most fl exibility, the PZ-Pre is equipped with an effects loop that can be linked to the power BOOST footswitch or set to remain on. When linked to the BOOST footswitch, you can turn on and off a string of effects with one footswitch. -
Page 19: Specifications
True to the Music Radial PZ-Pre Specifi cations Inputs 1 & 2: ¼" Phone unbalanced Input impedance: Normal 6.8k Ohm Piezo 10Meg Ohm PZB buffers: +10dB boost Low-cut fi lter: 75Hz / 220Hz Notch fi lter range: 56Hz - 330Hz... - Page 20 THREE YEAR TRANSFERABLE LIMITED WARRANTY RADIAL ENGINEERING LTD. (“Radial”) warrants this product to be free from defects in mate- rial and workmanship and will remedy any such defects free of charge according to the terms of this warranty. Radial will repair or replace (at its option) any defective component(s) of this product (excluding fi nish and wear and tear on components under normal use) for a period of three (3) years from the original date of purchase.
Need help?
Do you have a question about the PZ-Pre and is the answer not in the manual?
Questions and answers