Samsung DW-FN320T User Manual
Hide thumbs
Also See for DW-FN320T:
- User manual (288 pages) ,
- User manual (104 pages) ,
- User manual (218 pages)
Table of Contents
Advertisement
Quick Links
DD81-01446F-02_EN_20121008.indd 1
DD81-01446F-02_EN_20121008.indd 1
Dishwasher
user manual
imagine
the possibilities
Thank you for purchasing this Samsung product.
To receive more complete service,
please register your product at
www.samsung.com/register
DW-FN320T
DW-FN320W
2012-10-08
2012-10-08
7:10:04
7:10:04
Advertisement
Table of Contents
Troubleshooting

Related Manuals for Samsung DW-FN320T


Summary of Contents for Samsung DW-FN320T
- Page 1 DW-FN320T DW-FN320W Dishwasher user manual imagine the possibilities Thank you for purchasing this Samsung product. To receive more complete service, please register your product at www.samsung.com/register DD81-01446F-02_EN_20121008.indd 1 DD81-01446F-02_EN_20121008.indd 1 2012-10-08 2012-10-08 7:10:04 7:10:04...
- Page 2 Safety information Please read this User Information carefully and keep it to refer to at a later date. Pass it on to any subsequent owner of the appliance. This manual contains sections of Safety Instructions, Part and Features, Installation your dishwasher and Troubleshooting etc. Carefully reading it before using the dishwasher will help you to use and maintain the dishwasher properly.
- Page 3 DISPOSAL Dispose of the dishwasher packaging material correctly. All packaging materials can be recycled. Plastic parts are marked with the standard international abbreviations: for polyethylene, e.g. sheet wrapping material for polystyrene, e.g. padding material polyoxymethylene, e.g. plastic clips polypropylene, e.g. Salt filler Acrylonitrile Butadiene Styrene, e.g.
-
Page 4: Table Of Contents
Contents PART AND FEATURES Dishwasher features Control panel Displays INSTALLING YOUR DISHWASHER Water supply and drain Connection of drain hoses Position the appliance Start of dishwasher USING THE DETERGENT AND WATER Water softener Loading the salt into the softener SOFTENER Fill the rinse aid dispenser Function of detergent How to use the 3 in 1 option... -
Page 5: Part And Features
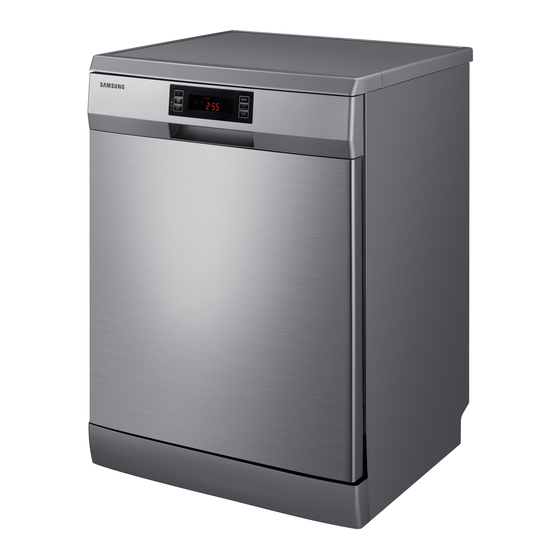
Part and features DISHWASHER FEATURES Front & Rear view Upper Basket Salt Container Spray arms Drain hose Duct nozzle Dispenser Filter assembly Lower Basket Cup Shelf hose Accessory parts - User manual, Salt funnel, cutlery basket. part and features _5 DD81-01446F-02_EN_20121008.indd 5 DD81-01446F-02_EN_20121008.indd 5 2012-10-08... -
Page 6: Control Panel
Part and features CONTROL PANEL POWER BUTTON Press this button to turn on your dishwasher: the screen lights up. To select 3 in 1 option which needs not salt and rinse aid but a 3 In1 3 IN 1 OPTION BUTTON tablet. -
Page 7: Displays
DISPLAYS PROGRAM ICON When press the Program button, each program is selected. 3*8 SEGMENT Display the remaining time, error code, or delay time. When rinse aid is needed refill, this indicator is on. Refill the rinse aid RINSE AID INDICATOR to dispenser. -
Page 8: Installing Your Dishwasher _9
Installing your dishwasher WARNING : Electrical shock hazard Disconnect electrical power before installing dishwasher. Failure to do so could result in death or electrical shock. ATTENTION: The installation of the pipes and electrical equipments should be done by professionals. About electricity connecting CAUTION, for personal safety: DO NOT USE AN EXTENSION CORD OR AN ADAPTER PLUG WITH THIS APPLIANCE. -
Page 9: Water Supply And Drain
WATER SUPPLY AND DRAIN Cold water connection Connect the cold water supply hose to a threaded 3/4 (inch) connector and make sure that it is fastened tightly in place. If the water pipes are new or have not been used for an extended period of time, let the water run to make sure that the water is clear and free of impurities. -
Page 10: Connection Of Drain Hoses
Installing your dishwasher CONNECTION OF DRAIN HOSES Insert the drain hose into a drain pipe with a minimum diameter of 4cm, or let it run into the sink, making sure to avoid bending or crimping it. The top of the hose must be at a height between 40 and 100 cm. The free end of the hose must not be immersed in water to avoid the back flow of it. -
Page 11: Using The Detergent And Water Softener
Using the detergent and water softener WATER SOFTENER The water softener must be set manually, using the water hardness dial. The water softener is designed to remove minerals and salts from the water, which would have a detrimental or adverse effect on the operation of the appliance. The higher the content of these minerals and salts, the harder your water is. -
Page 12: Lower Basket
Using the detergent and water softener LOADING THE SALT INTO THE SOFTENER Always use salt intended for use with dishwasher. The salt container is located beneath the lower rack and should be filled as follows: ATTENTION • Only use salt specifically designed for use in dishwashers! All other types of salt not specifically designed for use in a dishwasher, especially table salt, will damage the water softener. -
Page 13: Fill The Rinse Aid Dispenser
FILL THE RINSE AID DISPENSER Function of rinse aid Rinse aid is automatically added during the last rinse, ensuring thorough rinsing, and spot and streak free drying. ATTENTION: Only use branded rinse aid for dishwasher. Never fill the rinse aid dispenser with any other substances (e.g. -
Page 14: Rinse Aid Dispenser
Using the detergent and water softener Rinse Aid dispenser 1. To open the dispenser, turn the cap to the “open” (left) arrow and lift it out. 2. Pour the rinse aid into the dispenser, being careful not to overfill. 3. Replace the cap by inserting it aligned with “open” arrow and turning it to the closed (right) arrow. -
Page 15: Function Of Detergent
FUNCTION OF DETERGENT Detergents with its chemical ingredients are necessary to remove dirt, crush dirt and transport it out of the dishwasher. Most of commercial quality detergents are suitable for this purpose. WARNING: Dishwasher detergent is corrosive! Take care to keep it out of reach of children. Proper Use of Detergent Use only detergent specifically made for use in dishwashers. -
Page 16: Amount Of Detergent To Use
Using the detergent and water softener Amount of detergent to use 1. Fill the detergent dispenser with detergent. The marking indicates the dosing levels, as illustrated on right: A. This section is for main wash detergent, approximately B. This section is for the pre wash detergent, approximately 5g If the dishes are heavily soiled, place an additional detergent dose in the pre-wash detergent chamber. - Page 17 HOW TO USE THE 3 IN 1 OPTION Your dishwasher has a 3 in 1 option which does not need salt and rinse aid but a 3 In1 tablet. This option can select on Intensive, Auto or Eco program only. The 3 in 1 setting is only for use with 3 in 1 tablets.
-
Page 18: Loading The Dishwasher Racks
Loading the dishwasher racks For best performance of the dishwasher, follow these loading guidelines. Features and appearance of racks and silverware baskets may vary from your model. Attention before or after loading the dishwasher racks Scrape off any large amounts of leftover food. It is not necessary to rinse the dishes under running water. - Page 19 LOADING THE LOWER BASKET We recommend that you place large items which are most difficult to clean in to the lower rack: pots, pans, lids, serving dishes and bowls, as shown in the figure to the right. It is preferable to place serving dishes and lids on the side of the racks in order to avoid blocking the rotation of the top spray arm.
- Page 20 Loading the dishwasher racks CUTLERY(SILVERWARE) BASKET Silverware should be placed in the cutlery basket with handles at the bottom: The spoon should be loaded individually into the appropriate slots, especially long utensils should be placed in the horizontal position at the front of the upper basket.
- Page 21 FOR WASHING IN THE DISHWASHER THE FOLLOWING CUTLERY/ DISHES Are not suitable Are of limited suitability Cutlery with wooden, horn china or mother-of-pearl Some types of glasses can become dull after a handles. large number of washes. Plastic items that are not heat resistant Older Silver and aluminium parts have a tendency to cutlery with glued parts that is not temperature discolour during washing.
-
Page 22: Washing Programmes
Washing programmes TURNING ON THE APPLIANCE Starting a cycle wash 1. Draw out the lower and upper basket, load the dishes and push them back.. It is recommended to load the lower basket first, then the upper one (see the section entitled “Loading the dishwasher racks”). - Page 23 AT THE END OF THE WASH CYCLE When the working cycle has finished, the buzzer of dishwasher will beep shortly, then stop. In the digital display appears “End”, only in this case the programme has ended. 1. Switch off the dishwasher by pressing the Power button. 2.
-
Page 24: Cleaning And Care
Cleaning and care CLEANING THE FILTERS Filtering system For your convenience, we have placed the drain pump and filtering system within easy reach inside the tub. There are three components of the filtering system: the main filter, the coarse filter, and the fine filter. - Page 25 CLEANING THE SPRAY ARMS It is necessary to clean the spray arms regularly as hard water chemicals may clog the spray arm jets and bearings. To remove the middle spray arm, hold the nut, rotate the arm clockwise to remove it. To remove the lower spray arm, pull out the spray arm upward.
- Page 26 Cleaning and care HOW TO KEEP YOUR DISHWASHER IN SHAPE • After Every Wash After every wash, turn off the water supply to the appliance and leave the door slightly ajar so that moisture and odours not trapped inside. • Remove the Plug Before cleaning or performing maintenance, always remove the plug from the socket.
-
Page 27: Troubleshooting
Troubleshooting The manufacturer, following a policy of constant development and up-dating of the product, may make modifications without giving prior notice. BEFORE CALLING FOR SERVICE PROBLEM POSSIBLE CAUSE WHAT TO DO Dishwasher doesn’t • Fuse blown or the circuit • Replace fuse or reset circuit breaker. -
Page 28: Troubleshooting
Troubleshooting PROBLEM POSSIBLE CAUSE WHAT TO DO Spots and filming on 1. Extremely hard water. To remove spots from glassware: glasses and flatware 2. Low inlet temperature. 1. Take out all metal utensils out of the dishwasher. 3. Overloading the dishwasher. -
Page 29: Error Codes
PROBLEM POSSIBLE CAUSE WHAT TO DO Dishwasher leaks • Overfill dispenser or rinse • Be careful not to overfill the rinse aid aid spills. dispenser. Spilled rinse aid could cause overusing and lead to overflowing. Wipe away any spills with a damp cloth. •... -
Page 30: Appendix
Appendix SPECIFICATIONS Model DW-FN320T, DW-FN320W Type Freestanding Dishwasher Wash capacity 12 place setting Power 220 - 240 V / 50 Hz AC only Water pressure 0.04 ~ 1.0 MPa Rated power usage 1760-2100 W Hot water connection Max 60 °C... - Page 31 For standard test The information for comparability test in accordance with EN 50242, as follows: The diagrams below show the proper way to load the baskets based on the European Standards(EN50242). • Washing capacity: 12 place settings • Test standard: EN50242/IEC60436 •...
- Page 32 Product fiche REGULATION (EU) NO 1059/2010 Supplier SAMSUNG DW-FN320W Model name DW-FN320T Rated Capacity (place setting) Energy efficiency class Annual energy consumption, (AE c) (kWh/year) Standard cycle energy consumption, (E t) (kWh) 1.03 Power consumption in off mode, P o (W) 0.46...
- Page 33 Note Note _33 DD81-01446F-02_EN_20121008.indd 33 DD81-01446F-02_EN_20121008.indd 33 2012-10-08 2012-10-08 7:11:04 7:11:04...
- Page 34 Note 34_ Note DD81-01446F-02_EN_20121008.indd 34 DD81-01446F-02_EN_20121008.indd 34 2012-10-08 2012-10-08 7:11:05 7:11:05...
- Page 35 Note Note _35 DD81-01446F-02_EN_20121008.indd 35 DD81-01446F-02_EN_20121008.indd 35 2012-10-08 2012-10-08 7:11:05 7:11:05...
- Page 36 QUESTIONS OR COMMENTS COUNTRY CALL OR VISIT US ONLINE AT 1800 1100 11 3030 8282 INDIA www.samsung.com 1800 3000 8282 1800 266 8282 0330 SAMSUNG (7267864) www.samsung.com Code No.: DD81-01446F-02_EN DD81-01446F-02_EN_20121008.indd 36 DD81-01446F-02_EN_20121008.indd 36 2012-10-08 2012-10-08 7:11:05 7:11:05...
- Page 37 INSTALLATION GUIDE INSTALLATION GUIDE DW-SG970T, DW-SG720T, DW-SG520W, DW-SG520T DW-UG971T, DW-UG971T, DW-UG971T, DW-UG971T, DW-UG971T, DW-UG971T, DW-UG971T DW5363PGBSL, DW5343TGBSL, DW5343TGBWQ, DW5363PGBWQ DW80H9950US GALA DW-FG720L, DW-FG720S, DW-FG720W, DW-FG520S, DW-FG520L, DW-FG520W DW-FN320T, DW-FN310T, DW-FN320W, DW-FN310W, DW60H6050FS DW-BG970B, DW-BG580B, DW-BG770B DW80H9930US DW60H6050FW, DW60H5050FS, DW60H5050FW, DW60H3010FW...
- Page 38 INSTALLATION GUIDE INSTALLATION GUIDE DW-SG970T, DW-SG720T, DW-SG520W, DW-SG520T DW-UG971T, DW-UG971T, DW-UG971T, DW-UG971T, DW-UG971T, DW-UG971T, DW-UG971T DW5363PGBSL, DW5343TGBSL, DW5343TGBWQ, DW5363PGBWQ DW80H9970US, DW80H9950US GALA DW-FG720L, DW-FG720S, DW-FG720W, DW-FG520S, DW-FG520L, DW-FG520W DW-FN320T, DW-FN310T, DW-FN320W, DW-FN310W, DW60H6050FS DW-BG970B, DW-BG580B, DW-BG770B DW80H9930US DW60H6050FW, DW60H5050FS, DW60H5050FW, DW60H3010FW...
Need help?
Do you have a question about the DW-FN320T and is the answer not in the manual?
Questions and answers