Olympus DM-720 User Manual
Hide thumbs
Also See for DM-720:
- Basic manual (14 pages) ,
- Basic manual (172 pages) ,
- Quick reference manual (2 pages)
Table of Contents
Advertisement
Quick Links
DIGITAL VOICE
RECORDER
DM-720
USER MANUAL
Thank you for purchasing an Olympus digital voice recorder.
Please read these instructions for information about using the product
correctly and safely.
Keep the instructions handy for future reference.
To ensure successful recording, we recommend that you test the record
function and volume before use.
EN
1
2
3
4
5
6
Advertisement
Table of Contents

Related Manuals for Olympus DM-720


Summary of Contents for Olympus DM-720
-
Page 1: Table Of Contents
Menu Use with a PC Other information USER MANUAL Thank you for purchasing an Olympus digital voice recorder. Please read these instructions for information about using the product correctly and safely. Keep the instructions handy for future reference. To ensure successful recording, we recommend that you test the record... - Page 2 Table of contents Names of parts ...............4 3 Playback Recorder ..................4 Display ..................5 Playback ..............34 Basic playback procedure ............34 1 Getting started Fast-forwarding ............... 35 Rewinding ................35 Setup ................8 Skipping to the beginning of a file .......... 36 Inserting the battery ..............
- Page 3 Table of contents Playback menu [Play Menu] ...........60 5 Use with a PC Skipping non-voice portions during playback [Voice Playback] ..............60 PC operating environment ..........90 Alternating repeatedly between normal and muted playback PC connection/disconnection .........92 [Shadowing] ............... 60 Connecting the voice recorder to a PC ........92 Reducing noise during playback [Noise Cancel] .......
-
Page 4: Names Of Parts
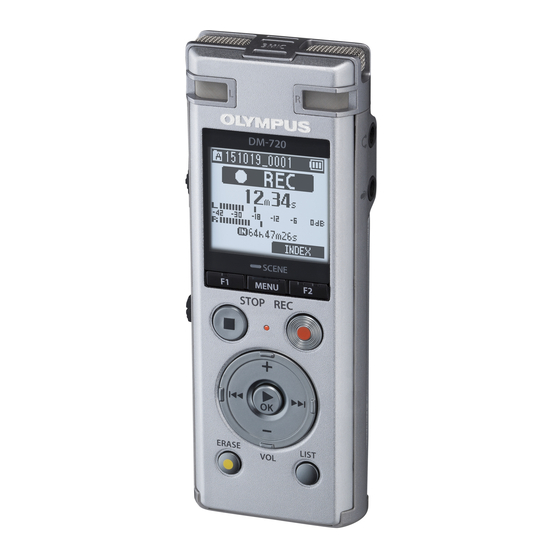
Names of parts Recorder & 1 Built-in center microphone ^ 0 button 2 Built-in stereo microphone (L) & + button 3 Display * 9 button 4 POWER/HOLD switch ( – button 5 F1 button ) Attachment mounting hole 6 STOP ( 4) button - Earphone jack ( 7 USB connector slide lever = Microphone jack ( ) -
Page 5: Display
Names of parts Display 4 [Recorder] mode Folder list display File list display File display 1 Recording media indicator 9 Elapsed recording time (during recording mode), playback time ]: Internal memory (during playback mode) ]: microSD card 0 Level meter (during recording 2 Current folder name mode), playback position bar 3 Battery indicator... - Page 6 Names of parts Display 4 [Music] mode File display List display 1 List display 2 When folder contains files When folder contains only and folders files 1 Recording media indicator 0 Music title ! Artist name ]: Internal memory ]: microSD card @ Album name 2 Current folder name # Speaker muting indicator (...
- Page 7 Names of parts Display ]: Equalizer ]: Voice Playback • Pressing and holding the STOP ( 4) ]: Rec Level button while the voice recorder is in stop mode displays the settings [Time ]: VCVA & Date] and [Remain] (amount of ]: V-Sync.
-
Page 8: Getting Started
Getting started Setup After unpacking the voice recorder, follow the steps below to have it ready for use. Inserting the battery Getting started Turning the power ON Getting started Selecting the battery setting Getting started Select the battery setting to match the inserted battery. Select the setting for a nickel-metal hydride rechargeable battery or the setting for an alkaline battery. -
Page 9: Inserting The Battery
Setup Inserting the battery Before using the voice recorder, insert the battery in the battery compartment of the voice recorder. Press and hold the battery/card Slide the battery/card cover cover lock button, and then slide completely closed. the battery/card cover to open. Insert a AAA battery, making sure its positive and negative terminals are placed correctly. -
Page 10: Turning The Power On
Press the + or – button to select off, slide the POWER/HOLD switch the type of battery you inserted. in the direction of the arrow. [Ni-MH] Select if you inserted an Olympus nickel-metal hydride rechargeable battery (model BR404). [Alkaline] Select if you inserted an alkaline battery. -
Page 11: Setting The Time/Date
Setup Setting the time/date Setting the voice guidance Using this feature, a voice announces the Press the 9 or 0 button to operating conditions of the recorder. select the item to set. Press the + or – button to select [On] or [Off]. -
Page 12: Charging The Battery
Charging the battery Charging the battery by connecting to a PC’s USB connector Press the `OK button to start NOTE charging the battery. • Before charging the battery, insert the rechargeable battery provided and set [Battery] to [Ni-MH] (☞ P.9, P.10). Start the PC. -
Page 13: Charging The Battery By Connecting To An Ac Adapter With A Usb Connection (Model A514; Optional)
(☞ P.86). • Before charging the battery, insert the rechargeable battery provided and set [Battery] to [Ni-MH] (☞ P.9, P.10). • Use only the Olympus USB connecting AC adapter model provided (A514). Connect the voice recorder to To an AC power... - Page 14 • Insert the USB connector securely all the way. Operation will not be normal if the connection is not made properly. • Use only a compatible Olympus USB extension cable. Operation is not guaranteed if another manufacturer’s cable is used. Only use the Olympus...
-
Page 15: Batteries
Batteries Use of a rechargeable battery outside the Battery indicator temperature ranges above may result in drops in battery performance or life. When As the battery loses its remaining charge, the not using the voice recorder for an extended battery indicator on the display changes as period, remove the rechargeable battery follows: before storage to prevent fluid leakage or... - Page 16 • When not using the voice recorder for an extended period, always remove the battery before storage. • When replacing the battery, use an AAA alkaline dry cell battery or an Olympus nickel-metal hydride rechargeable battery (model BR404). • Even if the battery indicator is [...
-
Page 17: Inserting/Removing A Microsd Card
Inserting/removing a microSD card The voice recorder has its own internal memory, and also supports standard microSD cards (microSD, microSDHC) sold separately. Inserting a microSD card While the voice recorder is in Close the battery/card cover. stop mode, open the battery/ •... -
Page 18: Removing A Microsd Card
Olympus has verified operation, but will not guarantee it's performance. Also note that some cards may no longer be recognized correctly... -
Page 19: Preventing Accidental Operation
Preventing accidental operation Setting the voice recorder to HOLD mode maintains the current operation and disables button operations. HOLD mode is a handy feature for preventing unintentional operation from accidental button presses when the voice recorder is carried in a bag or pocket. It is also useful for preventing the voice recorder being accidentally stopped during recording. -
Page 20: Turning The Power Off
Turning the power OFF Existing data, mode settings and the clock setting are saved when the power is turned off. Slide the POWER/HOLD switch in Power Save mode the direction of the arrow for at least half a second. When the voice recorder has been stopped for at least 10 minutes (default setting) after power ON, the display disappears and the voice recorder... -
Page 21: [Home] Screen Operations
[Home] screen operations Selecting the mode In addition to its recording function, the voice recorder also provides music player functions. Choose the application you want by selecting one of the voice recorder’s modes. While the voice recorder is in When [Recorder] is selected: stop mode, press the F1 (HOME) The voice recorder enters button to display the [Home]... -
Page 22: Selecting Folders And Files
Selecting folders and files You can select a different folder while the voice recorder is in stopped or playing a file. See “Transferring files to a PC” (☞ P.95) for a description of the voice recorder’s hierarchical folder structure. [Home] screen Folders for voice recordings Folder list File list display... - Page 23 Selecting folders and files [Home] screen Used to select the voice recorder mode (☞ P.21). List display Displays the folders and files recorded in the voice recorder. Pressing the F2 (FOLDER) button changes the display to the list display of the next folder.
-
Page 24: Attaching The Stand Clip (Cl4)
Attaching the stand clip (CL4) The voice recorder can be attached with a clip to the inside of a pocket of your clothes to prevent it from dropping when you take it out with you. You can also use the clip as a stand when you place the voice recorder on a table for recording. -
Page 25: Recording
Recording Recording The voice recorder has five folders ([&] to [*]) in which recorded files can be saved. These folders provide a handy way to sort recordings into separate categories (such as business and leisure). Basic recording procedure Press the 9 or 0 button Press the REC ( s) button to start in the [Home] screen and select recording. - Page 26 Recording NOTE Sound files recorded with the voice • To prevent the beginning of the recorder are automatically given a file recording being cut off, start recording name in the format below. after the LED indicator light has lit or mode indicator has appeared in the 151001 _ 0001.MP3 display.
-
Page 27: Pausing/Resuming Recording
Recording Pausing/resuming recording Recording linear PCM format files of over 2 GB Press the REC ( s) button during When recording a linear PCM format file, recording. recording will continue even after the file size exceeds 2 GB. • The data is divided and saved in separate files of up to 2 GB. -
Page 28: Monitoring While Recording
Recording Monitoring while recording Recording settings Various recording settings are available, You can monitor the recording as you are letting you tailor recording to different making it by listening on the earphones recording conditions. plugged into the voice recorder’s earphone ). -
Page 29: Selecting The Automatic Recording Setting [Rec Scene]
Selecting the automatic recording setting [Rec Scene] Changing the recording scene The voice recorder has preregistered templates of optimum settings tailored to various recording applications such as lectures and dictation. When selecting one of these templates you can enter several settings recommended for your recording application all in a single operation. - Page 30 Selecting the automatic recording setting [Rec Scene] Press the `OK button to finalize Preregistered [Rec Scene] settings the setting. [Lecture] Press the STOP ( 4) button to exit the selection screen. [Rec Level] [High] [Rec Mode] [MP3 128 kbps] [Zoom Mic] [+6] [Low Cut Filter] [On]...
- Page 31 Selecting the automatic recording setting [Rec Scene] [Dictation] [Rec Level] [Low] [Rec Mode] [MP3 128 kbps] [Zoom Mic] [Off] [Low Cut Filter] [On] [Mic Select] [Central Mic Off] [VCVA] [Off] [V-Sync. Rec] [Off] [DNS] [Rec Level] [Low] [Rec Mode] [MP3 128 kbps] [Zoom Mic] [Off] [Low Cut Filter]...
-
Page 32: Recording With An External Microphone
Recording with an external microphone You can record audio input using an external microphone or other device connected to the voice recorder’s microphone jack ( ). Do not plug or unplug devices into voice recorder jacks while recording. Connect an external microphone NOTE to the voice recorder’s •... -
Page 33: Recording From Another Connected Device
Recording from another connected device Recording audio from another Recording audio from this recorder device with this recorder with another device Audio can be recorded when you have Audio from this recorder can be recorded connected the audio output terminal to another device by connecting the audio (earphone jack) of another device and the input terminal (microphone jack) of the... -
Page 34: Playback
Playback Playback In addition to files recorded by the voice recorder, you can also play files in WAV and MP3 format transferred from a PC. Basic playback procedure Select the file to play from the Press the + or – button to adjust folder containing it (☞ P.22). -
Page 35: Fast-Forwarding
Playback Fast-forwarding Rewinding Fast-forwarding while the voice Rewinding while the voice recorder is recorder is in stop mode in stop mode With the voice recorder stopped, With the voice recorder stopped, press and hold the 9 button. press and hold the 0 button. •... -
Page 36: Skipping To The Beginning Of A File
Playback NOTE Skipping to the beginning of a file • If an index mark or temp mark is reached when skipping to the beginning of a file during playback, playback starts from the position of the mark. When skipping to the beginning of a file while the voice recorder is in stop mode, the mark is ignored (☞ P.45). -
Page 37: Playback Through The Earphones
Playback Playback through the earphones Playback settings You can select various file playback methods You can connect the earphones to the voice tailored to different applications and tastes. recorder’s earphone jack ( ) and listen to playback through them. [Voice Playback] Only plays voice portions of a (☞ P.60) recorded audio file. - Page 38 Playback NOTE Music files • To avoid unpleasantly loud sound, set If a music file transferred to the voice recorder the volume to [00] before plugging in is unplayable, check that its sampling rate, the earphone. bit count and bit rate values are within the •...
-
Page 39: Selecting The Automatic Playback Operation [Play Scene]
Selecting the automatic playback operation [Play Scene] You can set the optimum playback operation for transcription or language study. You can also use the fast or slow playback function at the same time. [Transcription] This is convenient for creating the minutes and written records from audio files of meetings, interviews, and other events where multiple people speak. - Page 40 Selecting the automatic playback operation [Play Scene] Preregistered [Play Scene] settings [Transcription] [STOP (4)] [Auto Back (3 sec)] Play Scene [9 (CUE)] [x3.5 Play Back] • Press and hold the STOP (4) button [0 (REV)] [Reviewing] when the recorder is stopped to check [9 (SKIP)] [10 sec.
-
Page 41: Changing The Playback Speed
Changing the playback speed Changing the playback speed is handy for speeding up conference presentations, or for slowing down parts difficult to discern when learning a language. Press the `OK button during playback. • When changing the playback speed, playback operations such as stopping playback, skipping to the beginning of a file, and writing index marks/temp marks are the same as during standard... -
Page 42: Abc Repeat Playback
ABC repeat playback The voice recorder has a function with which you can repeat the playback of a portion (segment) of the file being played. In addition to the A-B repeat function available from previous models, the segment to repeat can be changed during repeat playback. There is also a shadowing playback function handy for language learning that can be used during ABC repeat playback. - Page 43 ABC repeat playback Specifying new starting/ending points • You can change the playback speed (☞ P.41), and fast-forward/ Press the F1 (CANCEL A) button rewind (☞ P.35) when the [B] during ABC repeat playback. indicator is blinking. • If playback reaches the end of the file when the [B] indicator is blinking, the end of the file is treated as the segment end...
- Page 44 ABC repeat playback Canceling ABC repeat playback • You can repeat Steps 4 and 5 as needed to change the repeat Press the F2 (CNCL ABC) button. segment as desired. Press the STOP ( 4) button. • If pressed when ABC repeat playback is stopped, cancels ABC repeat playback.
-
Page 45: Index Marks/Temp Marks
Index marks can only be written in files created with Olympus voice recorders. For files created with other devices, you can temporarily store desired positions in the memory using temp marks. -
Page 46: Calendar Search Function
Calendar Search function You can search for voice files by specifying a recording date. If you have forgotten in which folder a file has been saved, with this feature you can access it quickly by entering its recording date. • Dates on which files were saved are NOTE underlined. -
Page 47: Erasing Files/Folders
Erasing files/folders This section describes how to erase a single unneeded file from a folder, erase all the files in the current folder at once, or erase a selected folder. Erasing files Select the file you want to erase Press the `OK button. (☞ P.22). -
Page 48: Erasing A Folder
Erasing files/folders Erasing a folder Select the folder you want to NOTE erase (☞ P.22). • Files cannot be restored after being erased, so please check carefully before In the folder display screen, press erasing a file. the ERASE button while the voice •... -
Page 49: Menu
Menu Setting menu items Basic operation Menu items are arranged by tabs, with which you can quickly set desired items by selecting a tab and then moving to the desired item within the tab. Follow the steps below to set a menu item. - Page 50 Setting menu items Basic operation Press the `OK button. Press the STOP ( 4) button to exit the menu screen. • The setting of the selected item is displayed. • When the menu screen is displayed • You can also use the 9 button to during recording or playback, press the MENU/SCENE button to return to perform this operation.
-
Page 51: During Recording
Setting menu items Basic operation 4 Menu items that can be set during recording • Rec Level • Zoom Mic • Low Cut Filter • VCVA • Backlight • LED 4 Menu items that can be set during Playback • Property •... -
Page 52: File Menu [File Menu]
File menu [File Menu] Sorting files [Sort by] Extracting the speaking portions of files of spoken-word content You can change the playback order of the [Voice Detect] files in a folder. Press the + or – button to select The function extracts the speech portions [File name], [Date ascending] or of a voice file or a file being recorded by the [Date descending]. -
Page 53: Moving/Copying Files [Move/Copy]
File menu [File Menu] Moving/copying files [Move/Copy] Displaying file or folder information [Property] Files saved in the internal memory or on a microSD card can be moved or copied within You can display the information of a file or memory. folder from a menu screen. -
Page 54: Recording Menu [Rec Menu]
Recording menu [Rec Menu] Selecting the recording level Adjusting the recording level [Rec Level] Adjust the recording level by pressing the 9 or 0 button You can change the recording level during recording or when (sensitivity) as needed for your recording recording is paused. -
Page 55: Setting The Recording Mode [Rec Mode]
Recording menu [Rec Menu] NOTE Setting the recording mode • When [Rec Mode] is set to stereo, [Rec Mode] recording with a connected mono microphone records on the left channel You can prioritize sound quality or recording only. time. Select the recording mode that best matches your recording application. -
Page 56: Reducing Noise During Recording [Low Cut Filter]
Recording menu [Rec Menu] Reducing noise during recording Zoom Mic function [Low Cut Filter] High directivity The voice recorder’s low cut filter function lets you make recordings that reduce humming sounds from air-conditioners or low-frequency sounds from equipment such as projectors. directivity [On]: Narrow sound... -
Page 57: Voice-Activated Recording Function [Vcva]
Recording menu [Rec Menu] Voice-activated recording function Adjusting the voice activation level for voice-activated recording [VCVA] The voice-activated recording function Press the REC ( s) button to start (VCVA) automatically starts recording when recording. a sound louder than a preset voice activation •... -
Page 58: Voice Sync Recording Function [V-Sync. Rec]
Recording menu [Rec Menu] Voice sync recording function • Increasing the setting number [V-Sync. Rec] increases the VCVA activation sensitivity, enabling quieter sounds to The voice sync recording function activate the start of recording. automatically starts recording when a sound •... -
Page 59: Setting Timer Recording [Timer Rec]
Recording menu [Rec Menu] Press the 9 or 0 button to adjust the voice sync level. • The voice recorder automatically ends recording and returns to recording standby mode when the input sound has been below the voice sync level for at least the set detection time. -
Page 60: Playback Menu [Play Menu]
Playback menu [Play Menu] Skipping non-voice portions during Alternating repeatedly between playback [Voice Playback] normal and muted playback [Shadowing] With the [Voice Playback] function you can only play the speaking portions of a recorded The voice recorder’s shadowing playback file of spoken-word content. function plays a repeat segment set for the ABC repeat playback function (☞... -
Page 61: Reducing Noise During Playback [Noise Cancel]
Playback menu [Play Menu] Reducing noise during playback Adjusting low volume portions [Noise Cancel] during playback [Voice Balancer] Use the [Noise Cancel] function to reduce Cuts low- and high-frequency components noise when a recorded voice is difficult to and compensates low-volume portions discern. -
Page 62: Selecting Playback Modes [Play Mode]
Playback menu [Play Menu] Press the + or – button to select a Selecting playback modes setting. [Play Mode] When [Playback Range] was selected: [File], [Folder], [All]: Several playback modes are available for Specify the range of files for playback. different listening styles. -
Page 63: Changing Music Sound Quality [Equalizer]
Playback menu [Play Menu] Changing music sound quality Setting a skip space [Equalizer] [Skip Space] The [Skip Space] function lets you skip The voice recorder’s equalizer settings can be changed to change music sound quality a preset amount forward (forward skip) as desired. - Page 64 Playback menu [Play Menu] NOTE • Forward/reverse skip operations over a skip space that contains an index mark/ temp mark or the starting position of a file will stop at that mark or at the start position. Forward/reverse skip playback Press the `OK button to start playback.
-
Page 65: Lcd/Sound Menu [Lcd/Sound Menu]
LCD/Sound menu [LCD/Sound Menu] Setting the backlight [Backlight] Turning beeping sound on/off [Beep] The display backlights are switched on for a preset amount of time when a button The voice recorder makes beeping sounds operation is performed. when buttons are pressed, or to warn in case of operation errors. -
Page 66: Setting The Voice Guidance [Voice Guide]
LCD/Sound menu [LCD/Sound Menu] Setting the voice guidance Selecting the speaker output [Voice Guide] [Speaker] This feature gives voice announcements of You can set the built-in speaker to be On or recorder operating conditions. Off when the earphones are not connected. When set to [Off], sound will not be output See “Setting the voice guidance [Voice from the speaker even if the earphones are... -
Page 67: Device Menu [Device Menu]
(☞ P.17). [Ni-MH]: Select this setting when using an Olympus Ni-MH rechargeable battery [Internal memory]: (model BR404). Uses on the internal memory on the voice recorder. [Alkaline]:... -
Page 68: Setting The Time/Date [Time & Date]
Device menu [Device Menu] Setting the time/date • When setting the hour or minute, [Time & Date] each time you press the F2 button the display changes between the AM/PM If you set the date and time, you will be and 24-hour clock formats. -
Page 69: Setting The Usb Connection [Usb Settings]
Device menu [Device Menu] Play Menu: Setting the USB connection Voice Playback : Off [USB Settings] Shadowing: Off Noise Cancel : Off Voice Balancer : Off The [PC] setting lets you connect the voice Play Mode: recorder to a PC to transfer files. The [AC Recorder: Adapter] setting lets you connect the voice Playback Range / File... -
Page 70: Formatting A Recording Media [Format]
Device menu [Device Menu] Formatting a recording media Checking voice recorder [Format] information [System Info.] Formatting a recording media erases all You can display voice recorder information existing files saved on it. Be sure to transfer all from a menu screen. important files to a PC before formatting. -
Page 71: Extracting The Speaking Portions Of Files Of Spoken-Word Content [Voice Detect]
Extracting the speaking portions of files of spoken-word content [Voice Detect] The function extracts the speech portions of a voice file or a file being recorded by the voice recorder. Press the `OK button to move to NOTE the respective setting. •... - Page 72 Extracting the speaking portions of files of spoken-word content [Voice Detect] When [With recording] is selected NOTE • The message [No file] appears if you 1 Press the + or – button to select [On] select a folder that doesn’t contain or [Off].
-
Page 73: Moving/Copying Files [Move/Copy]
Moving/copying files [Move/Copy] Files saved in the internal memory or on a microSD card can be moved or copied within memory. Before performing the move/ [Copy to memory]: Copies one or more files saved in the copy operation, first select the internal memory or inserted microSD folder containing the file you card to a different folder in the internal... - Page 74 Moving/copying files [Move/Copy] Press the `OK button to continue 2 Repeat Step 1 to select all the files to the next setting. you want to move or copy, then press the F2 button. When [One file] was selected When [All files] was selected 1 Press the + or –...
- Page 75 Moving/copying files [Move/Copy] Press the F2 button. • The progress of the operation is shown as a percentage in the display. • [File move completed] or [File copy completed] appears when the process has finished. • Locked files (☞ P.52) remain locked after being moved or copied.
-
Page 76: Dividing Files [File Divide]
Dividing files [File Divide] Large files or files with long recording times can be divided for easier management and editing. Press the F2 button at the desired NOTE division point. • Only MP3-format and PCM-format files recorded on the voice recorder can be divided. - Page 77 Dividing files [File Divide] • After dividing a file, the first half of the file is given the name “File name_1” and the second half “File name_2”. NOTE • [File Divide] can be performed only when the file list is displayed. •...
-
Page 78: Partially Erasing Files [Partial Erase]
Partially erasing files [Partial Erase] You can erase unneeded parts of a file. Press the F2 button at the partial NOTE erase start position. • Only PCM-format file recorded on the voice recorder can be erased. Before performing the file erasing operation, first select the file you want to erase (☞ P.22). - Page 79 Partially erasing files [Partial Erase] Press the + button to select NOTE [Start]. • Files cannot be restored after being erased, so please check carefully before erasing a file. • Locked files and read-only files cannot be erased (☞ P.52). • Before erasing a file or folder, charge or replace the battery to ensure it will not run out before the process has finished.
-
Page 80: Setting Timer Recording [Timer Rec]
Setting timer recording [Timer Rec] Start recording automatically when a set time is reached. Timer recording allows you to record at a set date and time as well as record at specific periods such as the following day or following week based on that set date and time. - Page 81 Setting timer recording [Timer Rec] Press the + or – button to select When [On/Off] was selected the desired setting item. 1 Press the + or – button to select [On] or [Off]. [On/Off]: [On]: Turns the selected reservation on or Timer recording is performed off.
- Page 82 Setting timer recording [Timer Rec] 2 Press the `OK button to exit the When [Rec Mode] was selected selection screen. 1 Press the + or – button to select *1 If you select [Every Week] and then [PCM] or [MP3], then press the `OK press the `OK button, a screen for button.
- Page 83 Setting timer recording [Timer Rec] When [Rec Level] was selected 1 Press the + or – button to select • Even though the power is OFF or on [High], [Middle], [Low], [Manual] or hold, when the specified [Timer Rec] [Auto]. time arrives, recording starts.
-
Page 84: Setting The Voice Guidance [Voice Guide]
Setting the voice guidance [Voice Guide] This feature gives voice announcements of recorder operating conditions. You can set voice announcement On/Off, speed and volume. Press the MENU/SCENE button Press the `OK button to move to while the voice recorder is in stop the respective setting. - Page 85 Setting the voice guidance [Voice Guide] When [Volume] was selected 1 Press the + or – button to select the voice volume. [Volume1] to [Volume5]: The greater the number, the louder the beep sound. 2 Press the `OK button to exit the selection screen.
-
Page 86: Setting The Usb Connection [Usb Settings]
Setting the USB connection [USB Settings] The [PC] setting lets you connect the voice recorder to a PC to transfer files. The [AC Adapter] setting lets you connect the voice recorder to a USB-connection AC adapter (model A514; optional) or a PC to charge the rechargeable battery. You can change the USB class setting as required by different USB applications. - Page 87 Setting the USB connection [USB Settings] When [USB Connection] was selected When [USB Class] was selected Press the + or – button to select a Press the + or – button to select a setting. setting. [PC]: [Storage Class]: Select to connect the voice recorder Select to have the voice recorder to a PC.
-
Page 88: Formatting Recording Media [Format]
Formatting recording media [Format] Formatting a recording media erases all existing files saved on it. Be sure to transfer all important files to a PC before formatting. Press the MENU/SCENE button Press the `OK button. while the voice recorder is in stop mode. - Page 89 Formatting recording media [Format] NOTE • Never format the voice recorder from a PC. • Formatting erases all the existing data, including locked files and read-only files. • If there is a microSD card in the voice recorder, make sure [Internal memory] or [microSD card] has been correctly selected as the recording media to erase (☞ P.67).
-
Page 90: Use With A Pc
Use with a PC When connecting the voice recorder to a PC you can do the following: • You can enjoy language content or music files in MP3 and WAV format stored on your PC. • Use the voice recorder as external storage to save or load data to/from your PC (☞... - Page 91 PC operating environment PC connection precautions • When uploading or downloading a file to or from the voice recorder, data transfer will continue as long as the voice recorder’s LED indicator light is flashing, even if the PC data communication screen disappears. Never disconnect the USB connector before data communication has finished.
-
Page 92: Pc Connection/Disconnection
PC connection/disconnection Connecting the voice recorder to a PC Start the PC. When you use an Olympus nickel- metal hydride rechargeable battery: Slide the USB connector slide • To charge the battery, press the `OK button. lever in the direction of the •... - Page 93 USB hub may result in unstable operation. Do not use a USB hub if operation is unstable. • Use only a compatible Olympus USB extension cable. Operation is not guaranteed if another manufacturer’s cable is used. Only use the Olympus...
-
Page 94: Disconnecting The Voice Recorder From A Pc
PC connection/disconnection Disconnecting the voice recorder from a PC Windows Macintosh Click [ ] on the task bar in the Drag-and-drop the removable lower right hand corner of the disk icon for the voice recorder screen and click [Eject DIGITAL shown on the desktop to the trash can icon. -
Page 95: Transferring Files To A Pc
[FOLDER_B], [FOLDER_C], [FOLDER_D] and [FOLDER_E] (Fig. C). You can copy voice recorder files to any folder on the PC (Fig. D). Copying files recorded with the built-in microphone to a PC Drive name Folder names FOLDER_A DM-720 RECORDER FOLDER_B microSD MUSIC Windows... - Page 96 Transferring files to a PC • Each folder can store up to 200 files. • Up to 400 folders can be created within the [Music] folder (including a [Music] folder itself ). • The voice recorder can only recognize two folder sublevels. Windows Connect the voice recorder to the PC (☞ P.92).
-
Page 97: Other Information
(☞ P.45). The maximum number of files (200) Folder full Erase unneeded files (☞ P.47). have been saved in the folder. Contact the Olympus Customer Memory error An internal memory error occurred. Support Center (☞ back cover). The microSD card was not recognized... - Page 98 Alarm message list Message Meaning Action required You must select a file before you can Select a file No file has been selected. perform the operation (☞ P.22). Same folder can’t be An attempt was made to move (copy) Select another folder. moved (copied) a file to the same folder.
-
Page 99: Troubleshooting
Troubleshooting Problem Possible cause Solution Check that the positive and negative The battery is not inserted terminals of the battery are placed properly. correctly (☞ P.9). The display is blank. The remaining battery power Replace or charge the battery (☞ P.9, is low. P.12). - Page 100 Troubleshooting Problem Possible cause Solution The connected external Sound recorded by a connected external microphone is a mono mono microphone is recorded on the left microphone. channel only. An audio file is not [Rec Mode] is set to a mono Set [Rec Mode] to a stereo recording recorded in stereo.
- Page 101 Troubleshooting Problem Possible cause Solution The maximum number of marks Erase unneeded marks (☞ P.45). (99) has been reached. Unable to write index The file is locked. Unlock the file (☞ P.52). marks/temp marks Unlock the file, or undo the read-only The file is a read-only file.
-
Page 102: Recorder Care
Recorder care s Exterior • Wipe gently with a soft cloth. If the recorder is very dirty, soak the cloth in mild soapy water and wring well. Wipe the recorder with the damp cloth and then wipe it with a dry cloth. s Display •... -
Page 103: Accessories (Optional)
Accessories (optional) Accessories for Olympus voice recorders can be purchased directly from the Online Shop on the Olympus website. Availability of accessories differs depending on the country. ME51SW stereo microphone ME15 mono tie clip microphone (omnidirectional) Has a large-diameter built-in microphone for sensitive stereo recording. -
Page 104: Copyright And Trademark Information
• Note that Olympus will assume no liability in the event of damages, lost earnings, or any claims from third parties resulting from improper use of the product. Trademarks and registered trademarks •... -
Page 105: Safety Precautions
Continued use may result in fire or burns (Do not touch the product with bare hands when it’s overheating). 2 Contact your place of purchase or an Olympus service center. - Page 106 If another card type is placed in the voice Batteries recorder by accident, do not try to pull it out by force. Contact an Olympus repair f DANGER center or service center. s If the voice recorder is dropped in...
- Page 107 Safety precautions s Do not connect the battery directly s Battery fluid in the eyes may cause to a power outlet or car cigarette blindness. If battery fluid gets in lighter. eyes, do not rub the eyes. Instead, rinse them thoroughly with tap s Do not use or leave the battery water or other clean water right in a hot location such as in direct...
- Page 108 Safety precautions f CAUTION Operating precautions • Do not leave the voice recorder in hot or s Do not throw the battery around, humid locations such as in direct sunlight or subject it to strong shocks. inside a vehicle, or on a beach during s Always charge the rechargeable summer.
- Page 109 • Note that Olympus will assume no liability for damages or lost earnings resulting from recorded data damage or loss, regardless of the nature or cause thereof.
-
Page 110: Specifications
Standard voltage: 1.5 V 320 kbps 44.1 kHz Battery: One AAA dry cell battery (model 128 kbps 44.1 kHz LR03), or one Olympus nickel-metal hydride rechargeable battery 64 kbps mono 44.1 kHz External power supply: USB-connection 8 kbps mono 11.025 kHz AC adapter (model A514;... - Page 111 Specifications Frequency response 4 When recording from microphone jack Linear PCM format 48.0 kHz/16 bits 20 Hz to 23 kHz 44.1 kHz/16 bits 20 Hz to 21 kHz MP3 format 320 kbps 20 Hz to 21 kHz 128 kbps 20 Hz to 17 kHz 64 kbps mono 20 Hz to 13 kHz 8 kbps mono...
- Page 112 Specifications Battery life The figures below are guideline values. 4 When recording with built-in stereo microphone (using internal memory) Nickel-metal hydride Recording mode Alkaline dry cell battery rechargeable battery 48.0 kHz/16 bits 26 hours (approx.) 20 hours (approx.) Linear PCM format 44.1 kHz/16 bits 28 hours (approx.)
- Page 113 Specifications NOTE • The battery life figures shown here were determined using an Olympus test method (When [Mic Select] is set to [Central Mic Off], and [LED] is set to [Off]). Actual battery life figures will vary greatly according to the battery used and usage conditions (Changing the playback speed or using the [Zoom Mic], [Noise Cancel] and [Voice Balancer] functions may affect the battery life).
- Page 114 Specifications NOTE • Actually available recording times may be shorter than the figures shown here when making short recordings repeatedly (Equipment displays of available/elapsed recording times should be considered guideline values). • Available recording time will also vary due to differences in the available memory capacity of different microSD cards.
- Page 115 - Consult the dealer or an experienced radio/TV technician for help. - Use only Olympus' supplied cable or AC adapter when you connect the applicable equipment to an external device or a power outlet.
- Page 116 9 am to 9 pm (Monday to Friday) ET 24/7 online automated help: http://www.olympusamerica.com/ http://www.olympusamerica.com/ contactus support Olympus software updates can be Phone customer support: obtained at: Tel.: 1-888-553-4448 (Toll-free) http://www.olympusamerica.com/digital OLYMPUS IMAGING AUSTRALIA PTY LTD. Ground Floor, 82 Waterloo Road, Macquarie Park NSW 2113, Australia PO Box 1991 Macquarie...
- Page 117 Unit No.10-8, Menara 1MK, Kompleks '1 Mont' Kiara' , No.1, Jalan Kiara, Mont' Kiara, 50480 Kuala Lumpur, Malaysia Tel. (60) 3-6411-0000 http://www.olympus.com.my OLYMPUS HONG KONG AND CHINA LIMITED L43, Office To wer, Langham Place, 8 Argyle Street, Mongkok, Kowloon, Hong Kong Tel. (852) 2481-7812 https://www.olympus.com.hk OLYMPUS (THAILAND) CO., LTD.
Need help?
Do you have a question about the DM-720 and is the answer not in the manual?
Questions and answers