Senco FN65DA Operating Instructions Manual
Fusion cordless finish nailers
Hide thumbs
Also See for FN65DA:
- Operating instructions manual (85 pages) ,
- Operating instructions manual (171 pages)

Related Manuals for Senco FN65DA


Summary of Contents for Senco FN65DA
- Page 1 F-15/F-16A/F-16S/F-18 (FN65DA/FN65RHA/FN65RHS/FN55AX) Fusion Cordless Finish Nailers Operating Instructions...
-
Page 2: Table Of Contents
tablE oF CoNtENts Employer’s Responsibilities ..........2 Safety Warnings ..............3 Functional Description ............14 Tool Operation ..............16 Maintenance ..............22 Battery Charger Label Reference ........23 Battery Specifications ............23 Charger Specifications ............23 Technical Specifications ............ 24 Fastener Specifications ............. -
Page 3: Safety Warnings
General Safety Rules (For all battery operated tools) saFEty WaRNiNgs Warning! Read all safety warnings and instructions. Failure to follow the warnings and instructions may result in electric shock, fire and/or serious personal injury. save all warnings and instruc- tions for future reference. The term "power tool"... - Page 4 saFEty WaRNiNgs Do not expose power tools to rain or wet conditions. Water entering a power tool will increase the risk of electric shock. Do not abuse the cord. Never use the cord for carrying, pulling or unplugging the power tool. Keep cord away from heat, oil, sharp edges or moving parts.
- Page 5 saFEty WaRNiNgs Remove any adjusting key or wrench before turning the power tool on. A wrench or a key left attached to a rotating part of the power tool may result in personal injury. Do not overreach. Keep proper footing and balance at all times. This enables better control of the power tool in unexpected situations.
- Page 6 saFEty WaRNiNgs store idle power tools out of the reach of children and do not allow persons unfamiliar with the power tool or these instruc- tions to operate the tool. Power tools are dangerous in the hands of untrained users. Maintain power tools.
- Page 7 saFEty WaRNiNgs Under abusive conditions, liquid may be ejected from the battery; avoid contact. if contact acciden- tally occurs, flush with water. if liquid contacts eyes, additionally seek medical help. Liquid ejected from the battery may cause irrita- tion or burns. SOAP VINEGAR LEMON...
- Page 8 Deliberate tampering with the drive assembly may result in the release of the driver. Any repair or upgrade requiring access to the pressure chamber should be handled by an authorized Senco dealer or service center.
- Page 9 saFEty WaRNiNgs Disconnect tool from battery when: Outside of the operator's ‡ supervision or control. Performing maintenance or ‡ repair Clearing a jam ‡ Moving the tool to a new ‡ location With battery disconnected, make daily inspection to assure free movement of workpiece contact element and trigger.
- Page 10 (3) Keep fingers AWAY from trigger when not driving fasteners to avoid accidental firing. (4) Choice of triggering mechanisms is important. Check manual for your SENCO representative to triggering instructions. (5) NEVER point tool at yourself or others in work area. Always point tool...
- Page 11 FoR CHaRgER & battERy CaRtRiDgE savE tHEsE iNstRUCtioNs this manual contains important safety and operating instruc- tions for sENCo battery charger vb0120 (Us) and vb0131 (aUs/ NZ). Use with approved senco batteries stated on the charger label. before using sENCo battery...
- Page 12 SENCO Authorized Service Center. Do not disassemble charger or bat- tery cartridge; take it to a SENCO Authorized Service Center when service or repair is required. Incor- rect reassembly may result in a risk of electric shock or fire.
- Page 13 saFEty WaRNiNgs Do not attempt to use a step-up transformer, an engine generator or DC power receptacle. Do not recharge non-rechargeable batteries. Do not allow anything to cover or clog the charger vents. Do not store the tool and battery cartridge in locations where the temperature may reach or exceed 45˚C (113˚...
-
Page 14: Functional Description
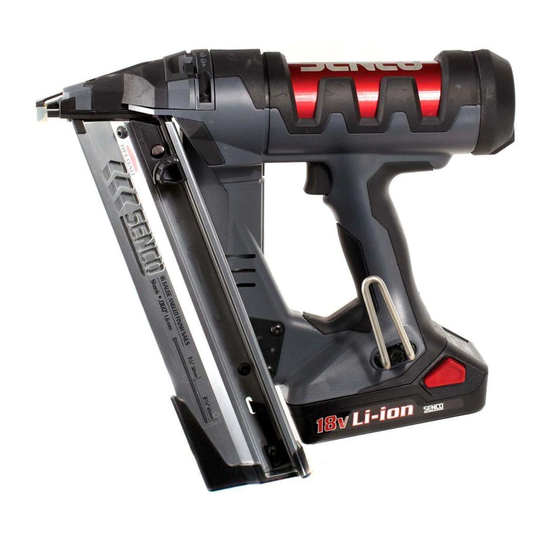
Trigger / On Switch ➐ Belt Hook ➑ Battery Pack loading the tool: Insert strip of nails into rear of magazine. Use only genuine SENCO ‡ fasteners (see Fastener Specifications). Do not load with workpiece ‡ contact (safety element) or trigger depressed. - Page 15 FUNCtioNal DEsCRiPtioN Straight Tool ➊ On/Off and Selective Actuation Button ➋ Depth of drive control ➌ Workpiece Illumination/ Status Indicator ➍ Workpiece contact (safety) element ➎ Magazine Latch ➏ Trigger/On Switch ➐ Belt Hook ➑ Battery Pack loading the tool: Pull magazine latch back to open access door.
-
Page 16: Tool Operation
tool oPERatioN Read section titled “Safety Warn- ings,” before using tool. For best results, charge new bat- tery before using. (see “To Charge Li-ion Battery” page 20). The tool should be switched off when not in use. Hold down either »... - Page 17 tool oPERatioN In the “contact-actuation” mode, nails can be driven in two ways: The first way: ① Press the side of the selector switch. This will be in- dicated by the flashing green LED on the selector switch. ② Press the workpiece contact (safety) element against the work surface.
- Page 18 tool oPERatioN This tool is equipped with a dual- purpose light on the nosepiece. The light will indicate that the electronic controls are energized while providing illumination of the workpiece in low light situations. The light will flash three times when the selection switch is switched to either sequential or contact actua- tion.
- Page 19 tool oPERatioN This tool is equipped with an adjustable belt hook. Remove the knurled fastener to raise or lower the hook. Switch the position of the mounting plate on the opposite side for left-handed operators. Whenever possible, hold the tool at a right angle to the work surface.
- Page 20 Red light indicates fast charging mode. Red and green light flashing indicates defective battery pack. Return battery pack to your nearest SENCO Authorized Service Center for inspection or replacement. Flashing Red indicates an over- heated battery. Charging will begin after battery cools.
- Page 21 tool oPERatioN After normal usage, 45 minutes of charge time is required to be fully charged. A maximum charge time of 1 hour or less is required to recharge a completely discharged battery pack. Maintenance charge is indicated when the red light turns off while the green light flashes.
-
Page 22: Maintenance
MaiNtENaNCE WaRNiNg Repairs other than those described here should be performed only by trained, qualified personnel. Con- tact SENCO for information at: 1-800-543-4596. Read section titled “Safety Warn- ings” before maintaining tool. The employer and tool operator are responsible for assuring that the... -
Page 23: Battery Charger Label Reference
VB0129 (EU) VB0130 (EU) VB0157 (EU) 1.5 AHr VB0131 (AU) VB0158 (AU) 1 AHr VB0132 (UK) VB0159 (UK) Li-ION Li-ION — Cells/Elementos/Éléments — Cells/Elementos/Éléments • Gen 2 Charger will charge all SENCO Li-Ion batteries Requires Gen 2 Charger ... -
Page 24: Technical Specifications
F-15 / F-16-A / F-16S / F-18 / FN65DA FN65RHA FN65RHS FN55AX tECHNiCal sPECiFiCatioNs Voltage 18 volts Li-ion 18 volts Li-ion 18 volts Li-ion 18 volts Li-ion Weight 6.2 lbs. (2.81 kg) 6.2 lbs. (2.81 kg) 6 lbs. (2.72 kg) 6 lbs. -
Page 25: Fastener Specifications
FastENER sPECiFiCatioNs F15 / FN65a F16-a / FN65RHa .072 in. .063 in. 1,83 mm 1,60 mm Gauge: 15 SENCO Fastener SENCO Code Fastener Code inches inches DA15 1-1/4 RHA15 1-1/4 RHA17 1-1/2 DA17 1-1/2 RHA19 1-3/4 DA18 1-5/8 DA19 1-3/4... -
Page 26: Accessories
Workpiece contact element is jammed Remove battery, then inspect tool to assure free movement of workpiece contact element. Workpiece contact element or trigger switches Return tool to authorized SENCO service repre- are damaged. sentative. Tool does not drive fastener to desired depth. - Page 27 Start with fully charged batteries at the beginning of each work day. Set the depth of drive on your SENCO tool so fasteners are not over-driven. To maximize battery life, follow storage recom- mendations and charging recommendations in this manual.
Need help?
Do you have a question about the FN65DA and is the answer not in the manual?
Questions and answers