Advertisement
Quick Links
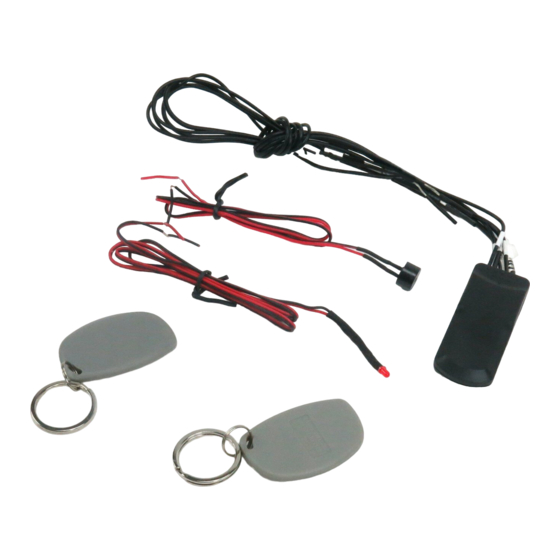
HANDS-FREE KEYLESS ENTRY
HF500
Remote Transmitter
Turn power on. For a successful communication between
the main unit and transmitter the LED on the transmitter
will blink 4 times. If unsuccessful, the LED will only blink 3
times.
If the voltage of the transmitter is lower than 2.3V in
status of Ant-hijack On, the brain unit will beep 3 times to
remind you.
Brain Unit Functions
1. The transmitter is in service range:
Once the ignition is ON, the brain unit will start to
work and detect the transmitter. A melody of music will
emit from the brain unit, meaning the communication is
successful. The engine can be started at this status.
2. The transmitter is out of service range and the Anti-
hijacking is ON (default setting):
a. Once the ignition is ON, the brain unit will begin
to work and detect the transmitter. If the transmitter is
out of service range, after 8 seconds, the siren will
chirp for 5 seconds, following 5 seconds of urgent
chirping. The engine is now locked. You can drive
when the transmitter is again detected by the brain.
b. In case the power is run down or the transmitter
malfunctions during driving, the brain unit will not
detect the transmitter. After 30 seconds the siren will
chirp for 25 seconds, following 5 seconds of urgent
chirping. The engine is now locked. You can drive
when the transmitter is again detected by the brain
unit.
3. The transmitter is out of service range and the Anti-
hijacking is OFF:
Mount in Dry
Install Fuses
Location
Good Ground
Use High
Required
Amp Relay
Once the ignition is ON, the brain unit will begin to work
and detect the transmitter. If the transmitter is out of service
range, the brain unit can not detect the transmitter. After
12 seconds, the engine will lock. You can drive when the
transmitter is again detected by the brain unit.
Function Modes
There are 5 function modes:
•
Code learning mode
•
Password setting mode
•
Service mode
•
Anti-hijacking ON mode
•
Anti-hijacking OFF mode
To go into function settings, the transmitter must be kept
out of service range from the brain unit and you must
enter the correct password (3 digit numbers, factory
default setting is "111") following the process below.
1. Turn the ignition ON to start working the brain unit,
keeping the transmitter out of range.
a. If the Anti-hijacking function is ON, wait 8 seconds,
then turn the ignition OFF. Then turn the ignition back
on immediately (interval of a half of a second from
ACC OFF to ACC ON).
b. If the Anti-hijacking function is OFF, wait 12
seconds for a sound to emit, then enter the first
digit number of your password. Following 10
signal tones will emit. Count the tones coincided
with the password number and turn your ignition
OFF.
2. Turn your ignition ON. After 2 sounds emit, enter
the second digit of your password. 10 signal tones
will emit accordingly. Count the tones coincided with
your password number and turn the ignition OFF.
Advertisement

Subscribe to Our Youtube Channel
Related Manuals for AutoLoc HF500


Summary of Contents for AutoLoc HF500
- Page 1 HANDS-FREE KEYLESS ENTRY HF500 Mount in Dry Install Fuses Good Ground Use High Location Required Amp Relay Remote Transmitter Once the ignition is ON, the brain unit will begin to work Turn power on. For a successful communication between and detect the transmitter. If the transmitter is out of service range, the brain unit can not detect the transmitter.
- Page 2 HANDS-FREE KEYLESS ENTRY transmitter code one by one, all at one time. 3. Turn your ignition ON. After 3 sounds emit, enter the third number of your password. 10 signal tones 6. Password Setting Mode will emit accordingly. Count the tones coincided with There are 3 digital numbers in your password.
- Page 3 HANDS-FREE KEYLESS ENTRY password. 10 double-tones will then emit. Count the tones coincided with the password number. Then turn your ignition OFF to confirm the third number of your password. If the password has been confirmed successfully, a sound will emit reminding you that the password has changed in the next ignition on.
- Page 4 HANDS-FREE KEYLESS ENTRY Wiring Diagram - Basic Starter Kill Remote Start Signal From Key Ing Switch Start Ing 12V Basic Hands-Free Keyless Entry Buzzer HF500 To Starter Ground Starter Push Button Start Diagram (Optional) Electrical Engine (EC0) Control Module LED/BUZZER Push Button (–)
Need help?
Do you have a question about the HF500 and is the answer not in the manual?
Questions and answers