
Related Manuals for Runco Q-750i


Summary of Contents for Runco Q-750i
- Page 1 N S T A L L A T I O N P E R A T I O N A N U A L Q-750i Series LED Home Theater Projectors Q-750i Q-750i/CineWide™ Q-750i/CineWide with AutoScope™...
-
Page 3: Runcocare™ Standard Two Year Limited Warranty
1. Runco may update this list of products excluded from this warranty from time to time at Runco’s sole discretion, but updates to the list of covered products will not apply on a retroactive basis. - Page 4 3. Runco Technical Support staff will attempt to correct any minor issues that may be causing the problem. If Runco is unable to fix the problem to the customer’s satisfaction, Runco will issue a Return Material Authorization (RMA) if it is determined that the claim was made within the coverage period of the Standard Limited Warranty.
- Page 5 6. Runco’s warranty does not cover black uniformity issues or other LCD issues associated with usage outside the Runco recommended guidelines and specifications for the product 7. Second day shipment delivery time and availability may vary based on origin and destination and Runco is unable to deliver to PO Box and FPO Box addresses Extended Service Options Runco offers extended and expanded service plans.
- Page 6 Runco. The trademarks reporduced in this Runco Owner’s Manual and used on the Runco Products are either owned by Runco or are licensed by Runco. You may not reproduce or use the trademarks without the prior written consent of Runco.
-
Page 7: Important Safety Instructions
Important Safety Instructions Thank you for your purchase of this quality Runco video product! For the best performance, please read this manual carefully as it is your guide through the menus and operation. WARNING This symbol is intended to alert the user to the presence of CAUTION uninsulated “dangerous voltage”... -
Page 8: Compliance Information
Council Directive 2006/95/EC and amended by M1 and C1 on Low Voltage Equipment Safety; EN 60950 “Safety of information technology equipment, including electrical business equipment” The Technical Construction file required by this Directive is maintained at the corporate headquarters of Runco International, LLC, located at 1195 NW Compton Drive, Beaverton, OR 97006-1992. - Page 9 The recycling of materials will help to conserve natural resources. This symbol is only valid in the European Union. If you wish to discard this product, please contact your local authorities or dealer and ask for the correct method of disposal. Q-750i Series Installation/Operation Manual...
- Page 10 Notes: Q-750i Series Installation/Operation Manual...
-
Page 11: Table Of Contents
Using This Manual ......................2 Description, Features and Benefits ................3 Key Features and Benefits ..................4 Parts List ........................4 2. Controls and Functions ....................5 Q-750i at a Glance .......................5 Q-750i Rear Panel ......................6 Q-750i Remote Control ....................8 3. Installation .......................11 Remote Control ......................11 Notes on Batteries ....................11... - Page 12 Adjusting the Projector Height or Projection Angle ..........26 Connections to the Q-750i ..................26 Connector Panel Access..................26 Connecting Source Components to the Q-750i ............27 RS-232 Controller Connection ................31 Connecting 12-Volt Trigger Output to External Theater Equipment .......32 Connecting an External IR Receiver ..............33 Connecting to AC Power ..................33...
- Page 13 RS-232 Connection and Port Configuration ...............73 Serial Command Syntax .....................73 Key Commands....................73 Operations Commands..................76 RS-232 Error Codes .....................83 7. Specifications ......................85 Q-750i Specifications ....................85 Overall Dimensions – Q-750i ..................87 Overall Dimensions – Q-750i/CineWide with AutoScope ..........88 Supported Timings .....................89 Q-750i Series Installation/Operation Manual xiii...
- Page 14 Table of Contents Notes: Q-750i Series Installation/Operation Manual...
- Page 15 3-6. Q-750i/CineWide with AutoScope Motor Assembly............20 3-7. Q750i with Ceiling Mount Adapters/Projector Stands ..........22 3-8. AutoScope Lens Motor Installation ................23 3-9. Q-750i/CineWide with Rainier II/McKinley (Cylindrical) Lens Base Plate - Exploded View ......................24 3-10. HDMI/DVI Source Connections ................27 3-11. RGB Connections ....................28 3-12.
- Page 16 4-13. Q-750i System Menu ....................62 4-14. Input Enable Sub-Menu....................63 4-15. PIP and PBP areas for 1080p Display...............64 4-16. PIP Split-Screen Mode .....................65 4-17. Q-750i Service Menu....................68 7-1. Overall Dimensions – Q-750i ..................87 7-2. Overall Dimensions – Q-750i/CineWide with AutoScope..........88 Q-750i Series Installation/Operation Manual...
-
Page 17: Introduction
Target Audience most out of the Q-750i. Runco has made every effort to ensure that this manual is accurate as of the date it was printed. However, because of ongoing product improvements and customer feedback, it may require updating from time to time. You can always find the latest version of this and other Runco product manuals on-line, at www.Runco.com. -
Page 18: Using This Manual
Use the following table to locate the specific information you need in this manual. Using This Manual If you need..Turn to page: Information about obtaining service General information about the Q-750i Series LED Home Theater Projector Installation instructions First-time configuration instructions Advanced configuration instructions... -
Page 19: Description, Features And Benefits
In addition to Runco's proprietary InfiniLight, Personal Color Equalizer and Runco Smart Color, Runco the Q-750i can also be paired with Runco’s award-winning CineWide™ and CineWide with AutoScope™ technology. CineWide provides uncompromised widescreen reproduction of movies originally filmed in the CinemaScope™... -
Page 20: Key Features And Benefits
➤ Parts List Your Q-750i is shipped with the following items. If any items are missing or damaged, please contact your Runco dealer or Runco Customer Service at (800) 23-RUNCO. • Q-750i Series LED Home Theater Projector •... -
Page 21: Controls And Functions
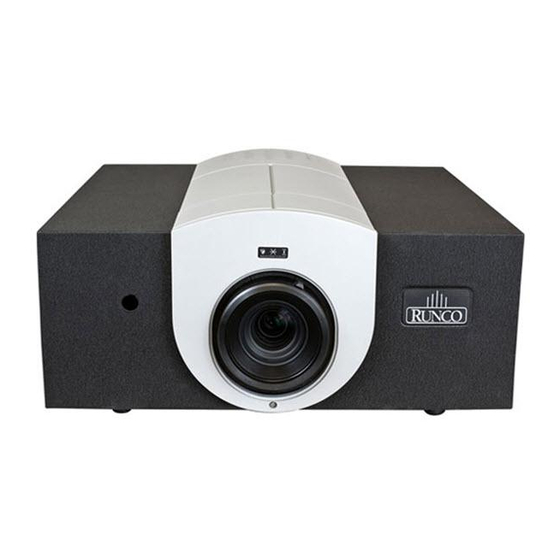
2. Controls and Functions Figure 2-1 shows the key Q-750i components. Q-750i at a Glance Top IR Sensor Intake Vent (on side) Runco Logo Focus Ring Projection Lens Front Bezel Retaining Screw Zoom Ring Status LED Exhaust Vent Front IR Sensor Figure 2-1. -
Page 22: Q-750I Rear Panel
Connect the Q-750i to power here. 3. RGB Provides a standard, 15-pin VGA-style connection to either an RGB or component high-definition source, or to a personal computer. The Q-750i automatically detects the input signal resolution. 4. COMPONENT 2 Three BNCs for connecting component (YPbPr) video sources. - Page 23 10. TRIGGER 1 Provides 12 (+/- 1.5) volt switched output for screen relays with 250mA current capacity and short protection. 11. RS-232 A female, 9-pin D-sub connector for interfacing with a PC or home theater automation/control system. Q-750i Series Installation/Operation Manual...
-
Page 24: Q-750I Remote Control
Controls and Functions Figure 2-3 shows the Q-750i remote control, and the paragraphs that follow describe its functionality. Q-750i Remote Control LIGHT SOURCE S-VID HDMI1 HDMI2 INFO ENTER EXIT MENU CONT TINT PICTURE MEMORY CUST1 CUST2 NIGHT ASPECT RATIO 16:9... - Page 25 Press this button to show or hide the OSD controls. 5. Picture Adjustment Buttons: BRT (Brightness) Press to adjust black level. CONT (Contrast) Press to adjust white level. COL (Color) Press to adjust color intensity. TNT (Tint) Press to adjust color hues. Q-750i Series Installation/Operation Manual...
- Page 26 Selects the Virtual Cinema aspect ratio, used for viewing 16:9 source material on a 2.35:1 screen. 8. 0 - 9 Use these keys to enter numeric characters. 9. FOCUS / ZOOM / LENS Not used with this projector. Q-750i Series Installation/Operation Manual...
-
Page 27: Installation
• The remote control may fail to operate if the infrared remote sensor is exposed to bright sunlight or fluorescent lighting. • Ambient conditions may possibly impede the operation of the remote control. If this happens, point the remote control at the projector, and repeat the operation. Q-750i Series Installation/Operation Manual... -
Page 28: Quick Setup
If installing a CineWide-equipped projector: Install AutoScope lens motor or fixed CineWide base plate (optional) Mount the projector Connect signal sources to the Q-750i Connect external controller to RS-232 port (optional) Connect 12-volt trigger output to AutoScope lens motor or other equipment (optional) -
Page 29: Installation Considerations
Images may then appear washed out and less vibrant. Q-750i Series Installation/Operation Manual... -
Page 30: Throw Distance
Throw Distance (TD) = Screen Width (w) x Lens Throw Ratio Figure 3-1. Estimating Throw Distance Table 3-3 gives the throw ratios for the Q750i Series. Table 3-3. Throw Ratios for the Q-750i Series Throw Range in Throw Ratio Throw Range in... -
Page 31: Vertical And Horizontal Position
Installation Table 3-3. Throw Ratios for the Q-750i Series (continued) Throw Range in Throw Ratio Throw Range in Throw inches, with with inches, with Ratio with 72.6x40.8-inch Primary 96x40.8-inch (2.35:1) Projector Model Primary (1.78:1) Screen Lens and Screen Lens Only... -
Page 32: Vertical And Horizontal Lens Shift
33.60 inches (0.85 meters) above or below the screen center. Vertical Lens Shift (Q-750i/CineWide or Q-750i/CineWide with AutoScope): The Q-750i provides up to 25% of upward vertical lens shift and up to 60% of downward vertical lens shift. For example, with a 100 x 56 inch (1.78:1) screen, you can shift the image up to 14.00 inches (0.36 meters) above or 33.60 inches (0.85 meters) -
Page 33: Horizontal Lens Shift (Example Only)
2. Vertical shift limits are percentages of the screen height. Horizontal shift limits are percentages of the screen width. 3. Vertical lens shift figures are for ceiling mount configurations. For floor installations (where the projector is upright), reverse the up/down vertical lens shift percentages. Q-750i Series Installation/Operation Manual... -
Page 34: Folded Optics
• Keep the projector away from devices that radiate electromagnetic energy such as motors and transformers. Common sources of these include slide projectors, speakers, power amplifiers and elevators. Q-750i Series Installation/Operation Manual... -
Page 35: Installing The Optional Cinewide/Autoscope Lens Mount
Installation If you are installing a standard (non-CineWide) Q-750i, skip this step and proceed with Mounting the Q-750i (page 26). Installing the Optional CineWide/AutoScope If you are installing a Q-750i/CineWide projector equipped with a Lens Mount cylindrical (Rainier II or McKinley) anamorphic lens, proceed with Installing the Fixed CineWide Base Plate (page 24). -
Page 36: Installing The Autoscope Lens Motor
Installation ➤ Installing the AutoScope Figure 3-6 shows the Q-750i/CineWide with AutoScope motor assembly. Lens Motor CineWide with AutoScope Ceiling Mt. Adapter/ Projector Stand, Right Screw, Phillips Pan-Head, M6-1.0 x 12mm (14x) CineWide with AutoScope Ceiling Mt. Adapter/ Projector Stand, Left... - Page 37 Using six (6) each of the supplied, M6 x 12mm Pan-Head Phillips screws (item #2), attach the AutoScope Ceiling Mount Adapters/Projector Stands (items #3 and #4) to the projector as shown in Figure 3-7. Q-750i Series Installation/Operation Manual...
- Page 38 DO NOT OVER-TIGHTEN THE SCREWS. Caution Install Lens Motor: 1. Position the AutoScope Lens Motor as shown in Figure 3-8. 2. Line up the mounting holes on the lens motor housing with those on the underside of the projector. Q-750i Series Installation/Operation Manual...
-
Page 39: Autoscope Lens Motor Installation
3. Secure the motor to the projector with the eight (8) remaining M6 x 12mm Pan-Head Phillips screws. Figure 3-8. AutoScope Lens Motor Installation After you have installed the AutoScope lens motor, proceed with Mounting the Q-750i on page 26. Q-750i Series Installation/Operation Manual... -
Page 40: Installing The Fixed Cinewide Base Plate
CineWide Base Plate Q750i/CineWide. Ceiling Mount Rails (part of Ceiling Mount Kit) Screw, Phillips Pan-Head, M6 x 1.0 x 12mm (6x) Anamorphic Lens Base Plate Figure 3-9. Q-750i/CineWide with Rainier II/McKinley (Cylindrical) Lens Base Plate - Exploded View Q-750i Series Installation/Operation Manual... - Page 41 Installation To install the fixed CineWide base plate on a Q-750i/CineWide: 1. Place the projector upside down on a blanket or other soft surface. 2. Place the CineWide base plate on the bottom of the projector. 3. If you are mounting the projector on a ceiling: Line up the three holes on the left and right mounting rails (included with the projector ceiling mount kit) with those on the projector and base plate.
-
Page 42: Mounting The Q-750I
For fixed installations, and for those that want the projector out of sight or have a limited (Inverted) space for projector and audience, you can invert the Q-750i and suspend it from the ceiling using a specially-designed ceiling mount fixture. -
Page 43: Connecting Source Components To The Q-750I
Installation Connect your video sources to the Q-750i as shown and described in the sections that Connecting Source follow. Components to the Q-750i HDMI/DVI Connections: See Figure 3-10. Use the HDMI input whenever possible. This ensures the highest video quality because the signal is carried in the digital domain throughout the entire signal path, from source component output into the projector. -
Page 44: Rgb Connections
Y, Pb and Pr terminals on the COMPONENT 1/SCART input and the sync output to the VIDEO input. See Figure 3-11. Sync Green Blue DVD Player or Other SCART RGBS Source Personal Computer Figure 3-11. RGB Connections Q-750i Series Installation/Operation Manual... -
Page 45: Component Video Connections
Installation Component Video Connections: Connect your component video sources to the COMPONENT 1/SCART, COMPONENT 2 or RGB inputs as shown in Figure 3-12. DTV Set-Top Box or Other Component (YPbPr) Source Figure 3-12. Component Video Connections Q-750i Series Installation/Operation Manual... - Page 46 Installation Composite/S-Video Connections: Connect your composite and S-Video sources to the Q-750i as shown in Figure 3-13. DVD Player, VCR, Satellite Receiver, Laser Disc etc. Figure 3-13. Composite and S-Video Connections Q-750i Series Installation/Operation Manual...
-
Page 47: Controller Connection
Connect a PC or home theater control/automation system (if present) to the RS-232 port RS-232 Controller on the Q-750i; see Figure 3-14. Use a standard, 9-pin serial cable, wired straight-through. Connection For more information about using this connection, refer to Serial Communications on page 73. -
Page 48: Connecting 12-Volt Trigger Output To External Theater Equipment
Installation ➤ Connecting 12-Volt If your Q-750i is equipped with a CineWide with AutoScope system, connect the Trigger Output to External AutoScope lens motor to a 12-volt trigger output on the projector; see Figure 3-15. Theater Equipment Similarly connect other 12-volt trigger-activated equipment (such as retractable screens or screen masks) to the other trigger output. -
Page 49: Connecting An External Ir Receiver
Connecting an External IR distance or obstructions such as walls or cabinet doors, you can connect an external IR Receiver repeater system to the IR INPUT on the Q-750i to extend the range of the remote control. See Figure 3-16. IR Sensor... -
Page 50: Turning On The Power
AutoScope lens motor. The lens motor power switch is located next to the AC input (see above). 3. Press the ON button on the remote control to turn on the Q-750i. The LED flashes green to indicate that it is warming up. -
Page 51: Changing The Osd Language
Installation When you turn on the Q-750i for the first time, the OSD Language Menu appears. Changing the OSD The Q-750i can display the menus in English, French, German, Italian, Spanish, Swedish, Language Portuguese or Russian. Press to select a language. Then, press ENTER to confirm your selection. -
Page 52: Installing And Adjusting The Cinewide Anamorphic Lens
Pitch Adjustment T-Screw and Washer (2x) Anamorphic Lens Holder Yaw/X Adjustment Lever (2x) 1/4-20 Hex Bolt (2x) and Washer (2x) AutoScope Carriage Plate or Fixed CineWide Base Plate Figure 3-17. Anamorphic Lens Mounting Assembly - Exploded View Q-750i Series Installation/Operation Manual... - Page 53 Yoke and Lens Adapter Ring to the Anamorphic Lens Holder. The Yoke should be as close to the primary lens as possible. 6. Attach the lens to the Lens Adapter Ring by threading it clockwise. Lens threads into ring Figure 3-18. Attaching the Anamorphic Lens to the Lens Ring Q-750i Series Installation/Operation Manual...
- Page 54 Cinema aspect ratio is selected. 5. Select the Cinema or Virtual Cinema aspect ratio to move the anamorphic lens into position, if it isn’t already. To do this, press CINEMA or VCINE on the Q-750i remote control (Figure 2-3). Adjusting the Horizontal (X) Lens Position: 1.
- Page 55 Too Low Correct position Too High When the height is properly set, tighten the Height Adjustment T-Screws to secure the lens in place. Q-750i Series Installation/Operation Manual...
- Page 56 Note properly adjusted, especially at shorter throw distances. If this is the case, Runco recommends that you slightly over-scan the image into the screen frame area to mask the distortion. Adjusting the Yaw: Loosen the Yaw/X-Adjustment Levers to allow the lens to pivot freely from side to side.
- Page 57 Anamorphic Lens Set Screw (item #10) to secure the lens in place. (When viewed from the front, the rear opening on the anamorphic lens should appear as a tall, narrow oval.) Focus: Finally, rotate the Focus Ring on the anamorphic lens to fine-tune the optical focus. Q-750i Series Installation/Operation Manual...
- Page 58 Installation Notes: Q-750i Series Installation/Operation Manual...
-
Page 59: Operation
4. Operation When you turn on the Q-750i, it switches to the last selected input and looks for a valid signal. Selecting An Input Source Use these buttons on the remote control to select an SOURCE input source directly. S-VID... - Page 60 ” means that that source is available as a PIP source with a given main source; “–” means that it is not. 2. Disabled sources (refer to Input Enable on page 62) are not available as PIP sources. Q-750i Series Installation/Operation Manual...
-
Page 61: Using The On-Screen Menus
6. From the Main Menu, press MENU to turn off the OSD menu. The Q-750i OSD menus are arranged hierarchically, as shown in Figure 4-1. Depending on the selected input source and signal characteristics, some menu options may not be available. -
Page 62: Main
Operation ➤ Main The Q-750i Main Menu, shown in Figure 4-2, provides access to the most commonly-used projector functions. 1. For best results, Runco recommends that you set Note ConstantContrast to Off before adjusting Brightness, Contrast and other image quality settings in this menu (refer to ConstantContrast on page 58). - Page 63 16:9 Letterbox image area. It scales (zooms in on) a 4:3 image linearly (by the same amount on all sides) to fill a 16:9 display. Q-750i Series Installation/Operation Manual...
- Page 64 NON-linear fashion (more on the sides). Virtual- Wide A 4:3 image is horizontally scaled in a NON-linear fashion (more on the sides than in the center) to fit a 16:9 screen. Q-750i Series Installation/Operation Manual...
- Page 65 2.35:1 image. A 16:9 image is scaled NON-linearly (more on the sides than in the center) to fit a 2.35:1 screen. Cinema 16:9 (Virtual Virtual Cinema is Cinema) available only on CineWide-equipped projectors. Q-750i Series Installation/Operation Manual...
- Page 66 ISF Day or ISF Night memory location. You must enter a passcode to access the Save ISF Note sub-menu. The settings that are saved are the same as those saved with the Save Settings command (see above). Q-750i Series Installation/Operation Manual...
- Page 67 Select Contrast from the Main menu. Use the buttons to adjust the contrast up until the top two bars become almost the same brightness, then down just until the brightness change between these bars is consistent with the other bars. Q-750i Series Installation/Operation Manual...
- Page 68 Main menu. Noise Reduction is useful for clearing up noisy images from interlaced SD sources. Use the button to adjust as desired, keeping in mind that reducing noise (which reduces high frequencies) may also soften the image. Q-750i Series Installation/Operation Manual...
- Page 69 ENTER. This displays the Input Select sub-menu, shown in Figure 4-7. The default source selection is HDMI 1. All sources that are not available per the source enable function (refer to Input Enable on page 62) are grayed out. Q-750i Series Installation/Operation Manual...
- Page 70 Resync, then press ENTER. This causes a re-acquisition of the active source and the PIP source, if present. It also changes any Fine Sync settings (described on page page 59) for this timing to the default setting. Q-750i Series Installation/Operation Manual...
-
Page 71: Advanced
In most cases, the Auto setting determines the correct color space to use. If it does not, you can force the Q-750i to use a specific color space. Choose one of the following: • REC709 sets the color space matrix to that defined in ITU-R BT.709. - Page 72 You can have the Q-750i automatically determine the optimum frame rate, or you can force it to use a specific frame rate. If PIP is active, the Q-750i converts the PIP source frame rate to the Note same frame rate as the main source.
- Page 73 • Select DCI to use the color gamut defined in Digital Cinema System Specification Version 1.2. • Select PCE to use the Personal Color Equalizer feature of the Q-750i. PCE lets you define a custom color gamut. Refer to PCE on page 60 for instructions on how to do this.
- Page 74 (Off) the ConstantContrast algorithm in the optical engine. ConstantContrast uses a dynamic LED driver that modulates light to the DMD based on the actual content of the video material. Runco recommends that you disable ConstantContrast before adjusting Brightness, Contrast or other image settings.
- Page 75 Use either setting in such cases. • Tracking (RGB or Component sources): Tracking determines the frequency of the pixel sampling clock, indicated by the number of incoming pixels per line, so that all pixels generated by a particular source are sampled. Q-750i Series Installation/Operation Manual...
-
Page 76: Pce Sub-Menu
(see above) can be optimized. • Sync Level (Component sources only): Select Sync Level to adjust the voltage level of the Q-750i Sync signal detection circuitry. Sync Level adjustment is occasionally necessary when a DVD player or HDTV source signal drops “below black” (for example, during scenes with explosions or when subtitles are present) and causes the projector to temporarily lose sync. - Page 77 Figure 4-12. CIE 1931 Color Coordinate Diagram and Effect of PCE Hue and Saturation Controls RSC™ (Runco Smart Color): Set RSC to On to to improve the accuracy of flesh tones and increase color saturation, without sacrificing the purity of other colors.
-
Page 78: System
Use the controls in the System menu, shown in Figure 4-13, to change the display orientation and perform other, common installation tasks. Figure 4-13. Q-750i System Menu Input Enable: To enable or disable selection of a source, choose Input Enable from the System menu and press ENTER. - Page 79 • Top Right: This places the PIP source into a 644x362 designated image area at the top right of the screen. • Bottom Left: This places the PIP source into a 644x362 designated image area at the bottom left of the screen-safe area of the DMD. Q-750i Series Installation/Operation Manual...
- Page 80 PIP source. The Q-750i applies the Custom 2 settings to the PIP image. Split-screen mode is useful for viewing “before” and “after” settings for Sharpness, Noise Reduction and other advanced image parameters.
- Page 81 The options are Logo, Black, Blue and White. The default is Black. Auto Power Off: Set Auto Power Off to On to have the Q-750i turn itself off after 20 minutes of inactivity (no source signal present).
-
Page 82: Control
CineWide: Select CineWide from the Control menu and set it according to the installed lens configuration, as follows: • For a standard Q-750i (no anamorphic lens), choose Off. • For a Q-750i/CineWide (fixed anamorphic lens), choose CineWide. • For a Q-750i/CineWide with AutoScope (motorized anamorphic lens), choose AutoScope. -
Page 83: Language
Trigger 2 operates identically to Trigger 1. Select Language from the Main Menu to change the OSD Language. Language The Q-750i can display the menus in English, French, German, Italian, Spanish, Swedish, Portuguese or Russian. Press to select a language. Then, press ENTER to confirm your selection. -
Page 84: Service
• Pixel Clock • Signal Format • H/V Refresh Rate Should you ever need to contact Runco Technical Support, this information will help them answer your questions and/or resolve product performance issues. Figure 4-17. Q-750i Service Menu You can also perform various maintenance tasks from this menu. - Page 85 Operation Test Patterns: The Q-750i has numerous internal test patterns that are useful to technicians for advanced calibration, measurement and fault isolation purposes. To access them, select Test Patterns from the Service menu and set it to On. The available test patterns are: •...
- Page 86 Operation Notes: Q-750i Series Installation/Operation Manual...
-
Page 87: Maintenance And Troubleshooting
5. Maintenance and Troubleshooting Table 5-1 provides some general guidelines for troubleshooting problems you may encounter with the Q-750i. If the suggested solutions fail to resolve the problem or if you Troubleshooting Tips encounter an issue not described here, please contact Runco Technical Support. - Page 88 Phase settings (refer to Fine Sync on page 59). LED is flashing red. • Q-750i internal • Power off the Q-750i and temperature is too high allow it to cool down. (Note). Ensure that the intake and exhaust vents are not blocked.
-
Page 89: Serial Communications
6. Serial Communications To interface the Q-750i with a home theater automation/control system or a PC running terminal emulation software: RS-232 Connection and Port Configuration 1. Connect it to your control system or PC as shown in Figure 3-11. 2. Start a terminal session on your PC using a terminal-emulation program, such as HyperTerminal. - Page 90 PIP source. 0x48 cur.righ Keypad right arrow. If no menu is present then this will change the PIP source. 0x06 bright Bring up or cancel brightness slider. 0x05 contrast Bring up or cancel contrast slider. CONT Q-750i Series Installation/Operation Manual...
- Page 91 The projector does not respond to this key. 0x17 The projector does not respond to this key. 0x18 The projector does not respond to this key. 0x12 (none) The projector does not respond to this key. FOCUS Q-750i Series Installation/Operation Manual...
-
Page 92: Operations Commands
Response: OP BRIGHT = 101 [CR] Input: op bright = 127 [CR] Response: OP BRIGHT = 127 [CR] Input: op bright - [CR] Response: OP BRIGHT = 126 [CR] Input: op resync [CR] Response: OP RESYNC [CR] Q-750i Series Installation/Operation Manual... - Page 93 0 = Off 1 = Crop 2 = Zoom source.sel 0 = HDMI 1 1 = HDMI 2 2 = RGB 3 = Component 1 4 = Component 2 5 = S-Video 6 = Video 7 = SCART Q-750i Series Installation/Operation Manual...
- Page 94 2 = SMPTE C 3 = EBU 4 = Native 5 = DCI 6 = PCE (custom) satco 0 = Off 1 = On ccont 0 = Off ConstantContrast 1 = Low 2 = Medium 3 = High Q-750i Series Installation/Operation Manual...
- Page 95 0 = Off 1 = On auto.pow.on 0 = Off 1 = On rear.proj 0 = Off 1 = On ceil.mode 0 = Off 1 = On 2 = Auto logo.disp 0 = Off 1 = On Q-750i Series Installation/Operation Manual...
- Page 96 2 = RGB 3 = Component 1 4 = Component 2 5 = S-video 6 = Video 7 = SCART h.refresh <number> v.refresh <number> pixel.clock <number> signal <string> total.hours <number> environment <string> temperatures fact.reset (exe- cute) Q-750i Series Installation/Operation Manual...
- Page 97 = ? + - 0-200 Personal Color Equalizer yellow.hsg.hue (PCE) “Hue” and “Satura- tion” settings. green.hsg.hue cyan.hsg.hue blue.hsg.hue magenta.hsg.hue red.hsg.sat yellow.hsg.sat green.hsg.sat cyan.hsg.sat blue.hsg.sat magenta.hsg.sat red.hsg.gain = ? + - 0-200 PCE “Level” settings. yellow.hsg.gain green.hsg.gain cyan.hsg.gain blue.hsg.gain magenta.hsg.gain Q-750i Series Installation/Operation Manual...
- Page 98 Refer to RS-232 Error Codes, below. msgbox 0 = On This control enables or 1 = Off disables the display of power off, source and adjustment message boxes (brightness, con- trast etc.). Default value is Q-750i Series Installation/Operation Manual...
-
Page 99: Rs-232 Error Codes
Fan 6 failed. DDP3021 communication failure upon system power-up. PCF8575 external GPIO communication failure. Gennum SP1 communication failure upon system power-up. System hardware I2C communication failure. System software I2C communication failure. EEPROM checksum error. EDID checksum error. Q-750i Series Installation/Operation Manual... - Page 100 Serial Communications Notes: Q-750i Series Installation/Operation Manual...
-
Page 101: Specifications
Refer to Table 3-3 (Factor x Screen Width): Vertical Offset: Standard Q-750i - 60% of screen height above or below lens center (120% of one half of the screen height) Q-750i/CineWide or Q-750i/CineWide with AutoScope - 25% of screen height (50% of one half of the screen height) - Page 102 Colors have up to 50% higher contrast than Mercury or Xenon lamp systems. These are typical projector brightness and contrast specifications found in most companies’ sales literature. Runco includes these measurements in its literature to allow for direct comparison with other manufacturers’ projectors. These measurements are typically taken at 9,000K to 13,000K to get expected performance data when the projector is used in professional, commercial and industrial displays.
-
Page 103: Overall Dimensions - Q-750I
Specifications Figure 7-1 shows the Q-750i dimensions (all dimensions are in millimeters and [inches]). Overall Dimensions – Q-750i Figure 7-1. Overall Dimensions – Q-750i Q-750i Series Installation/Operation Manual... -
Page 104: Overall Dimensions - Q-750I/Cinewide With Autoscope
Specifications Figure 7-2 shows the Q-750i/CineWide with AutoScope dimensions (all dimensions are in millimeters and [inches]). Overall Dimensions – Q-750i/CineWide with AutoScope Figure 7-2. Overall Dimensions – Q-750i/CineWide with AutoScope Q-750i Series Installation/Operation Manual... -
Page 105: Supported Timings
Specifications Table 7-2 lists the signal types supported by each input on the Q-750i. Supported Timings Table 7-2. Supported Signal Timings by Input Supported? (√ = Yes, – = No) Horizontal Refresh Pixel Frequency Format Resolution Frequency Component 1 HDMI 1... - Page 106 √ PAL-M – 59.94/60.00 15.734/15.750 3.580 – – – √ PAL-N – 50.00 15.625 3.580 – – – √ PAL-60 – 59.94/60.00 15.734/15.750 4.430 – – – √ SECAM – 50.00 13.500 4.250/4.410 – – – Q-750i Series Installation/Operation Manual...
- Page 108 1018-00 Rev. A 020- October 2009 Runco International • (800) 23RUNCO • Fax (503) 748-8161 • www.runco.com...
Need help?
Do you have a question about the Q-750i and is the answer not in the manual?
Questions and answers