
Subscribe to Our Youtube Channel
Related Manuals for Hilti PD 30


Summary of Contents for Hilti PD 30
- Page 1 PD 30 Operating instructions 1–26 Mode d’emploi 27–52 Istruzioni d’uso 53–78 Manual de instruções 79–104 Manual de instrucciones 105–130 Printed: 07.07.2013 | Doc-Nr: PUB / 5070011 / 000 / 00...
-
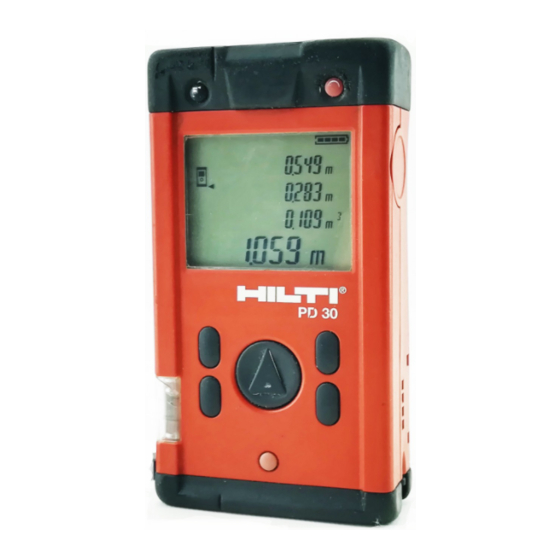
Page 2: Product View
Printed: 07.07.2013 | Doc-Nr: PUB / 5070011 / 000 / 00... -
Page 3: Table Of Contents
PDA 50 PDA 80 PDA 60 PDA 81 PDA 61 PDAW 80-1 PDA 62 PDAW 80 / 81-1 PDA 70 PDAW 80 / 81-2 PUA 60 PDAW 80 / 81-3 PDAW 81-1 Printed: 07.07.2013 | Doc-Nr: PUB / 5070011 / 000 / 00... -
Page 4: Table Of Contents
PD 30 laser range meter Contents Contents It is essential that the operating instructions are read before the range General information..3 meter is used the first time. 1.1. Safety notices and their meaning 3 1.2. - Page 5 Terminating the menu ..12 9.3. Hilti calibration service ..23 Operation ....12 Care and maintenance.
-
Page 6: General Information
Keep these pages open when studying the operating instructions. In these operating instructions, the PD 30 laser range meter is referred to as "the range meter". Printed: 07.07.2013 | Doc-Nr: PUB / 5070011 / 000 / 00... -
Page 7: Product Overview And Functions
Spike – Addition and subtraction of distances – Operation and storage in the specified temperatures 2.2 Items supplied 1 PD 30 laser range meter 1 PDA 60 hand strap 2 Type AA batteries 1 soft pouch 1 Operating instructions 1 Producer Certificate 2.3 Measuring principle... -
Page 8: Tools And Accessories
3. Tools and accessories laser beam should be perpendicular to 3. Tools and accessories the target plate whenever possible. If this not the case, the laser spot on the target Description Designation plate may not be in the same plane as Target plate PDA 50 the target point and the distance... -
Page 9: Pdaw 80/81-2 Car Battery Plug
3.10. Measuring extension PDA 70 designed to charge the NiMH batteries of The measuring extension is made from alu- the PD 30, it may not be replaced by other minium and durable plastic handle. types of car battery plugs. With the help of the belt clip the range meter attaches to the measuring extension. -
Page 10: Specifications
Max. number of measurements – Ambient light conditions with single set of batteries. In case measurements are not Alkaline: 15’000 - 20’000 possible, use the Hilti PDA 50 NiMH: 8’000 - 10’000 target plate. Operating temperature Accuracy - 10°C…+ 50°C (14°F… 122°F) ±1.5 mm (±1/16 inch) is typical... -
Page 11: Safety Information
Hilti service center. Unauthorized before use. If the range meter is found to opening of the range meter may cause be damaged, have it repaired at a Hilti the emission of laser radiation in service centre. The accuracy of the range excess of class 2. -
Page 12: Proper Organization Of Workplace
Laser information plates for the US the strict requirements of the relevant based on CFR 21 § 1040 (FDA) guidelines, Hilti cannot entirely rule out the following possibilities: This laser product complies with 21 CFR – The range meter might cause 1040, as applicable. -
Page 13: Getting Started
6. Getting started 6. Getting started same age and charged to the same level. – New rechargeable batteries are mostly empty and have to be charged prior to first use. – Use only NiMH batteries with 1.2 V and 1500 – 2000 mAh capacity. 6.1 Inserting alkaline / rechargeable batteries 6.2 Battery charging... -
Page 14: Fast Battery Charging
/ replace the rechargeable batteries. – Keep the range meter in a safe place. You have taken the first distance measurement with the PD 30 range meter. Printed: 07.07.2013 | Doc-Nr: PUB / 5070011 / 000 / 00... -
Page 15: And Off
6. Getting started / 7. Operation 6.4 Settings 7. Operation 6.4.1 Activating the setting menu 7.1 General controls The menu is activated by pressing the "On / Off" key pressed for about 2 seconds 7.1.1 Control panel while the range meter is switched off. The beep and the units may be set Beep Units... -
Page 16: Measure Keys
7. Operation 7.1.3 Measure keys 7.2 Display The display shows the measurements, "Measure" key settings and range meter status. – switches the range meter On In the measuring mode, the latest readings – activates the laser beam are shown in the lowest display line (result for aiming at the target, line) and the prior readings in the lines –... -
Page 17: Symbols Displayed
Switch the range meter Off and – Keep the measuring distance then back On. If the error per- > 50 mm (2 inch) from the front sists, notify the local Hilti serv- edge. ice centre. – Clean the lens. – Take a measurement from... -
Page 18: Display Illumination
7. Operation 7.2.2 Display illumination Display Reference position = Illumination key Front edge The illumination key, switches the display illumination On or Off. In the dark or in Rear edge very bright light, e.g. sunlight or a strong spotlight the display illumination helps the user to read the display more easily. -
Page 19: Measurement Mode
7. Operation The result appears in the result line 7.3.3.1 Single distance measurement normally in less than a second. The laser (Measure key) beam switches off. 1. Switch on the laser beam by pressing the "Measure" key. 2. Press the "Measure" key once again. Generally, the measured distance will be completed in less than a second and shown in the result line. -
Page 20: Measuring From Corners
7. Operation 7.3.4 Measuring from corners 7.3.5 Measuring with the aid of target The spike is used when measuring objects diagonally across rooms or from When taking measurements to exterior inaccessible corners. corners, e.g. on buildings, perimeter fences, etc., boards, bricks or other 1. -
Page 21: Taking Measurements To
7. Operation 7.3.7 Taking measurements to rough 7.3.10 Taking measurements to surfaces transparent surfaces When measuring to rough surfaces, e.g. It is not possible to measure distances to coarse render, stucco, etc, an average dis- transparent materials, e.g. liquids, foam tance value is measured weighting the cen- polystyrene, etc. -
Page 22: Applications
8. Applications 8. Applications and calculation 8.1.2 Historical data memory functions The range meter saves the last five measurements or calculation including the graphics. Always displays immediately after The individual steps within all functions are the range meter is switched On with the mostly supported, on principle, by graphics On/Off-key, before any function is activated on the display. -
Page 23: Volume Measurement
8. Applications 1. At the start of the area function, the The individual steps for determining a laser beam is switched on. volume are supported by a corresponding 2. Aim the range meter at the target. graphic display. To determine the volume 3. -
Page 24: Adding Distances
8. Applications 8.4 Adding distances This procedure can be repeated until all Single distances can be conveniently added. distances have been added. This is useful for determining door or window openings or to add several partial To terminate the addition of distances, distances to form the perimeter. -
Page 25: Setting Out
8. Applications 5. Aim the range meter at the next target. 8.6 Setting out 6. Press the "Measure" key. With the range meter, pre-determined The second distance will be measured dimensions can be set-out and marked, and shown in the bottom intermediate such as for installing drywall tracks. -
Page 26: Calibration And Adjustment
9.3 Hilti calibration service You may carry out the inspection, We recommend that you undertake a measuring and test of the PD 30 laser regular check of the laser range meter range meter as specified in ISO 900X... through the Hilti calibration service in order... -
Page 27: Care And Maintenance
(storage temperatures: -30°C to +70°C / -22°F to +158°F). – Replace damaged parts. Most of the materials from which Hilti range meters are manufactured can be 10.2 Storage recycled. A prerequisite for recycling is –... -
Page 28: Tools
12. Warranty / 13 FCC statement (applicable in US) 12. Manufacturer's warranty – tools 13 FCC statement (applicable in US) Hilti warrants that the tool supplied is free of defects in material and workmanship. - WARNING - This warranty is valid so long as the tool is... -
Page 29: Ec Declaration Of Conformity
Product information plate 14. EC conformity Designation: Laser range meter AVOID EXPOSURE Type: PD 30 Hilti = registered trademark of Hilti Corporation, Laser radiation is emitted Schaan, LI from this aperture Type: PD 30 Year of design: 2003 LASER RADIATION - DO NOT... - Page 30 Fax: +423 / 234 29 65 www.hilti.com Hilti = registered trademark of Hilti Corp., Schaan W 2873 0306 20-Pos. 1 1 Printed in Liechtenstein © 2006 Right of technical and programme changes reserved S. E. & O. Printed: 07.07.2013 | Doc-Nr: PUB / 5070011 / 000 / 00...
Need help?
Do you have a question about the PD 30 and is the answer not in the manual?
Questions and answers
My PD30 seems to be stuck . How do I reset it ?
To reset the Hilti PD30, short-press the Measure / Continuous measurement button to return to measuring mode. If the fault code does not disappear, restart the device.
This answer is automatically generated
Bonjour.. J ai un Hilti pd30...qui donne les mesure en anglais...comment le changer pour avoir les mesures en français... merci