Table of Contents
Advertisement
Quick Links
Advertisement
Table of Contents

Related Manuals for Rand McNally RoadExplorer 70


Summary of Contents for Rand McNally RoadExplorer 70
- Page 2 Intentional or unintentional changes or modifications to the equipment interference will not occur in a particular installation. If this equipment not expressly approved by Rand McNally could void the user’s authority does cause harmful interference to radio or television reception, which to operate the equipment.
- Page 3 About GPS The Global Positioning System (GPS) is a constellation of satellites that a GPS receiver uses to calculate geographical positions. To determine a position, data from at least three satellites is required. To determine elevation, the data from four or more satellites is required. Accuracy of the positioning varies from 10 feet to several hundred feet, depending on vehicle placement and the surrounding environment.
-
Page 4: Table Of Contents
Quick Planner ...............22 5. Road Atlas ................55 Tell Rand .................23 6. Dash Cam ................56 Unit Converter and Calculator ..........24 7. Rand McNally Market ............57 Go to Map ..................25 8. More Information ..............58 Exits Quick View ..............26 View Directions ...............27 Road Explorer 70 User Manual ™... -
Page 5: Your Device
Do not open the navigation device casing. and road traffic allow you do so. • Do not attempt to replace the battery. Contact Rand McNally • Make sure that the mount is securely mounted and properly Customer Support with questions about the battery. -
Page 6: What's Included
Your Device What’s Included Install the Mount Rand McNally Road Explorer ™ Note: Follow all local regulations governing the placement of the mount. • Two-piece mount: 1. Select an area on the vehicle’s windshield that has a line of sight to the sky and GPS satellites. -
Page 7: Road Explorer ™ 70 Hardware
Your Device Road Explorer 70 Hardware ™ Dash cam Volume Down Up Power Micro SD Audio out Main Menu Road Explorer 70 User Manual ™... -
Page 8: Getting Started
The GPS app, however, does not require a Wi-Fi connection. Registration In the next step, you’ll be prompted to register your tablet with Rand McNally. Your registration ensures that you have access to the latest information and updates, as well as customer support. Road Explorer 70 User Manual ™... -
Page 9: Using The Android Home Screen
Getting Started Using the Android Home Screen Swipe down at right Swipe down at left to view settings to view notifications After you turn on your device, the home screen will display. It works in a similar fashion to the desktop on your PC or Mac. At the top of the home screen is the status bar. -
Page 10: Settings
Getting Started Settings Swipe down from the top right to view the Quick Settings panel and adjust the following frequently used features: • Brightness • Settings – Access full menu of all settings • Wi-Fi – Shows available networks • Auto Rotate –... - Page 11 Getting Started From the Quick Settings panel, tap Settings to access a full menu of settings for your device. Wireless and Networks • Wi-Fi – View and connect to available Wi-Fi networks. Bluetooth – Pair with another device using Bluetooth. •...
- Page 12 Getting Started Personal Location – View location mode, location requests, and location services. • High accuracy mode is recommended. • Security – Enable screen security (each time the screen turns on) and encryption (each time the tablet powers on). Also view passwords, device administration, and credential storage.
-
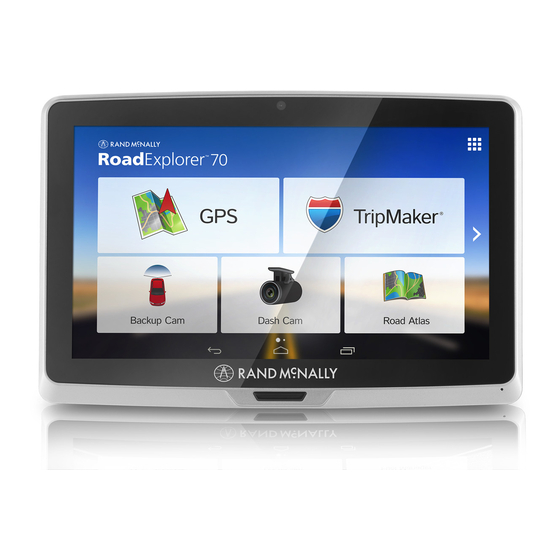
Page 13: Road Explorer ™ 70 Main Menu
The bottom three buttons on this home screen can be changed according to your preferences. To replace with other apps, tap the App Tray and select Rand McNally Launcher, then Car Widget Settings. Tap a box and select a shortcut, or tap applications to view more. -
Page 14: Gps
How the GPS App Works • When your tablet is attached to the magnetic mount, the GPS boost within the mount will provide accurate GPS location, even without a Wi-Fi connection. • Weather, traffic, fuel prices, local search within the GPS app, and device updates require a Wi-Fi connection. -
Page 15: Main Menu
Main Menu Tools Tap to view atlas information, create or modify checklists and logs, set warnings, and estimate trips between cities. Go to Map Tap to view location on the map. Choose Destination Tap to select an address or point of interest (POI). Preferences Tap to set general, route, or map settings. -
Page 16: Preferences
Preferences 1. Tap to view the options. General Preferences Options 2. Tap the option to be set. 3. Enter the new information. Brightness Tap the color/shade on the display for night 4. Tap Back to save changes. mode My Custom POIs Manage Custom POIs General Preferences Options... - Page 17 Preferences - continued General Preferences Options Route Preferences Options Screen Snapshot Button U-Turns Allow U-Turns Avoid U-Turns Shortcut Button Main Menu Ferries Allow Ferries Go to Map Avoid Ferries The shortcut button appears in the bottom Cross-Country Borders Allow Crossing Borders right corner of the screen.
- Page 18 Tap any category to fill in the On, State Scale square and display those icons. Set to auto scale to keep the current Rand McNally Icons vehicle position and the next turn in the map view at all times. Set to street/city/state scale to specify the Address Book Icons maximum scale of the zoom.
-
Page 19: Tools
Quick Planner Between any two cities or towns, quickly calculate the distance, driving time, and cost. Tell Rand Compose a message to send to Rand McNally. Converter Quickly convert distance, temperature, weight, and volume. Calculator Road Explorer 70 User Manual ™... -
Page 20: Tools
Tools Warnings Options Road Atlas Info Options to scroll through the Warning/Alert Prompts None Audio & Visual list of states. Each state atlas contains key Visual facts about the state and important phone Audio numbers. Auto Dismiss Warnings Never Canada to scroll through After 2 Seconds After 10 Seconds... - Page 21 Tools - continued Quick Planner Options Tell Rand Options Enter Location From City 1 Enter the city, state and zip code. Speed Limit Correction Add/Remove Location/Address To City 2 Road Change/New Road Enter the city, state and zip code. Construction Info Correction Routing Suggestion/Concern Vehicle Restriction Correction Tell Rand...
-
Page 22: Road Atlas Information
Road Atlas Information The Rand McNally Road Atlas contains key facts and important phone numbers for states and provinces in the U.S. and Canada and key facts and important phone numbers for Mexico. 1. Tap Tools. 2. Tap Road Atlas Information. -
Page 23: Checklists, Maintenance, Trails, Fuel
Checklists, Maintenance, Trails, Fuel Checklists Use checklists to create and complete complex lists to prepare for a trip. You can also add new checklists or modify existing checklists. 1. Tap Tools. 2. Tap Checklists, Maintenance, Trails, Fuel. 3. Select an existing checklist to use it or modify it, or 4. - Page 24 Trails Use Trails to record a “bread-crumb” path of GPS coordinates where your vehicle has traveled. To record a trail: 1. Tap Tools. 2. Tap Checklists, Maintenance, Trails, Fuel. 3. Tap Trails. 4. To record a trail, tap New Trail. 5.
- Page 25 Fuel Use the Fuel feature to create logs of the cost of the fuel used during specific timeframes (year and quarter). 1. Tap Tools. 2. Tap Checklist, Maintenance, Trails, Fuel. 3. Tap Fuel to view a list of fuel logs by quarter. 4.
-
Page 26: Quick Planner
Quick Planner Use this tool to quickly estimate the mileage and time between any two cities or towns. 1. Tap Tools. 2. Tap Quick Planner. The revenue or cost per mile used in the last computation displays. 3. Tap From City 1 and select the city. 4. -
Page 27: Tell Rand
Tell Rand Enter messages for Rand McNally regarding construction, new roads, addresses, your device, and more. 1. Tap Tools. 2. Tap Tell Rand. 3. Tap Current Location, Different Location, or Find Location on Map on the left side of the display. -
Page 28: Unit Converter And Calculator
Unit Converter and Calculator To access the unit converter: 1. Tap Tools. 2. Tap Converter. 3. Tap on the first field and select the type of conversion to perform. 4. Tap on the second field and enter the value to be converted. 5. -
Page 29: Go To Map
Go to Map Tap Go to Map to access the options in the Route Map Window. Zoom In/Zoom Out Wi-Fi Tap to access Wi-Fi connected features: traffic, weather, and fuel prices. Main Menu/Go to Map (See Shortcut Button in General Preferences.) Compass Direction Tap to change the map display. -
Page 30: Exits Quick View
Exits Quick View Slide out to show Points of Interest and amenities at upcoming exits. The list displays the distance to the next exit, exit name and number, and a count of available amenities. 1. Tap an exit to bring up the list icon 2. -
Page 31: View Directions
View Directions Detail View Route Display Options 1. When first opened, the slide-out list displays in Detail View showing each maneuver. 2. Use to view the instructions. 3. To change the route display, tap Route Display Options . Choose Detail View, Highway View, Trip Summary (for multi-stop trips), or Summary Map View. -
Page 32: Virtual Dashboard
Virtual Dashboard To show the Virtual Dashboard, tap the Current Speed. Sunrise and sunset times based on vehicle location (latitude/longitude) and day. Elevation at current location. Tap here View fuel logs and add fuel purchase information. Return to the Route Map Window. Current speed Note: Turns red when speed limit warning exceeded. - Page 33 Manually Reset Trip Information 1. Tap the tab you want to reset. 2. To set the odometer for the selected tab back to zero, tap Reset. 3. Information is captured as you travel the route. Automatically Reset Trip Information To reset trip information after the vehicle has remained stationary after a specific number of hours: 1.
-
Page 34: Junction View And Turn View
Junction View and Turn View Junction View When on a route, Junction View displays the upcoming maneuver. Set the distance to the upcoming maneuver in Preferences > Route > Junction View Distance. Once past the maneuver, Junction View closes and the previous window displays. -
Page 35: Location And Route Options
Location and Route Options To access the Location and Route Options, tap the black gear in the lower left corner of the display. Nearest cross street. Return to previous window. Current road you’re on, current town you’re in. Tap here Latitude and longitude at current location. -
Page 36: Traffic
Traffic Traffic Everywhere Download Traffic Everywhere and Predictive Traffic in the Rand McNally Market. (See “7. Rand McNally Market” on page 57.) Note: This feature requires a Wi-Fi connection. To view traffic information, tap the Traffic icon on the map screen. (The icon changes with traffic conditions.) Select Traffic Everywhere for current conditions or Predictive... - Page 37 Traffic Icons Closure Accident Accident Incident Carriageway Exit blocked Entrance blocked Traffic Carpool Road Work Obstruction Dangerous Road Condition Temperature Chance of Precipitation Security Wind Activities Delay Cancel Moderate Light Heavy Size/Weight Limit Visibility Travel Time Traffic Traffic Traffic Road Explorer 70 User Manual ™...
-
Page 38: Weather
Weather • This feature requires a Wi-Fi connection. • The refresh speed of the weather display is dependent on the connection speed. Weather information is updated every few minutes while the Wi-Fi connection is active. • Weather display depends on active weather patterns and map zoom level. -
Page 39: Fuel Prices
Fuel Prices Note: This feature requires a Wi-Fi connection. To show fuel prices, tap the Wi-Fi icon ( ) on the map screen and tap Fuel Prices. Displays stations and prices, with distance as the crow flies. Check to show the icons and prices on the map screen. Sort by distance or price. -
Page 40: Add/Avoid Location, Set Origin, Begin New Route
Add/Avoid Location, Set Origin, Begin New Route Tap the map to add a stop, avoid a location, set an origin, or begin a new route. Add as Via Add a via—an interim stop between the origin and the destination. Permanent Avoid Tap to avoid the route, road, or area, or to detour. - Page 41 Avoid Options Avoid List From the map, set specific locations to avoid. Tap the map and select Permanent Avoid. Choose Avoid Route, Avoid Road, or Avoid Area. Or, if the location is along an active route, choose Detour. The avoided routes, roads, or areas are added to an Avoid List. The list is located in GPS >...
-
Page 42: Choose Destination
Local Search Tap to search for local businesses, restaurants, and more by name or keyword. (Note: Wi-Fi connection required.) Rand McNally Trips Tap to search for recommended road trips, scenic tours, weekend getaways, and regional trips. Road Explorer 70 User Manual ™... -
Page 43: Helpful Tips On Entering Addresses
Helpful Tips on Entering Addresses Auto-Complete Feature: Enter the first few characters in a name and a short list displays names that start with the typed characters. On the keyboard, the only keys available are for the next valid characters in a search name. Continue entering characters until the searched-for name displays in the list. -
Page 44: New Location
New Location Tap Choose Destination, then New Location to plan a new route. Back Tap to return to the previous window. Address Tap to route to an address by entering the city, street, and number, or by entering the zip code and street. City Center Tap to route to a city center. -
Page 45: Search For An Address
Search for an Address 1. Tap Choose Destination > New Location > Address. 2. Type the first few characters in the city name. As you type, a short list of matching city names displays. 3. Tap the city to select it. If the city is not displayed on the short name list, continue typing characters of the city name or tap List to display a long list of city names. -
Page 46: Route To A City Center
Route to a City Center 1. Tap Choose Destination > New Location > City Center. 2. Type the first few characters in the city name. 3. Tap on the city/state name. The Confirmation Window displays. (See “Destination Confirmation Windows” on page 52.) 4. -
Page 47: Route To A Latitude/Longitude
Route to a Latitude/Longitude 1. Tap Choose Destination > New Location > Enter Lat/Long. 2. Tap in the Latitude field. 3. Enter the latitude of the location and tap Enter. 4. Tap in the Longitude field. 5. Enter the longitude of the location and tap Enter. 6. -
Page 48: Address Book
Address Book Helpful Tips for Finding Entries • Tap Choose Destination > Address Book. Entries are alphabetically sorted by Name. Tap Sort By to sort by Distance or Date. • • Use the up and down arrows to scroll through the list or use the alphabet buttons on the left. - Page 49 Create an Address Book Group 1. Tap Choose Destination > Address Book. 2. Tap Groups. 3. Tap New Group. 4. Type the group name. 5. To select a different color folder, tap 6. Tap a color, then tap Close. 7. When finished, tap Enter. Note: You can also choose to display address book icons on the map.
-
Page 50: Create A Multi-Stop Trip
Create a Multi-Stop Trip 1. Tap Choose Destination > Multi-Stop Trips. 2. Tap New Trip. 3. Type the trip name. 4. To select a different color folder, tap 5. Tap a color, then tap Close. 6. When finished, tap Enter. Note: A multi-stop trip can include up to 50 stops. - Page 51 Create a Multi-Stop Trip - continued Reorder Routes Optimize Automatically After all locations have been added to a multi-stop trip, you can run the optimizer wizard to organize your trip. 1. Tap Choose Destination > Multi-Stop Trips. 2. Tap the route you want to optimize. 3.
- Page 52 Create a Multi-Stop Trip - continued Select and Run a Saved Route 1. Tap Choose Destination > Multi-Stop Trips. 2. Tap the route to select it. 3. Tap Start Trip. 4. The Road Explorer calculates the route to your first stop. When you have reached the stop, a message displays.
-
Page 53: Points Of Interest (Pois)
Points of Interest (POIs) Back Tap to return to the previous window. My Car Tap to search for a point of interest near the current vehicle location. City Tap to search for a point of interest in a city. My Route Tap to search for a point of interest along the vehicle route. - Page 54 Points of Interest - Other Categories 1. Tap Choose Destination > Points of Interest. 2. Select a search type (My Car, City, My Route, or My Destination). 3. Tap Other Categories. 4. Tap a category. (For example, tap Hospital/Emergency.) 5. If necessary, tap a subcategory type. (For example, tap Pharmacy.) 6.
-
Page 55: Local Search
Local Search Note: This feature requires a Wi-Fi connection. Use Local Search to search the Internet for a restaurant, business, or any type of location by name, keyword, or category. Tap Choose Destination > Local Search. Choose a local search near: My Car, City, or My Destination... - Page 56 Save to Address Book/Add to Group Add the location to the Address Book or add to Address Book group. Atlas Cross-reference to printed Rand McNally Motor Carriers’ Road Atlas. (Page numbers apply to the most recent Atlas.) Go to Map Tap to view this location on a map.
- Page 57 Route Compare 1. From the destination confirmation window, tap Compare Routes to calculate and display two routes and choose between them. 2. The top of the screen displays the total distance and time for each route. Zoom in to get a closer look at each route on the map. 3.
-
Page 58: Tripmaker
TripMaker ® TripMaker is a trip planning app that allows you to easily browse the map and set up a multi-stop trip. Add via points and send your trip to the GPS app for routing. Please note that TripMaker does not provide truck routing. View Help in the TripMaker app to learn more. -
Page 59: Road Atlas
Road Atlas The Rand McNally Road Atlas is a digital version of Rand McNally’s Road Atlas. Legend Tap Legend at the top right of the screen to view the roads and related symbols. Maps Tap Maps at the top right of the screen to to select pages by state/area. -
Page 60: Dash Cam
Dash Cam Overview The Dash Cam records a video loop as you drive. Tap the red button to start or stop recording. Records Video Records Animated Gif Use the settings icon in the upper right corner of the camera screen to access preferences for video quality, audio, and segments. -
Page 61: Rand Mcnally Market
Additional complimentary apps are available for download in the Rand McNally Market. To access the Rand McNally Market: 1. Click the apps icon in the top right corner of the home screen. 2. Swipe to the left and click the Rand McNally Market icon. Complimentary Apps Road Atlas •... -
Page 62: More Information
More Information For More Information • Rand McNally Website www.randmcnally.com • Support www.randmcnally.com/support • GPS accessories store.randmcnally.com • Facebook www.facebook.com/randmcnally Road Explorer 70 User Manual ™... - Page 63 Neither this manual nor any parts thereof may be reproduced for any purpose whatsoever without the express written consent of Rand McNally, Inc., nor may it be transmitted in any form either electronically or mechanically, including photocopying, and recording.
- Page 64 RE70MANUAL-052016-v001...
Need help?
Do you have a question about the RoadExplorer 70 and is the answer not in the manual?
Questions and answers