Table of Contents
Advertisement
Available languages
Available languages
TO CUSTOMERS
Thank you very much for using our two way radio.
This radio of modern design is reasonable structure
with stable functions. It is designed to meet different
customers' need for high quality with easy operation
and perfect capablity. We believe you are pleased
with its nice shape and excellent performance.
This manual is suitable for using the model
of UV8000E.
Advertisement
Chapters
Table of Contents

Related Manuals for TYT TH-UV8000E


Summary of Contents for TYT TH-UV8000E
- Page 1 TO CUSTOMERS Thank you very much for using our two way radio. This radio of modern design is reasonable structure with stable functions. It is designed to meet different customers' need for high quality with easy operation and perfect capablity. We believe you are pleased with its nice shape and excellent performance.
- Page 2 Main Functions Dual band, dual display, dual standby 2*128 channels to store FM radio receiver and 25 channels Channel spacing selectable(25/12.5kHz) Hand free VOX function CTCSS/DCS encoding and decoding Cross band function Welcome to use two-way radio Low battery alarm Emergency Alarm http://www.tyt888.com Shift repeater function...
-
Page 3: Table Of Contents
User's Manual Contents Using tips Unpacking and checking equipments Using tips Battery Antenna Unpacking and checking equipments Installing and Uninstalling of supplied accessories Getting familiar Working mode Detailed Function Descriptions Basic Operations Optional Accessories Trouble shooting guide Specifications http://www.tyt888.com Warranty card... -
Page 4: Using Tips
"Do not use * * * * * * * * * * * TYT Science & Technology Electron Co., Ltd. wireless equipment", such as hospital and other healthcare places. -
Page 5: Battery
User's Manual Battery Please use designated battery; other batteries can cause explosion and hurt people. Notice: 1. Please do not short-circuit the battery terminals or expose of in fire. Do not dissemble the battery by yourself. 2. Charge the battery between temperature 0* and 45*. The battery can not be fully charged beyond this temperature range. - Page 6 3) The battery lasts shortly even if it is fully charged, the battery is exhausted, please high or too low. contact your local dealer to buy a new authentic TYT battery. Self-testing When the charger powers up, if the orange indicator lights for one second and then goes out, entering the standby mode, the charger passes the self-testing and can charge the battery.
-
Page 7: Installing And Uninstalling Of The Accessories
Antenna Installing and uninstalling of the accessories Short thick antenna is suitable for short-distance communication, while long thin antenna Installing/Removing the battery will offer you a better communication effect. Wearing the radio in your waist will not make 1) Align the two grooves of battery and the guide rail on the back of aluminum shell, you feel uncomfortable. - Page 8 Installing and removing the antenna Installing/removing the belt clip 1) Align the threaded end of antenna and the threaded hole at the top of radio, rotate the 1) Align the two holes of belt clip and the two holes of the radio, fix them with the supplied antenna clockwise until it is tight.
-
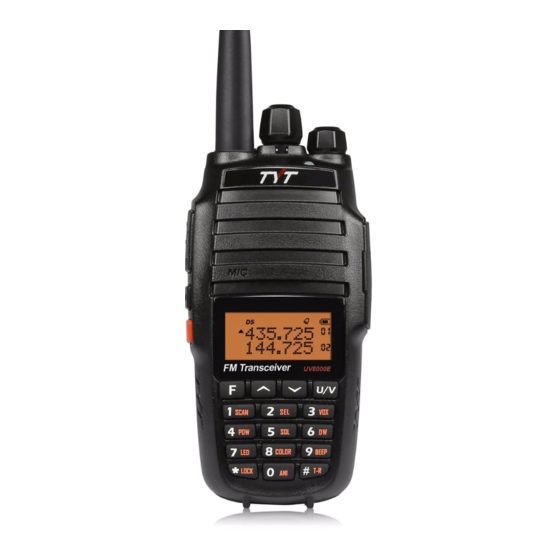
Page 9: Getting Familiar
User's Manual Installing external headset Reveal (do not remove) the mic/speaker jack cover (picture 7), insert the headset into the mic/speaker jack (picture 8). Note: Using the external headset will affect the water-tightness performance of radio. Getting familiar http://www.tyt888.com (picture 7) (picture 8) -
Page 10: Product View
Getting familiar Channel Knob Using to adjusting the channel and frequency Power/Volume Knob this control toggle the transceiver's power on/off and adjust the volume Antenna level. connect the supplied antenna here. Belt clip LED indicator light You can clip the radio in the The indicator light turns red belt and is easy to take. -
Page 11: Lcd Display
LCD DISPLAY Icons Description of functions Squelch active You will see various icons shown on the screen when power on. The following table can help you identify icons’ meaning which display on LCD. Beep tone active Receive calling ID or MSG Scrambler active Battery power indicator Set CTCSS tone... -
Page 12: Working Mode
User's Manual Working mode Frequency Mode(VFO) Under this mode, you can use key to change the frequency, then press , or the channel knob or input the frequency by keypad directly and store channel. Frequency Channel (MR) Mode When you have stored a memory channel at least and under VFO mode, press key to Working mode enter MR mode. -
Page 13: Set Menu Mode
SET MENU MODE LCD Display Available Values Description of Function VOX.SW ON / OFF VOX Switch ON/OFF LCD Display Available Values Description of Function ROGER ON / OFF Transmit Over Beeper SCAN Frequency/Channel Scan ON / OFF Dual Watch/Monitor TX.SEL EDIT / BUSY Priority Transmit RX.SAV... - Page 14 SHORTCUS MENU OPERATION LCD Display Available Values Description of Function Item Item Enter Screen Select Parameter Confirm Return + / - / OFF Shift Direction Name item Display parameter Explanation Standby Repeater Shift Frequency OFFSET 0.000-99.995MHz Press [ ] or [ ] or rotate the channel knob PTT/MONI/U/V...
- Page 15 Item Item Enter Screen Select Parameter Confirm Return Item Item Enter Screen Select Parameter Confirm Return Name item Display parameter Explanation Standby Name item Display parameter Explanation Standby Repeater Auto Press [ ] or [ Press [ ] or ON / OFF OR channel knob to ON / OFF ] to select...
-
Page 16: Detailed Function Descriptions
User's Manual Item Item Enter Screen Select Parameter Confirm Return Name item Display parameter Explanation Standby TX tone Press [ ] or OFF / QT / DCS ] to select coder available values Shift Press [ ] or + / - ] to select direction available values... -
Page 17: Functions
DETAILED FUNCTION DESCRIPTIONS 2) Priority Transmit (TX.SEL---MENU 2) Functions: UV8000E allows you to transmit on the sub band even if you are working 1) Scan & Scan Mode setting (SCAN&SCANS---MENU 1&20) on the operating band. Functions: under VFO/MR/CH mode, TH-UV8000D allows you to scan the entire current Enter Menu 2 to select priority transmit band. - Page 18 settings separately in each memory. OFF: Disable the LED lamp. Enter Menu 4 to set TX power. 8) Background Light Color (LIGHT---MENU 8) High: 10W Functions: choose LED background light color. Low: 5W, when you select Low power, the “L’ icon will appear on the display. Enter Menu 8 to select background light color.
- Page 19 14) Transmitter Time-Out Timer (TOT---MENU 14) 17) Transmit Over Beeper (ROGER---MENU 17) Functions: the TOT feature provides a safety switch which limits transmission to a Functions: sending a beeper to inform the receiver TX is over. pre-programmed value. This will promote battery conservation by not Enter Menu 17 to set ROGER.
- Page 20 by manual. Operation: Press to enter the CTCSS setting, Press to confirm, then press to enter 32nd Menu. 22) Voice Prompt (VOICE---MENU 22) OFF: Disable the CTCSS/DCS. Functions: enable/disable voice prompt. 67.0: the CTCSS number. Enter Menu 22 to set VOICE. D023N: DCS number.
- Page 21 Available values: 0.000-99.995MHz Basic Operations 28) VFO Step setting (STEP---MENU 34) Turning the Radio On/Off Functions: setting of the synthesizer steps Rotate the Radio On-Off/Volume Control knob clockwise/counter-clockwise until a click is Enter Menu 34 to set VFO step. heard to turn the radio on/off. Available Values: 0.5/2.5/5/6.2510/12.5/25/37.5/50/100K.
- Page 22 Reverse the frequency Emergency Alarm Under standby mode, long press to turn on this function, "R" will displayed at the top Under standby mode, press +CALL, to activate this function, until you press PTT, it will of LCD when you turn on this function. At this time, radio's transmitting frequency is its rec- exit.
-
Page 23: Channel Name Storage And Delete
Channel Name storage and delete Note: Under FM radio mode, if receiving the signal, the radio will be out of FM mode, after 5s, it will back to FM mode when the signals disappear. Channel Storage 2) FM Radio storage Under VFO mode, input desired frequency by keypad directly, press , then press It is the same as the channel storage. - Page 24 3. Press , then press , if radio has saved last calling ID, it will 2. Group call display this ID, if no, it is none, then key input DTMF code, 16 digits Code of calling one is 456, press , then press , then key input 1,1,A,#, press PTT to in maximum, then press PTT to send this ID.
- Page 25 CTCSS/DCS CTCSS 67.0 94.8 131.8 171.3 203.5 69.3 97.4 136.5 173.8 206.5 71.9 100.0 141.3 177.3 210.7 74.4 103.5 146.2 179.9 218.1 77.0 107.2 151.4 183.5 225.7 79.7 110.9 156.7 186.2 229.1 82.5 114.8 159.8 189.9 233.6 85.4 118.8 162.2 192.8 241.8 88.5...
-
Page 26: Optional Accessories
User's Manual Optional Accessories Vehicle Charger Speaker Antenna Adapter Earphone Optional Accessories Trouble shooting guide Professional FM Transceiver Specifications Clone Cable Program Cable Elliminator Software CD http://www.tyt888.com... - Page 27 Trouble shooting guide Specifications Troubles Solution General No Electrical Source The battery has been exhausted. 136-174MHz/220-260MHz Frequency range 220-260MHz/400-520MHz Replace or recharge the battery. 136-174MHz/400-520MHz The battery is installed incorrectly. *2.5PPm Frequency Stability Remove it and install again. Operating voltage DC 7.2V (Rechargeable Li-ion battery) The operating time becomes short, even Replace the battery.
- Page 28 Transmitter *10W Output power Modulation mode 16k*F3E / 11k*F3E Maximum deviation <5KHz / <2.5KHz *-65dB / *-60dB Adjacent Ch. power Spurious radiation <7µW Pre-emphasis characteristics *2.8A(10W) *1.8A(5W) Current CTCSS/DCS deviation 0.55KHz*0.15KHz 0.4KHz*0.1KHz Intermediation sensitivity 8-12mV Intermediation distortion <5% Note: Specifications will be revised without notice due to technical improvement. Thank you.
- Page 29 12 months, accessories 6 months), please applicable to two-way radio Customer's Tel: Maintenance carry the warranty card originals and purchase invoice to TYT of the above-listed model staff numbers designated authorized warranty repair station for warranty Model: service.
- Page 30 VORWORT Vielen Dank, dass Sie sich für den Kauf des UV8000E Sprechfunkgerät entschieden haben. Das moderne Gerät ist mit vernünftigen Struktur stabilen Funktion. Es kann sich verschiedenen Personen für hohe Qualität mit einfacher Bedienung perfekte Funktion anpassen. Wir glauben, dass Sie zufrieden mit seiner schönen Form und exzellente Leistung werden.Die Informationen in diesem Dokument werden Ihnen helfen, größtmögliche Leistung mit...
- Page 31 Hauptfunktionen Dual-Band, Dual-Display, Dual-Standby Bis zu 128 speicherbare Kanäle FM-Radioempfänger und 25 Kanäle Wählbare Frequenz in 12,5/25 kHz Schritten. "VOX" Funktion (sprachbetriebene Übermittlung). CTCSS/DCS codiert und decodiert Crossband Funktion Willkommen auf zu verwenden Batterie-Alarm Alarmfunktion http://www.tyt888.com "OFFSET"Funktion ANI Funktion DTMF & Remote Killfunction / Stunfunction Reversefunktion dreifarbige Hintergrundlicht wählbar Chinesisch und Englisch prompt...
- Page 32 INHALT HINWEIS AUSPACKEN UND ZUBEHÖR HINWEIS BATTERIE ANTENNE AUSPACKEN UND ZUBEHÖR ZUBEHÖR ANBRINGEN UND ABMONTIEREN EINGEWÖHNUNG ARBEITSMODUS DETAILIERTEN FUNKTIONSBESCHREIBUNGEN GRUNDLEGENDE OPERATIONEN OPTIONALES ZUBEHÖR PROBLEMLÖSUNG SPEZIFIKATIONEN http://www.tyt888.com GARANTIEKARTE...
-
Page 33: Hinweis
* * * * * * * * * * * Platzieren Sie das Gerät nicht in der unmittelbaren Nähe von Airbags . TYT Science & Technology Electron Co., Ltd. Setzen Sie das Gerät keiner direkten Sonneneinstrahlung über eine längere Zeit oder heißen Quellen aus.. -
Page 34: Batterie
BATTERIE Nuzten Sie diese designend Batteire.; Andere Batterien können dazu führen, dass Menschen verletzte .. Hinweis: 1. Schalten Sie das Gerät ab, wenn Sie leicht entzündliche Gegenden betreten. BATTERIE 2. Laden Sie die Batterie bei einer Temperatur von etwa 5 - 40° C. Alles darunter oder darüber könnte die Batterie beschädigen ANTENNE 3. - Page 35 Die Batterie können aufgeladen werden,wenn die Orange LED in eine Sekunde leuchtet. Bitte mit dem Händler vor Ort in Kontakt, eine neue authentische TYT Batterie zu kaufen.. (Dies bedeutet, dass das Produkt in den Standby-Modus geht.) Das Ladegerät hat den Test nicht bestanden,wenn die Orange LED ständig blinkt.
-
Page 36: Picture
Antenne Aus- und Einbau von Zubehör Kurze und dicke Antenne ist für die kurzen Kommunikationen geeignet.Aber die schmale BATTERIE EINLEGEN Antenne wird?Ihnen?eine bessere Kommunikationswirkung bieten. 1) Wenn Sie die Batterie einlegen, stellen Sie sicher, dass sie richtig im Aluminiumgehäuse sitzt. Das untere Ende derBatterie sitzt etwa 2 bis 3 cm überdem unteren Rand des Gerätes.Setzen Der Kommunikationsbereich wird durch das Wetter beeinflusst werden.Bitte vorbereiten im Sie die Batterie in die Führungsschienen und schieben Sie sie hoch, bis Sie ein "Klick"... -
Page 37: Picture
DIE ANTENNE ANBRINGEN DEN GÜRTELCLIP ANBRINGEN 1)Bringen Sie die Antenne an, wie es abgebildet ist. Drehen Sie sie hierzu im Uhrzeigersinn, 1)Bringen Sie, wenn nötig, den Gürtelclip an. Befestigen Sie diesen hierzu,wie abgebildet, am bis es fest ist. (picture 3) Batterieschacht.. -
Page 38: Eingewöhnung
MICRO-HEADSET ANSCHLIEßEN Stecken Sie das Headset in die dafür vorgesehene Buchse "SP / MIC".Die Abbildung zeigt wie. Hinweis: Es wird die Wasserundurchlässigkeitswirkung beeinflussen, wenn Sie externe Kopfhörer verwenden.. EINGEWÖHNUNG http://www.tyt888.com (picture 7) (picture 8) - Page 39 Eingewöhnung Kanal Knopf Der Kanal und die Frequenz eingestellt An / Aus / Lautstärke Knopf Schalter zur Betätigung einer Steuerung Und die Lautstärke einzustellen Antenne level. Schließen Sie die mitgelieferte Gürtelclip Antenne hier LED Anzeige Knopf zum Herausnehmen der Batterie Die Rot LED leuchte, Drücken Sie die Taste für die wenn es senden;...
- Page 40 LCD ANZEIGE Symbole Beschreibung der Funktionen Squelch aktiviert Die Displaysymbole erscheinen je nach spezifischer Anwendung. Spezielle Anwendungen lassen ein Symbol erscheinen. Tastenton beep aktiviert Aufruf-ID oder MSG erhalten Scrambler aktiviert Batteriestandsanzeige 'CTCSS' aktiviert 'DCS' aktiviert Symbole Beschreibung der Funktionen DTMF-Signalisierung aktiviert Signalstärkeanzeige MDF-A geringe Übertragungsenergie...
-
Page 41: Arbeitsmodus
Arbeitsmodus Frequenz Modus (VFO) Unter diesem Modus können Sie verwenden, um die Frequenz zu ändern .Dann drücken Sie oder der die Frequenz eingeben direkt und Kanal verwahren. FrequenzkanalModus(MR) ARBEITSMODUS Wenn Sie haben zumindest einen Speicherkanal gespeichert. Drücken Sie um MR Modus zu gelangen. - Page 42 MENÜ-MODUS LCD Anzeigen Verfügbare Werte Beschreibung der Funktion VOX.SW AN / AUS VOX-Schalter ein/aus LCD Anzeigen Verfügbare Werte Beschreibung der Funktion ROGER AN / AUS Ton bei Übertragungsende SCAN Frequenz/Kanal Scan AN / AUS Dual Display TX.SEL BEARBEITEN / GEBUCHEN Priorität übertragen RX.SAV AN / AUS...
- Page 43 SHORTCUS MENÜBEDIENUNG LCD Anzeige Verfügbare Werte Beschreibung der Funktion Artikel Artikel Artikel Bildschirmanzeige Select Parameter Rückkehr bestätigen + / - / AUS Shift-Richtung No. Name eingeben parameter Explanation Standby Frequenzverschiebung OFFSET 0.000-99.995MHz Frequenz Press [ ] or [ ] or rotate the channel knob PTT/MONI/U/V /Kanal...
- Page 44 Artikel Artikel Artikel Bildschirmanzeige Select Parameter Rückkehr bestätigen Artikel Artikel Artikel Bildschirmanzeige Select Parameter Rückkehr bestätigen No. Name eingeben parameter Explanation Standby No. Name eingeben parameter Explanation Standby Repeater Tastensperre Press [ ] or [ Press [ ] or ON / OFF OR channel knob to ON / OFF ] to select...
-
Page 45: Grundlegende Operationen
Artikel Artikel Artikel Bildschirmanzeige Select Parameter Rückkehr bestätigen No. Name eingeben parameter Explanation Standby TX Ton Press [ ] or ] to select OFF / QT / DCS Programmierer available values Shift Press [ ] or + / - ] to select Richtung available values Press [... - Page 46 Detaillierte Funktionsbeschreibung 2) Priorität übertragen (TX.SEL---MENU 2) Funktionen: UV8000E ermöglicht, auf dem Unterband zu übertragen, auch wenn 1) Scan & Scan Modus aufstellen (SCAN&SCANS---MENU 1&20) Sie auf dem Betriebsband arbeiten. Funktionen: Es ermöglicht, die gesamte aktuelle Betriebsband und Speicherkanäle Geben Sie Menü 2., um Priorität Sendeband auszuwählen. Default: EDIT. unter VFO/MR/CH Modus zu scannen.
- Page 47 Geben Sie Menü 4, TX Power einzustellen. OFF: Deaktivieren Sie die LED-Lampe. High: 10W 8) die Farbe der Hintergrundbeleuchtung (LIGHT---MENU 8) Low: 5W, wenn Sie einen geringen Strom wählen, die "L 'Symbol wird auf dem Display Funktionen: wählen die Farbe der Hintergrundbeleuchtung . angezeigt.
- Page 48 Geben Sie Menü 16, der VOX Funktion ein- / ausschalten. 14) Übertragungstimer (TOT---MENU 14) 17) Ton bei Übertragungsende (ROGER---MENU 17) Funktionen: Die TOT Funktion bietet einen Sicherheitsschalter, um ein vorgegebener Funktionen: Senden einen Piepser zu unterrichten,ob die Receiver TX vorbei ist. Wert zu begrenzen.Dies wird die Batterie der Erhaltung fördern, indem Geben Sie Menü...
- Page 49 22) Sprachmeldung/Eingabe (VOICE---MENU 22) Drücken Sie [ ] + [ ],um die CTCSS Einstellung einzugeben, drücken ] um zu bestätigen und drücken [ ],32nd Menü zu gelangen. Funktionen: Ansage aktivieren/deaktivieren OFF: Deaktivieren Sie die CTCSS / DCS. Geben Sie Menü 22. , VOICE einzustellen. 67.0: the CTCSS Nr,.
- Page 50 Default: OFF Grundoperationen Available values: 0.000-99.995MHz Das Radio einschalten/ausschalten 28) VFO Schritt einstellen (STEP---MENU 34) Drehen Sie den Knopf im/entgegen den Uhrzeigersinn, bis Sie ein "Klick" hören, um das Funktionen: Einstellung der Synthesizer-Schritte Gerät aus/anzuschalten. . Geben Menü 34th , VFO Schritt einzustellen. Verfügbare Werte:: 0.5/2.5/5/6.2510/12.5/25/37.5/50/100K.
- Page 51 Umkehren der Frequen Notfallalarm Längerer Drücken [ ]auf diese Funktion unter den Standby-Modus zu schalten."R" Unter den Standby-Modus, drücken [ ]+[CALL], um diese Funktion zu aktivieren, bis wird an der Spitze der LCD angezeigt, wenn Sie diese Funktion aktivieren. Die Sie PTT drücken,wird es verlassen.
- Page 52 Kanalname Speichersysteme und löschen 2) FM Radio Storage Es ist der gleiche wie der Kanal Storage. Kanal Storage Unter VFO Modus,die Frequenz zu eingeben,und drücken , dann drücken [U/V],die 3) FM Radiokanal löschen Ziffern blinkt oben rechts der LCD.Drücken Sie die Nummer zum gewünschten Kanal direkt Unter FM Modus, schalten Sie Radio aus,drücken ,um das Radio einzuschalten, Sie eingeben ,oder drücken...
- Page 53 3. Drücken , dann drücken , wenn Radio zuletzt Rufer-ID 2. Gruppenruf Die Code von calling is 456, drücken , dann drücken , dann gespeichert hat,wird es diese ID angezeigt werden . Wenn nein, 1,1,A,#,eingeben,drücken[PTT]zu übertragen. dann eingeben Sie die DTMF-Code(16 Stellen in maximal), dann Der eigentliche Übertragung Code ist 1,1,A,#,4,5,6.
- Page 54 CTCSS/DCS CTCSS 67.0 94.8 131.8 171.3 203.5 69.3 97.4 136.5 173.8 206.5 71.9 100.0 141.3 177.3 210.7 74.4 103.5 146.2 179.9 218.1 77.0 107.2 151.4 183.5 225.7 79.7 110.9 156.7 186.2 229.1 82.5 114.8 159.8 189.9 233.6 85.4 118.8 162.2 192.8 241.8 88.5...
-
Page 55: Optionales Zubehör
Optionales Zubehör Optionales Zubehör Kfz-Ladegerät Lautsprecher Antenne-Adapter Ohrhörer Problemlösung Spezifikationen Professional FM Transceiver Klon-Kabel Programm-Kabel Eliminator Software CD http://www.tyt888.com... - Page 56 Problemlösung Spezifikationen Allgemeine Probleme Lösung Das Gerät startet nicht Ersetzen Sie sie durch eine geladene 136-174MHz/220-260MHz Batterie oderladen Sie die Leere. Frequenzbereich 220-260MHz/400-520MHz 136-174MHz/400-520MHz Die Batterie ist nicht korrekt eingesetzt. Setzen Sie sie richtig ein. Frequenzstabilität *2.5PPm Betriebsspannung DC 7.2V (Rechargeable Li-ion battery) Die Batterie entlädt sich schnell Ersetzen Sie sie durch eine neue Kanal Nr.
- Page 57 Sender Ausgangsleistung *10W Modus der Modulation 16k*F3E / 11k*F3E Maximale Abweichung <5KHz / <2.5KHz Adjacent Ch. power *-65dB / *-60dB Störende Strahlung <7µW Preemphasis-Merkmale Strom *2.8A(10W) *1.8A(5W) CTCSS/DCS Abweichung 0.55KHz*0.15KHz 0.4KHz*0.1KHz Vermittlung-Empfindlichkeit 8-12mV Vermittlung-Verzerrung <5% Hinweis: Technische Daten werden ohne vorherige Ankündigung geändert werden,wenn die Technik gesteigert hat.Vielen Dank.
- Page 58 Wartung-Datensatz Vielen Dank für den Einkauf.Wir werden unser Garantiekarte Bestes versuchen, um einen guten Kundenservice Carry-in datum bereitzustellen.Wenn weiterhin Probleme auftreten, kontaktieren Sie ihren Händler, den Abschluss Vertrieb oderdas Service-Center.Bitte Datum konzentrieren sich auf die folgenden Defekt Informationen: Name des Käufers: Geschlecht: Beschreibung Hinweis:...
Need help?
Do you have a question about the TH-UV8000E and is the answer not in the manual?
Questions and answers