Advertisement
Available languages
Available languages
Quick Links
1
Your AstroMaster 70AZ/90AZ includes: optical tube
w/ built-on StarPointer finderscope, pre-assembled
tripod with center leg brace and altazimuth mount
attached; two eyepieces; star diagonal,
accessory tray, battery, owner's manual,
and The Sky™ CD Software.
4
All three legs should be the same length to provide
a level platform for the telescope.
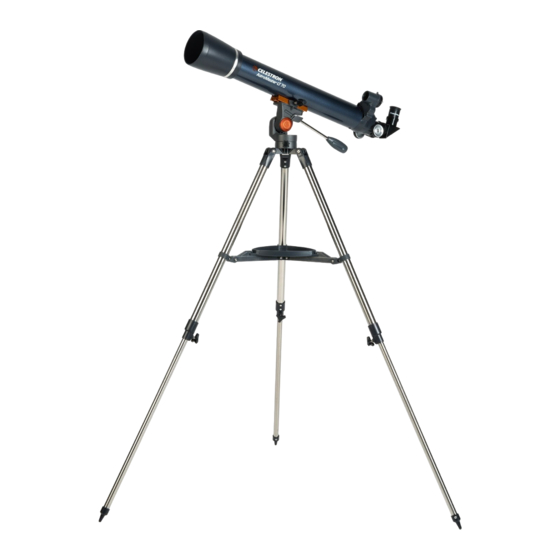
7
Here is how the fully assembled tripod and mount
should appear.
2
To set up the tripod, spread the legs outward until
they are fully extended. Extend each of the three
tripod legs down 6-12".
5
To attach the accessory tray, line up notches and
turn clockwise until tray tabs lock into place with
the tripod brackets.
8
dovetail
mount
fastening
screws
Next slide telescope tube into the mount. Be sure to
back out fastening screws to allow enough
clearance for the dovetail
www.celestron.com
Quick set-up guide for:
Model #21061 – AstroMaster 70AZ
Model #21063 – AstroMaster 90AZ
Model #21073 – AstroMaster LT 60AZ
Model #21074 – AstroMaster LT 70AZ
Questions or Problems with Set-up?
CONTACT: Celestron Technical Support:
310.803.5955
Quick Set-up Guide
3
Use the three tightening screws located at the
bottom of each leg to secure the extended legs
in place.
6
Properly assembled, the accessory tray should
appear as pictured above.
9
Center dovetail in the mount and tighten fastening
screw. For added security tighten the angled lock
down screw next to the fastening screw.
Advertisement

Related Manuals for Celestron AstroMaster LT 60AZ


Summary of Contents for Celestron AstroMaster LT 60AZ
- Page 1 Quick set-up guide for: Model #21061 – AstroMaster 70AZ Model #21063 – AstroMaster 90AZ Model #21073 – AstroMaster LT 60AZ Model #21074 – AstroMaster LT 70AZ Questions or Problems with Set-up? CONTACT: Celestron Technical Support: 310.803.5955 Quick Set-up Guide...
- Page 2 Quick Set-up Guide [cont] Loosen the set screw on the focuser. Remove the Insert the diagonal into the focuser and tighten the Insert the chrome barrel of the 20mm eyepiece plastic cap covering the end of the focuser. set screw. into the diagonal and tighten the set screw.
-
Page 3: Guide D'installation Rapide
Guide d’installation rapide pour : Modèle nº 21061 – AstroMaster 70AZ Modèle nº 21063 – AstroMaster 90AZ Modèle nº 21073 – AstroMaster LT 60AZ Modèle nº 21074 – AstroMaster LT 70AZ Des questions ou problèmes d’installation ? TÉLÉPHONEZ AU : Service technique Celestron: 310.803.5955... - Page 4 Guide d’installation rapide [suite] Desserrez la vis de réglage située sur le Insérez le prisme diagonal dans le dispositif de Insérez le barillet chromé de l’oculaire de 20 dispositif de mise au point. Retirez le cache mise au point et serrez la vis de blocage. mm dans le prisme diagonal et serrez la vis de en plastique destiné...
- Page 5 Schnellanleitung zum Aufbau für: Model #21061 – AstroMaster 70AZ Model #21063 – AstroMaster 90AZ Model #21073 – AstroMaster LT 60AZ Model #21074 – AstroMaster LT 70AZ Fragen oder Probleme beim Aufbau? KONTAKTPERSON: Technische Unterstützung von Celestron: 310.803.5955 Schnellanleitung zum Aufbau AstroMaster 70AZ/90AZ umfasst: Rohr mit Optik, Zum Aufbau des Stativs die Beine nach außen...
- Page 6 Schnellanleitung zum Aufbau (Fortsetzung) Die Stellschraube am Okularauszug losdrehen. Den Die Diagonale in den Okularauszug einstecken und Die verchromte Steckhülse des 20 mm Okulars in Plastikdeckel, mit dem das Ende des die Stellschraube festziehen. die Diagonale stecken und die Stellschraube Okularauszugs geschützt ist, entfernen.
- Page 7 Guía para realizar un ensablaje rápido: Modelo Nº 21061 – AstroMaster 70AZ Modelo Nº 21063 – AstroMaster 90AZ Modelo Nº 21073 – AstroMaster LT 60AZ Modelo Nº 21074 – AstroMaster LT 70AZ Preguntas o problemas referentes al ensamblado CONTACTO: Asistencia técnica de Celestron: 310.803.5955...
- Page 8 Guía para realizar un ensablaje rápido [continuación] Afloje el tornillo de colocación sobre el mecanis- Introduzca la lente a 90º en el mecanismo de Inserte el tambor cromado del ocular de 20 mm mode enfoque. Saque la tapa plástica que cubre enfoque y apriete el tornillo de fijación.
-
Page 9: Guida Rapida
Guida rapida per: Modello n.21061 – AstroMaster 70AZ Modello n.21063 – AstroMaster 90AZ Modello n.21073 – AstroMaster LT 60AZ Modello n.21074 – AstroMaster LT 70AZ Domande o problemi con la configurazione? CONTATTARE: Supporto tecnico Celestron: 310.803.5955 Guida Rapida AstroMaster 70AZ/90AZ comprende: tubo ottico con... - Page 10 Guida Rapida [continua] Allentare la vite sul focheggiatore. Rimuovere il Inserire la diagonale nel focheggiatore e serrare la Inserire il barilotto cromato dell’oculare da 20 mm tappo di plastica che copre l’estremità del focheg- vite. nel focheggiatore e serrare la vite. giatore.
Need help?
Do you have a question about the AstroMaster LT 60AZ and is the answer not in the manual?
Questions and answers