Celestron PowerSeeker 60AZ User Manual
Powerseeker series telescopes
Hide thumbs
Also See for PowerSeeker 60AZ:
- User manual ,
- Instruction manual (9 pages) ,
- Quick setup manual (2 pages)
Table of Contents
Advertisement
Available languages
Available languages
P
o
w
e
r
S
e
P
o
w
e
r
S
e
I
N
I
N
●
P
o
w
e
r
S
e
e
k
e
●
P
o
w
e
r
S
e
e
k
e
●
P
o
w
e
r
S
e
e
k
e
r
●
P
o
w
e
r
S
e
e
k
e
®
e
k
e
r
®
S
e
r
e
k
e
r
S
e
r
S
T
R
U
C
T
I
O
N
S
T
R
U
C
T
I
O
N
r
5
0
A
Z
#
2
1
0
3
9
●
r
5
0
A
Z
#
2
1
0
3
9
●
7
0
A
Z
#
2
1
0
3
6
●
r
7
0
A
Z
#
2
1
0
3
6
●
i
e
s
T
e
l
e
s
i
e
s
T
e
l
e
s
M
A
N
U
A
L
M
A
N
U
A
L
P
o
w
e
r
S
e
e
k
e
r
6
0
A
Z
P
o
w
e
r
S
e
e
k
e
r
6
0
A
Z
P
o
w
e
r
S
e
e
k
e
r
7
6
A
Z
P
o
w
e
r
S
e
e
k
e
r
7
6
A
Z
c
o
p
e
s
c
o
p
e
s
#
2
1
0
4
1
#
2
1
0
4
1
#
2
1
0
4
4
#
2
1
0
4
4
Advertisement
Chapters
Table of Contents

Related Manuals for Celestron PowerSeeker 60AZ


Summary of Contents for Celestron PowerSeeker 60AZ
- Page 1 ® ® ● ● ● ● ● ● ● ●...
-
Page 2: Table Of Contents
Installing the Diagonal & Eyepiece (Refractor) – 50AZ ............8 Installing the Eyepiece on the Newtonian .................. 9 Installing & Using the Barlow Lens ................... 9 Installing & Using the 1.5x Erecting Eyepiece – 50AZ ............. 9 Installing the Finderscope ......................10 Aligning the Finderscope......................10 TELESCOPE BASICS ......................... - Page 3 60mm refractor, 70mm refractor, and a 76mm Newtonian. The PowerSeeker Series is made of the highest quality materials to ensure stability and durability. All this adds up to a telescope that gives you a lifetime of pleasure with a minimal amount of maintenance.
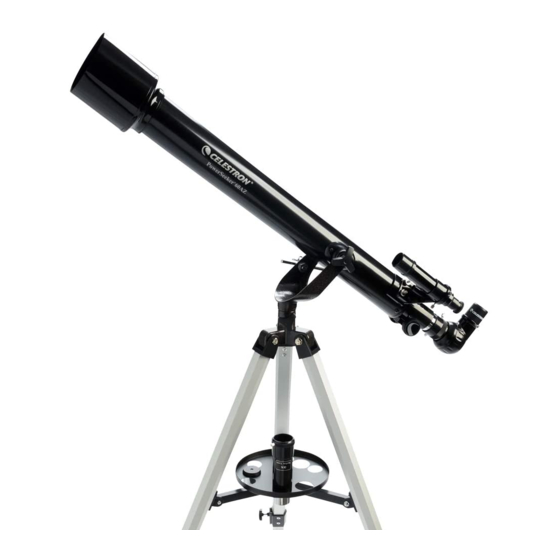
- Page 4 Figure 1-1 PowerSeeker 60AZ Refractor (PowerSeeker 50AZ & PowerSeeker 70AZ Similar) Objective Lens Altitude Slow Motion Rod Assembly (not on 50AZ) Telescope Optical Tube Accessory Tray Finderscope Tripod Eyepiece Azimuth Lock (not on 50AZ) Diagonal Alt-Az Mount Focus Knob Altitude Locking Knob...
-
Page 5: Assembly
Figure 1-2 PowerSeeker 76AZ Newtonian Finderscope Azimuth Lock Eyepiece Accessory Tray Collimation Adjustment Screws (in rear) Tripod Telescope Optical Tube Alt-Az Mount Primary Mirror Altitude Lock Altitude Slow Motion Rod Assembly Focus Knob... - Page 6 4. On the bottom of the tripod tray is a screw attached to the center (except the 50AZ). The screw attaches into a threaded hole in the center of the tripod leg brace by turning it clockwise - note: pull up slightly on the tripod leg brace to make it easy to attach.
- Page 7 (with the provided tool) shown on the far left of Figure 2-7 and put the rod in place as shown in Figure 2-7. Then, put the screw through the hole in the rod and into the mechanism and tighten it.
- Page 8 The PowerSeeker Alt-Az mount is easy to move wherever you want to point it. For the 60AZ, 70AZ, and 76AZ the up and down (altitude) is controlled by the altitude locking knob (Figure 2-12). The side-to-side (azimuth) is controlled by the azimuth lock (Figure 2-12). When both knobs are loose you can find your objects easily (through the finderscope) and then lock the controls.
- Page 9 The PowerSeeker 50AZ comes with a 1.5x erecting eyepieces, primarily for daytime terrestrial viewing. This eyepiece corrects the image you see in your telescope, so that it’s both right side up and corrected from left to right. Install and use this eyepiece the same way you do with the Barlow Lens in the section above. You cannot use the Barlow lens when using this eyepiece.
-
Page 10: Installing The Finderscope
Use the following steps to align the finderscope: 1. Locate a distant daytime object and center it in a low power (20mm) eyepiece in the main telescope. 2. Look through the finderscope (the eyepiece end of the finderscope) and take notice of the position of the same object. - Page 11 A Newtonian reflector uses a single concave mirror as its primary. Light enters the tube traveling to the mirror at the back end. There light is bent forward in the tube to a single point, its focal point. Since putting your head in front of the telescope to look at the image with an eyepiece would keep the reflector from working, a flat mirror called a diagonal intercepts the light and points it out the side of the tube at right angles to the tube.
-
Page 12: Image Orientation
Although the power is variable, each instrument under average skies has a limit to the highest useful magnification. The general rule is that 60 power can be used for every inch of aperture. For example, the PowerSeeker 60AZ is 2.4” inches in diameter. Multiplying 2.4 by 60 gives a maximum useful magnification of 144 power. Although this is the maximum useful magnification, most observing is done in the range of 20 to 35 power for every inch of aperture which is 48 to 84 times for the PowerSeeker 60AZ telescope. -
Page 13: Determining Field Of View
For the brightest images with the highest contrast levels, use lower powers. Determining the field of view is important if you want to get an idea of the angular size of the object you are observing. -
Page 14: The Celestial Coordinate System
15 degrees apart. Although the longitude lines are separated by an angular distance, they are also a measure of time. Each line of longitude is one hour apart from the next. Since the Earth rotates once every 24 hours, there are 24 lines total. -
Page 15: Motion Of The Stars
The daily motion of the Sun across the sky is familiar to even the most casual observer. This daily trek is not the Sun moving as early astronomers thought, but the result of the Earth's rotation. The Earth's rotation also causes the stars to do the same, scribing out a large circle as the Earth completes one rotation. -
Page 16: Observing The Moon
For safe solar viewing, use a proper solar filter that reduces the intensity of the Sun's light, making it safe to view. With a filter you can see sunspots as they move across the solar disk and faculae, which are bright patches seen near the Sun's edge. -
Page 17: Observing Deep-Sky Objects
20 mm eyepiece with the PowerSeeker telescope, your field of view is approximately 1.4º or so. If you know an object is 3º away from your present location, then you just need to move about two fields of view. - Page 18 Star hopping to the Andromeda Galaxy (M31) is a snap, since all the stars needed to do so are visible to the naked eye. Star hopping will take some getting used to and objects that don’t have stars near them that are visible to the naked eye are challenging.
-
Page 19: Seeing Conditions
LPR filters enhance deep sky viewing from light polluted areas by blocking unwanted light while transmitting light from certain deep sky objects. You can, on the other hand, observe planets and stars from light polluted areas or when the Moon is out. Seeing Seeing conditions refers to the stability of the atmosphere and directly affects the amount of fine detail seen in extended objects. -
Page 20: Astrophotography
The PowerSeeker series of telescopes was designed for visual observing. After looking at the night sky for a while you may want to try your hand at photography of it. There are a few simple forms of photography possible with your 60AZ, 70AZ and 76AZ telescope for celestial as well as terrestrial pursuits although celestial photography is best done using an equatorial mount or computerized altazimuth mount. -
Page 21: Care And Cleaning Of The Optics
Special care should be taken when cleaning any instrument so as not to damage the optics. If dust has built up on the optics, remove it with a brush (made of camel’s hair) or a can of pressurized air. Spray at an angle to the glass surface for approximately two to four seconds. -
Page 22: Aligning The Primary Mirror
To star collimate in the Northern Hemisphere, point at a stationary star like the North Star (Polaris). It can be found in the north sky, at a distance above the horizon equal to your latitude. It’s also the end star in the handle of the Little Dipper. - Page 23 Barlow lens. When a star is in focus it should look like a sharp pinpoint of light. If, when focusing on the star, it is irregular in shape or appears to have a flare of light at its edge, this means your mirrors aren’t in alignment.
- Page 24 T-Adapter – Universal 1.25” (# 93625) – This adapter fits the 1.25” focuser of your 60AZ, 70AZ & 76AZ telescope. It allows you to attach your 35mm SLR camera for terrestrial as well as lunar and planetary...
-
Page 25: Powerseeker Specfications
2.28 1.93 1.66 1.53 Light Gathering Power 100x 118x Optical Tube Length 22" (56cm) 28" (71cm) 30" (76cm) 26" (66cm) Telescope Weight 1.5# (0.7kg) 2.0# (0.9kg) 6# (2.7kg) 8.5# (3.9kg) Note: Specifications are subject to change without notice or obligation... - Page 26 ® ® ● ● ● ● ● ● ● ●...
- Page 27 Aufbau des Stativs..........................6 Anbringen des Teleskoptubus an der Montierung ................7 Manuelle Bewegung des Teleskops ....................8 Installation des Zenitspiegels und der Okulare (Refraktor) – 60AZ ..........8 Installation des Zenitspiegels und der Okulare (Refraktor) – 50AZ ..........8 Installation der Okulare in den Newton-Teleskopen................9 Installation und Verwendung der Barlow-Linse ................9...
- Page 28 Diese Teleskope, die einen außergewöhnlichen Wert bieten, wurden für Erstkäufer entwickelt. Die PowerSeeker-Serie zeichnet sich durch ein kompaktes, portables Design sowie eine umfangreiche optische Leistung aus, die den Anfänger auf dem Gebiet der Amateurastronomie begeistern wird. Außerdem ist das PowerSeeker-Teleskop mit seiner überragenden High-Power-Leistung ideal zur terrestrischen Beobachtung geeignet.
- Page 29 Abb. 1-1 PowerSeeker 60AZ-Refraktor (PowerSeeker 50AZ und PowerSeeker 70AZ ähnlich) Objektivlinse Höhenfeineinstellungsstange (nicht auf 50AZ) Teleskoprohr mit Optik Zubehörablage Sucherfernrohr Stativ Okular Azimut-Sperre (nicht auf 50AZ) Zenitspiegel Alt-Az-Montierung Fokussierknopf Höhenfeststellknopf...
- Page 30 Abb. 1-2 PowerSeeker 76AZ Newton-Teleskop Sucherfernrohr Azimut-Sperre Okular Zubehörablage Kollimationseinstellschrauben (hinten) Stativ Teleskoprohr mit Optik Alt-Az-Montierung Hauptspiegel Höhenarretierung Höhenfeineinstellungsstange Fokussierknopf...
-
Page 31: Aufbau Des Stativs
Zenitspiegel für aufrechtes Bild für 60AZ 1. Nehmen Sie das Stativ aus der Verpackung (Abb. 2-1). Das Stativ ist bereits vormontiert, um den Aufbau zu vereinfachen. Die Stative für die verschiedenen Modelle sind unterschiedlich, aber sie sehen alle ähnlich wie auf den nachstehenden Fotos aus. -
Page 32: Anbringen Des Teleskoptubus An Der Montierung
4. Stecken Sie die Stange durch die Augenschraube und ziehen Sie den Höheneinstellknopf fest – siehe Abb. 2-9. 5. Drehen Sie die beiden Knöpfe (einer auf jeder Seite der Montierung) durch den oberen Teil der Montierung in die Gewindeöffnungen im optischen Tubus und ziehen Sie sie fest – Abb. 2-7. - Page 33 Zenitspiegel und ziehen Sie die Daumenschraube fest. Hierbei müssen Sie wieder sicherstellen, dass die Daumenschraube nicht in den Zenitspiegel ragt, bevor das Okular eingesteckt wird. 3. Die Okulare können durch Umkehr des Verfahrens in Schritt 2 oben auf andere Brennweiten eingestellt werden. – –...
- Page 34 Zur Verwendung der Barlow-Linse mit Refraktoren entfernen Sie den Zenitspiegel und stecken die Barlow-Linse direkt in den Fokussiertubus. Dann stecken Sie ein Okular in die Barlow-Linse zur Beoachtung. Sie können auch den Zenitspiegel in die Barlow-Linse einstecken und dann ein Okular im Zenitspiegel verwenden, aber es ist u.U. nicht möglich, mit allen Okularen eine Scharfstellung zu erzielen.
-
Page 35: Installation Des Sucherfernrohrs
5. Nehmen Sie den Objektivdeckel von beiden Enden des Teleskops ab. Verfahren zur Ausrichtung des Sucherfernrohrs: 1. Machen Sie ein entferntes Objekt am Tage ausfindig und zentrieren Sie es in einem Okular mit geringer Vergrößerungskraft (20 mm) im Hauptteleskop. 2. Schauen Sie durch den Sucher (Okularende des Sucherfernrohrs) und notieren Sie die Position des gleichen Objekts. - Page 36 Reflektor nicht funktionieren würde, wenn man seinen Kopf vor das Teleskop hält, um das Bild mit einem Okular zu betrachten, fängt ein flacher Spiegel, der Zenitspiegel genannt wird, das Licht ab und richtet es im rechten Winkel zum Tubus auf die Seiten des Tubus.
-
Page 37: Bildorientierung
Zenitspiegels mit Refraktoren ist das Bild aufrecht, aber seitenverkehrt (links und rechts vertauscht, d.h. Spiegelbild). Wenn das Okular direkt in den Fokussierer eines Refraktors gesetzt wird (d.h. ohne den Zenitspiegel), ist das Bild auf dem Kopf und seitenverkehrt (d.h. invertiert). -
Page 38: Ermittlung Des Gesichtsfelds
Sie einfach mit 52,5. Multiplizieren Sie nun weiter in unserem Beispiel das Winkelfeld von 1,4° mit 52,5. Das ergibt eine lineare Feldbreite von 74 Fuß im Abstand von 1000 Yard. Bei der Arbeit mit jedem optischen Gerät gibt es ein paar Dinge, an die man denken muss, um sicherzustellen, dass man das bestmögliche Bild erhält. -
Page 39: Das Himmelskoordinatensystem
Grad). Obwohl die Längengrade durch eine Winkeldistanz getrennt sind, sind sie auch ein Zeitmaß. Jeder Längengrad ist eine Stunde vom nächsten entfernt. Da die Erde alle 24 Stunden eine Umdrehung abschließt, gibt es insgesamt 24 Grade. Daher werden die Rektaszensionskoordinaten in Zeiteinheiten markiert. Der Startpunkt ist ein beliebiger Punkt im Sternbild Fische, der als 0 Stunden, 0 Minuten und 0 Sekunden bezeichnet wird. -
Page 40: Bewegung Der Sterne
Zug ist aber keine Bewegung der Sonne, wie die ersten Astronomen dachten, sondern das Ergebnis der Drehung der Erde. Die Drehung der Erde hat den gleichen Effekt auf die Sterne, die einen großen Kreis beschreiben, während die Erde eine Drehung ausführt. Die Größe der Kreisbahn, die von einem Stern vollzogen wird, hängt von seiner Position im Himmel ab. -
Page 41: Mondbeobachtung
Die atmosphärischen Bedingungen sind in der Regel die Faktoren, die einschränken, wie viele feine Details der Planeten erkennbar sind. Man sollte daher die Planeten möglichst nicht dann beobachten, wenn sie sich tief am Horizont befinden oder wenn sie direkt über einer Wärmestrahlungsquelle, wie z.B. ein Dach oder Kamin, stehen. -
Page 42: Beobachtung Der Deep-Sky-Objekte
3. Gehen Sie ca. 7° nach Nordosten. Dort finden Sie zwei Sterne mit gleicher Helligkeit —Delta ( ) und Pi ( ) Andromeda—die ca. 3° voneinander entfernt sind. 4. Gehen Sie in die gleiche Richtung um weitere 8° weiter. Dort finden Sie zwei Sterne —Beta ( ) und Mu ( ) Andromedae—ebenfalls 3° voneinander entfernt. - Page 43 Starhopping zur Andromeda-Galaxie (M31) ist ein Kinderspiel, da alle Sterne, die dazu notwendig sind, mit dem bloßen Auge sichtbar sind. Es dauert eine Weile, bis man Starhopping beherrscht, und Objekte, die keine Sterne in ihrer Nähe haben, die mit bloßem Auge erkennbar sind, stellen eine Herausforderung dar. Ein solches Objekt ist M57 (Abb. 5-2), der berühmte Ringnebel.
-
Page 44: Beobachtungsbedingungen
Vergleich zu Ihrer Blendenöffnung bestimmt die Qualität der „Sicht“. Unter guten Sichtbedingungen sind feine Details auf den helleren Planeten, wie z.B. Jupiter und Mars, sichtbar und die Sterne sind als haargenaue Bilder zu sehen. Unter schlechten Sichtbedingungen sind die Bilder unscharf und die Sterne erscheinen als Klumpen. -
Page 45: Astrofotografie
Kamera für terrestrische Fotografie und Primärfokus-Astrofotografie fest installiert werden. 35 mm SLR-Kamera – Sie müssen Ihr Objektiv von der Kamera abnehmen und einen T-Ring für Ihr jeweiliges Kameramodell aufsetzen. Dann brauchen Sie noch einen T-Adapter (Best.-Nr. 93625) zum Aufsatz am T-Ring an einem Ende und am anderen Ende am Teleskop-Fokustubus. -
Page 46: Pflege Und Reinigung Der Optik
Wenn sich auf der Optik Staub angesammelt hat, entfernen Sie ihn mit einem Pinsel (Kamelhaar) oder einer Druckluftdose. Sprühen Sie ca. 2 bis 4 Sekunden im Winkel auf die Glasoberfläche. Entfernen Sie dann alle Reste mit einer Reinigungslösung für optische Produkte und einem weißen Papiertuch. Geben Sie die Lösung auf das Tuch und reinigen Sie dann die Optik mit dem Papiertuch. - Page 47 Ausrichtung des Hauptspiegels Stellen Sie jetzt die Schrauben des Hauptspiegels ein, um die Reflexion des kleinen Zweitspiegels so neu zu zentrieren, dass sie silhouettenhaft gegen die Ansicht des Hauptspiegels erscheint. Wenn Sie in den Fokussierer schauen, sollten die Silhouetten des Spiegels konzentrisch erscheinen. Wiederholen Sie Schritt 1 und 2, bis das der Fall ist.
- Page 48 Standardokular oder Ihrem Okular mit der größten Vergrößerungsleistung, d.h. mit der kleinsten Brennweite in mm (z.B. 6 mm oder 4 mm). Eine andere Option ist, ein Okular mit längerer Brennweite mit Barlow-Linse zu verwenden. Wenn ein Stern scharf eingestellt ist, sollte er wie ein scharfer Lichtpunkt aussehen. Wenn er bei scharfer Einstellung eine unregelmäßige Form hat oder am Rande ein flackernder Lichtschein erscheint, bedeutet das, dass Ihre Spiegel...
- Page 49 Vergrößerung des jeweiligen Okulars. Eine Barlow-Linse ist eine negative Linse, die die Brennweite eines Teleskops erhöht. Die 2x Omni hat eine 1,25 Zoll Steckhülse, eine Länge von unter 76 mm (3 Zoll) und ein Gewicht von nur 113 g (4 oz.).
-
Page 50: Technische Daten Für Powerseeker
71 cm (28 Zoll) 76 cm (30 Zoll) 66 cm (26 Zoll) Gewicht des Teleskops 1,5 lbs. (0,7 kg) 2,0 lbs. (0,9 kg) 6 lbs (2,7 kg) 8,5 lbs. (3,9 kg) Hinweis: Die technischen Daten können ohne Mitteilung oder Verpflichtung geändert werden. - Page 51 ® ® ● º ● º ● º ● º ● ● º º ● ● º º...
- Page 52 Cómo colocar el tubo del telescopio en el montaje ................7 Cómo mover el telescopio manualmente....................8 Instalación de la lente a 90º y el ocular (refractor) – 60AZ..............8 Instalación de la lente a 90º y el ocular (refractor) – 50AZ..............8 Instalación del ocular en el telescopio newtoniano ................
-
Page 53: Ensamblaje
Alt-AZ (el altacimutal es el modelo más simple de montaje con dos movimientos, uno de altitud de arriba y abajo y otro acimutal de lado a lado), refractor de 50 mm, 60 mm y de 70 mm, y newtoniano de 76 mm. - Page 54 Figura 1-1 Refractor PowerSeeker 60AZ (PowerSeeker 50AZ y PowerSeeker 70AZ Similar) Objetivo Ensamblaje de la barra de movimiento lento de la altura (no incluido en 50AZ) Tubo óptico del telescopio Bandeja de accesorios Telescopio buscador Trípode Ocular Bloqueador acimutal (no incluido en 50AZ) Lente a 90º...
- Page 55 Figura 1-2 PowerSeeker 76AZ Newtoniano Telescopio buscador Bloqueador acimutal Ocular Bandeja de accesorios Tornillos de ajuste de la colimación (en la Trípode parte posterior) Tubo óptico del telescopio Montaje Alt-Az Espejo principal Bloqueador de altura Ensamblaje de la barra de movimiento Botón de enfoque...
-
Page 56: Cómo Ensamblar El Trípode
5. A este punto el trípode está completamente ensamblado (Figura 2-4). 6. Ya puede extender las patas del trípode hasta la altura deseada. En el nivel más bajo, la altura es de 69 cm (27 pulg.) y se extiende 119 cm (47 pulg.). Los botones de la altura en la parte inferior de cada pata (Figura 2-5) se desbloquean al girarlos hacia la izquierda y tirando de las patas hacia afuera hasta conseguir la altura deseada;... -
Page 57: Cómo Colocar El Tubo Del Telescopio En El Montaje
óptico esté alineado con los orificios de la cabeza del soporte (vea la Figura 2-11). 3. Introduzca el botón de bloqueo de la altura (vea el centro de la Figura 2-10) por el cabezal del soporte y la plataforma del tubo óptico (asegúrese de que el orificio no esté... - Page 58 (con el telescopio buscador) y después bloquear los controles. Para ajustar mejor la altura, gire el aro estriado de la barra de movimiento lento de la altura (cuando el bloqueador de la altura está apretado) en cualquier dirección (vea la Figura 2-9).
-
Page 59: Instalación Del Ocular En El Telescopio Newtoniano
A continuación, introduzca un ocular en la lente Barlow para realizar la visualización. También puede introducir la lente a 90º en la Barlow y después utilizar un ocular en la lente a 90º pero quizás no pueda entonces enfocar con todos los oculares. -
Page 60: Instalación Del Telescopio Buscador
ó Siga las siguientes instrucciones para alinear el telescopio buscador: 1. Ubique un objeto distante durante el día y céntrelo en un ocular de baja potencia (20 mm) en el telescopio principal. 2. Mire por el telescopio buscador (el extremo del ocular del buscador) y fíjese en la posición del mismo objeto. - Page 61 índice diferente de refracción que permite un enfoque en el mismo punto de dos longitudes diferentes de onda de la luz. La mayoría de las lentes de dos elementos, por lo general hechas de vidrio con y sin plomo, se corrigen para la luz roja y verde.
-
Page 62: Orientación De Imágenes
(el PowerSeeker 60AZ de este ejemplo tiene una distancia focal de 700 mm) por la del ocular de 20 mm. El resultado de dividir 700 entre 20 es un aumento de 35 en potencia. -
Page 63: Cómo Se Determina El Campo Visual
Al utilizar el ocular de 4 mm junto con la lente Barlow 3x obtendrá... -
Page 64: El Sistema De Coordenadas De Los Cuerpos Celestes
Cada línea de longitud está a una hora de la siguiente. Dado que la Tierra rota una vez cada 24 horas, hay 24 líneas en total. Como resultado de esto, las coordenadas de A.R. -
Page 65: Movimiento De Las Estrellas
Usted nunca va a poder ver que las estrellas completen un círculo, porque la luz solar durante el día supera la luz de las estrellas. Sin embargo, se puede ver parte de este movimiento circular de las estrellas en esta región del firmamento colocando una cámara en un trípode y abriendo el obturador por un par de horas. -
Page 66: Observación De La Luna
Para observar el Sol, utilice un filtro solar apropiado que reduzca la intensidad de la luz y así protegerse. Con un filtro podrá apreciar las manchas solares y su movimiento por el disco y las fáculas solares, las cuales son unas manchas brillantes que se ven cerca del borde del Sol. -
Page 67: Observación De Cuerpos Celestes En El Cielo Profundo
3. Muévase hacia el noroeste unos 7º aproximadamente. Ahí encontrará dos estrellas de igual brillo: Delta ( ) y Pi ( ) Andrómeda (unos 3º de distancia entre sí). 4. Continúe en la misma dirección otros 8º. Ahí encontrará dos estrellas: Beta ( ) y Mu ( ) Andrómeda (también unos 3º entre sí). - Page 68 Nebulosa del Anillo, céntrela en su campo visual y después mire hacia su lateral. Esto causa que la luz del objeto que se está mirando vaya a los bastoncillos de los ojos que son sensibles al negro y blanco en vez de a los conos que son sensibles al color.
-
Page 69: Condiciones Para La Observación
Estas perturbaciones atmosféricas varían de vez en cuando y de un lugar a otro. El tamaño de las “parcelas de aire” comparadas a su apertura determina la calidad de la “visión”. Bajo buenas condiciones de “visión”, se pueden apreciar los detalles mínimos en los planetas más brillantes, como Júpiter y Marte, y las estrellas se ven como imágenes perfectas. -
Page 70: Fotografía De Corta Exposición Con Resultados De Primera Calidad
Cámara SLR de 35 mm: Tendrá que quitar las lentes de la cámara y conectar un aro T para la marca específica de la cámara. Después necesitará un adaptador en T (Nº 93625) para conectar un extremo al aro T y el otro al tubo de enfoque del telescopio. -
Page 71: Cuidado Y Limpieza De Las Lentes Ópticas
ó Limpie la lente del objetivo o el espejo principal (según el tipo de telescopio que tenga) de vez en cuando para que no acumule polvo o humedad Tenga cuidado al limpiar cualquier instrumento para no dañar el sistema óptico. - Page 72 El telescopio deberá configurarse de noche y se deberá estudiar la imagen de una estrella a una potencia de media a alta (de 30 a 60 de potencia por pulgada de apertura).
- Page 73 Anote la dirección donde la luz parece brillar. Por ejemplo, si la luz parece brillar en la posición de las 3 en un reloj en el campo visual, entonces deberá mover el tornillo o una combinación de tornillos de colimación según sea necesario para mover la imagen de la estrella hacia la dirección del brote de luz.
- Page 74 Una lente Barlow es una lente negativa que aumenta la distancia focal de un telescopio. El Omni 2x es un tambor de 3,18 cm (1,25 pulg.), mide menos de 76 mm (3 pulg.) de largo y pesa sólo 113gr (4 onzas).
-
Page 75: Especificaciones Del Powerseeker
Con 12 mm (150x) Con 4 mm (450x) Con 4 mm (525x) Con 4 mm (525x) Con 4 mm (525x) Campo visual angular con ocular estándar de 20 mm 1,7° 1,4° 1,4° 1,4° Campo visual lineal con ocular de 20 mm (pies/1.000... - Page 76 ® é é ® é é ’ ’ ● ● ● ● ● ● ● ●...
- Page 77 Fixation du tube du télescope sur la monture ..................7 Déplacement manuel du télescope......................8 Installation du renvoi à 90º et des oculaires (lunette) – 60AZ.............. 8 Installation du renvoi à 90º et des oculaires (lunette) – 50AZ.............. 8 Installation des oculaires sur les newtoniens ..................9 Installation et utilisation des lentilles de Barlow..................
- Page 78 – altitude (haut et bas) et azimut (mouvement latéral)) — lunette 50 mm, lunette 60 mm, lunette 70 mm et newtonien 76 mm. La série PowerSeeker est fabriquée à partir de matériaux de qualité...
- Page 79 Figure 1-1 Lunette astronomique PowerSeeker 60AZ (Similaire au PowerSeeker 50AZ et PowerSeeker 70AZ) Objectif Tige de contrôle lent de l’altitude (non sur le 50AZ) Tube optique du télescope Tablette à accessoires Chercheur Trépied Oculaire Verrouillage de l’azimut (non sur le 50AZ) Redresseur à...
- Page 80 Figure 1-2 Newtonien PowerSeeker 76AZ Chercheur Manette de verrouillage de l’azimut Oculaire Tablette à accessoires Vis de réglage de la collimation (sur l’arrière) Trépied Tube optique du télescope Monture Alt-Az Miroir primaire Verrouillage de l’altitude Tige de contrôle lent de l’altitude...
- Page 81 Figure 2-2). 4. Une vis est fixée sous la tablette à accessoires, au centre (sauf pour le 50AZ). La vis se fixe dans l’orifice fileté situé au centre du support central du trépied en la tournant dans le sens des aiguilles d’une montre - remarque : Tirez légèrement sur le support central du trépied pour pouvoir le fixer facilement.
-
Page 82: Fixation Du Tube Du Télescope Sur La Monture
– voir Figure 2-11. 3. Insérez le bouton de blocage de l’altitude (voir au centre de la Figure 2-10) à travers la tête de la monture et la plate- forme du tube optique (vérifiez que l’orifice est parfaitement dégagé... - Page 83 Desserrez ces commandes pour trouver des objets plus facilement (avec le chercheur), puis resserrez-les. Pour effectuer des réglages précis de l’altitude, tournez la bague moletée de la tige de contrôle lent de l’altitude (une fois le blocage de l’altitude effectué) dans l’une ou l’autre des directions – voir Figure 2-9.
- Page 84 Insérez ensuite un oculaire dans la lentille de Barlow avant toute observation. Vous pouvez aussi insérer le renvoi à 90° dans la lentille de Barlow et utiliser un oculaire dans le renvoi, mais vous ne parviendrez peut- être pas à...
-
Page 85: Alignement Du Chercheur
Retirez les caches de la lentille des deux extrémités du chercheur. Procédez comme suit pour aligner le chercheur : 1. Repérez en plein jour un objet éloigné et centrez-le dans l’un des oculaires de faible puissance (20 mm) du télescope principal. - Page 86 Un réflecteur newtonien utilise un seul miroir concave comme miroir primaire. La lumière pénètre dans le tube pour atteindre le miroir situé en bout. La courbure du miroir renvoie alors la lumière vers l’avant du tube sur un seul point, le point focal. Étant donné que si vous mettiez la tête devant le télescope pour observer une image avec un oculaire, le réflecteur ne fonctionnerait pas, un miroir plan appelé...
-
Page 87: Orientation De L'image
éloigné de vous que celui que vous êtes en train d’observer. Tournez le bouton dans le sens inverse pour faire la mise au point sur un objet plus proche de vous que celui que vous êtes en train d’observer. -
Page 88: Établissement Du Champ De Vision
35. Le résultat est un champ de vision actuel (réel) de 1,4 Pour convertir des degrés en pieds à 1000 verges, ce qui est plus utile pour des observations terrestres, il suffit de multiplier le champ de vision par 52,5. En continuant avec notre exemple, multipliez le champ angulaire de 1,4 par 52,5. -
Page 89: Le Système De Coordonnées Célestes
Chaque ligne de longitude est placée à une heure de la suivante. Étant donné que la Terre accomplit une révolution en 24 heures, il existe un total de 24 lignes. - Page 90 La taille de la trajectoire circulaire d’une étoile dépend de sa position dans le ciel. Les étoiles situées à proximité de l’équateur céleste forment les cercles les plus larges se levant à l’est et se couchant à l’ouest. En se déplaçant vers le pôle nord céleste, le point autour duquel les étoiles de l’hémisphère nord semblent tourner, ces cercles deviennent plus petits.
-
Page 91: Observation De La Lune
Soleil. Les moments les plus propices à l’observation du Soleil sont le début de la matinée et la fin de l’après-midi, lorsque la température se rafraîchit. -
Page 92: Observation D'objets Du Ciel Profond
Le Star Hopping (cheminement visuel) L’un des moyens les plus pratiques pour trouver des objets du ciel profond consiste à faire du « star hopping ». Le Star Hopping s’effectue généralement en vous servant d’étoiles brillantes pour vous « guider » vers un objet. Pour réussir ce Star Hopping , il est utile de connaître le champ de vision de votre télescope. - Page 93 à la couleur. (N’oubliez pas qu’en observant des objets pâles, il est important de se placer dans un endroit sombre, éloigné des lumières des rues et de la ville. L’œil nécessite en moyenne 20 minutes pour s’adapter complètement à...
-
Page 94: Conditions De Visibilité
Luminosité du ciel La luminosité générale du ciel, due à la Lune, aux aurores, à la luminance naturelle du ciel et à la pollution lumineuse affecte grandement la transparence. Tandis que ces phénomènes n’affectent pas la visibilité des étoiles et planètes les plus brillantes, les ciels lumineux réduisent le contraste des nébuleuses étendues qui deviennent difficiles, sinon impossibles à... -
Page 95: Photographie Au Foyer Primaire Et Courte Exposition
Vous pouvez immortaliser ainsi des panoramas variés, la faune et la flore et quasiment tout ce qui vous intéresse. Il vous faudra expérimenter avec la mise au point, les vitesses, etc., pour parvenir à la meilleure image souhaitée. Vous pouvez adapter votre appareil photo en suivant les... - Page 96 Vous regarderez dans le dispositif de mise au point le reflet du miroir secondaire projeté par le miroir primaire. Au cours de cette étape, ignorez le reflet du contour du miroir primaire.
- Page 97 Alignement du miroir primaire Vous devez ensuite régler les vis du miroir primaire pour centrer à nouveau le reflet du petit miroir secondaire, afin que le contour du miroir se détache sur le miroir primaire. Lorsque vous regardez dans le dispositif de mise au point, les contours des miroirs doivent avoir un aspect concentrique.
- Page 98 Après avoir centré l’étoile Polaire ou une étoile brillante dans le champ de vision, faites la mise au point avec l’oculaire standard ou votre oculaire le plus puissant, c'est-à-dire celui qui a la plus petite distance focale, soit 6 mm ou 4 mm par exemple.
- Page 99 Une lentille de Barlow est une lentille négative qui augmente la distance focale d’un télescope. L’Omni 2x est un barillet de 1,25 po (31 mm), de moins de 3 po (76 mm) de long et ne pesant que 113 g (4 oz).
-
Page 100: Spécifications Du Powerseeker
76 cm (30 po) 66 cm (26 po) Poids du télescope 0,7 kg (1,5 pd) 0,9 kg (2 pd) 2,7 kg (6 pd) 3,9 kg (8,5 pd) Remarque : Les spécifications sont sujettes à des changements sans notification ou obligation. - Page 101 ® ® ● ● ● ● ● ● ● ●...
- Page 102 Condizioni di visibilità ........................19 ASTROFOTOGRAFIA........................... 20 Fotografia a fuoco primario con a breve tempo di esposizione............20 Fotografia planetaria e lunare con speciali dispositivi per la creazione di immagini......20 Creazione di immagini CCD per oggetti del cielo profondo............... 20 Fotografia terrestre..........................20 MANUTENZIONE DEL TELESCOPIO....................
- Page 103 50 mm, uno da 60 mm ed uno da 70 mm, e un telescopio di Newton da 76 mm. I telescopi della serie PowerSeeker sono realizzati con materiali della più...
- Page 104 Figura 1-1 Telescopio rifrattore PowerSeeker 60AZ (PowerSeeker 50AZ e PowerSeeker 70AZ simile) Lente dell’obiettivo Gruppo barraasta per movimento lento verticale (altezza) in elevazione (non sul 50AZ) Tubo ottico del telescopio Vassoio portaccessori Cannocchiale cercatore Treppiedi Oculare Blocco di azimut (non sul 50AZ)
- Page 105 Figura 1-2 Telescopio di Newton PowerSeeker 76AZ Cannocchiale cercatore Blocco di azimut Oculare Vassoio portaccessori Viti di regolazione della collimazione (parte posteriore) Treppiedi Tubo ottico del telescopio Montatura altazimutale Specchio primario Blocco dell’altezza Gruppo barra per movimento lento verticale (altezza)
-
Page 106: Approntamento Del Treppiedi
Questa sezione descrive le istruzioni di assemblaggio del telescopio PowerSeeker. Il telescopio deve essere approntato per la prima volta al chiuso, in modo che sia più facile identificare le sue varie parti e imparare la corretta procedura di assemblaggio prima di avventurarsi all'aperto. - Page 107 Il tubo ottico del telescopio si collega alla montatura altazimutale con il gruppo barra per movimento lento verticale e con le rispettive manopole (per i modelli 60AZ, 70AZ e 76AZ). Il modello 50AZ si collega direttamente alla testa della montatura altazimutale.
- Page 108 La montatura altazimutale del PowerSeeker è facile da spostare in qualsiasi posizione la si voglia puntare. Per i modelli 60AZ, 70AZ e 76AZ il movimento verticale (altezza) è controllato dalla manopola di bloccaggio dell’altezza (Figura 2-12). Il movimento laterale (azimut) è controllato dal blocco di azimut (Figura 2-12). Quando entrambe le manopole sono allentate è...
-
Page 109: Installazione Dell'oculare Sul Telescopio Di Newton
Per eseguire la visualizzazione si inserisce quindi un oculare nella lente di Barlow. Si può anche inserire il diagonale nella lente di Barlow e poi usare un oculare nel diagonale, ma così facendo si potrebbe non essere in grado di ottenere la focalizzazione con tutti gli oculari. -
Page 110: Installazione Del Cannocchiale Cercatore
Per allineare il cannocchiale cercatore, attenersi alla seguente procedura: 1. Di giorno, individuare un oggetto distante e centrarlo con un oculare a bassa potenza (20 mm) nel telescopio principale. 2. Guardare attraverso il cannocchiale cercatore (dalla parte del cannocchiale cercatore con l’oculare) e prendere nota della posizione dello stesso oggetto. - Page 111 Il telescopio è uno strumento che raccoglie e mette a fuoco la luce. La natura del modello ottico usato determina il modo in cui la luce viene focalizzata. Alcuni telescopi, noti come rifrattori, usano lenti; altri, noti come riflettori (di Newton), usano specchi.
-
Page 112: Orientamento Dell'immagine
Figura 3-3 Per mettere a fuoco il telescopio rifrattore o di Newton, basta girare la manopola di messa a fuoco situata subito sotto il porta oculare (vedere le Figure 2-13, 2-14 e 2-15). Ruotando la manopola in senso orario si mette a fuoco un oggetto più lontano di quello che si sta attualmente osservando. -
Page 113: Determinazione Del Campo Visivo
Usando l’oculare da 4 mm con la lente di Barlow da 3x si ottiene una potenza estremamente alta che può... -
Page 114: Il Sistema Di Coordinate Celesti
Le linee vengono suddivise in gradi, minuti di arco e secondi di arco. Le letture di declinazione a sud dell’equatore riportano il segno meno (-) davanti alla coordinata, mentre quelle a nord dell’equatore celeste non hanno alcuna designazione davanti ad esse, oppure presentano un segno più... -
Page 115: Movimento Delle Stelle
Il movimento quotidiano del sole attraverso il cielo è noto persino all’osservatore più distratto. Questo apparente percorso non è dovuto al movimento del sole, come credevano i primi astronomi, bensì è il risultato della rotazione della Terra. La rotazione della Terra causa anche un percorso nelle stelle, facendo descrivere loro un grande cerchio mentre la Terra completa una rotazione. -
Page 116: Osservazione Della Luna
Per osservare il sole in modo sicuro, usare un appropriato filtro solare che riduca l’intensità della sua luce. Con un filtro, si possono vedere le macchie solari mentre si spostano attraverso il disco solare, e le facole, che sono zone luminose visibili vicino ai margini del sole. -
Page 117: Osservazione Di Oggetti Del Cielo Profondo
“star hopping”, è utile conoscere il campo visivo del proprio telescopio. Se si sta usando l’oculare standard da 20 mm con il telescopio PowerSeeker, il campo visivo è all’incirca di 1,4º. Se si conosce un oggetto che si trova ad una distanza di 3º... - Page 118 È necessario un po’ di esercizio per acquistare familiarità con il metodo dello “star hopping”, e gli oggetti che non hanno nelle loro vicinanze delle stelle visibili ad occhio nudo saranno difficili da trovare. Uno di questi oggetti è denominato M57 (Figura 5-2), la famosa “Ring Nebula”...
-
Page 119: Condizioni Di Visibilità
Le condizioni di visibilità si riferiscono alla stabilità dell’atmosfera, e influenzano direttamente la quantità di piccoli dettagli visibili negli oggetti estesi. L’aria nella nostra atmosfera agisce come una lente, che deflette e deforma i raggi di luce in arrivo. La curvatura dipende dalla densità dell’aria. Strati caratterizzati da varie temperature hanno diverse densità e, di conseguenza, la luce viene curvata in modo diverso. -
Page 120: Fotografia A Fuoco Primario Con A Breve Tempo Di Esposizione
Poi occorre un adattatore a T (N. di catalogo 93625) per il collegamento da un lato all’anello a T e dall’altro al tubo di messa a fuoco del telescopio. Il telescopio è diventato ora la lente della fotocamera. -
Page 121: Cura E Pulizia Dell'ottica
Così facendo si eliminerà l’umidità dal tubo del telescopio. Per ridurre al minimo l’esigenza di pulire il telescopio, rimettere al loro posto tutti i coperchi delle lenti non appena si finisce di usare il dispositivo. - Page 122 (Polaris). La si può trovare nel cielo settentrionale, ad una distanza sopra l’orizzonte pari alla propria latitudine. La stella polare è anche la stella terminale nel “manico” del Piccolo Carro, o Orsa Minore. Non è la stella più luminosa nel cielo, e potrebbe persino apparire tenue e indistinta, a seconda delle condizioni del cielo sovrastante la propria posizione l’emisfero meridionale, puntare il telescopio sulla Sigma Octantis.
- Page 123 Tenendo la stella Polaris o un’altra stella luminosa centrata entro il campo visivo, mettere a fuoco con l’oculare standard o con l’oculare della massima potenza, cioè quello dalla lunghezza focale minima in mm, come un 6 mm o un 4 mm. Un’altra opzione è...
- Page 124 Hanno un design di lente a 4 elementi, con le seguenti lunghezze focali: 4 mm, 6 mm, 9 mm, 12,5 mm, 15 mm, 20 mm, 25 mm, 32 mm e 40 mm – tutte in cilindri da 1,25 pollici.
-
Page 125: Dati Tecnici Del Powerseeker
28 pollici (71 cm) 30 pollici (76 cm) 26 pollici (66 cm) Peso del telescopio 1,5 libbre (0,7 kg) 2,0 libbre (0,9 kg) 6 libbre (2,7 kg) 8,5 libbre (3,9 kg) Nota: le specifiche tecniche sono soggette a cambiamenti senza obbligo di notifica. - Page 126 (Produkte oder Anleitung können ohne Mitteilung oder Verpflichtung geändert werden.) (Los productos o instrucciones pueden cambiar sin notificación u obligación). (Les produits ou instructions peuvent changer sans notification ou obligation). (I prodotti e le istruzioni sono soggetti a cambiamenti senza obbligo di notifica). Item # 21041-INST Printed in China Artikel-Nr.
Need help?
Do you have a question about the PowerSeeker 60AZ and is the answer not in the manual?
Questions and answers