Table of Contents
Advertisement
Advertisement
Table of Contents

Subscribe to Our Youtube Channel
Related Manuals for Citizen u680


Summary of Contents for Citizen u680
- Page 1 取扱説明書...
- Page 2 Thank you for your purchase of this Citizen watch. Before using the watch, read this instruction manual carefully to ensure correct use. After reading, be sure to store this manual in a safe place should it be needed for future reference.
- Page 3 Safety precautions ( IMPORTAMT ) This manual contains the following instructions that should be strictly followed at all times to prevent injury to yourself and other persons as well as damage to property. Safety advisories are categorized and depicted in this manual as follows: DANGER Highly likely to cause death or serious injury WARNING...
- Page 4 We recommend seeking the assistance of an experienced watch technician for sizing of your watch. If adjustment is not done correctly, the bracelet may unexpectedly become detached leading to loss of your watch or injury. Consult your nearest authorized Citizen Service Center.
-
Page 5: Radio Controlled Watch
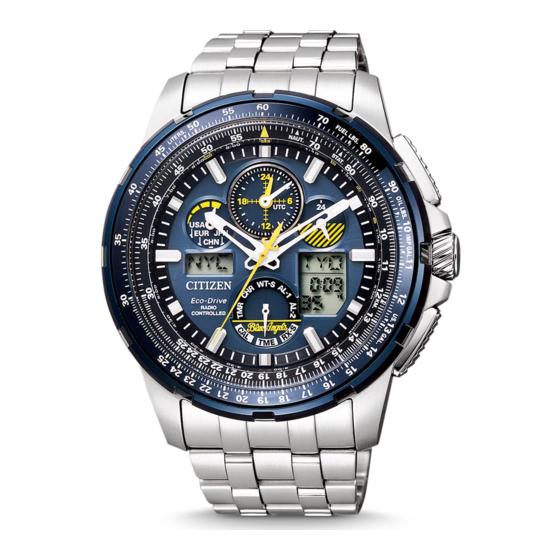
■ World Time Eco-Drive Radio Controlled Watch ■ This watch is a radio controlled watch that receives standard time radio waves broadcast from Japan, the USA, Europe (Germany) and China in order to correct the time and date. The radio controlled watch has no effect on the human body or medical equipment. ■... - Page 6 Part Names (1) UTC hour hand UTC minute hand Charge level indicator/ Home time minute radio wave reception hand indicator Button (B) Home time hour hand 24-hour hand Digital display 2 Crown (Displays the home city) Crown for turning Button (A) the outside scale Digital display 1 (Displays world city/...
- Page 7 Part Names (2): Digital Displays [Digital display 2] [Digital display 1] Home city name World city name Chronograph measurement mark Insufficient charge Timer measurement mark warning mark Alarm setting mark World city time Daylight saving time setting Hour/minute/second mark Morning: A Afternoon: P Note: To assist in the explanation, all parts of the digital display are shown in the illustration.
- Page 8 Part Names (3): Radio Wave Reception Display H, M, L: Reception level/ NO: Signal reception failed RX: Reception in progress reception status Modes where reception is possible: CAL, TME and RX-S JPN: JJY (Japan) USA: WWVB (USA) EUR: DCF77 (Germany) CHN: BPC (China)
-
Page 9: Table Of Contents
Table of Contents 1. Your Watch ....................117 2. Before Use ....................120 • Checking the Reference Position ............122 3. Basic Watch Operations ............... 124 Radio Signal Reception 4. Radio Signal Reception................. 126 5. Poor Reception Areas ................130 6. Display during Reception ..............131 7. - Page 10 Operations in Each Mode 10. Changing Mode ..................142 11. Using Home Time and World Time............144 12. Using Daylight Saving Time ..............146 13. Setting the Time (TME) ................147 14. Setting the Calendar (CAL) ..............151 15. Using the Timer (TMR) ................154 16.
- Page 11 24. Characteristics of the Eco-Drive Watch ..........178 A. Power Saving Function ..............180 B. Insufficient Charge Warning Function ..........182 C. Overcharging Prevention Function ..........183 D. Guide to Charging Time ..............184 E. Charge Level Display ................ 186 F.
-
Page 12: Your Watch
■ 1. Your Watch <Radio Signal Reception Function> This watch is a radio controlled watch, which receives the standard time radio waves that are broadcast from radio wave transmitters in four regions, Japan, the USA, Europe (Germany) and China, and uses these waves to automatically correct the time and date. P. - Page 13 <Solar Power Function> This is a multi-functional Eco-Drive watch, which is equipped with a solar power function for powering the watch by converting light energy into electric energy. Charge level display function: This function displays the charge level in four ◎...
- Page 14 The watch integrates three functions, a JIS Type 1 magnetic resistance watch* function, shock detection function, and Automatic hand correction function, in order to prevent hand misalignment caused by external factors such as impacts or magnetism. * JIS: Japanese Industrial Standards A JIS Type-1 antimagnetic watch (able to withstand a direct-current field of 4,800 A/m) maintains its time functionality as close as 5 cm away from devices that generate a magnetic field during normal use.
-
Page 15: Before Use
2. Before Use ■ NO: Signal RX: Reception Reception level/ reception failed in progress Check the movement of reception status the second hand. H: High M: Middle The second hand is L: Low moving at 1-second intervals. Crown The second hand is moving at 2-second intervals or is stopped. - Page 16 • Press the lower right hand indicates radio wave reception. button (A) at the 4:00 a reception Before Use position. status of NO If you are unable to receive radio waves, please inquire to the Citizen Consumer Help Desk at 0120-78-4807.
-
Page 17: Checking The Reference Position
[Checking the Reference Position] Before using the watch, confirm that the hands are aligned with “0”, similar to when setting weighing scales The reference position may become misaligned when ◎ the watch is exposed to strong magnetism, static electricity or impacts. Even if radio waves are received, the correct time will not be indicated unless the watch hands are aligned to the correct reference position. - Page 18 1. Pull the crown out to position 1 and turn to align UTC hour and the mode hand with CHR (chronograph mode). minute hands 2. Pull out the crown to position 2. Hour, minute and • The hands will move rapidly, stopping at the second hands reference position recorded in the watch memory.
-
Page 19: Basic Watch Operations
3. Basic Watch Operations ■ * The watch receives the radio wave from the radio wave transmitter located in the home city’s region. Home time Home time Check the Set the home city. hour hand minute hand charge If the city in which you are situated is displayed in level. - Page 20 Set the home time. Set digital display 1. If the home time is correct, The world time or date can be displayed on digital display 1. Also, the mode can be switched in (1) Set the time manually order to use the alarm, timer or (2) Set the time by receiving the chronograph.
-
Page 21: Radio Signal Reception
4. Radio Signal Reception ■ Three types of radio signal reception are possible: automatic reception, on demand reception and recovery automatic reception. There are three modes where reception is possible: time (TME), calendar (CAL) and receive set (RX-S). The watch cannot receive signals in any other mode. Display the home city in digital display 2 when receiving the radio wave. - Page 22 Automatic Reception • I t is not necessary to operate buttons during automatic reception. • T he watch will automatically receive the radio wave every day at 2 a.m., 3 a.m. and 4 a.m. • The 4 a.m. reception can be changed to any time of the day. (P.167) • Reception can be set to OFF. (P.167) <Receiving the radio signals> 1. Remove the watch from your wrist and place on a stable surface in a location, such as near a window, from which radio waves can be easily received, pointing the 9:00 side (reception antenna position) in the direction of the radio wave transmitter.
-
Page 23: Manual Reception
On Demand Reception (Manual Reception) • Signals can be received at any time. [Mode hand position <Receiving the radio signals> when receiving] 1. Pull the crown out to position 1 and turn to align the mode hand with the CAL, TME or RX-S position. 2. Return the crown to the normal position. 3. - Page 24 Recovery Automatic Reception (Automatic Reception) • I f the watch stops due to insufficient charging, expose the watch to sunlight to recharge it. When the watch is recharged sufficiently, it will automatically receive the radio wave once. * Regularly charge your radio controlled watch so it does not become insufficiently charged. The radio wave reception can be checked with “Confirming Reception Status”.
-
Page 25: Poor Reception Areas
■ 5. Poor Reception Areas It may not be possible to receive radio waves under environmental conditions where reception is difficult or in areas susceptible to radio noise, such as those shown in the illustrations below. While referring to the reception level display, try to find a location with better reception. ◆... -
Page 26: Display During Reception
■ 6. Display during Reception [Reception in progress] [Reception level] [Reception completed] [Second hand display] Radio wave reception ◆ The second hand moves ◆ When the reception is success- ◆ Second hand moves to RX and indicator from RX to reception ful, the second hand will return stops. -
Page 27: Confirming Reception Status
■ 7. Confirming Reception Status • The result of the radio wave reception can be confirmed. • The daylight saving time setting status of the home city can be confirmed. 1. Pull the crown out to position 1 and set the mode to TME, CAL or RX-S. 2. - Page 28 Reception level Reception level and reception status Radio wave was received or is being received under very good reception conditions. Radio wave was received or is being received under good reception conditions. Radio wave was received or is being received under not very good reception conditions.
-
Page 29: Reception Area Guidelines
■ 8. Reception Area Guidelines This watch can receive standard time radio waves broadcast from Japan (two transmitters), the USA, Europe (Germany) and China. The standard time radio wave to be received can be changed by selecting the city in another region. The maps show the approximate reception areas. - Page 30 JPN: JJY (Japan) Automatically selects one of the two transmitters Fukushima Transmitter: Radius of approximately 1,500 km from the transmitter Kyushu Transmitter: Radius of approximately 2,000 km from the transmitter...
- Page 31 USA: WWVB (USA) Fort Collins: Radius of approximately 3,000 km from the transmitter...
- Page 32 EUR: DCF77 (Germany) Mainflingen: Radius of CHN: BPC (China) Shangqiu, Henan: Radius approximately 1,500 km from the of approximately 1,500 km from the transmitter transmitter...
-
Page 33: World City Display
■ 9. World City Display UTC (Coordinated Universal Time) and 43 cities (or regions) are registered in this watch in advance, and it is also possible to register one additional city. The time of each city can be called up and displayed. •... - Page 34 [Cities and the standard time radio wave assignment] The received standard time radio waves shown in “Table of UTC Time Zones” are assigned one of the following four radio wave transmitters, in accordance with the home city in digital display [Standard time radio wave assignment] JPN : JJY (Japan)
- Page 35 [Table of UTC Time Zones] Set to TME mode and press the upper right button (B) repeatedly while the crown is in position 1 to display in sequence in digital display 1 the table’s city names from top to bottom, and press the lower right button (A) to display in sequence the city names from bottom to top.
- Page 36 • Radio waves are only received from the assigned transmitters. (Example: When TYO is displayed in digital display 2, radio waves other than the Japan radio wave cannot be received.) • You may not be able to pick up the signal in environments where signals cannot reach you. •...
-
Page 37: Changing Mode
■ 10. Changing Mode This watch has eight modes: time (TME), calendar (CAL), timer (TMR), chronograph (CHR), world time set (WT-S), alarm 1 (AL-1), alarm 2 (AL-2) and receive set (RX-S). 1. Pull the crown out to position 1 (mode switching position). •... - Page 38 <Mode names> 【WT-S】 World time set * Crown in position 1 【CHR】 【AL-1】 Chronograph Alarm 1 Turn the Turn the 【TMR】 【AL-2】 crown to crown to Timer Alarm 2 the right the left 【CAL】 【RX-S】 Calendar Receive set 【TME】 Time...
-
Page 39: Using Home Time And World Time
■ 11. Using Home Time and World Time • When going to a country or region in a different time zone when on business or vacation, the destination home time can be easily displayed by switching the home time and world time. * Switching can only be performed during the time mode (TME) or calendar mode (CAL). - Page 40 Example: During time mode (TME) Los Angeles New York Switch Pull the crown out to Button (B) position 1 and press buttons (A) and (B) at the same time. The hands also change at the same time. Button (A) Digital display 2 Digital display 1 [Digital display 2]...
-
Page 41: Using Daylight Saving Time
■ 12. Using Daylight Saving Time [What is daylight saving time?] This is a time system where the clocks are put forward an hour during the summer, when the daylight hours are longer. Whether or not the system is used and the length of use differs between countries and regions. ◎... -
Page 42: Setting The Time (Tme)
■ 13. Setting the Time (TME) (The time is corrected using the digital display) • The time can be set manually in countries or regions where the radio wave cannot be received. • To set the time, call up the city whose time you want to correct in digital display 1. The home time (hour/minute/second hands) cannot be corrected directly. - Page 43 3. Pull the crown out to position 2 to enter the time correction status. • The second hand will move to the 12:00 position and stop. • The home city display of digital display 2 will go off. • The correction status for the daylight saving time setting is entered and ON or OF flashes.
- Page 44 6. Press the upper right button (B) to enter the hour correction status. • Turn the crown to correct the time. Turn to the right to move forward and to the left to move back. • Turn the crown continuously to move quickly. 7.
- Page 45 • When the time is set for one of the Position 1 cities, the times for all the other cities are also corrected automatically. Button (A)/(B) • Daylight saving time can be set for Button (B) Select the city each city. Position 2 Button (A) Daylight saving...
-
Page 46: Setting The Calendar (Cal)
■ 14. Setting the Calendar (CAL) (The date is corrected using the digital display) • The date can be set manually in countries or regions where the radio wave cannot be received. • In the same way as for “Setting the Time”, to adjust the date of the home city, call up the city whose date you want to correct in digital display 1. - Page 47 4. Each time the upper right button (B) is pressed, the correction location changes. The new correction location will begin flashing. • The correction location changes in the following sequence: month → date → year. 5. Select the correction location and turn the crown to correct the time. Turn to the right to move forward and to the left to move back.
- Page 48 <Date correction status> Button (B) Position 1 Button (A) / (B) Select the city Position 2 Correct the month Button (A) Button (B) Correct the date Correct the year • When the date is set for one of the cities, the dates for all the other cities are also corrected automatically.
-
Page 49: Using The Timer (Tmr)
■ 15. Using the Timer (TMR) • The timer can be set from 1 minute up to 99 minutes, in 1-minute units. After the end of measurement, the time-up tone sounds for about 5 seconds and the watch returns to the timer initial setting status. - Page 50 3. Turn the crown to set the time. • Turn to the right to increase the time and turn to the left decrease the time. • Turn the crown continuously to move quickly. To stop, turn the crown to the left or right. 4.
-
Page 51: Using The Timer
<Using the timer> 1. A confirmation tone will sound each time you press the upper right button (B) to start and stop the measurement. • RUN (run) is displayed in digital display 2 during measurement, and STP (stop) is displayed when the timer is stopped. The measurement mark comes on during measurement. - Page 52 4. When the time is up, END is displayed in digital display 2 and the time-up tone sounds for 5 seconds. • To stop the time-up tone, press button (A) or (B). • RES is displayed on digital display 2 and the timer returns to the initial set time. * The measurement continues even if the watch is switched to a different mode during measurement.
-
Page 53: Using The Chronograph (Chr)
■ 16. Using the Chronograph (CHR) • The chronograph can display times up to 23 hours 59 minutes and 59.99 seconds. • After it exceeds 24 hours, the measurement stops and the chronograph returns automatically to the reset status. • Radio waves cannot be received during chronograph Button (B) measurement. - Page 54 • While the chronograph is being operated, the display of digital display 2 changes as follows. (Reset) (During measurement) Button (B) Button (A) (Measurement stopped) (Split display) * If there are no button (A) or (B) operations for 10 seconds, the watch returns to the measurement status.
-
Page 55: Using The World Time Setting (Wt-S)
■ 17. Using the World Time Setting (WT-S) • Daylight saving time can be set for each city. (Cannot be set for UTC) • Whether show or hide each city (44 cities other than UTC) can be set. * Using this function, it is easy to call up and display the cities from each mode. (Zone set function) * If a city is set to not display, it cannot be displayed from other modes. - Page 56 3. Press the lower right button (A) to switch between daylight saving time ON (set) and OF (canceled). • When daylight saving time is set, the time will move forward by one hour. • Turn the crown to set the daylight saving time for other cities. Turn to the right to change in the direction of cities with more of a time zone, and turn to the left to change in the direction of cities with less of a time zone.
- Page 57 <Setting the desired time zone> • Any time zone can be set for HOM (user setting city), in intervals of 15 minutes from the UTC time. (Range of -12 to +14 hours from UTC) • The radio wave received at HOM will be from the transmitter assigned to the city that has the most similar time zone with UTC.
- Page 58 4. Press the upper right button (B) twice to enter the [Time zone setting status] time zone setting status. • Each time you press the upper right button (B), the “Daylight saving time ON/OF”, “City display SET/ OFF” and “Time zone setting” correction location 0:00 flashes changes.
-
Page 59: Using The World Time Alarm (Al-1 And 2)
■ 18. Using the World Time Alarm (AL-1 and 2) • An alarm can be set for the set city time. • Once a day, the alarm will sound for 15 seconds when it reaches the set time. To stop the alarm, press button (A) or (B). - Page 60 • The correction location changes in the following sequence: Alarm ON/OF → City name → Alarm: Hours → Alarm: Minutes. • City name: Turn the crown to select the city. • Alarm hours/minutes: Turn the crown to the right to move the time forward and to the left to move the time back.
-
Page 61: Using The Receive Setting (Rx-S)
■ 19. Using the Receive Setting (RX-S) [Daylight saving time reception setting] • Select whether to update the time with the daylight saving time from the received radio wave. Refer to “Using Daylight Saving Time” (P.146) for details on daylight saving time. AU (Auto): The time is updated with the daylight saving time from the received radio wave. - Page 62 [Automatic reception setting] • Set the operating conditions for automatic reception. MAN (Manual): The 4 a.m. automatic reception can be changed to any time of the day for the home time. * The time can be changed in 1-hour units. It cannot be set to 2 a.m. or 3 a.m. OFF (Off): Automatic reception is not performed.
-
Page 63: Daylight Saving Time
<Setting procedure> 1. Pull the crown out to position 1 and turn to align the mode hand with RX-S (receive set mode). 2. Pull the crown out to position 2 to enter the daylight saving time (SMT) reception setting status. •... - Page 64 4. Press the upper right button (B) to enter the automatic reception setting status. • The set automatic reception status flashes. • AUT, MAN and OFF flash and the watch enters the correction status. 5. Press the lower right button (A) to set the automatic reception operating condition to MAN.
-
Page 65: Led Lights
■ 20. LED Lights • Press the upper right button (B) while the crown is in the normal position to turn on the LED lights of digital displays 1 and 2 for 2 seconds. However, note that the lights do not come on in the following cases. - Page 66 <Resetting procedure> All parts displayed 1. Pull the crown out to position 1 and turn to align the mode hand with CHR (chronograph mode). [Digital display 2] [Digital display 1] 2. Pull out the crown to position 2. • The hands will rotate rapidly. 3.
-
Page 67: Adjusting The Reference Position
■ 22. Adjusting the Reference Position UTC hour 1. Pull the crown out to position 1 and turn and minute to align the mode hand with CHR. hands 2. Pull the crown out to position 2. The Hour, minute hands will move rapidly and stop at the 24-hour hand and second reference position (12:00 position) - Page 68 4. ① Adjusting the charge level indicator (1) Display CHA in digital display 2. (2) Turn the crown to align the charge level indicator of the watch face with the center of CHN. * Turn the crown continuously to move quickly. To stop, turn the crown to the left or right.
- Page 69 6. ② Adjusting the UTC hands (hour hand and minute hand) (1) Press the upper right button (B) to display UTC in the digital display. (2) Turn the crown to align the UTC hour hand and minute hand with 12:00. •...
- Page 70 8. ④ Adjusting the minute hand (1) Press the upper right button (B) to display MIN in digital display 2. (2) Turn the crown to align the minute hand with 12:00. 9. When the upper right button (B) is pressed for more than 2 seconds after adjusting all the hands to their correct reference positions, (0) is displayed in digital display 2 to show that the reference position adjustment is completed.
-
Page 71: Solar Power Function
■ 23. Solar Power Function This watch uses a rechargeable cell to store electrical energy. When the watch is fully charged, it will run for about 6 months. <Ensuring best operation of the watch> Always store the watch in a bright location for best results. ◆... - Page 72 ◆ Wearing clothes with long sleeves makes it difficult for the watch to get the necessary light, resulting in insufficient charging. We recommended that you charge the watch for a long time in direct sunlight once a month. [Caution] Do not charge on surfaces that can easily become hot, such as a car dashboard.
-
Page 73: Characteristics Of The Eco-Drive Watch
■ 24. Characteristics of the Eco-Drive Watch ◎ When the watch is insufficiently charged, the indication will be changed as follows: [Normal display] [Insufficient charge warning] The watch has been insufficiently charged because the watch face, which contains the solar cell, has not received sufficient light. - Page 74 * 1. When the watch stopped due to insufficient charging • It takes at least 30 minutes to recharge sufficiently to perform recovery automatic reception, even if the watch is being exposed to light. After recovery, refer to “Guide to Charging Time” and sufficiently charge the watch. * 2.
-
Page 75: Power Saving Function
A. Power Saving Function If the watch face is not exposed to light for a long time, the power saving function is activated to minimize the battery consumption. • Power saving 1: When power is not generated for more than 30 consecutive minutes, the digital displays go off to save power. - Page 76 <Canceling the power saving function> The power saving function will be automatically cancelled when the watch face is exposed to light. The power saving function can be cancelled using crown or button operations as well. • When power saving 1 is canceled, the digital display is restored. •...
-
Page 77: Insufficient Charge Warning Function
B. Insufficient Charge Warning Function When the charge level indicator reaches level 0, the second hand’s movement changes from 1-second intervals to 2-second intervals and the mark flashes in digital display 1 to show that the watch is insufficiently charged. The watch will stop due to insufficient charging about 3 2-second days after starting the 2-second interval movement if... -
Page 78: Overcharging Prevention Function
◆ If the charging insufficiency occurs during radio signal reception, the operation will stop automatically, the watch will return to the time before the operation, and 2-second interval movement will begin. Regularly charge your radio controlled watch so it does not become insufficiently charged. -
Page 79: Guide To Charging Time
D. Guide to Charging Time * Below are the approximate times required for charging when exposing the watch dial to light continuously. Please use this table as a reference only. Charging time (approx.) To start working Illuminance To become fully Environment To work for normally when... - Page 80 To work for one day... The charging time to run the watch for one day with normal movement. To become fully charged when the cell is discharged ... The time for full charging after the watch has stopped due to an insufficient charging.
-
Page 81: Charge Level Display
E. Charge Level Display • The charge level (approximate) is displayed in four grades to show how much the rechargeable cell is charged. • The charge level indicator points to the middle of each grade. • Use the charge level display as a guideline when wearing your watch. We recommend that you regularly check the charge level and keep it at level 2 or above. - Page 82 [Caution] When the charge level indicator points at level 0, the rechargeable cell is very low. The second hand moves at 2-second intervals, and the mark flashes in the digital display. After about three days the battery will run out and the watch will stop. Be sure to recharge the watch before this condition is reached.
-
Page 83: Handling Your Solar Powered Watch
F. Handling Your Solar Powered Watch <Always make sure to recharge frequently> ◆ Please note that if you wear long sleeves, the watch may stop as a result of being covered by your sleeve and blocked from the light. ◆ When you take off the watch, try to place it in as bright a location as possible. This will ensure that it willcontinue to run properly. - Page 84 WARNING Handling of Rechargeable Cell ◆ The rechargeable cell should never be removed from the watch. If for any reason it becomes necessary to remove the rechargeable cell from the watch, keep out of the reach of children to prevent accidental swallowing. If the rechargeable cell is accidentally swallowed, consult a doctor immediately.
-
Page 85: Troubleshooting
Troubleshooting <Radio Signal Reception Function> Problem Check Remedy • Is the home city (digital • Check the map and change the setting. display 2) set to the same • Check the map. reception area as your current • Change the setting. location? Radio signals cannot be... - Page 86 Problem Check Remedy • Are there objects nearby that • Avoid objects that block radio signals could block radio signals or or generate noise. Try to receive radio generate noise? signals by pointing the 9:00 position of the watch in the direction of the radio signal transmitter.
- Page 87 Problem Check Remedy • Is the mode hand pointing to • Pull the crown out to position 1 and Radio signals a mode other than TME, CAL set the mode to TME, CAL or RX-S. cannot be or RX-S? received. •...
- Page 88 Problem Check Remedy • Check the reception status. • If the reception status is NO, The time is not change your location and try to correct. receive the radio wave again. “On Demand Reception” • Check whether the daylight • In TME or WT-S mode, select saving time is ON or OF daylight saving time ON or OF (off).
-
Page 89: Eco-Drive
If “ERR” is displayed again, contact the store where you purchased the watch or a Citizen Consumer Help Desk or Customer Support Center. • Did you charge the watch • Charge the watch sufficiently, as The watch does sufficiently in sunlight? indicated in “Guide to Charging Time”. - Page 90 Problem Check Remedy • Is the charge level indicator • Charge the watch sufficiently until the The second hand pointing at level 0? charge level indicator reaches the fully is moving in charged level. 2-second intervals. • This is because the power saving The hands moved mode was canceled when the watch forward quickly at...
-
Page 91: Precautionary Items And Usage Limitation
Precautionary Items and Usage Limitation WARNING Water Resistance • Refer to the watch dial and the case back for the indication of the water resistance of your watch. The following chart provides examples of use for reference to ensure that your watch is used properly. - Page 92 • Upgraded water-resistance for daily use (to 5 atmospheres) means that the watch may be worn while swimming, but is not to worn while skin diving. • Upgraded water-resistance for daily use (to 10/20 atmospheres) means that the watch may be worn while skin diving, but not while scuba or saturated diving using helium gas.
- Page 93 CAUTION To avoid injury • Be particularly careful when wearing your watch while holding a small child, to avoid injury. • Be particularly careful when engaged in strenuous exercise or work, to avoid injury to yourself and others. • Do NOT wear your watch while in a sauna or other location where your watch may become excessively hot, since there is the risk of burns.
- Page 94 • Even if your watch has a high level of water resistance, please be careful of the following. - If your watch is immersed in sea water, rinse thoroughly with fresh water and wipe with a dry cloth. - Do not pour water from a tap directly onto your watch. - Take off your watch before taking a bath.
- Page 95 Consult your nearest authorized Citizen service center. <Temperature> • The watch may stop or the function of the watch may be impaired in extremely high or low temperature.
-
Page 96: Static Electricity
<Strong Shock> • Avoid dropping the watch or subjecting it to other strong impact. It may cause malfunctions and/or performance deterioration as well as damage to the case and bracelet. <Static Electricity> • The integrated circuits (IC) used in quartz watches are sensitive to static electricity. Please note the watch may operate erratically or not at all if exposed to intense static electricity. - Page 97 CAUTION Always Keep Your Watch Clean • Rotate the crown while it is pressed in fully and press the buttons periodically so they do not become stuck due to accumulations of foreign matter. • The case and band of the watch come into direct contact with the skin in the same manner as undergarments.
-
Page 98: Caring For Your Watch
Caring for Your Watch • Wipe any dirt or moisture such as perspiration from the case and crystal with a soft cloth. • For a metallic, plastic or rubber (urethane) watchband, wash any dirt off with water. Remove the small amounts of dirt trapped between the crevices of the metallic band with a soft brush. -
Page 99: Specifications
■ 25. Specifications 1. Cal. No.: U680 2. Type: Combination solar powered watch 3. Time accuracy: Without reception (when watch is not receiving a radio signal) Average monthly deviation: ±15 seconds when used in room temperature (+5°C to +35°C) 4. Acceptable temperature range: 0°C to + 50°C 5. - Page 100 • Daylight saving time on/off • Calendar: Month, date, day of week (perpetual calendar until December 31, 2099) 6. Additional functions • Radio signal reception function (automatic reception, on demand reception, recovery automatic reception) • Radio wave transmitter automatic selection function (only when radio wave from Japan) •...
- Page 101 • Time zone set by user • JIS Type-1 antimagnetic watch • Zone set function (city name display SET/OFF) • Impact detection function • Home time (analog) and world time (digital) • Automatic Hand correction switching function function • LED lights •...
- Page 102 7. Operation time: • Time from a full charge until the watch stops without charging :About 3.5 years (when in the power saving mode) :About 6 months (when not in the power saving mode) (The operation time may vary depending on the conditions of use, such as how many times the radio wave is received.) •...
-
Page 103: Warranty And After-Sales Service
Warranty and After-Sales Service <Free guarantee> In the case a malfunction has occurred during the course of normal use while the watch is till under warranty, the watch will be repaired free of charge in accordance with the conditions of the warranty included with this manual. <Stock Period of Repair Parts>... - Page 104 5 years as a guide. <Request to customers> All parts of this watch, except for the band, are to be repaired only at CITIZEN. This is because special technologies and equipment are required to perform repairs,inspections and adjustments. Please make requests for repairs to Customer Support Center when having your watch repaired.
-
Page 105: To Customers With Reception Problems
We offer support for such customers, for example by sending them a map showing the direction of the radio wave transmitter. If you have problems in receiving the radio wave, please contact the Citizen Consumer Help Desk.
Need help?
Do you have a question about the u680 and is the answer not in the manual?
Questions and answers
Почему нет сигнала каждый час CITIZEN PROMASTER JY8078-52