Chapters
Table of Contents

Related Manuals for DeDietrich DOP1180X


Summary of Contents for DeDietrich DOP1180X
- Page 1 FR NSTRUCTIONS D’EMPLOI EN USER MANUEL ES MANUAL DE UTILIZACIÓN PT MANUAL DE UTILIZAÇÃO DE BETRIEBSANLEITUNG Four De Dietrich De Dietrich Oven Horno De Dietrich Forno De Dietrich De Dietrich Ofen...
- Page 2 Chère Cliente, cher Client, Découvrir les produits D D e e D D i i e e t t r r i i c c h h , c’est éprouver des émotions uniques que seuls peuvent produire des objets de valeurs. L’attrait est immédiat dès le premier regard.
-
Page 3: Table Of Contents
SOMMAIRE 1 / DESCRIPTION DE VOTRE APPAREIL • • Présentation de votre four ___________________________________ • • Présentation des commandes ________________________________ 2 / UTILISATION DE VOTRE APPAREIL • • Réalisation d’une cuisson ___________________________________ • • Utilisation du programmateur º Comment régler l’heure _________________________________ •... -
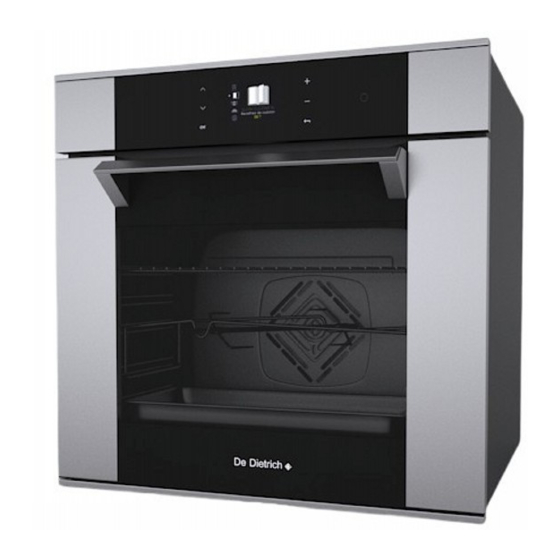
Page 4: Présentation De Votre Four
1 / DESCRIPTION DE VOTRE APPAREIL • • PRESENTATION DE VOTRE FOUR Programmateur Gradins fil Touches de commandes Lampe Touche W W a a k k e e u u p p Trou pour tournebroche... -
Page 5: Présentation Des Commandes
1 / DESCRIPTION DE VOTRE APPAREIL PRESENTATION DES COMMANDES • • Touche de sélection (vers le haut) Afficheur Touche de sélection (vers le bas) Touches de réglages (+ ou -) du temps/température Touche de validation Touche de retour en arrière... -
Page 6: Réalisation D'une Cuisson
2 / UTILISATION DE VOTRE APPAREIL • • REALISATION D’UNE CUISSON Ce four vous permet d’accéder à 4 types de programmations différentes selon le degré de connaissances que vous avez sur la cuisson de votre recette : - Une recette dont vous maitrisez tous les paramètres (vous choisissez vous-même le type de cuis- son, la température et la durée de cuisson) : sélectionnez la f f o o n n c c t t i i o o n n “... -
Page 7: Utilisation Du Programmateur
2 / UTILISATION DE VOTRE APPAREIL • • UTILISATION DU PROGRAMMATEUR • Comment régler l’heure Appuyez sur O O K K (fig.1). Sélectionnez “Informations” par appui sur (fig.2). Fig.1 Validez en appuyant sur O O K K . . - Choisissez la ligne “3. Heure/Date” par appui sur (fig.3). -
Page 8: Utilisation De La Fonction "Expert
2 / UTILISATION DE VOTRE APPAREIL UTILISATION DE LA FONCTION • • “EXPERT” Cette fonction vous permet de régler vous même tous les paramètres de cuisson : température, type de cuisson, durée de cuisson. - Appuyez sur la touche O O K K . Vous accédez à l’écran “E E x x p p e e r r t t ”... - Page 9 2 / UTILISATION DE VOTRE APPAREIL DUREE DE CUISSON ET HEURE • • DE FIN DE CUISSON Vous pouvez entrer la durée de cuisson de votre plat en sélectionnant la case (fig.1) par appui sur Entrez la durée de cuisson par appui sur + (fig.2). - Validez en appuyant sur la touche O O K K .
- Page 10 2 / UTILISATION DE VOTRE APPAREIL UTILISATION DE LA FONCTION • • “OPTION BIOGRIL +” Elle n’est pas active sur les fonctions suivantes : Eco, gril ventilé, maintien au chaud, gril fort et gril moyen. Après avoir réglé une durée de cuisson, en appuyant une fois sur “OK”...
- Page 11 2 / UTILISATION DE VOTRE APPAREIL UTILISATION DE LA FONCTION “MEMOIRES” • • - - M M é é m m o o r r i i s s e e z z u u n n e e c c u u i i s s s s o o n n La fonction “Mémoires”...
- Page 12 MODES DE CUISSONS “EXPERT” C C H H A A L L E E U U R R T T O O U U R R N N A A N N T T E E (température préconisée 1 1 9 9 0 0 ° ° C C mini 35°C maxi 250°C) •La cuisson s’effectue par l’élément chauffant situé...
- Page 13 MODES DE CUISSONS “EXPERT” G G R R I I L L F F O O R R T T + + T T O O U U R R N N E E - - B B R R O O C C H H E E (positions préconisées 4 4 - mini 1 - maxi 4) •La cuisson s’effectue par l’élément supérieur sans brassage d’air.
-
Page 14: Utilisation De La Fonction "Guide Culinaire
2 / UTILISATION DE VOTRE APPAREIL UTILISATION DE LA FONCTION • • “GUIDE CULINAIRE” Cette fonction sélectionne pour vous les paramètres de cuisson appropriés en fonction de l'aliment à préparer et de son poids. - Appuyez sur “OK” (fig.1). Fig.1 Le four propose alors différentes familles d'aliments. - Page 15 MODES DE CUISSONS “GUIDE CULINAIRE” N°4 LEGUMES : N°1 VIANDES BLANCHES : N°1 endives N°1 poulet ( plat) flan de légumes poulet ( tourne-broche) gratin dauphinois canard lasagnes cuisse de dinde poivrons farcis lapin tomates farcies pintade N°5 TARTES/QUICHES : porc échine N°1 quiche...
-
Page 16: Utilisation De La Fonction "I.c.s
2 / UTILISATION DE VOTRE APPAREIL • • UTILISATION DE LA FONCTION “I.C.S.” La fonction ICS (Intelligent Cooking System) saura vous faciliter entièrement la tâche puisque le four calculera automatiquement tous les paramètres de cuisson en fonction du plat sélectionné (température, durée de cuisson, type de cuisson). - Page 17 2 / UTILISATION DE VOTRE APPAREIL • • UTILISATION DE LA FONCTION “I.C.S.” N N . . B B . . : : a a u u c c u u n n p p r r é é c c h h a a u u f f f f a a g g e e n n ' ' e e s s t t n n é é c c e e s s s s a a i i r r e e p p o o u u r r u u t t i i l l i i s s e e r r l l a a f f o o n n c c t t i i o o n n I I C C S S .
- Page 18 GUIDE DES FONCTIONS “I.C.S.” • pizza traiteur fraîches • pizza pâtes prêtes à l’emploi i i z z z z a a • pizza pâtes “maison” • pizza surgelées • quiches fraîches a a r r t t e e s s •...
- Page 19 GUIDE DES FONCTIONS “I.C.S.” • posez-la sur la grille pour obtenir une pâte croustillante (vous pouvez intercaler une feuille de papier cuisson entre la grille et la pizza pour protéger le four des débor- dements de fromage) • posez sur la plaque à patisserie pour obtenir une pâte moëlleuse. •...
- Page 20 CONSEILS ET ASTUCES I.C.S. P P i i z z z z a a Pour éviter au fromage ou à la sauce tomate de couler dans le four, vous pouvez poser une feuille de papier sulfurisé entre la grille et la pizza. T T a a r r t t e e s s / / Q Q u u i i c c h h e e s s : : Evitez les plats en verre, en porcelaine: trop épais ils prolongent le temps de cuisson et le fond de la pâte n’est pas croustillant.
- Page 21 QUELQUES RECETTES I.C.S. P P i i z z z z a a Base: 1 pâte pour pizza *aux légumes : 6 cuillerées à soupe de sauce tomate + 100 g de courgettes coupées en dès + 50 g de poivrons coupés en dés + 50 g d’aubergines en rondelles +2 petites tomates en rondelles + 50 g de gruyère râpé...
- Page 22 QUELQUES RECETTES I.C.S. P P o o i i s s s s o o n n s s Dorade grise au cidre brut: 1 dorade de 1,5 kg 500 g de champignons de Paris. 2 pommes acides. 2 échalotes. 2 cuillerées à...
- Page 23 QUELQUES RECETTES I.C.S. P P e e t t i i t t s s g g â â t t e e a a u u x x a a u u c c h h o o c c o o l l a a t t 12 ramequins individuels en aluminium 60 g de beurre 200 g de chocolat amer (plus de 50% de cacao)
-
Page 24: Utilisation De La Fonction "Basse Temperature
2 / UTILISATION DE VOTRE APPAREIL UTILISATION DE LA FONCTION • • “BASSE TEMPERATURE” L L a a c c u u i i s s s s o o n n “ “ B B A A S S S S E E T T E E M M P P E E R R A A T T U U R R E E ” ” d d o o i i t t a a b b s s o o l l u u m m e e n n t t d d é... - Page 25 2 / UTILISATION DE VOTRE APPAREIL - Préconisation du niveau de gradin (fig.1). Validez votre choix en appuyant sur O O K K . Le four s'éteint automatiquement, sonne pendant 2 minutes et vous indique que c'est prêt. Appuyez sur O O K K pour arrêter les bips. Pour les viandes, phase de maintien au chaud (durée 1 heure).
-
Page 26: Utilisation De La Fonction "Informations
2 / UTILISATION DE VOTRE APPAREIL UTILISATION DE LA FONCTION • • “INFORMATIONS” Appuyez sur O O K K . . Vous accédez aux réglages suivants avec la touche (fig.1): · · 1 1 M M i i n n u u t t e e r r i i e e ·... - Page 27 2 / UTILISATION DE VOTRE APPAREIL • 2 - Nettoyage R R e e t t i i r r e e z z l l a a c c a a s s s s e e r r o o l l e e r r i i e e d d u u f f o o u u r r e e t t e e n n l l e e v v e e z z l l e e s s d d é é - - b b o o r r d d e e m m e e n n t t s s i i m m p p o o r r t t a a n n t t s s q q u u i i a a u u r r a a i i e e n n t t p p u u s s e e p p r r o o - - d d u u i i r r e e .
-
Page 28: º Heure / Date
2 / UTILISATION DE VOTRE APPAREIL • 3 - Heure / Date Voir Chapitre: Utilisation du programmateur - Comment régler l’heure (page 7). • 4 - Verrouillage des touches Fig.1 Sélectionnez la fonction (fig.1). Appuyez sur O O K K . Faites votre choix par Validez votre choix “oui ou non”... - Page 29 2 / UTILISATION DE VOTRE APPAREIL • 6 - Consommation En accédant à cet écran, vous aurez la possibi- lité de consulter la consommation électrique de votre four depuis la dernière remise à zéro. Fig.1 Appuyez sur OK (fig.1): Si vous bénéficiez d’un contrat EDF avec heures creuses, vous pouvez entrer les plages horaires correspondantes et connaître ainsi le détail des consommations “heures pleines -...
- Page 30 2 / UTILISATION DE VOTRE APPAREIL • 8 - Mode démo - Reglez l’heure à 00:00 (voir réglage de l’heure) - Appuyez simultanément sur les touches en restant appuyé 10 secondes (fig.1). Fig.1 D D E E M M O O apparait à l’écran. Le four est en mode d d é...
- Page 31 De Dietrich Oven EN USER MANUEL...
- Page 32 Dear valued customer, To discover a D D e e D D i i e e t t r r i i c c h h product is to experience the range of unique emotions which only high-value items can produce. The attraction is immediate, from the moment you set eyes on the product.
- Page 33 TABLE OF CONTENTS 1 / DESCRIPTION OF YOUR APPLIANCE • • Introduction to your oven ____________________________________ • • Swivelling fascia ___________________________________________ • • Description of controls ______________________________________ 2 / USING YOUR APPLIANCE • • Cooking __________________________________________________ • • Using the programmer º...
-
Page 34: Introduction To Your Oven
1 / DESCRIPTION OF YOUR APPLIANCE • • INTRODUCTION TO YOUR OVEN Programmer Wire shelf supports Selection touch control Lamp W W a a k k e e u u p p touch Hole for rotisserie... -
Page 35: Description Of Controls
1 / DESCRIPTION OF YOUR APPLIANCE DESCRIPTION OF CONTROLS • • Selection touch control (at the top) Display Selection touch control (at the Adjustment buttons (+ or -) bottom) for time / temperature Validation touch control “Go back” touch control... -
Page 36: Cooking
2 / USING YOUR APPLIANCE • • COOKING This oven allows you to access three different types of programming depending on the knowledge you have about preparing the recipe in question: - A recipe for which you know all the settings (you will choose on your own the type of cooking, temperature and cooking time): select t t h h e e “... -
Page 37: Using The Programmer
2 / USING YOUR APPLIANCE • • USING THE PROGRAMMER •How to set the time Press O O K K (fig.1). Select “Information” by pressing (fig.2). Confirm by pressing O O K K . . Fig.1 - Select line “3. Time/Date” by pressing (fig.3). -
Page 38: Using The "Expert" Function
2 / USING YOUR APPLIANCE USING THE “EXPERT” • • FUNCTION This function lets you set all the cooking settings yourself: temperature, type of cooking, cooking time - Confirm by pressing O O K K . You access the “E E x x p p e e r r t t ” s s c c r r e e e e n n (fig.1). - Confirm by again pressing O O K K . - Page 39 2 / USING YOUR APPLIANCE COOKING TIME AND COOKING • • FINISH TIME You can enter the cooking time for your dish be selecting the option (fig.1) by pressing Enter the cooking time by pressing + (fig.2). - Confirm your selection by pressing O O K K . When you set the cooking time, the cooking Fig.1 finish...
- Page 40 2 / USING YOUR APPLIANCE USING THE “OPTION BIOGRILL +” • • FUNCTION It is not active during the following functions: Eco, fan grill, keep warm, high grill and medium grill. After setting your cooking time, if you press “OK” once, the oven will suggest “option biogrill+”...
- Page 41 2 / USING YOUR APPLIANCE USING THE “MEMORY” FUNCTION • • - - M M e e m m o o r r i i s s e e a a c c o o o o k k i i n n g g . . The MEMORY function makes it possible to memorise 3 cooking modes that you have tried out with the “Expert”...
- Page 42 “EXPERT” COOKING MODES F F A A N N (recommended temperature 1 1 9 9 0 0 ° ° C C mini 35°C maxi 250°C) •Cooking controlled by the heating element located at the back of the oven by the fan. •Rapid temperature increase: Some dishes can be placed in the oven while it is still cold.
- Page 43 “EXPERT” COOKING MODES H H I I G G H H G G R R I I L L L L + + S S P P I I T T (recommended positions 4 4 - min 1 - max 4) •Cooking is done by the upper element without the fan.
-
Page 44: Using The "Cooking Guide" Function
2 / USING YOUR APPLIANCE USING THE “COOKING GUIDE” • • FUNCTION This function selects for you the appropriate cooking parameters based on the food being prepared and its weight. - Press “OK” (fig.1). The oven then suggests different food categories. - Page 45 “COOKING GUIDE” COOKING MODES No.4 VEGETABLES: No. 1 WHITE MEAT: No.1 endives No.1 chicken (dish) vegetable flans chicken (spit) potato gratin duck lasagna turkey leg stuffed peppers rabbit stuffed tomatoes goose guinea fowl No. 5 TARTS/QUICHES: pork loin No.1 quiche pork fillet short crust terrine...
-
Page 46: Using The "Ics" Function
2 / USING YOUR APPLIANCE • • USING THE “ICS” FUNCTION The ICS (Intelligent Cooking System) function will completely simplify cooking for you because the oven will automatically calculate all the cooking parameters (temperature, cooking time, cooking mode) based on the selected dish thanks to its electronic sensors located in the oven that constantly measure the moisture level and temperature variations. - Page 47 2 / USING YOUR APPLIANCE • • USING THE “ICS” FUNCTION N N . . B B . . : : N N o o p p r r e e h h e e a a t t i i n n g g i i s s r r e e q q u u i i r r e e d d t t o o u u s s e e t t h h e e I I C C S S f f u u n n c c t t i i o o n n .
- Page 48 GUIDE TO THE “I.C.S.” FUNCTIONS • Fresh store-bought pizza • Ready-to-use pizza dough i i z z z z a a • Home-made pizza dough • Frozen pizza • Fresh quiches a a r r t t s s • Frozen quiches ( ( s s a a v v o o u u r r y y ) ) •...
- Page 49 GUIDE TO THE “I.C.S.” FUNCTIONS • Place it on the grid for a crispy crust (you can place a sheet of parchment paper between the grid and the pizza to protect the oven from cheese drippings). • Place the pizza on the baking tray for a soft crust. •...
- Page 50 TIPS AND HINTS FOR ICS P P i i z z z z a a To prevent cheese or tomato sauce from dripping in the oven, you can place a piece of parchment paper between the grid and the pizza. T T a a r r t t s s / / Q Q u u i i c c h h e e s s Avoid glass and porcelain dishes: because they are too thick, they extend the cooking time and the bottom of the crust is not crispy.
- Page 51 SOME ICS RECIPES P P i i z z z z a a Base: 1 pizza crust *with vegetables: 6 tablespoons tomato sauce + 100g diced courgettes + 50g diced bell peppers + 50g sliced aubergine +2 small sliced tomatoes + 50g grated gruyere + oregano + salt + pepper.
- Page 52 SOME ICS RECIPES F F i i s s h h Black sea bream with dry cider: 1 bream weighing 1.5 kg. 500g button mushrooms. 2 sour apples. 2 shallots. 2 tablespoons heavy cream. 100g butter. 1/2 litre cider. Salt, pepper. Gut and scale the fish.
- Page 53 SOME ICS RECIPES I I n n d d i i v v i i d d u u a a l l c c h h o o c c o o l l a a t t e e c c a a k k e e s s 12 individual aluminium ramekins.
-
Page 54: Using The "Low Temperature" Function
2 / USING YOUR APPLIANCE USING THE “LOW • • TEMPERATURE” FUNCTION C C o o o o k k i i n n g g a a b b s s o o l l u u t t e e l l y y m m u u s s t t b b e e g g i i n n i i n n a a “ “ L L O O W W T T E E M M P P E E R R A A T T U U R R E E ”... - Page 55 2 / USING YOUR APPLIANCE - Recommended shelf support level (fig.1). Confirm your selection by pressing O O K K . The oven automatically turns off, beeps for 2 minutes and tells you that it is ready. Press O O K K to stop the beeping. Fig.1 For meats, there is an automatic stay warm function (duration: 1 hour).
-
Page 56: Using The "Information" Function
2 / USING YOUR APPLIANCE USING THE “INFORMATION” • • FUNCTION Press O O K K . . You access the following settings with the touch control (fig.1): · · 1 1 T T i i m m e e r r ·... - Page 57 2 / USING YOUR APPLIANCE • 2 - Cleaning R R e e m m o o v v e e t t h h e e g g r r i i d d s s a a n n d d t t r r a a y y s s f f r r o o m m t t h h e e o o v v e e n n a a n n d d c c l l e e a a n n a a n n y y m m a a j j o o r r s s p p i i l l l l r r e e s s i i d d u u e e .
-
Page 58: º Time / Date
2 / USING YOUR APPLIANCE • 3 - Time / Date See Chapter: Using the programmer - How to set the time (page 127). Fig.1 • 4 - Lock controls Select the function (fig.1). Press O O K K . Make your selection using Confirm your selection “yes or no”... - Page 59 2 / USING YOUR APPLIANCE • 6 - Consumption By accessing this screen, you will be able to view the energy consumption of your oven since the last time it was reset to zero. Press OK (fig.1): Fig.1 If you have an energy bill arrangement with off-peak hours, you can consult the corresponding time periods and obtain detailed information about your consumption...
-
Page 60: º Demo Mode
2 / USING YOUR APPLIANCE • 8 - Demo Mode Adjust the time to 0:00 (see section "Resetting the time") then confirm. Press and hold down the buttons simultaneously for 10 seconds until "DEMO" is shown in the Fig.1 display. To exit from DEMO mode: Set the time to 0:00. - Page 61 Horno De Dietrich ES MANUAL DE UTILIZACIÓN...
- Page 62 Estimado cliente, estimada clienta: Descubrir los productos D D e e D D i i e e t t r r i i c c h h , es sentir las emociones únicas que sólo nos aportan algunos objetos de valor. La atracción es inmediata nada más verlos.
- Page 63 ÍNDICE 1 / DESCRIPCIÓN DEL APARATO • • Presentación del horno _____________________________________ • • Panel pivotante ____________________________________________ • • Descripción de los mandos __________________________________ 2 / UTILIZACIÓN DEL APARATO • • Realización de una cocción __________________________________ • • Utilización del programador º...
-
Page 64: Presentación Del Horno
1 / DESCRIPCIÓN DEL APARATO • • PRESENTACIÓN DEL HORNO Programado Niveles de altura varilla Teclas de mandos. Lámpara Mando W W A A K K U U P P Agujero para asador... - Page 65 1 / DESCRIPCIÓN DEL APARATO PRESENTACIÓN DE LOS MANDOS • • Botón de selección (hacia arriba) Pantalla Botón de selección (hacia abajo) Botones de ajuste (+ o -) del tiempo / temperatura Botón de validación Botón para retroceder...
-
Page 66: Realización De Una Cocción
2 / UTILIZACIÓN DEL APARATO • • REALIZACIÓN DE UNA COCCIÓN Este horno le permite acceder a 4 tipos de programación diferentes según el grado de conocimientos que tenga sobre la cocción de la receta: - Una receta de la que conoce todos los parámetros (usted mismo selecciona la temperatura, el tipo de cocción y la duración de la misma): seleccione la f f u u n n c c i i ó... -
Page 67: Utilización Del Programador
2 / UTILIZACIÓN DEL APARATO • • UTILIZACIÓN DEL PROGRAMADOR •Cómo ajustar la hora Pulse O O K K (fig.1). Seleccione “informaciones” pulsando (fig.2). Fig.1 Valide pulsando O O K K . . - Elija la línea “3. Hora / Fecha” pulsando (fig.3). -
Page 68: Utilización De La Función "Expert
2 / UTILIZACIÓN DEL APARATO UTILIZACIÓN DE LA FUNCIÓN • • “EXPERT” Esta función le permite ajustar usted mismo todos parámetros cocción: temperatura, tipo de cocción y duración de cocción - Pulse el botón O O K K . Accederá a la pantalla “E E x x p p e e r r t t ”... - Page 69 2 / UTILIZACIÓN DEL APARATO DURACIÓN DE LA COCCIÓN Y • • HORA DE FINAL DE COCCIÓN Puede introducir la duración de cocción del plato seleccionando la casilla (fig.1), pulsando Introduzca la duración de la cocción pulsando + (fig.2). - Valide pulsando el botón O O K K . Fig.1 Cuando ajuste la duración de cocción, la hora de final de cocción (casilla...
- Page 70 2 / UTILIZACIÓN DEL APARATO UTILIZACIÓN DE LA FUNCIÓN • • “OPTION BIOGRIL +” No está activa en las siguientes funciones: Eco, grill ventilado, mantener caliente, grill fuerte y grill medio. Una vez regulada la duración de la cocción, al pulsar una vez “OK”, el horno le propone “opción biogrill +”...
- Page 71 2 / UTILIZACIÓN DEL APARATO UTILIZACIÓN DE LA FUNCIÓN “MEMORIAS” • • - - M M e e m m o o r r i i c c e e l l a a c c o o c c c c i i ó ó n n . . La función “Memorias”...
- Page 72 MODOS DE COCCIÓN “EXPERT” C C A A L L O O R R G G I I R R A A T T O O R R I I O O (temperatura recomendada 1 1 9 9 0 0 ° ° C C mín. 35°C máx. 250°C) •La cocción se efectúa con el elemento calefactor situado al fondo del horno y con la hélice para mover el aire.
- Page 73 MODOS DE COCCIÓN “EXPERT” G G R R I I L L L L F F U U E E R R T T E E + + A A S S A A D D O O R R R R O O T T A A T T I I V V O O (posiciones recomendadas 4 4 - mín.
-
Page 74: Utilización De La Función "Guía Culinaria
2 / UTILIZACIÓN DEL APARATO UTILIZACIÓN DE LA FUNCIÓN • • “GUÍA CULINARIA” Esta función selecciona para usted los parámetros de cocción adecuados en función del alimento que vaya a preparar y de Fig.1 su peso. - Pulse “OK” (fig.1). El horno propone entonces distintas familias de alimentos. - Page 75 MODOS DE COCCIÓN “GUÍA CULINARIA” N°4 VERDURAS: N°1 CARNES BLANCAS: N°1 endibias N°1 pollo (bandeja) flan de verduras pollo (asador rotativo) gratén dauphinois pato lasaña muslo de pavo pimientos rellenos conejo tomates rellenos pintada N°5 TARTAS/QUICHES: costilla de cerdo N°1 quiche solomillo de cerdo tarta quebrada...
-
Page 76: Utilización De La Función "I.c.s
2 / UTILIZACIÓN DEL APARATO • • UTILIZACIÓN DE LA FUNCIÓN “I.C.S.” La función ICS (Intelligent Cooking System) le facilitará totalmente la tarea, ya que el horno calculará automáticamente todos parámetros de cocción en función del plato seleccionado (temperatura, duración y tipo de cocción) gracias a sensores electrónicos situados horno... - Page 77 2 / UTILIZACIÓN DEL APARATO • • UTILIZACIÓN DE LA FUNCIÓN “I.C.S.” N N o o t t a a : : P P a a r r a a u u t t i i l l i i z z a a r r l l a a f f u u n n c c i i ó ó n n I I C C S S n n o o s s e e r r e e q q u u i i e e r r e e n n i i n n g g ú...
- Page 78 GUÍA DE LAS FUNCIONES “I.C.S” • Pizzas preparadas frescas • Pizzas masas preparadas listas usar i i z z z z a a • Pizzas masas “hechas en casa” • Pizzas congeladas • Quiches frescas a a r r t t a a s s •...
- Page 79 GUÍA DE LAS FUNCIONES “I.C.S” • Colóquela sobre la rejilla para obtener una masa crujiente (puede intercalar una hoja de papel de cocción entre la rejilla y la pizza para proteger el horno de los desbordamientos de queso). • Colóquela sobre la placa de repostería para obtener una masa tierna. •...
- Page 80 CONSEJOS Y TRUCOS I.C.S. P P i i z z z z a a Para evitar que el queso o la salsa de tomate goteen en el horno, puede poner una hoja de papel sulfurizado entre la parrilla y la pizza. T T a a r r t t a a s s / / Q Q u u i i c c h h e e s s No utilice fuentes de cristal ni de porcelana: al ser demasiado gruesas prolongan el tiempo de cocción y el fondo de la masa no queda crujiente.
- Page 81 ALGUNAS RECETAS I.C.S. P P i i z z z z a a Base: 1 masa para pizza *con verduras: 6 cucharadas de salsa de tomate + 100 g de calabacines cortados en dados + 50 g de pimientos cortados en dados + 50 g de berenjenas en rodajas + 2 tomates pequeños en rodajas + 50 g de gruyer rallado + orégano + sal + pimienta.
- Page 82 ALGUNAS RECETAS I.C.S. P P e e s s c c a a d d o o s s Besugo con sidra brut: 1 besugo de 1,5 kg. 500 g de champiñones de París. 2 manzanas ácidas. 2 chalotas. 2 cucharadas de nata espesa. 100 g de mantequilla.
- Page 83 ALGUNAS RECETAS I.C.S. P P a a s s t t e e l l i i l l l l o o s s d d e e c c h h o o c c o o l l a a t t e e 12 moldes individuales de aluminio.
-
Page 84: Utilización De La Función "Baja Temperatura
2 / UTILIZACIÓN DEL APARATO UTILIZACIÓN DE LA FUNCIÓN • • “BAJA TEMPERATURA” L L a a c c o o c c c c i i ó ó n n d d e e b b e e e e m m p p e e z z a a r r O O B B L L I I G G A A T T O O R R I I A A M M E E N N T T E E c c o o n n e e l l h h o o r r n n o o f f r r í... - Page 85 2 / UTILIZACIÓN DEL APARATO - Recomendación del nivel de altura (fig.1). Valide su elección pulsando O O K K . El horno se apaga automáticamente y se escucha un sonido durante 2 minutos indicando que está listo. Pulse O O K K para detener los pitidos. Para las carnes, fase de mantenimiento en caliente (duración 1 hora).
-
Page 86: Utilización De La Función "Informaciones
2 / UTILIZACIÓN DEL APARATO UTILIZACIÓN DE LA FUNCIÓN • • “INFORMACIONES” Pulse O O K K . . Accederá a los siguientes ajustes con el botón (fig.1): · · 1 1 M M i i n n u u t t e e r r o o Fig.1 ·... - Page 87 2 / UTILIZACIÓN DEL APARATO • 2 - Limpieza R R e e t t i i r r e e l l a a b b a a t t e e r r í í a a d d e e c c o o c c i i n n a a d d e e l l h h o o r r n n o o y y l l o o s s d d e e s s b b o o r r d d a a m m i i e e n n t t o o s s i i m m p p o o r r t t a a n n t t e e s s q q u u e e h h u u b b i i e e r r a a n n p p o o d d i i d d o o p p r r o o d d u u c c i i r r s s e e .
-
Page 88: º Hora / Fecha
2 / UTILIZACIÓN DEL APARATO • 3 - Hora / Fecha Ver Capítulo: Utilización del programador - Cómo regular la hora (página 157). • 4 - Bloqueo de los mandos Seleccione la función de cocción (fig.1). Pulse O O K K . Elija con Fig.1 Valide su elección “sí... - Page 89 2 / UTILIZACIÓN DEL APARATO • 6 - Consumo Accediendo a esta pantalla, tiene la posibilidad de consultar el consumo eléctrico del horno después de la última puesta a cero. Fig.1 Pulse OK (fig.1): Si tiene un contrato con la compañía eléctrica con horas valle, puede introducir las franjas horarias correspondientes para conocer con detalle los consumos “horas punta/horas...
- Page 90 NOTAS • 8 - Modo démo Para activar el modo DEMO: Ajuste la hora en 0:00 (ver apartado "Puesta en hora") y valídelo. Pulse simultáneamente los mandos durante 10 segundos hasta que Fig.1 aparezca “D D E E M M O O ” en la pantalla (fig.1). Para eliminar el modo DEMO: Regule la hora en 0:00 y valídelo.
- Page 91 Forno PT MANUAL DE UTILIZAÇÃO...
- Page 92 Estimado(a) Cliente, Descobrir os produtos D D e e D D i i e e t t r r i i c c h h é experimentar emoções únicas que apenas os objectos de valor podem produzir. A atracção é imediata desde o primeiro olhar. A qualidade do design é ilustrada pela estética intemporal e os acabamentos cuidados que tornam cada objecto elegante e refinado, em perfeita harmonia uns com os outros.
- Page 93 ÍNDICE 1 / DESCRIÇÃO DO SEU APARELHO • • Apresentação do seu forno __________________________________ • • Apresentação dos comandos ________________________________ 2 / UTILIZAÇÃO DO SEU APARELHO • • Realização de uma cozedura _________________________________ • • Utilização do programador º Como acertar a hora ____________________________________ •...
-
Page 94: Apresentação Do Seu Forno
1 / DESCRIÇÃO DO SEU APARELHO • • APRESENTAÇÃO DO SEU FORNO Programador Encaixes do filamento Botões dos comandos Lâmpada Botões W W a a k k e e u u p p Buraco para espeto rotativo. - Page 95 1 / DESCRIÇÃO DO SEU APARELHO DESCRIÇÃO DOS COMANDOS • • Botão de selecção (para cima) Visor Botão de selecção (para baixo) Botões de regulação (+ ou -) do tempo/temperatura Botão de validação Botão de retorno...
-
Page 96: Realização De Uma Cozedura
2 / UTILIZAÇÃO DO SEU APARELHO • • REALIZAÇÃO DE UMA COZEDURA Este forno permite-lhe aceder a 4 tipos de programações diferentes, de acordo com o grau de conhecimentos que possuir relativamente à cozedura da sua receita: - Uma receita em que domine todos os parâmetros (escolhe você mesmo o tipo de cozedura, a temperatura e o tempo de cozedura): Escolha a f f u u n n ç... -
Page 97: º Como Acertar A Hora
2 / UTILIZAÇÃO DO SEU APARELHO • • APRESENTAÇÃO DO PROGRAMADOR • Como acertar a hora Prima O O K K (fig.1). Escolha “Informações”, premindo (fig.2). fig.1 Valide premindo O O K K . . - Escolha a linha “3. Hora/Data”, premindo (fig.3). -
Page 98: Utilização Da Função "Expert
2 / UTILIZAÇÃO DO SEU APARELHO UTILIZAÇÃO DA FUNÇÃO • • “EXPERT” Esta função permite-lhe ser você mesmo a definir todos os parâmetros de cozedura: Temperatura, tipo de cozedura, tempo de cozedura - Prima o botão O O K K . Acederá ao ecrã “E E x x p p e e r r t t ” (fig.1). - Page 99 2 / UTILIZAÇÃO DO SEU APARELHO DURAÇÃO DE COZEDURA E • • HORA DO FIM DE COZEDURA Pode introduzir a duração de cozedura do seu prato, escolhendo a caixa (fig.1) premindo Insira a duração de cozedura, premindo + (fig.2). - Valide, premindo o botão O O K K . fig.1 Quando regular a duração da cozedura, a hora do fim de cozedura (casa...
- Page 100 2 / UTILIZAÇÃO DO SEU APARELHO UTILIZAÇÃO DA FUNÇÃO • • “OPÇÃO BIOGRIL +” É apenas activa nas seguintes funções de cozedura: Eco, grelhador ventilado, manter quente, grelhador forte e grelhador médio. Após regular o tempo de cozedura e premir uma vez “OK”, o forno propõe a “opção biogril +”...
- Page 101 2 / UTILIZAÇÃO DO SEU APARELHO UTILIZAÇÃO DA FUNÇÃO “MEMÓRIAS” • • - - M M e e m m o o r r i i z z a a r r u u m m a a c c o o z z e e d d u u r r a a . . A função “MEMÓRIAS”...
- Page 102 MODOS DE COZEDURA “EXPERT” C C A A L L O O R R V V E E N N T T I I L L A A D D O O (temperatura recomendada 1 1 9 9 0 0 ° ° C C mín. 35°C máx. 250°C) •A cozedura é...
- Page 103 MODOS DE COZEDURA “EXPERT” G G R R E E L L H H A A D D O O R R F F O O R R T T E E + + E E S S P P E E T T O O R R O O T T A A T T I I V V O O (posições recomendadas 4 4 mín.
-
Page 104: Utilização Da Função "Guia De Culinária
2 / UTILIZAÇÃO DO SEU APARELHO UTILIZAÇÃO DA FUNÇÃO “GUIA • • DE CULINÁRIA” Esta função selecciona para si os parâmetros de cozedura adequados, de acordo com o alimento a preparar e o seu peso. fig.1 - Prima “OK” (fig.1). O forno propõe-lhe então diferentes famílias de alimentos. - Page 105 MODOS DE COZEDURA “GUIA DE CULINÁRIA” N°4 LEGUMES: N°1 CARNES BRANCAS: N° 1 Endívias N° 1 Frango (prato) Flan de legumes Frango (espeto rotativo) Batatas gratinadas Pato Lasanhas Coxa de peru Pimentos recheados Coelho Tomates recheados Ganso Pintada N°5 TARTES/QUICHES: Lombo de porco N°...
-
Page 106: Utilização Da Função "I.c.s
2 / UTILIZAÇÃO DO SEU APARELHO • • UTILIZAÇÃO DA FUNÇÃO “I.C.S.” A função ICS (Intelligent Cooking System - Sistema de Cozinhar Inteligente) vai facilitar-lhe a vida, já que o forno calculará automaticamente todos os parâmetros de cozedura em função do prato seleccionado (temperatura, tempo de cozedura, tipo de cozedura), graças a sensores electrónicos colocados no interior do forno que... - Page 107 2 / UTILIZAÇÃO DO SEU APARELHO • • UTILIZAÇÃO DA FUNÇÃO “I.C.S.” A A t t e e n n ç ç ã ã o o : : A A f f u u n n ç ç ã ã o o I I C C S S n n ã ã o o r r e e q q u u e e r r q q u u a a l l q q u u e e r r p p r r é...
- Page 108 GUIA DAS FUNÇÕES “I.C.S.” • Pizza fresca de charcutaria • Pizza de massa pronta a ser cozida i i z z z z a a • Pizza de massa feita em casa • Pizzas congeladas • Quiches frescas a a r r t t e e s s •...
- Page 109 GUIA DAS FUNÇÕES “I.C.S.” • Coloque-a em cima da grelha, de modo a obter uma massa estaladiça (pode intercalar uma folha de papel vegetal entre a grelha e a pizza para proteger o forno dos derrames de queijo). • Coloque em cima do tabuleiro para pastelaria, de modo a obter uma massa fofa. •...
- Page 110 DICAS E CONSELHOS PARA I.C.S. P P i i z z z z a a Para evitar os derrames de queijo ou de molho de tomate para o interior do forno, pode colocar uma folha de papel vegetal entre a grelha e a pizza. T T a a r r t t e e s s / / Q Q u u i i c c h h e e s s Evite os tabuleiros de vidro, ou porcelana: Demasiado espessos, estes prolongam o tempo de cozedura e o fundo das massas não fica estaladiço.
- Page 111 ALGUMAS RECEITAS I.C.S. P P i i z z z z a a Base: 1 massa para pizza. *com legumes: 6 colheres de sopa de molho de tomate + 100 g de courgettes cortadas em cubos + 50 g de pimentos cortados em cubos + 50 g de beringelas às rodelas +2 tomates pequenos às rodelas + 50 g de queijo gruyère ralado + orégãos + sal + pimenta.
- Page 112 ALGUMAS RECEITAS I.C.S. P P e e i i x x e e s s Dourada cinza com cidra bruta: 1 dourada de 1,5 kg. 500 g de cogumelos de Paris. 2 maçãs ácidas. 2 echalotas. 2 colheres de sopa de creme espesso. 100 g de manteiga.
- Page 113 ALGUMAS RECEITAS I.C.S. Q Q u u e e q q u u e e s s d d e e c c h h o o c c o o l l a a t t e e 12 formas individuais de alumínio. 60 g de manteiga.
-
Page 114: Utilização Da Função "Baixa Temperatura
2 / UTILIZAÇÃO DO SEU APARELHO UTILIZAÇÃO DA FUNÇÃO • • “BAIXA TEMPERATURA” A A c c o o z z e e d d u u r r a a e e m m “ “ B B A A I I X X A A T T E E M M P P E E R R A A T T U U R R A A ” ” d d e e v v e e I I M M P P E E R R A A T T I I V V A A M M E E N N T T E E i i n n i i c c i i a a r r c c o o m m o o f f o o r r n n o o f f r r i i o o . - Page 115 2 / UTILIZAÇÃO DO SEU APARELHO - Sugestão do nível de encaixe (fig.1). Valide a sua escolha, premindo o botão O O K K . O forno desliga-se automaticamente, toca durante 2 minutos e indica-lhe que o prato está pronto. Prima O O K K para parar os bips.
-
Page 116: Utilização Da Função "Informações
2 / UTILIZAÇÃO DO SEU APARELHO UTILIZAÇÃO DA FUNÇÃO • • “INFORMAÇÕES” Prima O O K K . . Pode aceder às seguintes regulações com o botão (fig.1): · · 1 1 T T e e m m p p o o r r i i z z a a d d o o r r fig.1 ·... - Page 117 2 / UTILIZAÇÃO DO SEU APARELHO • 2 - Limpeza R R e e t t i i r r e e o o s s a a c c e e s s s s ó ó r r i i o o s s d d o o f f o o r r n n o o e e r r e e m m o o v v a a o o s s e e v v e e n n t t u u a a i i s s d d e e r r r r a a m m e e s s i i m m p p o o r r t t a a n n t t e e s s .
-
Page 118: º Hora / Data
2 / UTILIZAÇÃO DO SEU APARELHO • 3 - Hora / Data Consulte o Capítulo: Utilização do programador - Como acertar a hora (página 247). • 4 - Bloqueio dos botões Seleccione a função (fig.1). Prima O O K K . fig.1 Faça a sua escolha com Valide a sua escolha “sim ou não”... - Page 119 2 / UTILIZAÇÃO DO SEU APARELHO • 6 - Consumo Acedendo a este ecrã, terá a possibilidade de consultar o consumo eléctrico do seu forno desde a última vez que o reiniciou. fig.1 Prima OK (fig.1): Se beneficiar da tarifa Bi-Horária da EDP com horas de vazio, poderá...
- Page 120 2 / UTILIZAÇÃO DO SEU APARELHO • 8 - Modo demo Para activar o m m o o d d o o D D E E M M O O : Acerte a hora em 0:00 (consulte o capítulo "Acertar a hora") e valide. Prima em simultâneo os botões durante 10 segundos até...
- Page 121 Backofen DE BETRIEBSANLEITUNG...
- Page 122 Liebe Kundin, lieber Kunde, wenn sie Produkte aus dem Hause D D e e D D i i e e t t r r i i c c h h entdecken, dann ist das mit einzigartigen Emotionen verbunden, die nur von Wertobjekten hervorgerufen werden können.
- Page 123 INHALT 1 / BESCHREIBUNG DES GERÄTS • • Übersicht über den Ofen ____________________________________ • • Bedienungselemente _______________________________________ 2 / BENUTZUNG DES GERÄTS • • Garvorgang _______________________________________________ • • Nutzung des Programmierers º Einstellung der Uhr _____________________________________ • • Nutzung der Funktion “EXPERT” _____________________________ •...
-
Page 124: Übersicht Über Den Ofen
1 / BESCHREIBUNG DES GERÄTS • • ÜBERSICHT ÜBER DEN OFEN Programmierer Einschubleistenhalter Bedientasten Lampe Wake up Schlüssel Loch für Spieß... -
Page 125: Bedienungselemente
1 / BESCHREIBUNG DES GERÄTS BEDIENUNGSELEMENTE • • Wahltaste (nach oben) Anzeiger Wahltaste (nach unten) Einstelltasten (+ oder -) für Zeit/Temperatur Bestätigungstaste Taste zurück... -
Page 126: Garvorgang
2 / BENUTZUNG DES GERÄTS • • GARVORGANG Der Backofen bietet 4 verschiedene Programmiermodi je nach den vorhandenen Kenntnissen über das Garen nach Rezept: - Ein Rezept, dessen Parameter alle bekannt sind (eigene Wahl des Garmodus, der Temperatur und der Gardauer): wählen Sie direkt die F F u u n n k k t t i i o o n n “ “ E E X X P P E E R R T T ” ” durch Druck auf die Wahltaste. - Ein Rezept, für das die Hilfe des Backofens erforderlich ist (eigene Wahl nur der vorgeschlagenen Lebensmittelart, des Gewichts und der Backofen wählt die passenden Parameter aus: Temperatur, Gardauer und Garmodus): F F u u n n k k t t i i o o n n “... -
Page 127: Nutzung Des Programmierers
2 / BENUTZUNG DES GERÄTS • • NUTZUNG DES PROGRAMMIERERS • Einstellung der Uhr Auf O O K K drücken (Abb.1). drücken, um “Informationen” zu wählen (Abb.2). Abb.1 Mit Drücken von O O K K bestätigen. - Zeile “3. Uhrzeit/Datum” durch Druck auf wählen (Abb.3). -
Page 128: Nutzung Der Funktion "Expert
2 / BENUTZUNG DES GERÄTS NUTZUNG DER FUNKTION • • “EXPERT” Über diese Funktion können alle Garparameter selbst eingestellt werden: Temperatur, Garmodus, Gardauer. - Auf Taste O O K K drücken. Zugriff auf Bildschirm “E E x x p p e e r r t t ” (Abb.1). - Nochmals auf Taste O O K K drücken. - Page 129 2 / BENUTZUNG DES GERÄTS GARDAUER UND ZEITPUNKT • • DES ENDES DER GARZEIT Über das Kästchen kann die Gardauer des Gerichts eingegeben werden (Abb.1). Durch Druck auf Durch Druck auf + (Abb.2) Gardauer eingeben. - Zur Bestätigung die Taste O O K K drücken. Abb.1 Beim Einstellen der Gardauer zählt die Uhrzeit des Garendes (Kästchen...
- Page 130 2 / BENUTZUNG DES GERÄTS NUTZUNG DER FUNKTION • • “OPTION BIOGRILL +” Bei folgeden Funktionen ist sie nicht aktiv: Eco, Grill mit Umluft, Warmhalten, starker und mittlerer Grill. Nach Einstellung einer Garzeit einmaligem Drücken auf “OK” bietet der Backofen die “Option Biogrill +” (Abb.1). Mit dieser Funktion kann zum Abschluss der gewählten Backfolge...
- Page 131 2 / BENUTZUNG DES GERÄTS NUTZUNG DER FUNKTION “SPEICHER” • • - - G G a a r r m m o o d d u u s s a a b b s s p p e e i i c c h h e e r r n n Mit der Funktion “Speicher”...
- Page 132 “EXPERT” GARMODI U U M M L L U U F F T T (empfohlene Temperatur 1 1 9 9 0 0 ° ° C C mindestens 35°C, maximal 250°C) •Das Garen erfolgt durch das Heizelement an der Rückwand des Backofens und die Luftschraube.
- Page 133 “EXPERT” GARMODI S S T T A A R R K K E E R R G G R R I I L L L L + + S S P P I I E E S S S S (empfohlene Positionen 4 4 - mindestens 1 - maximal 4) •Das Garen erfolgt anhand des oberen Heizelements ohne Umluft.
-
Page 134: Nutzung Der Funktion "Kulinarischer Leitfaden
2 / BENUTZUNG DES GERÄTS NUTZUNG DER FUNKTION • • “KULINARISCHER LEITFADEN” Die Funktion Küchenleitfaden wählt die geeigneten Parameter nach zuzubereitendem Gericht und Gewicht aus. Abb.1 - Auf “OK” (Abb.1) drücken. Der Backofen schlägt dann verschiedene Lebensmittelfamilien vor. - Auf drücken, um eine Lebensmittel- familie auszuwählen (Abb.2): Abb.2... - Page 135 GARMODI “KULINARISCHER LEITFADEN” Nr. 4 GEMÜSE: Nr. 1 HELLES FLEISCH: Nr. 1 Chicoree Nr. 1 Hähnchen (Gericht) Gemüseplätzchen Hähnchen (Spieß) Kartoffelgratin Ente Lasagne Putenschenkel Gefüllte Paprikaschoten Kaninchen Gefüllte Tomaten Gans Perlhuhn Nr 5 TARTE/SPECKKUCHEN: Schweinekamm Nr. 1 Quiche Schweinefilet Mürbeteigtorte Pastete Blätterteigtorte Kalbsbraten...
-
Page 136: Nutzung Der Funktion "I.c.s
2 / BENUTZUNG DES GERÄTS • • NUTZUNG DER FUNKTION “I.C.S.” Die Funktion ICS (Intelligent Cooking System) erleichtert die Aufgabe erheblich, denn der Backofen berechnet automatisch alle Garpara- meter nach ausgewähltem Gericht (Temperatur, Gardauer, Garmodus) durch elektronische Sonden im Backofen, die ständig den Feuchtigkeitsgrad und die Temperatur- veränderungen messen. - Page 137 2 / BENUTZUNG DES GERÄTS • • NUTZUNG DER FUNKTION “I.C.S.” N N . . B B . . : : F F ü ü r r d d i i e e F F u u n n k k t t i i o o n n I I C C S S i i s s t t k k e e i i n n e e r r l l e e i i V V o o r r h h e e i i z z e e n n d d e e s s B B a a c c k k o o f f e e n n s s e e r r f f o o r r d d e e r r l l i i c c h h .
- Page 138 EINFÜHRUNG IN DIE “I.C.S.”-FUNKTIONEN • Frische Pizza aus dem Feinkostgeschäft • Pizza aus Fertigteig i i z z z z a a • “Hausgemachter” Pizzateig • Tiefkühl-Pizza • Frischer Speckkuchen a a l l z z i i g g e e •...
- Page 139 EINFÜHRUNG IN DIE “I.C.S.”-FUNKTIONEN • Pizza auf das Gitter legen, um einen knusprigen Teig zu erhalten. (Es kann ein Backpapier zwischen Gitter und Pizza eingeschoben werden, damit der Backofen vor tropfendem Käse geschützt wird). • Pizza auf das Backblech legen, um einen weichen Teig zu erhalten. •...
- Page 140 TIPPS UND TRICKS FÜR I.C.S. P P i i z z z z a a Backpapier zwischen Gitter und Pizza legen, um zu vermeiden, dass schmelzender Käse oder Tomatensoße den Ofenboden verschmutzen. T T a a r r t t e e / / S S p p e e c c k k k k u u c c h h e e n n Glas- und Porzellangeschirr vermeiden: Es ist zu dick, verlängert die Backdauer und der Teigboden wird nicht knusprig.
- Page 141 EINIGE I.C.S. REZEPTE P P i i z z z z a a Grundlage: 1 Portion Pizzateig *mit Gemüse: 6 EL Tomatensauce + 100 g gewürfelte Zucchini + 50 g gewürfelte Paprikaschote + 50 g Aubergine in Scheiben + 2 kleine Tomaten in Scheiben + 50 g geriebener Greyerzer Käse + Oregano + Salz + Pfeffer.
- Page 142 EINIGE I.C.S. REZEPTE F F i i s s c c h h Graue Goldbrasse mit trockenem Apfelwein: 1 Goldbrasse, 1,5 kg. 500 g Champignons. 2 säuerliche Äpfel. 2 Schalotten. 2 EL Crème fraîche. 100 g Butter. 1/2 Liter Cidre. Salz, Pfeffer. Den Fisch ausnehmen und schuppen.
- Page 143 EINIGE I.C.S. REZEPTE K K l l e e i i n n e e S S c c h h o o k k o o l l a a d d e e n n k k u u c c h h e e n n 12 einzelne Schälchen aus Aluminium.
-
Page 144: Nutzung Der Funktion "Niedertemperatur
2 / BENUTZUNG DES GERÄTS NUTZUNG DER FUNKTION • • “NIEDERTEMPERATUR” D D e e r r “ “ N N I I E E D D E E R R T T E E M M P P E E R R A A T T U U R R ” ” - - G G a a r r v v o o r r g g a a n n g g m m u u s s s s u u n n b b e e d d i i n n g g t t b b e e i i k k a a l l t t e e m m B B a a c c k k o o f f e e n n b b e e g g i i n n n n e e n n . - Page 145 2 / BENUTZUNG DES GERÄTS - Empfehlung für die Einschubleiste (Abb.1). Zur Bestätigung die Taste O O K K drücken. Der Backofen schaltet automatisch ab, klingelt 2 Minuten lang und weist darauf hin, dass das Essen fertig ist. O O K K drücken, Signaltöne auszustellen.
-
Page 146: Nutzung Der Funktion "Informationen
2 / BENUTZUNG DES GERÄTS NUTZUNG DER FUNKTION • • “INFORMATIONEN” Auf O O K K drücken. Mit der Taste (Abb.1) erhält man Zugang zu folgenden Einstellungen: · · 1 1 K K u u r r z z z z e e i i t t w w e e c c k k e e r r Abb.1 ·... - Page 147 2 / BENUTZUNG DES GERÄTS • 2 - Reinigung A A l l l l e e s s Z Z u u b b e e h h ö ö r r a a u u s s d d e e m m B B a a c c k k o o f f e e n n n n e e h h m m e e n n u u n n d d e e v v e e n n t t u u e e l l l l v v o o r r h h a a n n d d e e n n e e s s t t a a r r k k ü...
-
Page 148: º Uhrzeit / Datum
2 / BENUTZUNG DES GERÄTS • 3 - Uhrzeit / Datum S. Kapitel: Nutzung des Programmierers - Einstellung der Uhrzeit (Seite 97). • 4 - Tastenverriegelung Funktion auswählen (Abb.1). Auf O O K K drücken. Abb.1 Auswahl über Wahl über “ja oder nein” (Abb.2) bestätigen und auf O O K K drücken. - Page 149 2 / BENUTZUNG DES GERÄTS • 6 - Verbrauch Über diesen Bildschirm kann Stromverbrauch des Backofens seit der letzten Nullrückstellung abgefragt werden. Abb.1 Auf OK dürcken (Abb.1): Bei einem Vertrag mit dem Stromversorger mit Mondscheintarif können die entsprechenden Zeitspannen eingegeben und somit der Verbrauch in Stunden mit vollem Tarif und Mondscheintarif im Detail geprüft werden.
- Page 150 2 / BENUTZUNG DES GERÄTS Aktivierung des DEMO- • 8 - Modus: Die Uhrzeit auf 0:00 stellen (siehe Kapitel „Neueinstellung der Uhrzeit"), anschließend bestätigen. Gleichzeitig 10 Sekunden lang die Tasten drücken, bis ”D D E E M M O O ” in der Anzeige erscheint.
- Page 151 CZ5700675_00 08/11...
Need help?
Do you have a question about the DOP1180X and is the answer not in the manual?
Questions and answers