
Subscribe to Our Youtube Channel
Related Manuals for Gree GUHD series


Summary of Contents for Gree GUHD series
- Page 1 CENTRAL AIR CONDITIONERS U-MATCH SERIES A/A DC INVERTER AIR CONDITIONERS ATCH VER R R T SERVICE MANUAL CE MAN T1/R410A/50Hz (GC201111- )
-
Page 2: Table Of Contents
CONTENTS PRODUCT ...................... 2 1 MODELS LIST ......................2 1.1 Outdoor Unit ..........................2 1.2 Indoor Unit ............................. 3 2 NOMENCLATURE...................... 4 3 PRODUCT DATA......................5 3.1 Product Data of Indoor Unit ......................5 3.2 Operation Range ........................34 3.3 Electrical Data ..........................34 4 PIPING DIAGRAM..................... - Page 3 ..............82 MAINTENANCE .................... 84 1 TROUBLE TABLE ....................84 2 FLOW CHART OF TROUBLESHOOTING ............... 89 ......................89 ................................95 ................................99 ....103 3 WIRING DIADRAM....................110 3.1 Outdoor unit..........................110 3.2 Indoor unit ..........................117 4 DISASSEMBLY AND ASSEMBLY PROCEDURE OF MAIN PARTS ..... 121 4.1 Outdoor Unit ..........................
- Page 4 PRODUCT...
-
Page 5: Product
PRODUCT 1 MODELS LIST 1.1 Outdoor Unit Power Supply Model Name Product Code Appearance (V, Ph, Hz) GUHD09NK3CO CF090W0260 220-240V 50Hz GUHD12NK3CO CF090W0270 220-240V 50Hz GUHD09NK3C1O CF090W0340 220-240V 50Hz GUHD12NK3C1O CF090W0350 220-240V 50Hz GUHD18NK3CO CF090W0281 220-240V 50Hz GUHD18NK3C1O CF090W0500 220-240V 50Hz GUHD24NK3CO CF090W0290... -
Page 6: Indoor Unit
U-Match Series DC Inverter Service Manual 1.2 Indoor Unit Nominal Capacity Power Type Model Name Product Code Cooling/ Supply Appearance Heating (V, Ph, Hz) (Btu/h) GFH09K3CI CF060N0220 9212/10000 GFH12K3CI CF060N0231 12000/13000 GFH18K3CI CF060N0240 18000/21000 GFH24K3CI CF060N0250 24000/25500 GFH30K3CI CF060N0260 28000/30000 220-240V GFH36K3CI CF060N0270... -
Page 7: Nomenclature
2 NOMENCLATURE Description Options Gree Electric Appliances Inc Capital Letter :G Unit Type U=U-Match Outdoor Unit C=Cool Only Product Type H=Heat Pump without Aux Electric Heaters N=Constant Frequency Compressor Power Supply D=DC Inverter Type Code A=AC Inverter Nominal Cooling Capacity Nominal Cooling Capacity =Number×1000Btu/h... -
Page 8: Product Data
3 PRODUCT DATA 3.1 Product Data of Indoor Unit 3.1.1 Duct Type Indoor unit GFH09K3CI GFH12K3CI Product Code CF060N0220 CF060N0231 Model Outdoor unit GUHD09NK3CO GUHD12NK3CO roduct Code CF090W0260 CF090W0270 Cooling Btu/h 9212 12000 Nominal Capacity Heating Btu/h 9895 13000 Cooling 0.83 1.077 Power Input... - Page 9 Continued 1 Indoor unit GFH09K3CI GFH12K3CI Product Code CF060N0220 CF060N0231 Model Outdoor unit GUHD09NK3C1O GUHD12NK3C1O Product Code CF090W0340 CF090W0350 Cooling Btu/h 9212 12000 Nominal Capacity Heating Btu/h 9895 13000 Cooling 0.83 1.077 Power Input Heating 0.803 0.974 EER/COP 3.25/3.61 3.25/3.90 Indoor Unit GFH09K3CI GFH12K3CI...
- Page 10 Continued 2 Indoor unit GFH18K3CI GFH24K3CI GFH30K3CI Product Code CF060N0240 CF090W0290 CF060N0260 Model Outdoor unit GUHD18NK3CO GUHD24NK3CO GUHD30NK3CO Product Code CF090W0281 CF060N0250 CF090W0330 Cooling Btu/h 18000 24000 28000 Nominal Capacity 6.15 Heating Btu/h 21000 25500 30000 Cooling 1.65 2.18 2.55 Power Input Heating 2.07...
- Page 11 Continued 3 Indoor unit GFH18K3CI GFH24K3CI GFH30K3CI Product Code CF060N0240 CF060N0250 CF060N0260 Model Outdoor unit GUHD18NK3C1O GUHD24NK3C1O GUHD30NK3C1O Product Code CF090W0500 CF090W0510 CF090W0520 Cooling Btu/h 18000 24000 28000 Nominal Capacity 6.15 Heating Btu/h 21000 25500 30000 Cooling 1.65 2.18 2.55 Power Input Heating...
- Page 12 Continued 4 Indoor unit GFH36K3CI GFH42K3CI GFH36K3CI Product Code CF060N0270 CF060N0290 CF060N0270 Model Outdoor unit GUHD36NK3CO GUHD42NK3CO GUHD36NM3CO CF090W0301 CF090W0311 CF090W0411 Product Code 10.0 11.0 10.3 Cooling Btu/h 34120 37530 35140 Nominal Capacity 11.5 12.5 11.5 Heating Btu/h 39238 42650 39238 Cooling 3.115...
- Page 13 Continued 5 Indoor unit GFH36K3CI GFH42K3CI GFH36K3CI Product Code CF060N0270 CF060N0290 CF060N0270 Model Outdoor unit GUHD36NK3CO GUHD42NK3CO GUHD36NM3CO Product Code CF090W0300 CF090W0310 CF090W0410 10.3 11.0 10.3 Cooling Btu/h 35140 37530 35140 Nominal Capacity 11.5 13.2 11.5 Heating Btu/h 39238 45038 39238 Cooling 3.208...
- Page 14 Continued 6 Indoor unit GFH36K3CI GFH42K3CI GFH36K3CI Product Code CF060N0270 CF060N0290 CF060N0270 Model Outdoor unit GUHD36NK3C1O GUHD42NK3C1O GUHD36NM3C1O Product Code CF090W0530 CF090W0540 CF090W0560 10.0 11.0 10.0 Cooling Btu/h 34100 37530 34100 Nominal Capacity 11.0 12.0 11.0 Heating Btu/h 37500 40944 37500 Cooling 3.115...
- Page 15 Continued: 7 Indoor unit GFH42K3CI GFH42K3CI GFH48K3CI Product Code CF060N0290 CF060N0290 CF060N0280 Model Outdoor unit GUHD42NM3CO GUHD42NM3CO GUHD48NK3CO Product Code CF090W0421 CF090W0420 CF090W0320 Cooling Btu/h 37530 37530 48000 Nominal Capacity 12.5 13.2 16.5 Heating Btu/h 42650 45038 56300 Cooling 3.42 4.35 Power Input Heating...
- Page 16 Continued: 8 Indoor unit GFH42K3CI GFH48K3CI GFH48K3CI Product Code CF060N0290 CF060N0280 CF060N0280 Model Outdoor unit GUHD42NM3C1O GUHD48NM3C1O GUHD48NK3C1O Product Code CF090W0570 CF090W0580 CF090W0550 Cooling Btu/h 37530 48000 48000 Nominal Capacity 12.0 16.0 16.0 Heating Btu/h 40944 54600 54600 Cooling 3.426 4.36 4.36 Power Input...
- Page 17 Continued: 9 Indoor unit GFH48K3CI GFH60K3CI GFH60K3CI Product Code CF060N0280 ED020N0440 ED020N0440 Model Outdoor unit GUHD48NM3CO GUHD60NM3CO GUHD60NM3C1O Product Code CF090W0430 CF090W0440 CF090W0590 Cooling Btu/h 48000 58000 58000 Nominal Capacity 16.5 Heating Btu/h 56300 61400 61400 Cooling 4.35 5.29 Power Input Heating 4.98 EER/COP...
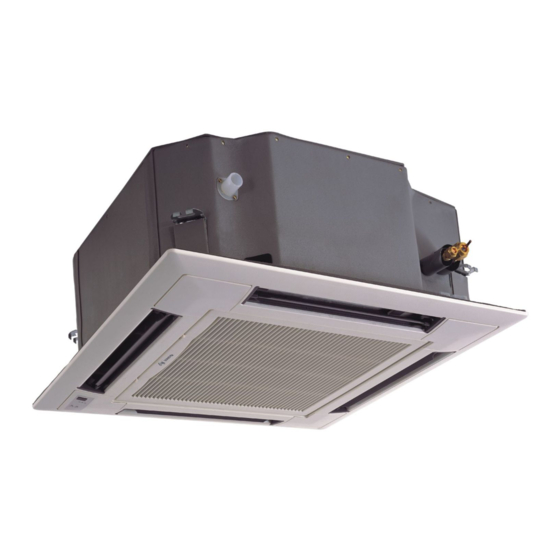
- Page 18 4.1.2 Cassette Type Indoor unit GKH12K3CI GKH18K3CI GKH24K3CI Product Code ET010N0170 ET010N0180 ET010N0190 Model Outdoor unit GUHD12NK3CO GUHD18NK3CO GUHD24NK3CO Product Code CF090W0350 CF090W0281 CF090W0290 Cooling Btu/h 18000 24000 Nominal 11600 Capacity 6.15 Heating Btu/h 21000 27000 12600 Cooling 1.65 2.18 1.03 Power Input Heating...
- Page 19 Continued: 1 Indoor unit GKH12K3CI GKH18K3CI GKH24K3CI Product Code ET010N0170 ET010N0180 ET010N0190 Model Outdoor unit GUHD12NK3C1O GUHD18NK3C1O GUHD24NK3C1O Product Code CF090W0350 CF090W0500 CF090W0510 Cooling Btu/h 11600 18000 24000 Nominal Capacity 6.15 8.00 Heating Btu/h 12600 21000 27000 Cooling 1.03 1.65 2.18 Power Input Heating...
- Page 20 Continued: 2 Indoor unit GKH30K3CI GKH36K3CI GKH42K3CI Product Code ET010N0200 ET010N0210 ET010N0230 Model Outdoor unit GUHD30NK3CO GUHD36NK3CO GUHD42NK3CO Product Code CF090W0330 CF090W0301 CF090W0311 Cooling Btu/h 30000 34120 37530 Nominal Capacity 11.0 12.0 Heating Btu/h 32400 37532 40944 Cooling 2.74 3.115 3.42 Power Input Heating...
- Page 21 Continued: 3 Indoor unit GKH36K3CI GKH42K3CI Product Code ET010N0210 ET010N0230 Model Outdoor unit GUHD36NK3CO GUHD42NK3CO Product Code CF090W0300 CF090W0310 10.3 Cooling Btu/h 35140 37530 Nominal Capacity 11.2 12.4 Heating Btu/h 38210 42300 Cooling 3.427 Power Input Heating 3.434 EER/COP 3.22/3.73 3.21/3.61 Indoor Unit GKH36K3CI...
- Page 22 Continued:4 Indoor unit GKH30K3CI GKH36K3CI GKH42K3CI Product Code ET010N0200 ET010N0210 ET010N0230 Model Outdoor unit GUHD30NK3C1O GUHD36NK3C1O GUHD42NK3C1O Product Code CF090W0520 CF090W0531 CF090W0541 10.0 Cooling Btu/h 30000 34100 37530 Nominal Capacity 11.0 12.0 Heating Btu/h 32400 37500 40944 Cooling 2.74 3.115 3.426 Power Input Heating...
- Page 23 Continued:5 Indoor unit GKH36K3CI GKH42K3CI Product Code ET010N0210 ED020N0310 Model Outdoor unit GUHD36NM3CO GUHD42NM3CO Product Code CF090W04101 CF090W0421 Cooling Btu/h 34120 37530 Nominal Capacity 11.0 12.0 Heating Btu/h 37532 42300 Cooling 3.115 3.42 Power Input Heating 3.047 3.324 EER/COP 3.21/3.61 3.21/3.61 Indoor Unit GKH36K3CI...
- Page 24 Continued:6 Indoor unit GKH36K3CI GKH42K3CI Product Code ET010N0210 ED020N0310 Model Outdoor unit GUHD36NM3CO GUHD42NM3CO Product Code CF090W04100 CF090W0420 10.3 Cooling Btu/h 35140 37530 Nominal Capacity 11.2 12.4 Heating Btu/h 38210 42300 Cooling 3.18 Power Input Heating EER/COP 3.24/3.61 3.33/3.75 Indoor Unit GKH36K3CI GKH42K3CI Power Supply...
- Page 25 Continued:7 Indoor unit GKH36K3CI GKH42K3CI Product Code CF060N0270 ET010N0230 Model Outdoor unit GUHD36NM3C1O GUHD42NM3C1O Product Code CF090W0560 CF090W0570 11.0 10.0 Cooling 37530 Btu/h 34100 Nominal Capacity 11.0 12.0 Heating Btu/h 37500 40944 Cooling 3.115 3.426 Power Input Heating 3.047 EER/COP 3.21/3.61 3.22/3.61 Indoor Unit...
- Page 26 4.1.3 Ceiling Type Indoor unit GTH09K3CI GTH12K3CI Product Code ED020N0171 ED020N0181 Model Outdoor unit GUHD09NK3CO GUHD12NK3CO Product Code CF090W0260 CF090W0270 Cooling Btu/h 10236 11600 Nominal Capacity Heating Btu/h 10236 13000 Cooling 0.857 1.059 Power Input Heating 0.75 0.927 EER/COP 3.5/4.0 3.21/4.1 Indoor Unit GTH09K3CI...
- Page 27 Continued:1 Indoor unit GTH09K3CI GTH12K3CI Product Code ED020N0171 ED020N0181 Model Outdoor unit GUHD09NK3C1O GUHD12NK3C1O Product Code CF090W0340 CF090W0350 Cooling Btu/h 10236 11600 Nominal Capacity Heating Btu/h 10236 13000 Cooling 0.857 1.059 Power Input Heating 0.75 0.927 EER/COP 3.5/4.0 3.21/4.1 Indoor Unit GTH09K3CI GTH12K3CI Power Supply...
- Page 28 Continued:2 Indoor unit GTH18K3CI GTH24K3CI GTH30K3CI Product Code ED020N0191 ED020N0200 ED020N0210 Model Outdoor unit GUHD18NK3CO GUHD24NK3CO GUHD30NK3CO Product Code CF090W0281 CF090W0290 CF090W0330 Cooling Btu/h 18000 24000 30000 Nominal Capacity 6.15 Heating Btu/h 21000 27000 32400 Cooling 1.65 2.18 2.74 Power Input Heating 2.21 2.63...
- Page 29 Continued:3 Indoor unit GTH18K3CI GTH24K3CI GTH30K3CI Product Code ED020N0191 ED020N0200 ED020N0210 Model Outdoor unit GUHD18NK3C1O GUHD24NK3C1O GUHD30NK3C1O Product Code CF090W0500 CF090W0510 CF090W0520 Cooling Btu/h 18000 24000 30000 Nominal Capacity 6.15 Heating Btu/h 21000 27000 32400 Cooling 1.65 2.18 2.74 Power Input Heating 2.21...
- Page 30 Continued:4 Indoor unit GTH36K3CI GTH42K3CI GTH36K3CI Product Code ED020N0220 ED020N0310 ED020N0220 Model Outdoor unit GUHD36NK3CO GUHD42NK3CO GUHD36NM3CO Product Code CF090W0301 CF090W0311 CF090W0411 10.5 11.5 10.5 Cooling Btu/h 35826 39238 35800 Nominal Capacity 11.5 12.5 11.5 Heating Btu/h 39238 42650 39238 Cooling 3.27 3.58...
- Page 31 Continued:5 Indoor unit GTH36K3CI GTH42K3CI GTH36K3CI Product Code ED020N0220 ED020N0310 ED020N0220 Model Outdoor unit GUHD36NK3CO GUHD42NK3CO GUHD36NM3CO Product Code CF090W0300 CF090W0310 CF090W0410 10.6 11.9 10.5 Cooling Btu/h 36160 40600 35800 Nominal Capacity 12.0 13.5 Heating Btu/h 40940 46060 40940 Power Cooling 3.26 3.707...
- Page 32 Continued:6 Indoor unit GTH36K3CI GTH42K3CI GTH36K3CI Product Code ED020N0220 ED020N0310 ED020N0220 Model Outdoor unit GUHD36NK3C1O GUHD42NK3C1O GUHD36NM3C1O Product Code CF090W0531 CF090W0541 CF090W0561 10.5 11.5 10.5 Cooling Btu/h 35800 39238 35800 Nominal Capacity 11.2 12.5 11.2 Heating Btu/h 38200 42650 38200 Cooling 3.27 3.58...
- Page 33 Continued:7 Indoor unit GTH42K3CI GTH48K3CI GTH42K3CI Product Code ED020N0310 ED020N0230 ED020N0310 Model Outdoor unit GUHD42NM3CO GUHD48NM3CO GUHD42NM3CO Product Code CF090W0421 CF090W0430 CF090W0420 11.5 11.9 Cooling Btu/h 39238 48000 40600 Nominal Capacity 12.5 16.5 Heating Btu/h 42650 56300 44356 Cooling 3.58 Power Input Heating 3.46...
- Page 34 Continued:8 Indoor unit GTH42K3CI GTH48K3CI GTH48K3CI Product Code ED020N0310 ED020N0230 ED020N0230 Model Outdoor unit GUHD42NM3C1O GUHD48NM3C1O GUHD48NK3C1O Product Code CF090W0570 CF090W0580 CF090W0550 11.3 Cooling Btu/h 38555 48000 48000 Nominal Capacity 12.5 16.0 16.0 Heating Btu/h 42650 54600 54600 Cooling 3.52 4.36 4.36 Power Input...
- Page 35 Continued:9 Indoor unit GTH48K3CI GTH60K3CI GTH60K3CI Product Code ED020N0230 ED020N0440 ED020N0440 Model Outdoor unit GUHD48NK3CO GUHD60NM3CO GUHD60NM3C1O Product Code CF090W0320 CF090W0440 CF090W0590 Cooling Btu/h 48000 54500 54500 Nominal Capacity 16.5 17.5 17.5 Heating Btu/h 56300 59700 59700 Cooling 4.98 4.98 Power Input Heating 4.84...
- Page 36 Note:Nominal capacities are based on the follow conditions. Mode Indoor Outdoor DB:35 (95 DB:27 (80.6 Cooling WB:19 (66.2 WB:24 (75.2 DB:20 (68 DB:7 (44.6 Heating WB:-- (-- WB:6 (42.8 Piping Length The air volume is measured at the relevant standard external static pressure. Noise is tested in the Semianechoic room, so it should be slightly higher in the actual operation due to environmental change.
-
Page 37: Operation Range
3.2 Operation Range Mode Range of Outdoor Temperature Cooling 18 /-15 --48 Heating -7 -24 3.3 Electrical Data Compressor Fuse/ Fan Motor Min. Power Breaker Capacity Supply Cord Model Power Supply Qty. V,Ph,Hz — GUHD09NK3CO/GUHD09NK3C1O 0.35 5/16 GUHD12NK3CO/GUHD12NK3C1O 0.35 5/16 GUHD18NK3CO/GUHD18NK3C1O 0.58 5/20... -
Page 38: Piping Diagram
Fuse/ Min. Power Supply Power Supply Fan Motor Breaker Capacity Cord Model V,Ph,Hz GFH48K3CI 5.05 220-240 GTH48K3CI 2.53 GFH60K3CI 3.33 GTH60K3CI 2.53 Notes: RLA:Rated load amperes LRA:Locked rotor amperes FLA:Full load current Fuse: On the main board 4 PIPING DIAGRAM... - Page 39 CONTROL...
-
Page 40: Control
CONTROL 1 OPERATION FLOWCHART 1.1Cooling/Dry Operation... -
Page 41: Heating Operation
1.2 Heating Operation... -
Page 42: Wireless Remote Controller
2 WIRELESS REMOTE CONTROLLER 2.1 Operation View 2.1.1 Controller-Duct Type Name Function description ON/OFF button Press the button to set turning on/off the unit. Press the button to select the mode, Mode button cooling , heating , fan or auto mode. Increase/Decrease button Press this button to increase/decrase the setup temp. - Page 43 2.1.2 Controller-Cassette Type and Ceiling Type SWING SWING AUTO FAN Auto Fan OPER OPER AUTO AUTO SWING HUMID LIGHT SAVE SWING HUMID LIGHT SAVE TIMER TIMER ON/OFF ON/OFF SLEEP LIGHT HUMID TIME ON TIME OFF SAVE ANION MODE ON/OFF MODE ON/OFF Name Function description...
-
Page 44: Display View
3.2 Display View Display Function description :auto fan speed; :low fan speed, Fan Speed :middle fan speed; :high fan speed. :Auto running; :Cool running. Run Mode :Dry Running ; :Fan Running. :Heat running (Heat and Cool unit only) Setup temp Temperature value of setting Swing function Swing is on... -
Page 45: Wired Remote Controller
3 WIRED REMOTE CONTROLLER 3.1 Operation View 3.1.1 LCD Display of Wired Controller... -
Page 46: Buttons
3.1.2 Instruction to LCD Display Description Instruction to Displaying Contents Swing Swing function Air exchange function Sleep Sleeping states Running mode Each kind of running mode of indoor unit (auto mode) Cooling Cooling mode Dry mode Fan mode Heating Heating mode Defrost Defrosting state Gate-control card... - Page 47 3.2.2 Instruction to Function of Buttons Description Function of Button. Function selection and canceling; Enter/cancel Press it for 5s to enquiry the outdoor ambient temperature. Running temperature setting of indoor unit, range :16-30 Timer setting, range:0.5-24hr; Switchover between quiet/auto quiet. Setting of high/middle/low/auto fan speed.
-
Page 48: Installation Of Wired Controller And Project Debugging
3.3 Installation of Wired Controller and Project Debugging 3.3.1 Installation of Wired Controller Fig.3.3.1: Fig.1 Surface mounting of Cable Fig.3.3.2: Fig.2 Concealed mounting of Cable Fig.3.3.3: Sketch for Installation of Wired Controller Socket’s base Soleplate of Front panel of Description box installed in Screw M4×12 Screw ST2.9×6... -
Page 49: Error Display
3.4 Error Display If there is malfunction during running of the system, LCD will display error code at temperature– displayed location. Once there is more than one malfunction, error codes will be displayed circularly. If there are multiple circuit systems, the system number of failed system will be displayed before the colon (not for single system). -
Page 50: Dimension
3.5 Dimension 4 CENTRALIZED CONTROLLER 4.1 Centralized Controller-week timer 4.1.1 Function Centralized Control and Week Timer Functions: The centralized controller and the weekly timer are integrated in the same wire controller. The system has both the centralized control and the week timing functions. - Page 51 Name Function description ENTER button Press the button to let setting validate. Increasing button Press “ Decreasing button Press “ CANCEL/DELETE short-press “cancel/delete button “cancel/delete SINGLLE/GROUP short-press “single/group SINGLE button long-press “single/group GROUP TIMER/TIME Short-press “timer/time button Long-press “timer/time On/off button Press the button to set start or close the unit.
-
Page 52: Smart Zone Controller
4.1.4 Dimensions 4.2 Smart Zone Controller 4.2.1 Function The smart zone controller can directly control up to 16 sets of indoor units in a control network and is available to check the running status of any unit through the LCD, including running mode, timer, fan speed, central control and shielding setting etc. - Page 53 1. Under the single/centralized control status:It is used to set the running temperature of °C °C the indoor unit with max.30 anmin.16 2. Under the timing setting status:It is used to set the timing period with max.24 hours and min.0 hour; 3.
- Page 54 Name Description Fan speed It displays the fan speed of the indoor unit, high, medium, low and auto. Running mode It displays the running mode of the indoor unit, auto, cool, dry, fan and heat. System clock It displays the current time (hour and minute) in 24-hour time system and also the week day. Shield It displays the shield status, “ALL’, “TEMP MODE...
- Page 55 INSTALLATION...
-
Page 56: Installation
INSTALLATION 1 INDOOR UNIT INSTALLATION 1.1 Installation of Duct Type 1.1.1 Before Installation damage, please immediately report to the transport company or equipment company in writing. b. After receiving the machine, please check the unit and accessories in reference to the packing list. and quantity of accessory parts are correct. - Page 57 d. Install the hanger onto the indoor unit as Figure 1-1-2 and Figure 1-1-3 shows. e. Install the indoor unit at the ceiling as Figure 1-1-5 shows. Figure 1-1-5 f. Precautions for unfavorable installation: The preparation of all pipes (connecting pipes and drainage pipes) and cables (connecting lines of wire controller, indoor unit and outdoor unit) must be ready before the installation, so as to achieve smooth installation.
- Page 58 Figure 1-1-7 Unit:mm Item Model GFH09K3CI GFH12K3CI GFH18K3CI GFH24K3CI 1101 1159 1270 1002 GFH30K3CI GFH36K3CI 1011 1115 1226 GFH42K3CI GFH48K3CI 1015 1115 1226 GFH60K3CI 1353 1150 1463...
- Page 59 Installation Accessories List for Duct-type Indoor Unit Name & Shape Notes Installation and Operating Instructions Insulation materials for gas pipe Used for gas pipe connector on indoor unit Insulation materials for liquid pipe Used for liquid pipe connector on indoor unit Insulation materials for drainage pipe Used for wrapping the condensate pipe and rubber plug.
- Page 60 Figure 1-1-8 Warning:The height of installation for the indoor unit should be 2.5m above. 1.1.6 Drain Piping Work a. Installation of Drainage Pipeline A drainage outlet is located at both the left and right sides of the indoor unit. After selecting one drainage outlet, the other outlet shall be blocked by rubber plug.
- Page 61 c. Matters of Attention The joint of Drainage Pipeline must not have leakage. The Drainage Pipeline shall be installed with an inclining angel of 5 10°, so as to facilitate the drainage of condensate. The joints of the Drainage Pipeline must be covered by thermal insulation materials to avoid generation of exterior condensate.
- Page 62 Figure 1-1-12 Number Name Number Name Hanger rod Transition air duct Return air duct Supply air duct Canvas air duct Diffuser Return air louver Diffuser joint Supply air outlet Notes: may also be used as needed for actual installation. The installation method is similar to that of back return air inlet.
-
Page 63: Installation Of Ceiling Type
Figure 1-1-15 Number Name Number Name Canvas air duct Supply air duct Return air duct Test grill d. Installation of round Supply air outlet Figure 1-1-16 1.2 Installation of Ceiling Type 1.2.1 Before Installation damage, please immediately report to the transport company or equipment company in writing. After receiving the machine, please check the unit and accessories in reference to the packing list. - Page 64 Such a place where condensation water is easily drained out. Such a place that can handle the weight of indoor unit. Such a place which has easy access for maintenance. Such a place where is permitting easy connection with the outdoor unit. Such a place where is 1m or more away from other electric appliances such as television, audio device, etc.
- Page 65 1.2.4 Dimension Data Figure 1-2-7 Unit: mm Model GTH09K3CI GTH12K3CI 1220 1158 GTH18K3CI GTH24K3CI GTH30K3CI 1420 1354 GTH36K3CI GTH42K3CI GTH48K3CI 1700 1634 GTH60K3CI 1.2.5 Installation Clearance Data Figure 1-2-8 1.2.6 Drain Piping Work a. Installation of Drainage Pipeline A Drainage outlet is located at both the left and right sides of the indoor unit. After selecting one Drainage outlet, the other outlet shall be blocked by rubber plug.
-
Page 66: Installation Of Cassette Type
Purchase general-purpose hard PVC pipe locally to be used as the drainage pipeline. When carrying (As shown in Figure 1-2-9) When the laid drainage pipe is used for multiple units, the common pipe shall be about 100mm lower than the drainage outlet of each set of unit. A pipe with thicker wall shall be used for such purpose. Figure 1-2-9 b. - Page 67 Please contact the local Gree special nominated repair department before installation. Any malfunction caused by the unit that is installed by the department that is not special nominated by Gree would not deal with on time by the inconvenience of the business contact.
- Page 68 GKH12K3CI Figure 1-3-1 GKH18K3CI / GKH24K3CI / GKH30K3CI GKH36K3CI / GKH42K3CI Figure 1-3-2 The drilling of holes in the ceiling must be done by the professional personnel. Figure 1-3-3 Cautions: The dimension for the ceiling openings with * marks can be as large as 910mm. But the overlapping sections of the ceiling and the decorated surface boards should be maintained at no less than 20mm.
- Page 69 c. Main body of hoisting air conditioner Figure 1-3-4 The primary step for install the indoor unit. When attach the hoisting stand on hoisting screw, do use nut and gasket individually at the upper and Use install cardboard Please refer to the install cardboard about the dimension of ceiling opening. The central mark of the ceiling opening is marked on the install cardboard.
- Page 70 Figure 1-3-6 Model GKH18K3CI GKH24K3CI GKH30K3CI GKH36K3CI GKH42K3CI 1.3.5 Installation Clearance Data Figure 1-3-7 Models GKH12K3CI GKH18K3CI GKH24K3CI GKH30K3CI GKH36K3CI GKH42K3CI 1.3.6 Drain Piping Work a. Installation of Drainage Pipeline When connecting the drainage pipe with the unit, do not apply excessive force to the pipeline at the Purchase general-purpose hard PVC pipe locally to be used as the drainage pipeline.
- Page 71 than the drainage outlet of each set of unit. A pipe with thicker wall shall be used for such purpose. Figure 1-3-8 b. Testing of Drainage System After the electrical installation is completed, carry out the testing of the drainage system. to ensure that there is no leakage.
- Page 72 Please install the drain hose according to the following process if several drain hoses join together. (As shown in Figure 1-3-11) Check the smoothness of drain after installation. Check the drain state by immiting 600cc water slowly from the outlet vent or test hole. (As shown in Figure 1-3-12) Check the drain in the state of refrigerating after installation of the electric circuit.
-
Page 73: Outdoor Unit Installation
to let the swing motor lead wire get caught in the sealing material.) Screw all 4 hexagon head screws located right beneath the latches in approximately 15mm.(Panel will rise) Adjust the panel by turning it to the arrowed direction in Fig.4 so that the ceiling opening is completely covered. -
Page 74: Installation Site
and quantity of accessory parts are correct. Determine the correct handling route and methods, thus to avoid damaging the unit or causing possible hazard. For the sake of protection and safety, it is suggested to move the unit with the packaging box. -
Page 75: Dimension Data
2.4 Dimension Data Figure 1-3-17 Unit:mm Item model GUHD09NK3CO/GUHD12NK3CO GUHD09NK3C1O/GUHD12NK3C1O GUHD18NK3CO/GUHD18NK3C1O GUHD24NK3CO/GUHD24NK3C1O GUHD30NK3CO/GUHD30NK3C1O GUHD36NK3CO/GUHD36NK3C1O GUHD36NM3CO/GUHD36NM3C1O 1107 1100 GUHD42NK3CO/GUHD42NK3C1O GUHD42NM3CO/GUHD42NM3C1O GUHD48NK3CO/GUHD48NK3C1O GUHD48NM3CO/GUHD48NM3C1O 1085 1365 GUHD60NM3CO/GUHD60NM3C1O 2.5 Installation Clearance Data Figure 1-3-18 3 REFRIGERATION PIPING WORK 3.1 Refrigeration Piping Work Procedures a. Connection Pipe The connection pipe must meet the following requirements. - Page 76 Align the flared end of copper pipe with the center of threaded connector and use your hands to shown in Fig. 3-1-1. See Table 3-1-1 for the torque required for tightening the nuts. Figure 3-1-2 Form 3-1-1 the tightening torque needed for tightening nut Pipe diameter Tightening Torque Inch...
- Page 77 Figure 3-1-4 Tighten the valve cap and then use soap water or leakage detector to check the connection between outdoor unit and pipe for any leakage. Caution: If possible, it is best to discharge the air out of the machine from the valve by using vacuum pump. To establish vacuum by using vacuum pump, please operate as follows: Take out the nut cover of the inlet for refrigerant.
-
Page 78: Caution In Connecting Pipes
Use adhesive tape to bundle the connecting pipe and the cables together. To prevent condensate cables. Use thermal insulation tape to wrap the pipes from the bottom of the outdoor unit until the upper end of the pipe where the pipe enters the wall. When wrapping thermal insulation tape, the later circle of tape must cover half of the front circle of tape (Figure 3-1-7). -
Page 79: Electric Wiring Work
Max. Height Amount of Max. Item Size of Fitting Pipe(Inch) Difference Additional Pipe between Refrigerant to be Model Length Indoor Unit and Filled (For Extra Liquid Outdoor Unit m Length of Pipe) GUHD09NK3CO/GUHD09NK3C1O GUHD12NK3CO/GUHD12NK3C1O 30g/m GUHD18NK3CO/GUHD18NK3C1O GUHD24NK3CO/GUHD24NK3C1O GUHD30NK3CO/GUHD30NK3C1O 60g/m GUHD36NK3CO/GUHD36NK3C1O GUHD36NM3CO/GUHD36NM3C1O GUHD42NK3CO//GUHD42NK3C1O GUHD42NM3CO/GUHD42NM3C1O... - Page 80 4.1.2 Connection between power cables and wiring terminals Caution be larger than 2.5mm The lines must be installed by professional personnel. An electricity leakage protection switch and an air switch with gap between electrode heads larger than a. Connection of single wire Use wire stripper to strip the insulation layer (25mm long) from the end of the single wire.
-
Page 81: Electric Wiring Design
For air-conditioner with auxiliary heater, it is required to connect the power cable to the “L1, L2 4.1.4 Connection of Signal Line of Wire Controller Caution: Take great care when carrying out the following connections, so as to avoid malfunction of the air- conditioning unit because of electromagnetic interference. - Page 82 GUHD18NK3CO / GUHD18NK3C1O + GFH18K3CI GUHD24NK3CO / GUHD24NK3C1O + GFH24K3CI GUHD30NK3CO / GUHD30NK3C1O + GFH30K3CI 1. Power cord 3×4.0mm (H07RN-F) 2. Power cord 3×1.0 mm (H05VV-F) 3. Communication Cords GUHD36NM3CO/ GUHD36NM3C1O + GFH36K3CI GUHD42NM3CO / GUHD42NM3C1O + GFH42K3CI GUHD48NM3CO / GUHD48NM3C1O GFH48K3CI GUHD60NM3CO / GUHD60NM3C1O GFH60K3CI...
- Page 83 GUHD36NK3CO/ GUHD36NK3C1O + GTH36K3CI GUHD42NK3CO/ GUHD42NK3C1O GTH42K3CI 1.Power cord 3×4.0 mm (H07RN-F) 2.Power cord 3×1.0 mm (H05VV-F) 3.Communication Cords GUHD48NK3CO/ GUHD48NK3C1O GTH48K3CI 1.Power cord 3×6.0 mm (H07RN-F) 2.Power cord 3×1.0 mm (H05VV-F) 3.Communication Cords GUHD18NK3CO/ GUHD18NK3C1O GTH18K3CI GUHD24NK3CO/ GUHD24NK3C1O GTH24K3CI GUHD30NK3CO/ GUHD30NK3C1O GTH30K3CI 1.Power cord 3×4.0 mm...
- Page 84 GUHD12NK3CO/ GUHD12NK3C1O GKH12K3CI 1.Power cord 3×2.5 mm (H07RN-F) 2.Power cord 3×1.0 mm (H05VV-F) 3.Communication Cords GUHD36NK3CO/ GUHD36NK3C1O GKH36K3CI GUHD42NK3CO/ GUHD42NK3C1O GKH42K3CI 1.Power cord 3×4.0 mm (H07RN-F) 2.Power cord 3×1.0 mm (H05VV-F) 3.Communication Cords GUHD18NK3CO/ GUHD18NK3C1O + GKH18K3CI GUHD24NK3CO/ GUHD24NK3C1O + GKH24K3CI GUHD30NK3CO/ GUHD30NK3C1O + GKH30K3CI...
- Page 85 Minimum Minimum Sectional Area Capability of Air Power Sectional Area of power Wire Model Switch(A) Supply of Earth Wire (mm (Outdoor/Indoor) (Outdoor/Indoor) (Outdoor/Indoor) GUHD09NK3CO/ 16/6 2.5/1.0 2.5/1.0 GUHD09NK3C1O GUHD12NK3CO/ 16/6 2.5/1.0 2.5/1.0 GUHD12NK3C1O GUHD18NK3CO/ 20/6 4.0/1.0 4.0/1.0 GUHD18NK3C1O GUHD24NK3CO/ 20/6 4.0/1.0 4.0/1.0 GUHD24NK3C1O...
- Page 86 MAINTENANCE...
-
Page 87: Maintenance
MAINTENANCE 1 TROUBLE TABLE Table 1 Fault Display on Indoor Wired Controller: Trouble Trouble Origin of Control Description Code Name Trouble Signal If the water-full protection cannot be recovered after 2 hours, it is believed Water Pump that the water pump is failed, in which case all the loads will be switched off Water pump Malfunction and cannot be recovered automatically. - Page 88 Trouble Trouble Origin of Control Description Name Code Trouble Signal system will enter into full water protection and the indicator will blink (or display E9): Under cooling and dry mode, the outdoor fan and compressor Full Water Liquid level will be stopped, while the indoor fan will be stopped after 1 minute. Under Protection switch heating mode, the outdoor fan and compressor will be stopped, the 4-way...
- Page 89 Trouble Trouble Origin of Control Description Name Code Trouble Signal All of The Terminal Air System The air valve on end will be fully closed. Valve Colsed (not failure) Wire Controller the units is remotely monitored or controlled by centralized controller and Invalid wire controller the wire controller’s functions are invalidated (not failure)
- Page 90 When the unit has error,it will display error code, Its error code as the same as Table 1 Fault Display on Indoor Wired Controller. Table3 This section is applicable to the electric control box of the outdoor unit 09~12K . Running Status Yellow Lamp Red Lamp...
- Page 91 U-Match Series DC Inverter Service Manual Table 4 Main board dual 8 numeral tube Display Codes for Outdoor Unit of 18~60k Outdoor unit display of dual 8 Malfunction Item Indoor Unit Display numeral tube DC busbar over-voltage protection IPM or PFC over-temperature protection Current sense circuit error IPM or PFC temperature sensor error Compressor current protection...
-
Page 92: Flow Chart Of Troubleshooting
2 FLOW CHART OF TROUBLESHOOTING Service personnel shall collect the malfunction information as much as possible and research them thoroughly, list these electrical parts which may cause malfunction, service personnel shall be able to Observe the status of the complete device and do not observe the partial It is advised to start from the simple operation during analyzing, judging and confirming malfunction reason, then conduct the complicated operations such removal of device, part replacement and refrigerant Find the malfunction reason carefully as unit may occur several malfunction at the same time and one... - Page 93 Malfunction display: E3 Compressor Low Pressure Protection...
- Page 94 Malfunction display: E4 Compressor Exhaust High Temperature Protection Malfunction display: E5 Compressor Overheat (Please check the corresponding method of drive protection) Malfunction display: E6 Communications Failure...
- Page 95 Malfunction display: E9 Full Water Protection Malfunction display: F0 Failure of Indoor Room Sensor at Return air inlet...
- Page 96 Malfunction display: F1 Failure of Evaporator Temp. Sensor Malfunction display: F2 Failure of Condenser Temp. Sensor...
- Page 97 Malfunction display: F3 Failure of Outdoor Ambient Sensor Malfunction display: F4 Failure of Exhaust Temp. Sensor...
- Page 98 Malfunction display: F5 Failure of Indoor Room Sensor at Wire Controller 2.2.1Brief Introduction to the Electric Control Box of the Outdoor Unit .(Applicable to 09~12K) right) 2. Testing Method to the Key Points on the Outdoor Unit’s Electric Control Box 2.1Test Points and Testing Method of 15V/12V/5V Power Supplies.
- Page 99 2.2Test Points and Testing Method of 5Vand 3.3V Power Supplies. 2.3Test Points and Testing Method of IGBT and IPM Module...
- Page 100 3 Status Indicating Lamp of the Electric Control Box of the Outdoor Unit There are three independent indicating lamps on the electric control box of the outdoor unit, and they on again. 2.2.2 Analysis to the Common After-Sales Faults 1. Stalling of the Outdoor Fan Motor Method of testing the AC fan motor: pull out the terminals of the fan motor, then measure the resistance between the red, brown, and black wires with the universal meter;...
- Page 101 and black wires with a universal meter; The normal value is about several hundreds ohms, if the measure value is beyond this range, it indicates there is a open circuit or the fan motor is defective. Compressor: apart from the badly running environment, improper connection, or systematic abnormity, if H5 still occurs frequently after the replacement of the electric control box, then it indicates that the compressor is probably defective.
- Page 102 (Applicable to GUHD18NK3CO/GUHD24NK3CO/ GUHD30NK3CO/ GUHD36NK3CO/ GUHD42NK3CO/ GUHD48NK3CO/GUHD18NK3C1O/GUHD24NK3C1O/ GUHD30NK3C1O/ GUHD36NK3C1O/ GUHD42NK3C1O/ GUHD48NK3C1O) P0 Drive module reset P7 IPM or PFC temperature sensor error PA AC current protection (input side) PC Current sense circuit error Hc PFC protection P8 IPM or PFC over-temperature protection...
- Page 103 PH DC busbar over-voltage protection PL DC busbar under-voltage protection P6 Drive-to-main-control communication error...
- Page 104 U-Match Series DC Inverter Service Manual Lc Compressor Startup Failure P5 Compressor current protection H7 Compressor motor desynchronizing H5 IPM protection Ld Phase loss...
- Page 105 PU Charging circuit error H6 DC fan error...
- Page 106 (Applicable to GUHD36NM3CO/ GUHD42NM3CO/ GUHD48NM3CO/ GUHD60NM3CO/ GUHD36NM3C1O/ GUHD42NM3C1O/ GUHD48NM3C1O/ GUHD60NM3C1O IPM Module Protection...
- Page 107 Method of Testing IPM Module Short Circuit: 1. Preparation before test: prepare a universal meter and turn to its diode option, and then remove the wires U, V, W of the compressor after it is powered off for one minute. 2.
- Page 108 Tripping...
- Page 109 DC Busbar underVoltage Protection...
- Page 110 DC busbar high voltage protection...
- Page 111 Open Phase...
- Page 112 U-Match Series DC Inverter Service Manual Communication Error between the Indoor and Outdoor Units...
-
Page 113: Wiring Diadram
3 WIRING DIADRAM 3.1 Outdoor unit The actual wiring should always refer to the wiring diagram of the unit. Model: GUHD09NK3CO/ GUHD12NK3CO Model: GUHD18NK3CO... - Page 114 Model: GUHD09NK3CO/ GUHD12NK3C1O Model: GUHD18NK3C1O...
- Page 115 Model:GUHD24NK3C1O/ GUHD30NK3C1O Model:GUHD36NK3CO/ GUHD42NK3CO...
- Page 116 GUHD24NK3C1O/ GUHD30NK3C1O Model: Model:GUHD36NK3C1O/ GUHD42NK3C1O...
- Page 117 Model:GUHD48NK3CO Model:GUHD36NM3CO/GUHD42NM3CO...
- Page 118 Model:GUHD48NK3C1O Model:GUHD36NM3C1O/ GUHD42NM3C1O...
- Page 119 Model:GUHD48NM3CO Model:GUHD60NM3CO...
-
Page 120: Indoor Unit
Model:GUHD48NM3C1O/ GUHD60NM3CO 3.2 Indoor unit The actual wiring should always refer to the wiring diagram of the unit. Duct Type Model:GFH09K3CI/GFH12K3CI/GFH18K3CI/GFH24K3CI/GFH30K3CI/GFH36K3CI/ GFH42K3CI/ GFH48K3CI/ GFH60K3CI... - Page 121 Floor Ceiling Type Model:GTH09K3CI/ GTH12K3CI/ GTH18K3CI /GTH24K3CI Model:GTH30K3CI/ GTH36K3CI/ GTH42K3CI...
- Page 122 Model:GTH48K3CI/ GTH60K3CI Cassttee Type Model:GKH12K3CI...
- Page 123 Model:GKH24K3CI Model:GKH18K3CI/GKH30K3CI/ GTH36K3CI/ GTH42K3CI...
-
Page 124: Disassembly And Assembly Procedure Of Main Parts
4 DISASSEMBLY AND ASSEMBLY PROCEDURE OF MAIN PARTS 4.1 Outdoor Unit Double-fan Inverter Outdoor Unit, applicable to 9 KBtu/h~12 KBtu/h Disassembly and Assembly of external casing Note: Before removing the outer housing, make sure that the unit has been cut off from the power supply. Step Illustration Handling Instruction... - Page 125 6 . R e m o v e t h e Remove the back panel back panel. away from the unit . 7 . D i s a s s e m b l e Loosen the screws on t h e r i g h t s i d e the side panel with a panel.
- Page 126 a . D i s m a n t l e t h e g a s - l i q u i d separator through heating its inlet/ outlet pipe by the means of gas welding. 3 . D i s c o n n e c t b.
- Page 127 9. Charge Recharge the refrigerant to the refrigerant system through liquid valve. through liquid T h e c h a r g e v o l u m e m u s t b e valve identical to the indications on nameplate.
- Page 128 correct position. please wrap the valve body with wet cloth, thus to prevent the guide 5. Connect the new inside the valve body from burn. Also 4-way valve to the pipe. take care to prevent any water from nitrogen pressure kept at 0.5±0.1kgf/ c(relative pressure).
- Page 129 Remove the grill away from 2. Remove the grille the back panel. Loosen the screws on the 3. Loosen the top t o p p a n e l w i t h a s c r e w panel driver.
- Page 130 7 . D i s c o n n e c t t h e Disconnect the motor power p o w e r c o r d o f t h e cord on the main board with motor hands or pliers 8 R e m o v e t h e f a n Remove the fan from motor.
- Page 131 correct position. 12. Install a new motor to motor support to motor support with bolts. fan to correct position and fix it to the motor shaft in reverse to the disassembly procedures. 13. Assemble the fan t o c o r r e c t p o s i t i o n a n d fix it onto the electric box according to disassembly procedures.
- Page 132 Disassembly and Assembly of electrical parts box Remark : Before removing the electric box or electric box sub-assembly, make sure that the power has been cut off. Handling Instruction Step Illustration 1. Remove the Remove the backside panel away backside panel from the unit 2.
- Page 133 6. Connect the c o m p o n e n t t o c o r r e c t p o s i t i o n power cable of according to disassembly procedures. each component For details, please refer to the wiring diagram.
- Page 134 3. Disassemble Loosen the screws on the the grille grille with a screw driver. 4 . R e m o v e t h e Remove the grille away from grille the unit . Loosen the screws between 5. Disassemble t h e f r o n t p a n e l a n d t h e the back panel partition board with a screw...
- Page 135 8 . R e m o v e t h e Remove the right side panel right side panel. away from the unit. Removal and Installation of Gas-liquid Separator and Compressor Remark: Before removing the compressor, make sure that there is no refrigerant inside the pipe system and that the power has been cut off.
- Page 136 4 . R e m o v e t h e Remove the compressor away from compressor away its base. a. Put the new compressor in the right place. 5. Place the new b . T i g h t e n t h e s c r e w s o f t h e compressor on the compressor with a wrench base...
- Page 137 9. Charge Recharge the refrigerant to the refrigerant through system through liquid valve. liquid valve The charge volume must be identical to the indications on nameplate. Disassembly and Assembly of 4-way valve Note: Before removing the 4-way valve, make sure that there is no refrigerant inside the pipe system and that the power has been cut off.
- Page 138 4. Remove 4-way valve the unit. correct position. please wrap the valve body with wet cloth, thus to prevent the guide 5. Connect the new inside the valve body from burn. Also 4-way valve to the pipe. take care to prevent any water from nitrogen pressure kept at 0.5±0.1kgf/ c(relative pressure).
- Page 139 Removal and Installation of Fan and Motor Note : Before the dismantlement of the motor, make sure the unit is powered off. Step Illustration Handling Instruction Loosen the screws between 1 Loosen the grille. the grille and the back panel with a screw driver.
- Page 140 Loosen the screws on the 5 . L o o s e n t h e backside panel with a screw backside panel driver. 6. Remove the rear Remove the rear side plate side plate. away from the unit 7 . D i s c o n n e c t t h e Disconnect the motor power p o w e r c o r d o f t h e cord on the main board with...
- Page 141 Loosen the bolts on the 10. Loosen the motor motor with a wrench. screwdriver to remove 11. Remove the motor motor support. correct position. 12. Install a new motor to motor support to motor support with bolts. fan to correct position and fix it to the motor shaft in reverse to the disassembly procedures.
- Page 142 1 5 . A s s e m b l e t h e cover to correct position electric box cover cover onto electric box. Removal and Installation of Electronic Expansion Valve Note : Before removing the compressor, make sure that there is no refrigerant inside the pipe system and that the power has been cut off.
- Page 143 4.Remove the old Remove the old expansion valve. expansion valve. A.Weld the electric expansion valve B.During soldering, charge nitrogen 5. Install a new electric with pressure of 0.5±0.1kgf/cm expansion valve and (relative pressure) connect it to system C.Do not burn the surrounding material during heating.
- Page 144 Double-fan Inverter Outdoor Unit, applicable to 48KBtu/h~60 KBtu/h Disassembly and Assembly of external casing . Note: Before removing the outer housing, make sure that the unit has been cut off from the power supply. Step Illustration Handling Instruction a. Cut off the power supply b.
- Page 145 5 . L o o s e n t h e back side plate back side plate. 6 . R e m o v e t h e Remove the back side plate. backside plate Removal and Installation of Gas-liquid Separator and Compressor Remark: Before removing the compressor, make sure that there is no refrigerant inside the pipe system and that the power has been cut off.
- Page 146 2 . R e m o v e t h e s c r e w f i x i n g Remove the screw fixing the gas- t h e g a s - l i q u i d liquid separator.
- Page 147 7 . R e m o v e t h e Remove the compressor from the compressor . compressor support. 8. Install a new A. Put a new compressor in the right c o m p r e s s o r o n place.
- Page 148 Disassembly and Assembly of 4-way valve Note: Before removing the 4-way valve, make sure that there is no refrigerant inside the pipe system and that the power has been cut off. Step Illustration Handling Instruction connected on the four opennings of 4-way valve.
- Page 149 5 . R e c h a r g e t h e r e f r i g e r a n t t o t h e system through liquid valve. system through liquid valve. to the indications on nameplate. Removal and Installation of Fan and Motor Note : Before the dismantlement of the motor, make sure the unit is powered off.
- Page 150 4. Remove the electric the screws on electric box box cover from electric box. out the motor power cable from mainboard. (Note: 5. Remove the motor Before removal, please power cable mark the insert position of the upper and lower motor power cables correctly).
- Page 151 9. Remove the fan Remove the fan from motor. from motor screwdriver to remove the 10. Remove the motor motor support. correct position. 11. Install a new motor to motor support to motor support with bolts. fan to correct position and reverse to the disassembly procedures.
- Page 152 1 4 . A s s e m b l e t h e cover to correct position. electric box cover cover onto electric box. Removal and Installation of Electronic Expansion Valve Note : Before removing the compressor, make sure that there is no refrigerant inside the pipe system and that the power has been cut off.
- Page 153 4.Establish vacuum Establish vacuum inside the system inside the system through liquid valve. through liquid valve. 5 . R e c h a r g e t h e system through liquid valve. r e f r i g e r a n t t o t h e system through liquid identical to the indications on valve.
- Page 154 3. Loosen the screws Loosen the screws between the between the electric electric box and side panel and box and side panel and motor base with a screw driver. motor base. 4. Remove the electric assembly upward from the middle box sub-assembly isolation plate.
- Page 155 7. Assemble the electric correct position and use screwdriver box cover.
-
Page 156: Indoor Unit
4.2.Indoor Unit 4.2.1 Duct type For GFH09K3CI /GFH12K3CI/GFH18K3CI Removal and Assembly of Fan Motor Step Illustration Handling Instruction Cut off the power supply of indoor unit. 1. Unplug the motor Use screwdriver to remove the electric cables box cover and unplug the motor cables in electric box. - Page 157 For GFH24K3CI/GFH30K3CI/GFH36K3CI/GFH42K3CI/GFH48K3CI/GFH60K3CI Remark: Make sure that the power supply is cut off before disassembling and protect all the parts during disassembly. Step Illustration Handling Instruction return air down on the guide slot 1.Disassembly of filter sponge, and remove according to screen for return air the direction shown by the arrow.
- Page 158 Disassembly of evaporator disassembly shall be long, put the copper tube under pressurized condition. Step Illustration Handling Instruction Disassemble the fastening screw 1 . D i s a s s e m b l y o f connecting left and right side panels f i x i n g s c r e w s o n on the evaporator and the upper the side panels of...
- Page 159 4.2.2Cassette-type Unit Removal and Assembly of Fan Motor. Step Illustration Handling Instruction 1.Loosen the screws Use screwdriver to loosen the screws 2. Remove the water Remove the water tray. tray 3 . L o o s e n t h e b o l t s the fan.
- Page 160 Removal and Installation of Drainage Pump Step Illustration Handling Instruction 1 . L o o s e n t h e s c r e w s Use screwdriver to loosen the screws Remove the water pump and replace 2. Remove the water tray 3 .
- Page 161 4.2.3 Floor Ceiling Type Model: GTH09K3CI/GTH12K3CI/GTH18K3CI/GTH24K3CI/GTH30K3CI/GTH36K3CI/GTH42K3CI Remove panel grating module Remark: Make sure that the power supply is cut off before disassembling and protect all the parts during disassembly. Step Illustration Handling Instruction Move down the clip of the sub-assy of fromt grill until the front grill is open.
- Page 162 Remove panel parts Remark: Make sure the power supply is cut off before disassembling and protect all the parts during disassembly. Do not scratch the outer parts. Step Illustration Handling Instruction arrow in the graph with screwdriver (two on both right and left and 4 in the front) and then remove the panel parts.
- Page 163 Remove evaporator components disassembly shall be long, seal the copper tube. Step Illustration Handling Instruction shown by the arrow in the g r a p h w i t h s c r e w d r i v e r. (There are 6 screws on left and right of the evaporator and 5 on evaporator outlet...
- Page 164 screws of fan wheel with inner hexagonal and remove the wheel. The inner hexagonal 2. Remove fans a n d i t s d i r e c t i o n o f effect are shown by the arrow in the graph. the bearing fixing plates with screwdriver.
- Page 165 Step Illustration Handling Instruction Disassembly of on the cover to remove the panel parts cover. Disassembly of sub-assy of electric box Remark: Make sure that the power supply is cut off before disassembling and protect all the parts during disassembly, especially the components inside the box in case of water and hit.
- Page 166 Disassembly of evaporator components disassembly shall be long, seal the copper tube . Step Illustration Handling Instruction evaporator, 3 screws of Disassembly water groove press board of evaporator and the 2 screws of water components b o a r d t o r e m o v e t h e evaporator.
- Page 167 Step Illustration Handling Instruction nuts of support to remove the mounting support 3. Disassembly o f b e a r i n g motor attaching clamp, remove the motor attaching clamp and motor attaching c l a m p s u b a s s e m b l y t o 4.
-
Page 168: Outdoor Unit
5 EXPLODED VIEWS AND SPARE PART LIST 5.1 Outdoor Unit Model: GUHD09NK3CO/GUHD12NK3CO Exploded Views and spare parts list: GUHD09NK3CO GUHD12NK3CO Description CF090W0260 CF090W0270 Name of Part Part Code Part Code 01253454 01253454 Top Cover Sub-Assy Condenser Assy 01125387 01125386 01473042 01473042 Rear Grill 3900028008... -
Page 169: Exploded Views And Spare Part List
01703058 01703058 Motor Support 1501306713 1501306713 Fan Motor 10333004 10333004 Axial Flow Fan 01533027P 01533027P Front Panel 22413433 22413433 Front grill '26233100 '26233100 Small Handle 01395860 01395860 Electric Box Assy 49013027 49013027 Radiator 20113014 20113014 Electric Box 30033073 30033073 Filter Board Main Board 30228206 30228207... - Page 170 GUHD09NK3C1O GUHD12NK3C1O Description CF090W0340 CF090W0350 Name of Part Part Code Part Code Front Grill 22413433 22413433 Front Panel 22413433 015330124 Axial Flow Fan 015330124 10333012 Fan Motor 10333012 15013159 Chassis Sub-assy 15013159 01195320P Drainage Connecter 01195320P 06123401 Compressor Gasket 06123401 76711040 Compressor and Fittings 76711040...
- Page 171 Model: GUHD18NK3CO Exploded View and spare parts list: GUHD18NK3CO Dscription CF090W0281 Name of Part Part Code Front Grill '22415002 Front Panel '01535008P Chassis Sub-Assy '0120371401P Compressor And Fittings '00103501 Compressor Gasket '76710236 Magnet Coil '4300040033 4-way Valve Assy '04145373 4-way Valve '430004032 Gas Tube Filter '072190511...
- Page 172 Cut-off Valve '071302392 Cut-off Valve Sub-Assy '07133058 Cut-off Valve '07130239 Handle '26235254 Electronic Expansion Valve '07134601 '4300876703 Inductance '4312002001 Supporter '01805405 Supporting Strip '01895240 Temperature Sensor '3900028010 Rear Grill '01473043 Clapboard Sub-Assy '01232902 Condenser Assy '01113386 Motor Support Sub-Assy '01705020 Top Cover '01255005P Left Handle...
- Page 173 Model: GUHD18NK3C1O Exploded View and spare parts list: GUHD18NK3C1O Description CF090W0500 Name of Part Part Code Front Grill '22415002 Front Panel '01535008P Chassis Assy '01195709 Electrical Heater '765100047 Compressor and Fittings '00103501 Overload Protector '00180002 Rubber Grommet '76710236 Electric Heater(Compressor) '7651300402 Magnet Coil '4300040033...
- Page 174 Right Side Plate '01305053P Valve support assy '01715010P Cut off Valve Sub-Assy '07133060 Cut off Valve '071302392 Cut off Valve Sub-Assy '07133058 Cut off Valve '07130239 Handle '26235254 Electronic Expansion Valve '07134601 '4300876703 Pressure Protect Switch '46020003 Inductance '4312002001 Temperature Sensor '3900028010G Rear Grill '01473043...
- Page 175 Model: GUHD24NK3CO Exploded View and spare parts list. GUHD24NK3CO Description CF090W0290 Name of Part Part Code Top Cover '01255006P Top Cover Sub-Assy '01255007 Electric Box Cover '01425281 Condenser Assy '01125394 Rear Grill '01475008 4-way Valve '4300008201 Temperature Sensor '3900028010 Electronic Expansion Valve '07334193 StrainerA '07210022...
- Page 176 Chassis Sub-assy '01195307P Compressor Gasket '76710207 '00105036 Clapboard '01245237 Motor Support Sub-Assy '01805362 Fan Motor '15705224 Axial Flow Fan '10335005 Front Side Plate '01305072P left handle '26235401 Cabinet '01435004P Front Grill '22415003 Left Side Plate '01305043P Condenser support plate '01175092 Electric Box Assy '01395898 Radiator...
- Page 177 GUHD30NK3CO Description CF090W0290 Name of Part Part Code Cabinet '01435004P Left Side Plate '01305043P Top Cover Sub-Assy '01255007 Condenser Assy '01125396 Motor Support Sub-Assy 01805429 Rear Grill '01475008 Electric Box Cover '01425279 PFC Inductance '43128003 Inductance Box Assy 01395909 Electric Box Cover '01425281 Main Board '30224306...
- Page 178 Model: GUHD24NK3C1O\GUHD30NK3C1O Exploded View and spare parts list GUHD24NK3C1O GUHD30NK3C1O Description CF090W0510 CF090W0520 Name of Part Part Code Part Code Front Grill '22415003 '22415003 Cabinet '01435004P '01435004P Left Handle '26235401 '26235401 Front Side Plate 01305086P 01305086P Axial Flow Fan 10335005 10335005 Fan Motor '15702802...
- Page 179 StrainerA '07210022 '07210022 Electronic Expansion Valve '07334193 '07334193 Right Side Plate '01305044P '01305044P Valve Support Sub-Assy '01715012P '01715012P Valve '07100005 '07100005 Cut off Valve '07133157 '07133157 Big Handle '26235001 '26235001 Electric Expand Valve Fitting 4300010818 4300010818 Silencer '07245007 '07245007 4-way Valve '4300008201 '4300008201 Rear Grill...
- Page 180 Model: GUHD36NK3CO/GUHD42NK3CO Exploded View and spare parts list GUHD36NK3CO GUHD42NK3CO Description CF090W0300 CF090W0301 CF090W0310 CF090W0311 Name of Part Part Code Part Code Part Code Part Code Front Grill 22415005 22415005 22415005 22415005 Cabinet 01435007P 01435007P 01435007P 01435007P Condenser support plate 01895309 01795020 1895309...
- Page 181 Valve Support Sub-Assy 01715257P 01715257P 01715257P 01715257P Cut-off Valve '07133157 '07133157 '07133157 '07133157 Valve '07133185 '07133185 '07133185 '07133185 Chassis Sub-assy 01195244P 01195244P 01195244P 01195244P Retaining Plate Sub-Assy 01845235P 01845235P 01845235P 01845235P 00205230 00205275 205230 00205275 Inhalation Tube 4655520 4655520 4655520 4655520 Front Side Plate Sub-Assy 1305508...
- Page 182 GUHD36NK3C1O GUHD42NK3C1O Description CF090W0530 CF090W0540 Name of Part Part Code Part Code Axial Flow Fan '10335010 '10335010 Fan Motor 1570280201 1570280201 Condenser support plate '01895309 '01895309 Left Side Plate '01305064P '01305064P Left Handle '26235401 '26235401 Condenser Assy 01125736 '01125392 Top Cover '01255009P '01255009P Motor Support Sub-Assy...
- Page 183 Model: GUHD48NK3CO Exploded View and spare parts list GUHD48NK3CO Description CF090W0320 Name of Part Part Code Condenser Assy '01025396 Rear Grill '01575205 Temp. Sensor sleeving '05212423 Strainer '07210037 Temperature Sensor '3900028002 Pressure Protect Switch '460200061 4-way Valve '43000338 Strainer '07210037 Handle '26235253 Valve Support Sub-Assy...
- Page 184 Compressor Gasket '76815204 '00205224 Liquid Accumulator Clamp '01745001 Gas-liquid Separator Sub-Assy '07225018 Fan Motor '1501506105 Axial Flow Fan '10335008 Front Side Plate '01315364P Handle '26235253 Front grill '22415002 Left Side Plate '01315366P left handle '26235401 Electric Box Assy '01395965 Radiator '49010252 Main Board 30224304...
- Page 185 Model: GUHD48NK3C1O Exploded View and spare parts list GUHD48NK3C1O Description CF090W0550 Name of Part Part Code Front Grill '22415002 Cabinet '01515204P Handle '26235253 Front Side Plate '01315364P Axial Flow Fan '10335008 Fan Motor 1570411502 Chassis Sub-assy 01195710P Electrical Heater 765100048 Compressor Gasket '76815204 '00205224...
- Page 186 Bidirection Strainer '07220016 Electronic Expansion Valve '07334194 Cut off Valve '07130209 Gas Valve Sub-Assy '07103030 Valve Support Sub-Assy '01715001 Handle '26235253 Rear Side Plate Sub-Assy '01314306P Pressure Protect Switch '46020003 4-way Valve '43000338 Magnet Coil '4300040032 Pressure Protect Switch '46020006 Temperature Sensor 3900028015G Rear Grill...
- Page 187 Model: GUHD36NM3CO/GUHD42NM3CO Exploded View and spare parts list...
- Page 188 GUHD36NM3CO GUHD36NM3CO GUHD42NM3CO GUHD42NM3CO Description CF090W0410 CF090W0411 CF090W0420 CF090W0421 Name of Part Part Code Part Code Part Code Part Code Top Cover '01255009P '01255009P '01255009P '01255009P Air Guard '01355204 '01355204 '01355204 '01355204 Condenser Assy 01125373 '01125392 '01125392 '01125392 Rear Grill '01475012 '01475012 '01475012...
-
Page 189: Left Handle '26235401 '26235401
Model: GUHD36NM3C1O/GUHD42NM3C1O Exploded View and spare parts list GUHD36NM3C1O GUHD42NM3C1O Description CF090W0560 CF090W0570 Name of Part Part Code Part Code Axial Flow Fan '10335010 '10335010 Fan Motor '1570280201 '1570280201 Condenser support plate ''01795020 '01795020 Left Side Plate '01305064P '01305064P Left Handle '26235401 '26235401 Condenser Assy... -
Page 190: Chassis Sub-Assy 01195314P 01195314P
Electric Box Assy 02405223 02405223 '4300010812 '4300010812 4-Way Valve Assy '04145733 04145732 4-way Valve '43000338 '43000338 Right Side Plate Sub-Assy '01305441P '01305441P Handle '26235253 '26235253 Pressure Protect Switch '46020006 '46020006 Valve Support Sub-Assy '01715257P '01715257P Strainer '07215201 '07215201 Pressure Protect Switch '46020003 '46020003 Magnet Coil... - Page 191 Model: GUHD48NM3CO/GUHD60NM3CO Exploded View and spare parts list GUHD48NM3CO GUHD60NM3CO Description CF090W0430 CF090W0440 Name of Part Part Code Part Code Top Cover '01265356P 01265356P Condenser Assy 01025396 '01125410 Rear Grill '01575205 '01575205 Clapboard Sub-Assy 01244144 01244144 Strainer '07210037 '07210037 Temperature Sensor '3900028002 '3900028002 Pressure Protect Switch...
- Page 192 Pressure Protect Switch '46020007 '46020007 Electrical Heater '765152123 '765152123 Compressor Gasket '76815204 '76815204 '00204126 '00204126 Liquid Accumulator Clamp 01745001 '02145435 Gas-liquid Separator Sub-Assy '07225018 07225016 Fan Motor '1501506105 1570531302 Axial Flow Fan '10335008 '10335008 Front Side Plate '01315364P '01315364P Handle '26235253 '26235253 Front grill...
-
Page 193: Drainage Plug '06813401 '06813401
GUHD48NM3C1O GUHD60NM3C1O Description CF090W0580 CF090W0590 Name of Part Part Code Part Code Front Grill '22415002 '22415002 Cabinet '01515204P '01515204P Handle '26235253 '26235253 Front Side Plate '01315364P '01315364P Axial Flow Fan '10335008 '10335008 Fan Motor 1570280203 1570280203 Chassis Sub-assy '01195710P '01195710P Electrical Heater '765100047 '765100047... -
Page 194: Indoor Unit
Terminal Board 42011223 42011223 Reactor 43138004 43138004 Filter Board 30228118 30228118 Electric Box 26904131 26904131 Main Board 30228007 30228007 Radiator 49018028 49018028 Electric Box Assy 02405225 02405225 Left Handle '26235401 '26235401 Left Side Plate '01315366P '01315366P 5.2 Indoor Unit 5.2.1 Duct Type Model:GFH09K3CI exploded view and spare parts list GFH09K3CI Description... - Page 195 Fan Motor '1570520103 Top Cover Board Assy '01264176 Right Side Plate Assy '01314175 Front volute casing '22202030 Centrifugal fan '10319051 Propeller Housing '22202029 Motor Sub-Assy 150024011 Border Plate Assy of Air Return End '02225234 Filter Sub-Assy '11725202 Fan Motor Mounting Plate Sub-Assy '01324341 Display Board '30294219...
- Page 196 GFH12K3CI GFH18K3CI Description CF060N0231 CF060N0240 Name of Part Part Code Part Code Return air frame sub-assy '01498641 '01498641 Evaporator Assy '01025394 01025401 Strainer '07212121 '07212121 Filter Sub-Assy '11128633 '11128633 Water Tray Assy '01285269 '01285269 Top Cover Board Sub-assy '01259064 '01259064 left Supporting Board sub- assy of evapora '01805280 '01805280...
- Page 197 Model: GFH24K3CI exploded view and spare parts list. GFH24K3CI Description CF060N0250 Name of Part Part Code Filter 11125304 Filter 111200515 Filter Sub-Assy 11125303 Top Cover Board Assy 01265301 Evaporator Assy 01025301 Right Side Plate Sub-Assy 01315304 Fan Mounting Plate Assy 01325301 Motor 15012454...
- Page 198 Model: GFH30K3CI exploded view and spare parts list. GFH30K3CI Description CF060N0260 Name of Part Part Code Filter '11125304 Filter '111200515 Filter Sub-Assy '11125303 Top Cover Board Assy '01265301 Left Side Plate Sub-Assy '01315293 Motor '15012458 Fan Motor '15705304 Motor '15012454 Fan Mounting Plate Assy '01325301 Seal of Connection Pipe...
- Page 199 Model:GFH36K3CI/GFH42K3CI/GFH48K3CI exploded view and spare parts list. GFH36K3CI GFH42K3CI GFH48K3CI Description CF060N0270 CF060N0290 CF060N0280 Name of Part Name Code Name Code Name Code Filter Sub-Assy 111253031 111253031 111253031 Seal of Connection Pipe 1495306 1495306 1495306 Left Side Plate 1315306 1315306 1315306 Top Cover Board Assy 01265306...
- Page 200 Model: GFH60K3CI exploded view and spare parts list. GFH60K3CI Description CF060N0300 Name of Part Name Code Front Side Plate Sub-Assy '01315374 Motor Support Sub-Assy '01804715 Fan Motor 1570523001 Motor '15705307 Rubber Plug (Water Tray) 01285283 Bottom Cover Board Sub-Assy '01265357 Cable-Cross Loop '76510021 Right Side Plate Sub-Assy...
- Page 201 Main Board '30228205 Electrical Retaining Plate '01845221 Top Cover Board Assy '01265359 Remote Controller '305050031 Ambient Temperature Sensor '39000208 Tube sensor '3900012128 Display Board '30294219 Sealing Plate '01345218 Evaporator Assy '01025405 Evaporator Assy '01025404 Left Side Plate Sub-Assy '01315376 Motor '15705306 Hook '02112466...
- Page 202 GKH12K3CI Description ET010N0170 Name of Part Name Code Remote Controller '305125063 Water Tray Assy '20182704 Sponge '76712709 Centrifugal fan '10312702 Fan Motor 15012707 Evaporator Support '01072714 Evaporator Assy '01029472 Motor support '01702702 Motor Gasket '76712705 Water Tray Support '01332706 Front Side Plate '01302741 Body Installing Support '01332705...
- Page 203 Model:GKH18K3CI exploded view and spare parts list.
- Page 204 GKH18K3CI Description ET010N0180 Name of Part Name Code Tube Exit plate Assy '01382715 Body Fixing Plate '01332701 Front Side Plate Assy '01302718 Left Side Plate Assy '01302715 Base Plate Assy '01222701 Rear Side Plate Assy '01302714 Motor Support '10312701 Fan Motor '15012703 Centifugal Fan '10312705...
- Page 205 Model:GKH24K3CI exploded view and spare parts list.
- Page 206 GKH24K3CI Description ET010N0190 Name of Part Part Code Tube Exit Plate Assy '01382715 Shell Assy '01432703 Motor support '01702701 Base Plate Assy '01222701 Right Side Plate Assy '01302716 Rear side plate assy '01302714 Fan Motor '15709404 Centrifugal fan '10312705 Evaporator Assy '01029451 Water Tray Assy '20182701...
- Page 207 Model:GKH30K3CI exploded view and spare parts list. GKH30K3CI Description ET010N0200 Name of Part Name Code Tube Exit Plate Assy '01382715 Shell Assy Motor support '01702701 Base Plate Assy '01222701 Right Side Plate Assy '01302712 Rear side plate assy '01302709 Fan Motor '15012706 Centrifugal fan '10310101...
- Page 208 Model:GKH36K3CI/ GKH42K3CI exploded view and spare parts list. Exploded View...
- Page 209 GKH36K3CI GKH42K3CI Description ET010N0210 ET010N0230 Name of Part Part Code Part Code Tube Exit Plate '01382715 '01382715 Body Fixed Plate 1332701 1332701 Front Side Plate 01302713 01302713 Left Side Plate '01302711 '01302711 Base Plate '01222701 '01222701 Rear Side Plate '01302709 '01302709 Motor Support '01702701...
- Page 210 5.2.2 Floor Ceiling Type Model:GTH09K3CI/GTH12K3CI/ GTH18K3CI/ GTH24K3CI exploded view and spare parts list. GTH09K3CI GTH12K3CI GTH18K3CI GTH24K3CI Description ED020N0171 ED020N0181 ED020N0191 ED020N0200 Name of Part Part Code Part Code Part Code Part Code Front Grill sub-assy '01579403 '01579403 '01579403 '01579403 Top Cover Board Sub-assy '01269409 '01269409...
- Page 211 Left Cover '26909443 '26909443 '26909443 '26909443 Right Pensile Bracket '01809401 '01809401 '01809401 '01809401 Electric Box Cover '01429420 '01429420 '01429420 '01429420 Transformer '4311023701 '4311023701 '4311023701 '4311023701 Main Board '30224223 '30224223 '30224223 '30224223 Electric Box '01429419 '01429419 '01429419 '01429419 Step Motor '1521240201 '1521240201 '1521240201 '1521240201...
- Page 212 Model:GTH30K3CI exploded view and spare parts list. GTH30K3CI Description ED020N0210 Name of Part Name Code Front panel '01349408P Front foam assy '12509424 Rotating Shaft '26909430 Guide Louver '26909432 Bracket #3(Guide Louver) '26909409 Rear side plate assy '0131941901 Step Motor '1521240206 Rotating Shaft '26909413 Connecting Rod...
- Page 213 Electric Box Assy '01399476 Centrifugal fan '1041410101 Rear connect plate '01349410 Room Sensor '39000191 Front volute casing '26909419 O-Gasket of Bearing 76512404 Rotary Axis Sub-Assy '73018052 Joint Slack '73018731 Fan Motor '15709408 Fixing plate '02229408 Bracket for motor 01329413 Rear volute casing '26909419 Front Grill sub-assy '01579402...
- Page 214 Model:GTH36K3CI exploded view and spare parts list. GTH36K3CI Description ED020N0220 Name of Part Part Code Front panel 01349408P Front foam assy '12509424 Rotating Shaft '26909430 Guide Louver '26909432 Bracket #3(Guide Louver) '26909409 Rear side plate assy '0131941901 Step Motor '1521240206 Rotating Shaft '26909413 Connecting Rod...
- Page 215 Electric Box Assy '01399459 Centrifugal fan '1041410101 Rear connect plate '01349410 Room Sensor '39000191 Front volute casing '26905208 O-Gasket of Bearing 76512404 Rotary Axis Sub-Assy '73018052 Joint Slack '73018731 Fan Motor '15709407 Fixing plate '02229408 Bracket for motor '01329407 Rear volute casing '26909419 Front Grill sub-assy '01579402...
- Page 216 GTH42K3CI Description ED020N0310 Name of Part Part Code Front panel '01349408P Front foam assy '12509424 Rotating Shaft '26909430 Guide Louver '26909432 Bracket #3(Guide Louver) '26909409 Rear side plate assy '0131941901 Step Motor '1521240206 Rotating Shaft '26909413 Connecting Rod '26909411 Rotating Shaft '26909412 Left foam assy '12509408...
- Page 217 Model:GTH48K3CI/ GTH60K3CI exploded view and spare parts list. GTH48K3CI GTH60K3CI Description ED020N0230 ED020N0440 Name of Part Part Code Part Code Front Grill sub-assy '01579401 '01579401 Top Cover Board Sub-assy '01269403 '01269403 Water Tray Assy '01289401 '01289401 Spacing Board '02229408 '02229408 Rear volute casing '26909419 '26909419...
- Page 218 Terminal Board '42010178 '42010178 Transformer '4311023701 '4311023701 Main Board '30224223 '30224223 PCB Base '26909407 '26909407 Left Side Plate Sub-Assy '01319406 '01319406 Display Board Sub-Assy '02229416 '02229416 Display Board '30294224 '30294224 Step Motor '1521240206 '1521240206 Axile Bush '10542704 '10542704 Connecting Rod '26909411 '26909411 Rotating Shaft...
- Page 219 JF00300705...
Need help?
Do you have a question about the GUHD series and is the answer not in the manual?
Questions and answers