Table of Contents
Advertisement
Available languages
Available languages
Quick Links
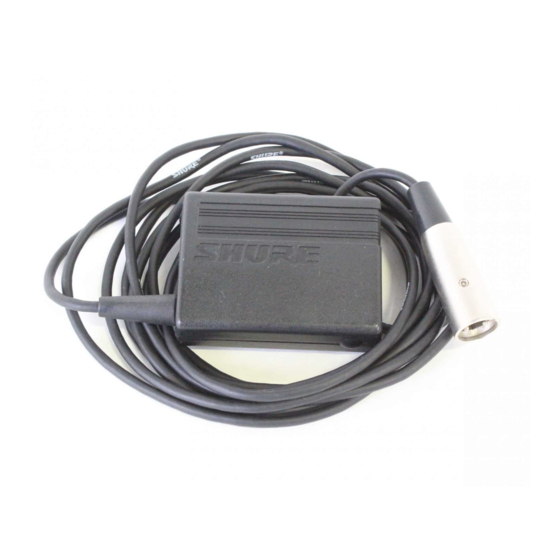
GENERAL
The MX1BP is a battery-powered preamplifier designed to be
used with Microflex or other condenser microphones. It allows use
of these microphones in situations where phantom power is not
available.
FEATURES
4-pin Tini Q-G connector allows use with a variety of con-
denser microphones
Power LED Indicator indicates power status to the preampli-
fier
Mute/On switch attenuates microphone without turning off
preamplifier
Belt clip allows mobility while using lavalier and headset mi-
crophones
Preamplifier operates on 9 V battery or phantom power
Features 3.7 m (12 ft) cord with attached male XLR
connector
BATTERY INSTALLATION
1. Move the Mic Mute/On switch on preamplifier to the Mute
position.
2. Press down on the OPEN side of the battery compartment
cover, slide it back and flip it open.
3. Insert a 9 V battery as shown, observing proper battery polar-
ity ("+/–"). Close the battery compartment cover.
4. Move the Mic Mute/On switch on the preamplifier to the On
position when ready to use the unit.
NOTE: A minimal power drain occurs while the 9 V battery
is installed. To conserve battery life, remove the battery when
preamplifier is not in use.
FIGURE 1
1999, Shure Brothers Incorporated
27A3026 (SF)
(Figure 1)
– +
Shure Brothers Incorporated
222 Hartrey Avenue
Evanston IL 60202-3696 U.S.A.
Model MX1BP User Guide
OPERATION (Figure 2)
1.
With the Mic Mute/On switch in the Mute position, plug the mi-
crophone into the preamplifier's Tini Q-G connector. (NOTE:
The Power LED Indicator will remain lit in both the Mute and
On microphone modes.)
2.
Plug the XLR cable from the preamplifier into the respective au-
dio device microphone input.
3.
Switch the Mic Mute/On switch to the On position.
4.
Adjust the gain level of the audio input device, if necessary.
Phantom power may be applied with a 9 V battery in place or
removed. With the battery installed, the MX1BP will silently and au-
tomatically switch to the battery reserve should phantom power fail.
Battery depletion will not occur while phantom power is applied.
POWER
2
GENERAL SPECIFICATIONS
INTERNAL HIGH-PASS FILTER
An internal high-pass filter is featured in the MX1BP. It is
jumper selectable and allows the user to alter the low frequency
response of the unit. For information on how to adjust this fea-
ture, please call (800) 488-3297 and follow the recorded direc-
tions for technical data by fax. For additional technical assis-
tance, phone Shure at (847) 866-2200. In Europe, phone
49-7131-72140.
USE WITH PHANTOM POWER
The MX1BP can also be used in situations where phantom
power is available.
Signal to Noise Ratio
(Referenced at 94dB SPL w/ Cardioid
Microflex cartridge, at 1 kHz with 1 kΩ load)
(Factory Setting: 25 Hz with a 6 dB per octave rolloff.)
61.0 dB
3
1) Mic Mute/On Switch
2) Tini Q-G Connector
MIC
3) Power LED Indicator
MUTE ON
1
FIGURE 2
Printed in U.S.A.
Advertisement
Table of Contents

Subscribe to Our Youtube Channel
Related Manuals for Shure MX1BP


Summary of Contents for Shure MX1BP
- Page 1 Adjust the gain level of the audio input device, if necessary. Phantom power may be applied with a 9 V battery in place or removed. With the battery installed, the MX1BP will silently and au- tomatically switch to the battery reserve should phantom power fail.
-
Page 2: Input Specifications
....... 55C8048 PINS 3 and 4 = BLACK LEAD (jumped) SHURE, the Shure logo, and MICROFLEX are registered trade- marks of Shure Brothers Incorporated. Tini Q-G, DURACELL, PIN 2 = RED LEAD and ULTRALIFE are registered trademarks of their respective FIGURE 3 owners. -
Page 3: Spécifications Générales
Le connecteur à 4 broches Tini Q-G permet son utilisation UTILISATION AVEC ALIMENTATION EN DUPLEX avec une variété de microphones électrostatiques Le MX1BP peut aussi être utilisé dans les cas où l’alimenta- La DEL témoin d’alimentation indique l’état d’alimentation tion en duplex est disponible. -
Page 4: Spécifications D'entrée
SPÉCIFICATIONS D’ENTRÉE Type de connecteur Tini Q-G à 4 broches Désignation des bro- Broche 1 : reliée à la terre ches de connecteur Broche 2 : reliée à +5 volts Broche 3, broche 4 : reliées à audio Configuration de l’en- Asymétrique trée SPÉCIFICATIONS D’SORTIE... -
Page 5: Technische Eigenschaften
ABBILDUNG 2 4–Stift Tini Q-G -Steckerbuchse ermöglicht den Gebrauch EINSATZ MIT PHANTOMSPANNUNG mit zahlreichen verschiedenen Kondensatormikrofonen Der MX1BP kann auch in Situationen verwendet werden, in Der Netz-LED-Anzeiger weist den Einschaltzustand des Vor- denen Phantomspannungsversorgung verfügbar ist. verstärkers aus Phantomspannung kann angelegt werden, wenn die 9 V- Der Stumm/Ein-Schalter dämpft das Mikrofon ohne den Vor-... - Page 6 EINGANGSDATEN Steckertyp 4–Stift Tini Q-G Stecker–Stiftbelegun- Stift 1: Verbunden mit Erde Stift 2: Verbunden mit +5 Volt Stift 3, Stift 4: Verbunden mit Ton Eingangskonfiguration unsymmetrisch AUSGANGSDATEN Steckertyp 3–Stift XLR Stecker–Stiftbelegun- Stift 1: Erde Stift 2: stromführend Stift 3: stromlos Ausgangskonfigura- Transformator–symmetrisch tion...
-
Page 7: Especificaciones Generales
Se puede usar la potencia fantasma con o sin la batería de 9 cendido V instalada. Con la batería instalada, el MX1BP se conmuta de modo automático y silencioso a modo de funcionamiento a bate- El interruptor de silenciamiento (Mute/On) desconecta el mi- ría en caso que la potencia fantasma falle. -
Page 8: Especificaciones De Entrada
ESPECIFICACIONES DE ENTRADA Tipo de conector Tini Q-G de 4 clavijas Designación de clavi- Clavija 1: Conectada a tierra jas de conector Clavija 2: Conectada a +5 V Clavija 3, clavija 4: Conectada a audio Configuración de en- Desequilibrada trada ESPECIFICACIONES DE SALIDA Tipo de conector XLR de 3 clavijas... -
Page 9: Dati Tecnici Generali
GUIDA D’USO DEI MX1BP FILTRO INTERNO PASSA ALTO L’MX1BP è dotato di un filtro passa alto, inseribile mediante DESCRIZIONE GENERALE un ponticello, che permette di cambiare la risposta in frequenza. Il modello MX1BP è un preamplificatore alimentato a pila Per informazioni sulla regolazione di questa funzione, chiamate realizzato per l’uso con il modello Microflex o altri microfoni a... - Page 10 DATI TECNICI D’INGRESSO Connettore Tini Q-G a 4 piedini Segnali ai piedini del Piedino 1: sempre a massa Piedi- connettore no 2: sempre a +5 V Piedini 3 e 4: sempre collegati all’audio Ingresso Sbilanciato DATI TECNICI DI USCITA Connettore XLR a 3 piedini Segnali ai piedini del Piedino 1: massa Piedino 2: livello...
- Page 11 SIDE 2 CÔTÉ 2 SEITE 2 LADO 2 LATO 2 SIDE 1 CÔTÉ 1 SEITE 1 LADO 1 LATO 1 PREAMPLIFIER PRINTED CIRCUIT BOARD LEGEND LÉGENDE DU CIRCUIT IMPRIMÉ DU PRÉAMPLI LEGENDE DER VORVERSTÄRKER–LEITERPLATTE LEYENDA DE TARJETA DE CIRCUITOS DEL PREAMPLIFICADO LEGENDA DELLA SCHEDA DI CIRCUITI DEL PREAMPLIFICATORE FIGURE 5 ABBILDUNG 5...
- Page 12 NOTES: All resistors1/10 Watt, 1%, 0805 unless otherwise specified. Electrolytic capacitors shown in µF, 10%, 50V or more, unless otherwise specified. The following symbols denote: Printed Clrcuit Ground A.C. Voltage, Mic Off A.C. Voltage D.C. Voltage, Mic Off Case Ground D.C.
Need help?
Do you have a question about the MX1BP and is the answer not in the manual?
Questions and answers