Table of Contents
Advertisement
C
o
n
s
u
m
C
o
n
s
u
m
V
o
i
c
e
M
a
i
l
M
a
n
a
V
o
i
c
e
M
a
i
l
M
a
n
a
P
r
o
v
i
d
e
d
e
x
c
l
u
s
i
P
r
o
v
i
d
e
d
e
x
c
l
u
s
i
A
T
&
T
A
T
&
T
e
r
S
e
r
v
i
c
e
s
e
r
S
e
r
v
i
c
e
s
g
e
r
1
0
0
U
s
e
r
'
s
g
e
r
1
0
0
U
s
e
r
'
s
v
e
l
y
f
o
r
A
T
&
T
V
o
v
e
l
y
f
o
r
A
T
&
T
V
o
G
u
i
d
e
G
u
i
d
e
i
c
e
M
a
i
l
i
c
e
M
a
i
l
1
Advertisement
Table of Contents

Related Manuals for AT&T VoiceMail Manager 100

Summary of Contents for AT&T VoiceMail Manager 100
- Page 1 & & ’ ’ & &...
-
Page 2: Table Of Contents
ABLE OF ONTENTS Introduction ......................1 What's Included ....................2 Quick Start Your VoiceMail Manager 100 ............2 Getting Started Making the Connections ................. 3 The Control Panel ................... 4 The VoiceMail Indicator Light & New Message Announcement......5 The Display ..................... 6 Initialization Error Messages ................ - Page 3 PPENDICES Troubleshooting ....................18 FCC Regulations and Compliance ..............19 Product Warranty ....................20 Instructions for Wall Mounting Your VoiceMail Manager 100 ......21 Wall-Mounting Template ..................22 Safety Precautions ....................24 IST OF IGURES Making the Connections ..................3 The Control Panel....................
-
Page 4: Introduction
NTRODUCTION Enclosed is your VoiceMail Manager 100 for use with AT&T VoiceMail. This system has been designed to be simple to use; however, you can reach its full potential by taking a few moments to read this User’s Guide. The VoiceMail Manager 100 (VM100) is a multi-function product for use with VoiceMail and Caller ID, available from AT&T Consumer Services. -
Page 5: What's Included
NCLUDED The following items should be included with your VoiceMail Manager 100: One VoiceMail Manager 100 unit (VM100) One telephone cord One AC power adapter This User’s Guide AT&T VoiceMail User Guide (Please contact AT&T Consumer Services (1 800 288-2747 ) if any of these items are... -
Page 6: Making The Connections
AKING THE ONNECTIONS Refer to the following diagram and directions to connect your VM100. To Electrical Outlet To Telephone To Phone Jack Select the telephone you wish to use - this should be located near an electrical outlet that is easily accessible. Make sure your telephone is properly connected to a phone jack by a phone cord in good condition. -
Page 7: The Control Panel
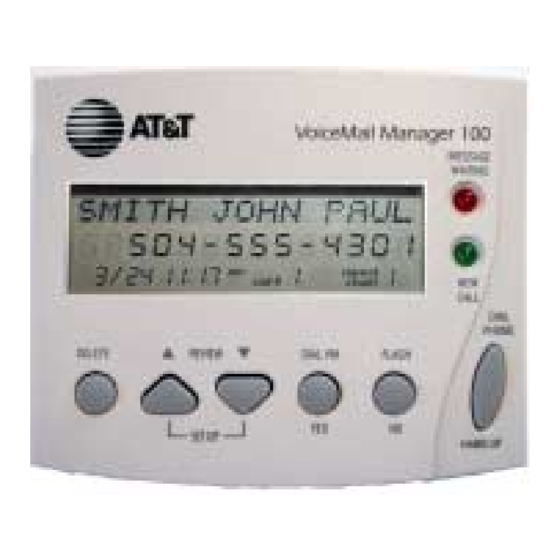
ONTROL ANEL The following keys are used in the operation of your VoiceMail Manager 100 system. DELETE - Erases call(s) from the Call Log. REVIEW - Scrolls through the Call Log starting with the oldest received call and moving towards the most recent call. -
Page 8: The Voicemail Indicator Light & New Message Announcement
Caller ID, the green light will steadily illuminate when you have received a new call, even if the caller did not leave a message on your VoiceMail. In addition, the VoiceMail Manager 100 provides a New Message Announcement. When you pick up any telephone connected to the line shared with VM100 you will hear, “New VoiceMail.”... -
Page 9: The Display
12:30 PM. This is the 12 call in the Call Log, and Joseph has called 14 times - one original call, and 13 repeats. (The time and date of the call are sent to the VoiceMail Manager 100 by the telephone company’s system.) -
Page 10: Initialization Error Messages
Once you have completed all the connections, the indicator lights on the upper right-hand corner of the VoiceMail Manager 100 should flash once and the display will show INITIALIZING - PLEASE WAIT. The VoiceMail Manager 100 will run through a brief initialization process and then display NO CALLS. -
Page 11: Other Display Messages
ISPLAY ESSAGES ## CALLS ## NEW - Appears when the VoiceMail Manager 100 has been idle for more than 30 seconds. It indicates that there are ## of calls in the Call Log, and ## of them are new. (e.g., if the display shows 12 CALLS 10 NEW, you have twelve calls in the Call Log, ten of which are new (not yet reviewed). -
Page 12: Setting Up Your Voicemail Manager 100
REVIEW keys to OPTIONAL PROGRAMMING Press get into Set Up mode. Once in Set Up mode, the VoiceMail Manager 100 will display questions requesting information required to complete the programming of your unit. - Page 13 REVIEW key twice.) UESTIONS After the VoiceMail Manager 100 enters Set Up mode it will scroll the Set Up questions across the display. Questions you will be asked appear in bold text and the response options are numbered below.
- Page 14 2. If you wish to select the alternate language (Spanish), press YES. Although English is the default language, you will be asked, ENGLISH? YES/NO. Press NO to select the alternate language (Spanish). You will be asked, ESPANOL? SI/NO. Press YES to select Spanish. If you decide you do not want to select Spanish after all, press NO.
- Page 15 Manager 100 must know how many digits you dial to reach a local telephone number Press NO to move onto the next question. Press YES to set up dialing. If you pressed YES, the VoiceMail Manager 100 will ask, DO YOU DIAL 7 DIGITS FOR LOCAL CALLS? YES/NO.
- Page 16 If you do not dial 10-digit numbers for local calls, press NO. If you answered NO to both #2 and #3 above, the VoiceMail Manager 100 will ask, DO YOU DIAL 1 + 10 FOR ALL CALLS? YES/NO. If you must dial a 1 before all of your calls, press YES.
- Page 17 Press YES to erase all Set Up entries you have made and return them to the system defaults. If you press YES, the VoiceMail Manager 100 will ask if you are sure. Press YES if you are certain you want to return all values to the system defaults and reset the VoiceMail Manager 100.
-
Page 18: Viewing Calls
Caller ID data is transmitted between the first and second ring: If you pick up the phone too quickly, the VoiceMail Manager 100 will not display this information. If you choose not to answer the call, or you are not available to answer the call, the information regarding the call will be stored in the VoiceMail Manager 100’s Call Log. -
Page 19: Speed Dialing Return Calls
Press YES to confirm and all calls will be deleted. The message NO CALLS will be displayed. The VoiceMail Manager 100 can store up to 97 calls in the Call Log. When the Call Log is full, the oldest call will automatically be deleted from the Call Log memory. -
Page 20: Checking Voicemail
OICE Checking VoiceMail is easier than ever with the VoiceMail Manager 100. Simply press the DIAL VM button and the VoiceMail Manager 100 will dial your Voice Mailbox and display PICK UP PHONE AND DIAL PASSWORD. If you have configured your VoiceMail Manager 100 to dial automatically your password, the display will show PICK UP PHONE. -
Page 21: Troubleshooting
ROUBLESHOOTING If the VoiceMail Manager 100 behaves abnormally during use, it will need to be reset. To reset the VoiceMail Manager 100, do the following: Disconnect unit - remove power cord and telephone lines. Wait for one minute. Reconnect the telephone lines and power cord. Wait for initialization. -
Page 22: Fcc Regulations And Compliance
FCC R EGULATIONS AND OMPLIANCE Some electronic equipment can generate and radiate radio frequency energy that may cause radio and/or television interference if not installed and used properly. This equipment has been tested by the manufacturer and found to comply with the limits for a Class B digital device, as specified in Part 15 of the FCC rules. -
Page 23: Product Warranty
RODUCT ARRANTY Notify Technology, the equipment manufacturer, warrants this product against defects in materials and workmanship for a period of one (1) year from the date of original retail purchase. This warranty is limited to the repair or replacement of this product only and does not extend to damage, malfunctions or product failures caused by: (1) accident, misuse, or abuse;... -
Page 24: Instructions For Wall Mounting Your Voicemail Manager 100
VM100 NSTRUCTIONS OUNTING To save desk space and facilitate ease of use, your VoiceMail Manager 100 can be mounted on the wall. Use the template on the following page and two (2) one-inch- long #6 screws. Choose a location that is near a telephone jack and a power outlet. -
Page 25: Wall-Mounting Template
OUNTING EMPLATE 2.3 Inches We recommend one-inch #6 screws for mounting the VoiceMail Manager 100. -
Page 27: Safety Precautions
AFETY RECAUTIONS Please Review These Safety Precautions Never install telephone wiring during a lightning storm. Never install telephone jacks in wet locations unless the jack is specifically designed for wet locations. Never touch uninsulated telephone wires or terminals unless the telephone line has been disconnected at the network interface. - Page 28 OICE ANAGER 05151_049800...
Need help?
Do you have a question about the VoiceMail Manager 100 and is the answer not in the manual?
Questions and answers