
Related Manuals for Franke FMO 46 CS 9T1 XS


Summary of Contents for Franke FMO 46 CS 9T1 XS
- Page 1 Hoja de Características Folha de Caracteristicas Feature List Feuille de Caractéristiques Datenblatt Kullanim Kilavuzu Firin FMO 46 CS 9T1 XS...
-
Page 2: Table Of Contents
Índice Antes del Primer Uso Lea atentamente este Manual de instrucciones Antes del Primer Uso Página 2 para obtener el máximo rendimiento de su horno. Por el proceso de fabricación, puede haber en Embalaje Ecológico el horno restos de grasas y otras impurezas, para eliminarlos proceda como sigue: •... -
Page 3: Funciones Del Horno
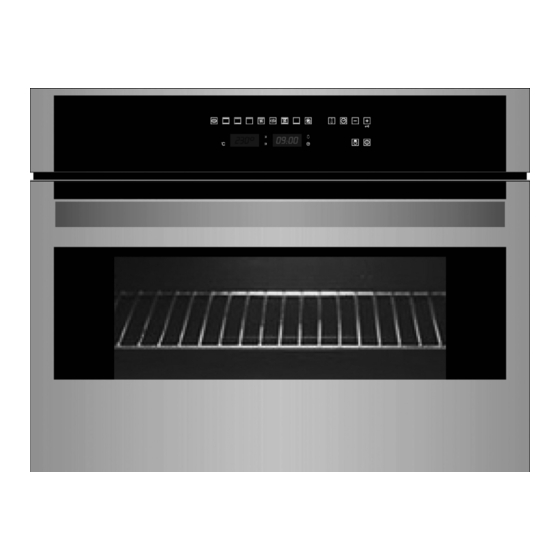
Frontal de Mandos Modelo FMO 46 CS 9T1 XS 11 Funciones de cocinado 16 Sensor 12 Indicador de temperatura 17 Sensor / Función seguridad niños 13 Reloj electrónico 18 Puesta en marcha / Apagado 14 Sensor de temperatura 19 Luz interior 15 Sensor reloj electrónico... - Page 4 Convencional con Turbina Solera Adecuado para asados y pastelería. El ventila - Calor sólo desde la parte inferior. Apropiado dor reparte de forma uniforme el calor en el para calentar platos o levantar masas de interior del horno, reduciendo el tiempo y la repostería y afines.
- Page 5 Manejo del Horno Atención 4 La cavidad superior del horno empezará a calentar. En las funciones Su reloj electrónico incorpora tecnología se activará la función de precalenta- Touch-Control. Para manejarlo es suficiente miento rápido durante unos minutos. con tocar los símbolos del cristal con su dedo. Cuando llegue a la temperatura selecciona- La sensibilidad del touch-control se adapta da, el horno emitirá...
- Page 6 Duración y Fin del cocinado: Permite progra- 3 Posteriormente sonarán 2 beep seguidos, mar la duración y la hora de finalización del se mostrará el tiempo restante de cocinado cocinado. Con esta función el horno se pondrá y el símbolo parpadeará...
- Page 7 Puede emplear esta función aunque usted ya Función seguridad niños esté cocinando con su horno. Para ello siga Bloquea el horno, evitando su manipulación las instrucciones indicadas salvo la número 4. por parte de niños pequeños. Para activar la función, toque en el símbolo de forma pro- Programación de la Duración y Fin del longada, a continuación escuchará...
-
Page 8: Instrucciones De Seguridad Importantes
Instrucciones de Seguridad Importantes Seguridad Eléctrica • No se apoye ni se siente en la puerta abier- ta del horno, podría dañarla además de • Cualquier manipulación o reparación del poner en peligro su seguridad. aparato, incluida la sustitución del cable de •... -
Page 9: Tablas De Cocinado
Tablas de Cocinado Los tiempos y las temperaturas indicados en las Tablas son orientativos. Las funciones de coci- nado dependen de cada modelo. En general es recomendable que realice un precalentamiento del horno en vacío y en función . El tiempo de precalentamiento finaliza cuando se apaga el piloto de calentamiento. - Page 10 Peso Tiempo Función Temperat. Altura Recipiente PESCADOS (Kg) (ºC) (min) 180-200 25-30 Bandeja Besugo Media 170-190 20-25 190-210 25-30 Dorada a la Sal Media Bandeja 180-200 25-30 170-190 15-20 Media Bandeja Lenguado 160-180 10-15 190-210 20-25 Lubina Bandeja Media 180-200 10-15 190-210 25-30...
- Page 11 Peso Temperat. Tiempo Altura Función Recipiente CARNES (Kg) (ºC) (min) 190-210 70-75 Bandeja Cochinillo Media 170-190 70-75 180-200 55-60 Conejo Media 170-190 45-50 Bandeja 170-190 30-35 190-210 50-55 Bandeja Media 170-190 45-50 Cordero 180-200 50-55 170-190 35-40 Bandeja Lomo a la Sal Media 170-190 40-45...
- Page 12 Peso Temperat. Tiempo Función Altura Recipiente REPOSTERÍA (Kg) (ºC) (min) 150-170 35-40 Bizcocho Esponjoso Media 170-190 30-35 Molde 160-180 30-35 170-190 10-15 Bandeja Media Brazo de Gitano 160-180 10-15 160-180 55-60 Molde Flan Media 150-170 50-55 160-180 20-25 Bandeja Media Galletas 150-170 20-25...
-
Page 13: Limpieza Y Mantenimiento
Limpieza y Mantenimiento Debe desconectar el aparato de la red eléctrica Limpieza del Exterior y los para realizar cualquier intervención. Accesorios de Horno Limpieza del Interior de Horno Limpie el exterior del horno y los accesorios con agua jabonosa y templada o con algún •... - Page 14 3 El cristal interior está ya suelto. Sáquelo. Atención Por favor preste atención porque cuando retire el cristal interior, la puerta del horno se cerrará. 4 Limpie el cristal interior y el interior de la puerta del horno. 5 A continuación, introduzca los soportes del cristal interior en las ranuras superiores de la puerta (B).
-
Page 15: Si Algo No Funciona
Si Algo no Funciona El Horno no funciona Compruebe la conexión a la red. Verifique los fusibles y el limitador de su instalación. Asegúrese que el reloj está en posición manual o programado. Verifique la posición del selector de funciones y de temperaturas La luz interior del horno no se enciende •... -
Page 16: Información Técnica
Información Técnica Si el aparato no funciona comunique al • Para el encastre de los hornos multifunción Servicio de Asistencia Técnica el tipo de ano- la parte posterior del mueble, correspon- malía que usted observa indicando: diente a la zona sombreada en la figura 3 (ver página 98), no debe presentar ningún 1 Número de Serie (S-No) saliente (refuerzos de mueble, tuberías,... - Page 17 • La conexión eléctrica dispone de la adecua- da toma de tierra de acuerdo con la norma- tiva vigente. • La conexión debe realizarse a través de un interruptor omnipolar, adecuado a la inten- sidad a soportar y con una apertura mínima entre contactos de 3 mm para la descone- xión en casos de emergencia, limpieza o cambio de la lámpara.
-
Page 18: Antes Da Primeira Utilização
Índice Antes da Primeira Utilização Leia atentamente este Manual de Instruções Antes da Primeira Utilização Página 18 para obter o máximo rendimento do seu forno. Devido ao processo de fabricação, pode haver Embalagem Ecológica no forno restos de gorduras e outras impure- zas. - Page 19 Painel de Comandos Modelo FMO 46 CS 9T1 XS 11 Funções de cozinhado 16 Sensor 12 Indicador de temperatura 17 Sensor / Função segurança crianças 13 Relógio electrónico 18 Pôr em funcionamento / Desligado 14 Sensor de temperatura 19 Luz interior 15 Sensor relógio electrónico...
- Page 20 Resistência Inferior Convencional com Turbina Calor somente na parte inferior. Apropriado Adequado para assados e pastelaria. O venti - para aquecer pratos ou levantar massas de lador reparte de forma uniforme o calor no confeitaria e semelhantes. interior do forno. Descongelação Recomendações para a Descongelação de Alimentos A descongelação é...
- Page 21 Utilizaçao do Forno Atenção 4 A cavidade superior do forno começara a aquecer. Nas funções O seu relógio electrónico incorpora tecnologia activar-se-á a função de pré-aquecimento Touch-Control. Para manuseá-lo é suficiente rápido durante uns minutos. Quando tocar nos símbolos do vidro com o seu dedo. chegue à...
- Page 22 Duração e Fim do Cozinhado: Permite 3 Posteriormente soarão 2 beep seguidos, programar a duração e a hora de finalização mostrar-se-á o tempo restante de cozinhado do cozinhado. Com esta função o forno e o símbolo piscará lentamente, pôr-se-á funcionamento forma indicando que o seu forno se apagará...
- Page 23 Pode utilizar esta função mesmo que já Se durante o cozinhado deseja modificar a esteja a cozinhar com o seu forno. Para tal hora de finalização, toque várias vezes no siga as instruções indicadas excepto a sensor do relógio até que o símbolo número 4.
-
Page 24: Instruções De Segurança Importantes
Instruções de Segurança Importantes Segurança Eléctrica • Não se apoie nem se sente na porta aber- ta do forno, já que poderia danificá-la além • Qualquer manuseamento ou reparação do de pôr em perigo a sua segurança. aparelho, incluindo a substituição do fio de •... -
Page 25: Tabelas De Cozinhado
Tabelas de Cozinhado Os tempos e as temperaturas indicados nas tabelas são para orientação. As funções de cozin- hado dependem de cada modelo. Geralmente é recomendável realizar um pré-aquecimento do forno em vazio, na função . O tempo pré-aquecimento finaliza quando apaga-se ao pilo- to de aquecimento. - Page 26 Peso Tempo Função Temperat. Posição Recipiente PEIXES (Kg) (ºC) (min) 180-200 25-30 Bandeja Besugo Media 170-190 20-25 190-210 25-30 Dourada no sal Media Bandeja 180-200 25-30 170-190 15-20 Media Bandeja Linguado 160-180 10-15 190-210 20-25 Robalo Bandeja Media 180-200 10-15 190-210 25-30 Pescada...
- Page 27 Peso Temperat. Tempo Posição Função Recipiente CARNES (Kg) (ºC) (min) 190-210 70-75 Bandeja Leltao Media 170-190 70-75 180-200 55-60 Coelho Media 170-190 45-50 Bandeja 170-190 30-35 190-210 50-55 Bandeja Media 170-190 45-50 Borrego 180-200 50-55 170-190 35-40 Bandeja Lombo no sal Media 170-190 40-45...
- Page 28 Peso Temperat. Tempo Função Posição Recipiente CONFEITARIA (Kg) (min) (ºC) 150-170 35-40 Media 170-190 30-35 Bolo esponjoso Forma 160-180 30-35 170-190 10-15 Media Bandeja Bolo com crema 160-180 10-15 160-180 55-60 Forma Pudim Media 150-170 50-55 160-180 20-25 Bandeja Media Bolachas 150-170 20-25...
-
Page 29: Limpeza E Manutenção
Limpeza e Manutenção Atenção Limpeza do Exterior e dos Acessórios do Forno O aparelho deve ser desligado da rede eléc- trica para realizar qualquer intervenção. Limpe o exterior do forno e os acessórios com água morna e sabão ou com um detergente Limpeza do Interior do Forno suave. - Page 30 4 Levante agora a porta e retire as dobradi- 3 O vidro interior solta-se. Retire-o. ças das ranhuras frontais do forno, desen- Atenção caixando-as. Por favor, ter em atenção, quando retirar o vidro interior, a porta do forno fechar-se-á. 4 Limpe o vidro interior e a porta do forno por dentro.
-
Page 31: Se Algo Não Funciona
Se Algo não Funciona O Forno não funciona Verifique a ligação à rede Verifiquese o disjuntor da sua instalação eléctrica desligou. Assegure-se que o relógio está em posição manual ou programada. Verifique a posição do selector de funções e de temperatura. A luz interior do forno não acende •... -
Page 32: Informação Técnica
Información Técnica Se o aparelho não funcionar ao Serviço de • Para encastrar os fornos multifunção, a Assistência Técnica comunique o tipo de ano- parte posterior do móvel, correspondente à malia que observa, indicando: zona sombreada na figura 3, não deve apre- sentar nenhuma saliência (reforços do 1 Número de Série (S-No) móvel, tubagens, bases de tomada, ..) - Page 33 • A ligação eléctrica dispõe da tomada de terra adequada, de acordo com a norma em vigor. • A ligação deve ser realizada através de um interruptor omnipolar, adequado à intensi- dade a suportar e com uma abertura míni- ma entre contactos de 3 mm para a desco- nexão em casos de emergência, limpeza ou troca da lâmpada.
- Page 34 Index Before Using your Oven for the First Time Carefully read this Instruction Manual to Before Using your Oven achieve the best results from your oven. for the First Time Page 34 Due to the manufacturing process there may be residues of grease and other substances. Ecological Packaging To eliminate these, proceed as follows: •...
-
Page 35: Control Panel
Control Panel Modelo FMO 46 CS 9T1 XS 11 Cooking Functions 16 Sensor 12 Temperature Indicator 17 Sensor / Child Safety Function 13 Electric Clock 18 On / Off 14 Temperature Sensor 19 Inside Light 15 Electric Clock Sensor Oven Functions... - Page 36 Conventional with fan Lower element Appropriate for roasts and cakes. The fan Heats only from beneath. Suitable for heating spreads the heat uniformly inside the oven. dishes and raising pastry and similar. Defrosting Recommendations for thawing out frozen food Frozen food can be thawed out using a system •...
-
Page 37: Using The Oven
Using the oven Caution Caution: this preheating function turns on the The electronic clock features Touch-Control turbo motor at the back of the top oven cavity. technology. To operate, simply touch the glass 5 During oven heating, the display will flash control symbols with your fingertip. - Page 38 Programming the Timer Alarm Programming the Cooking Stop Time 1 Press on the clock sensor several times 1 Press on the clock sensor several times until the symbol lights up. until the symbol lights up. 2 Select the length of time after which you 2 Select the cooking stop time by pressing the want the alarm to sound by pressing on the sensors.
- Page 39 17 Select a cooking function and temperature. Child Safety Function 18 The oven will remain off, with the This function locks the oven, preventing small symbol lit and the symbol flashing children from playing with it. To turn on the slowly.
-
Page 40: Important Safety Instructions
Important Safety Instructions Electrical Safety • Do not lean or sit on the open door of the oven as it could damage the door and be • All adjustments to or repair of the appliance, dangerous for you. including replacement of the power lead, •... -
Page 41: Cooking Tables
Cooking Tables The Cooking Tables show examples of temperature ranges and approximate cooking times. The cooking mode depends on the model. For the best results we recommend the oven to be preheated with the function . The preheating time finishes when the heating pilot light switches off. - Page 42 Weight Tray Position Cooking Time Temperat. Receptacle FISH Mode (Kg) (ºC) (min) 180-200 25-30 Tray Red Bream Intermediate 170-190 20-25 190-210 25-30 Salted Dorado Intermediate Tray 180-200 25-30 170-190 15-20 Intermediate Tray Sole 160-180 10-15 190-210 20-25 Sea-bass Tray Intermediate 180-200 10-15 190-210...
- Page 43 Weight Tray Position Cooking Time Temperat. Receptacle MEAT Mode (Kg) (ºC) (min) 190-210 70-75 Tray Suckling Pig Intermediate 170-190 70-75 180-200 55-60 Rabbit Intermediate 170-190 45-50 Tray 170-190 30-35 190-210 50-55 Tray Intermediate 170-190 45-50 Lamb 180-200 50-55 170-190 35-40 Tray Salted Pork Loin Intermediate...
- Page 44 Tray Position Cooking Weight Temperat. Time Receptacle CAKES AND DESSERTS Mode (Kg) (min) (ºC) 150-170 35-40 Intermediate 170-190 30-35 Sponge Cake Cake Mould 160-180 30-35 170-190 10-15 Tray Intermediate Swiss Roll 160-180 10-15 160-180 55-60 Bread Mould Flan Intermediate 150-170 50-55 160-180 20-25...
-
Page 45: Cleaning And Maintenance
Cleaning and Maintenance Caution Cleaning the Oven Exterior and Accessories Before carrying out any work, the appliance must be disconnected from the mains electricity supply. Clean the outside of the oven and the accessories with warm soapy water or with a Cleaning the Inside of the Oven mild detergent. -
Page 46: Changing The Oven Bulb
4 Then lift the door and release the hinges from 3 The interior glass is now free. Remove it. the front slots on the oven by pulling out- Warning wards. Be careful: the oven door closes when the interior glass is removed. 4 Clean the interior glass and the inside of the oven door. -
Page 47: Trouble Shooting
Trouble Shooting The oven does not work Check the connection to the electrical circuit. Check the fuses and current limiter of your installation. Ensure the clock is in the manual or programmed mode. Check the position of the function and temperature selectors The inside light of the oven does not work •... -
Page 48: Technical Information
Technical Information • To fit multifunction ovens in their locations, the back part of the unit corresponding to the shaded area of figure 3, must not have any projections (reinforcements, pipes, sockets, etc). (See the page 98). If the equipment does not work, please contact the Technical Service Department and •... -
Page 49: Installing The Oven
• This switch may be replaced with a plug, which must always be accessible in normal working conditions. After connecting the electricity, check that all the electrical parts of the oven are working. This appliance must be installed by a licensed electrician in accordance with AS/NZS 3000 wiring rules and any local wiring rules, and a Certificate... - Page 50 Index Avant le Premier Usage Nous vous prions de lire attentivement ce Manuel d'instructions afin d'obtenir un Avant le Premier Usage Page 50 rendement maximum de votre four. A cause du processus de fabrication, il peut y Emballage Écologique avoir dans le four des restes de graisses et autres impuretés;...
- Page 51 Panneau frontal de commandes Modelo FMO 46 CS 9T1 XS 11 Fonctions de cuisson 16 Symbole 12 Indicateur de température 17 Symbole / Fonction sécurité enfants 13 Horloge électronique 18 Mise en marche / Arrêt 14 Sélecteur de température 19 Lumière intérieure 15 Symbole horloge électronique...
- Page 52 Conventionnel avec turbine Résistance inférieure Recommandé pour les rôtis et la pâtisserie. La chaleur provient seulement de la partie Le ventilateur répartit la chaleur de façon inférieure. Approprié pour réchauffer des plats uniforme á l’intérieur du four. ou faire lever des pâtes pour pâtisseries et analogues.
- Page 53 Manipulation du four Attention 3 L’indicateur de température indiquera une température préréglée pour cette cuisson. Si Cette horloge électronique est équipée de la vous souhaitez la modifier, il suffit d'appuyer technologie Touch-Control. Pour l’utiliser, il sur le symbole de température puis suffit d’appuyer sur les symboles représentés d'appuyer sur les symboles...
- Page 54 Fonctions de l’horloge électronique Programmation de la durée de cuisson Durée de cuisson : permet de cuisiner durant un 1 Appuyez sur le symbole de l'horloge , le temps sélectionné, puis, le four s’éteint symbole s'allumera. automatiquement. 2 Sélectionnez la durée de cuisson, en appuyant Heure de fin de cuisson : permet de cuisiner jusqu’à...
- Page 55 À tout moment, vous pouvez modifier l’heure 11 Appuyez sur n'importe quel symbole de la de fin sélectionnée, en appuyant à plusieurs façade pour arrêter le signal sonore. reprises sur le symbole de l'horloge jus- Si au cours de la cuisson, vous voulez qu'à...
- Page 56 Instructions de Sécurité Importantes Sécurité Électrique • Ne pas s'appuyer ni s'asseoir sur la porte ouverte du four; cela pourrait l'endommager • Toute manipulation ou réparation de et, de plus, mettre votre sécurité en danger. l'appareil, y compris le remplacement du •...
- Page 57 Tableaux de Cuissons Vous trouverez dans les tableaux des indications de température et des temps de cuisson, selon les quantités et les moules à utiliser. Les fonctions du four sont différentes selon le modèle. Veuillez consulter la Feuille de Caractéristiques du four. Pour de meilleurs résultats, il est conseillé...
- Page 58 Poids Temps Fonction Températ. Position Récipient POISSONS (Kg) (ºC) (min) 180-200 25-30 Plateau Daurade Moyenne 170-190 20-25 190-210 25-30 Dorade au Sel Moyenne Plateau 180-200 25-30 170-190 15-20 Moyenne Plateau Sole 160-180 10-15 190-210 20-25 Plateau Moyenne 180-200 10-15 190-210 25-30 Colin Plateau...
- Page 59 Poids Températ. Temps Position Fonction Récipient VIANDES (Kg) (ºC) (min) 190-210 70-75 Plateau Cochon de lait Moyenne 170-190 70-75 180-200 55-60 Lapin Moyenne 170-190 45-50 Plateau 170-190 30-35 190-210 50-55 Plateau Moyenne 170-190 45-50 Mouton 180-200 50-55 170-190 35-40 Plateau Echine au Sel Moyenne 170-190...
- Page 60 Poids Températ. Temps Fonction Position Récipient PÂTISSERIE (Kg) (min (ºC) 150-170 35-40 Moyenne 170-190 30-35 Biscuit moelleux Moule 160-180 30-35 170-190 10-15 Moyenne Plateau Biscuit Roule 160-180 10-15 160-180 55-60 Moule Flan Moyenne 150-170 50-55 160-180 20-25 Plateau Moyenne Petis gâteaux 150-170 20-25 170-190...
-
Page 61: Nettoyage Et Entretien
Nettoyage et Entretien Attention Nettoyage de l'extérieur et des Avant toute operation de nettoyage ou Accessoires du Four d’entretien, vérifiez que la prise de l’appareil est débranchée. Nettoyez l'extérieur du four et les accessoires Nettoyage de l'intérieur du Four avec de l'eau savonneuse tiède ou avec un détergent doux. - Page 62 4 Soulevez la porte et enlevez les charnières 3 La vitre intérieure est déjà libre. Sortez-la. des rainures avant du four en les tirant vers Attention vous. Veuillez prêter attention car lorsque vous reti- rez la vitre intérieure, la porte du four se fer- mera.
- Page 63 En Cas de Panne Le four ne fonctionne pas Vérifiez si le four est branché au réseau. Vérifiez les fusibles et le limitateur de votre installation. Assurez-vous que l´horloge est en position manuelle ou qu'elle est programmée. Vérifiez la position du sélecteur de fonctions et de températures.
- Page 64 Information Technique • Pour l'encastrement fours Si l'appareil ne fonctionne pas, communiquez multifonctions, la partie postérieure du au Service d'Assistance technique le type meuble, qui correspond à la zone ombrée d'anomalie que vous avez obser vée en de la figure 3, ne doit présenter aucune indiquant: partie saillante (renforcements du meuble, 1 Numéro de Série (S-No)
-
Page 65: Installation Du Four
• Le raccordement doit être effectué par l’intermédiaire d’un interrupteur omnipolaire adéquat à l’intensité à supporter et la distance de séparation des contacts doit être au moins de 3 mm pour le débranchement en cas d’urgence, de nettoyage ou de changement de l’ampoule. -
Page 66: Vor Dem Ersten Gebrauch
Inhalt Vor dem ersten Gebrauch Lesen diese Bedienungsanleitung aufmerksam, um mit Ihrem Herd die besten Vor dem ersten Gebrauch Seite 66 Ergebnisse zu erreichen. Herstellungsbedingt könen im Herd Reste von Ökologische Verpackung Fett zurückgeblieben sein, zu deren Entfernung Sie bitte wie folgt vorgehen: Wichtige Sicherheitshinweise •... - Page 67 Bedienelementeleiste Modelo FMO 46 CS 9T1 XS 11 Kochfunktionen 16 Sensor 12 Temperaturanzeige 17 Sensor / Kindersicherung 13 Elektronikuhr 18 Ein-/Ausschalter 14 Temperatursensor 19 Innenlicht 15 Elektronikuhr-Sensor Funktionen des Herds Pizza MaxiGrill mit Umluft Ideal um Pizzas, Tor ten und aller Ar t kuchen Gestattet gleichzeitig ein gleichmäßiges Garen...
- Page 68 Normal mit Umluft Unterhitze Geeignet zum Braten und für Gebäck. Der Es wird nur von der Unterseite Wärme zuge- Lüfter verteilt die Wärme gleichmäßig im Herd. führt. Geeignet zum Anwärmen von Tellern, zum Aufgehen von Teigmassen oder für ähn- liche Anwendungen. Auftauen Empfehlungen zum Auftauen von Lebensmitteln Das Auftauen erfolgt mit Heißluft in zwei...
- Page 69 Bedienung des Herds Achtung 3 Auf der Temperaturanzeige erscheint die Ihre Elektronikuhr verfügt über eine Touch- für diese Garfunktion voreingestellte Zeit. Control-Technologie. Zur Bedienung reicht es aus, Wenn Sie diese ändern möchten, berühren die Glas-Symbole mit dem Finger zu berühren. Sie einfach den Temperatursensor danach die Sensoren oder...
- Page 70 Funktionen der Elektronikuhr Programmierung der Gar-Dauer Garzeit-Dauer: Ermöglicht das Garen während 1 Berühren Sie den Uhrsensor ; das Symbol der gewählten Zeit, danach schaltet sich der leuchtet auf. Backofen automatisch aus. 2 Wählen Sie die Gardauer, indem Sie die Garzeit-Ende: Ermöglicht die Garung bis zu einer Sensoren oder berühren.
- Page 71 Sie können jederzeit die Gar-Endzeit ändern, Wenn Sie während des Gar vorgangs die indem Sie mehrmals den Uhrsensor Garendzeit ändern möchten, berühren Sie berühren, bis das Symbol blinkt, und dann mehrmals den Uhrsensor , bis das Symbol die Sensoren oder berühren.
-
Page 72: Wichtige Sicherheitshinweise
Wichtige Sicherheitshinweise Elektrische Sicherheit • Decken Sie den Boden des Herds nicht mit Alufolie hierdurch können • Eingriffe oder Reparaturen am Gerät Gar vorgang beeinträchtigt einschließlich Austausches Innenemaillierung beschädigt werden. Netzanschlusskabels dür fen nur durch • Zum Zubereiten von Speisen schieben Sie zugelassenes Fachpersonal die mitgelieferte Schale oder den Rost in die... -
Page 73: Kochtabellen
Kochtabellen Die angegebenen Zeiten und Temperaturen sind Richtwerte. Die Kochfunktionen hängen von dem jeweiligen Modell ab, sehen Sie hierzu bitte auf dem Technischen Datenblatt Ihres Herds nach. Im allgemeinen wird ein Vorheizen des leeren Herds empfohlen. Die angegebene Zeit gilt ab Beendigung des Vorheizens (Funktionen oder ). - Page 74 Gewicht Temperat. Zeit Funktion Gefäß Stellung FISCH (Kg) (min) (ºC) 180-200 25-30 Schale Mitte Graubarsch 170-190 20-25 190-210 25-30 Goldbrassen mit Salz Mitte Schale 180-200 25-30 170-190 15-20 Schale Seezunge Mitte 160-180 10-15 190-210 20-25 Seebarsch Schale Mitte 180-200 10-15 190-210 25-30 Seehecht...
- Page 75 Gewicht Temperat. Zeit Gefäß Stellung FLEISCHGERICHTE Funktion (Kg) (ºC) (min) 190-210 70-75 Schale Spanferkel Mitte 170-190 70-75 180-200 55-60 Kaninchen Mitte 170-190 45-50 Schale 170-190 30-35 190-210 50-55 Schale Mitte 170-190 45-50 Lamm 180-200 50-55 170-190 35-40 Schale Lendenstück mit Salz Mitte 170-190 40-45...
- Page 76 Gewicht Temperat. Zeit Stellung Funktion Gefäß NACHTISCH (Kg) (ºC) (min) 150-170 35-40 Rührkuchen Mitte 170-190 30-35 Form 160-180 30-35 170-190 10-15 Gefüllte Schale Mitte Blätterteigrolle 160-180 10-15 160-180 55-60 Form Karamelpudding Mitte 150-170 50-55 160-180 20-25 Schale Plätzchen Mitte 150-170 20-25 170-190 20-25...
-
Page 77: Reinigung Und Pflege
Reinigung und Pflege Achtung Reinigung der Außenseite des Vor Ausführung von Eingriffen jeglicher Art Herds und des Zubehörs das Gerät vom Netz trennen. Die Außenseite des Herds und die Zubehörteile Innenreinigung des Herds mit warmem Seifenwasser oder einem sanft wirkenden Reinigungsmittel säubern. •... - Page 78 4 Heben Sie die Tür jetzt an und holen Sie die 3 Damit ist die Innenscheibe gelöst und kann Scharniere aus den vorderen Schlitzen des heraus genommen werden. Ofens, indem Sie sie nach außen ziehen. Achtung Denken Sie bitte daran, dass sich die Herdtür schließt, wenn die Innenscheibe herausge- nommen wird.
-
Page 79: Wenn Das Gerät Nicht Funktioniert
Wenn das Gerät nicht funktioniert • Lösen Sie die ausziehbare Führungen von der Mutter (E). Der Herd funktioniert nicht Überprüfen Sie den Netzanschluß. Überprüfen Sie die Sicherungen Ihrer Elektroanlage. Prüfen Sie, ob die Schaltuhr auf manuell oder Programm eingestellt ist. Überprüfen Sie die Stellung des Funktionswahlschalters und des Temperaturreglers. -
Page 80: Technische Informationen
Technische Informationen • Zum Einbau des Mehrzweckherds darf das Wenn Ihr Gerät nicht funktioniert, teilen Sie Hinter teil Küchenmöbels bitte unserem Technischen Kundendienst die schraffier ten Teil in Abbildung 3 keine Art des aufgetretenen Fehlers sowie folgende Vorsprünge (Versteifungen, Leitungen, Angaben mit: Steckdosen usw.) aufweisen. - Page 81 • Der Anschluß muß über einen allpoligen, für die erforderliche Stromstärke ausgelegten Schalter mit einem Mindestkontaktabstand von 3 mm zur Abschaltung im Notfall oder bei Reinigungsarbeiten und Lampenwechsel erfolgen. Der Schutzleiter darf nicht über diesen Schalter geführt werden. • Dieser Schalter kann durch einen Stecker ersetzt werden, vorausgesetzt, dass dieser unter normalen...
- Page 82 kalm olabilir. Bu maddeleri yok etmek için a a daki i lemleri uygulay n z. Ç NDEK LER Varsa koruyucu plastik tabaka dahil olmak üzere paketleme için kullan lan tüm maddeleri ç kar n z. Sayfa F r n n z 1saat süresince 200°C ya da konumunda F r n n z n lk Kullan m ndan Önce...
- Page 83 Kontrol Paneli Model FMO 46 CS 9T1 XS Pi irme Fonksiyonlar Sensör + S cakl k Göstergesi Sensör – Elektronik Saat F r n Off / Blok F r n On / ç ayd nlatma Sıcaklık Sensörü Sensörü saat F r n Fonksiyonlar Pizza Pizza, börek ve meyveli kek pi irmek için özel...
- Page 84 Fanl geleneksel K zartmalar ve kekler için uygun. Fan, s y f r n n içinde e it olarak da t r. Alt Rezistans Sadece alttan s tma yapar. Yemeklerin s t lmas ve börek ve benzeri yemeklerin kabart lmas için kullan l r. Buz çözücü...
- Page 85 F r n n kullan lmas Elektronik Saatte Zaman Ayar F r n n z ba lad n z zaman, 12:00 ve yan p sönmeye ba lar. + ve – dü melerini kullanarak zaman ayarlay n z. Saat, seçilen zaman onaylamak için iki defa öter. E er zaman de i tirmek isterseniz, saat ekran na, sembolü...
- Page 86 Çocuk Güvenli i Fonksiyonu: Bu fonksiyon, küçük çocuklar n kontroller ile oynamalar n önlemek için f r n bloke eder. Alarm n Programlanmas : sembolü yanana kadar saat ekran na bas n z. 2 Sonunda alarm n ötmesini istedi iniz süre aral n + ve –...
- Page 87 Gerekti inde pi irmenin bitti i saati ö renmek için saat ekran na sembolü yan p sönene kadar bas n z. Bu noktada + ve – dü melerini kullanarak saatte de i iklik yapabilirsiniz. Saat de i ikli i onaylamak için iki defa öter. E er kalan sürenin ekranda süre bitimine kadar kalmas n isterseniz, saat ekran na yan p sönene kadar bas n z.
- Page 88 Önemli güvenlik talimatlar Elektrik güvenli i Olu abilecek tüm ar zalar Teka yetkili servis elemanlar nca ve orijinal Teka yedek parçalar kullan larak yap lmal d r. Di er ki iler taraf ndan yap lan tamiratlar f r n n za hasar verebilir, bozabilir ve en önemlisi sizin güvenli inizi tehlikeye sokabilir.
- Page 89 Pi irme Tablolar Pi irme tablolar yakla k s ve pi irme zamanlar n gösterir. Pi irme programlar modellere göre de i ir. En iyi neticeyi alabilmek için f r n n veya fonksiyonu ile ön s tma yap n z. Pilot n n sönmesi ön s tman n tamamlanm oldu unu gösterir.
- Page 90 Tepsi S cakl k Bal k Fonksiyon Süre A rl k Pozisyonu Derecesi 180-200 25-30 Tuzlu Tepsi çipura 170-190 25-30 170-190 20-25 Ya l ka tta Tepsi somon 160-180 15-20 180-200 20-25 Alabal k Tepsi 170-190 15-20...
- Page 91 Tepsi S cakl k A rl k Pozisyon Pi irme Süre Dercesi 180-200 60-65 Tav an 160-180 45-50 Tepsi 170-190 45-50 190-210 50-55 Kuzu 170-190 45-50 Tepsi 180-200 50-55 190-210 50-55 Tavuk Tepsi 170-190 45-50...
- Page 92 Kekler ve Tepsi S cakl k Fonksiyon Süre Tatl lar A rl k Pozisyonu Derecesi 145-155 60-65 Tart Tart kal b 145-155 55-60 145-165 25-3 Ufak kek Tepsi 135-155 25-30 165-185 45-50 Peynirli Peynirli kal b 155-185 35-40...
- Page 93 Temizlik ve Bak m Dikkat: F r n n D n n ve Aksesuarlar n n Temizlenmesi Herhangi bir i leme ba lamadan önce cihaz elektrik ba lant s ndan ayr lmal d r. F r n n d k sm n ve aksesuarlar sabunlu su ile ya da hafif bir deterjanla temizleyebilirsiniz.
- Page 94 Uyar : Dikkat edin: iç cam ç kard n zda f r n kapa kapan r. 4. ç cam ve f r n kapa n n içini temizleyin. 5. ç cam n üzerindeki destekleri, kapa n üstünde bulunan yuvalara oturtun. ( C ). Ampulü...
- Page 95 Problem Çözümü PROBLEM ÇÖZÜM F r n çal m yor Elektrik devre ba lant s n kontrol ediniz. Sigortalar ve montaj n z n ak m dengeleyicisini kontrol ediniz. Saatin manuel ayar veya programlanm konumunda oldu undan emin olunuz. Is ve fonksiyon seçicilerinin konumlar n kontrol ediniz.
- Page 96 Teknik Bilgiler (Sayfa 18’de f r n montaj n gösteren ekil 1 ve 2’ye bak n) E er cihaz çal m yor ise, lütfen Teka Multifonksiyonel f r nlar yerlerine Yetkili Servisi ile irtibata geçin ve yerle tirmek için, ekil 3’deki problemin ne oldu unu belirtin.
- Page 97 F r n Montaj Elektrik ba lant s yap ld ktan sonra tüm f r nlar için; 1. F r n mutfak dolab n n içine, kablosu s k mayacak ya da s nan yüzeylerle temas etmeyecek ekilde yerle tiriniz. 2.
- Page 98 Fig. 1 Fig. 2 í Fig. 3...
Need help?
Do you have a question about the FMO 46 CS 9T1 XS and is the answer not in the manual?
Questions and answers
Clean glass door
To clean the glass door of a Franke FMO 46 CS 9T1 XS oven:
1. Wait until the oven is cold.
2. Open the oven door completely.
3. Insert the safety pins into the hinge holes.
4. Hold the door on both sides, close it slightly, then lift and remove it from the slots.
5. Remove the interior glass.
6. Clean the interior glass and the inside of the oven door.
7. Reinsert the interior glass by aligning its supports with the grooves at the top of the door.
8. Reattach the oven door by reversing the removal steps.
This answer is automatically generated
Oven Fmxo 86
The Franke FMO 46 CS 9T1 XS oven features include:
- Cooking functions such as Pizza, MaxiGrill with turbine, and Conventional mode.
- A control panel with indicators and sensors: temperature indicator, child safety function, electronic clock, temperature sensor, and light.
- Recommended for uniform cooking and browning, suitable for pizzas, pastries, large meat pieces, cakes, and tarts.
- Electronic controls for starting and stopping the oven.
- Interior light and safety features.
- Preheating function with a heating pilot light indicator.
- Suitable for various recipes with specific temperature and time guides.
- Recyclable packaging and proper disposal instructions for environmental safety.
This answer is automatically generated