Miele CVA 3660 Operating And Installation Instructions
Built-in coffee machine
Hide thumbs
Also See for CVA 3660:
- Operating and installation instructions (72 pages) ,
- Operating and installation instructions (84 pages)
Table of Contents
Advertisement
Advertisement
Table of Contents

Related Manuals for Miele CVA 3660


Summary of Contents for Miele CVA 3660
- Page 1 Operating and installation instructions Built-in coffee machine CVA 3660 en - AU, NZ To avoid the risk of accidents or damage to the machine, it is essential to read these instructions before it is installed and used for the first time.
-
Page 2: Table Of Contents
Contents Caring for the environment ......... . 5 Guide to the machine . - Page 3 Contents Settings: Customising your machine ....... . 23 Settings menu ........... . 23 Selecting a language .
- Page 4 Contents Cleaning and care ..........43 Overview .
-
Page 5: Caring For The Environment
Caring for the environment Disposal of the packing Disposal of your old appliance material or machine The transport and protective packing Electrical and electronic appliances / has been selected from materials which machines often contain materials are environmentally friendly for disposal which, if handled or disposed of and can normally be recycled. -
Page 6: Guide To The Machine
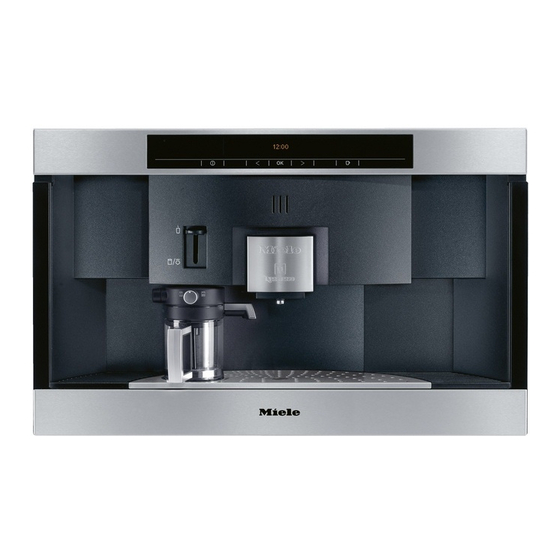
Guide to the machine Exterior view On/Off sensor for switching the coffee machine on and off Display Left arrow sensor, for scrolling through the various programme options OK sensor, for confirming the selection of a programme option and for saving a setting Right arrow sensor, for scrolling through the various programme options Drinks selection sensor for selecting the type of coffee (coffee or espresso) -
Page 7: Interior View
Guide to the machine Interior view Master switch Capsule plate (replaced with the descaling funnel when descaling is carried out) Brew unit Capsule carousel Carousel runners Water container Drip tray with grid Waste container... -
Page 8: Warning And Safety Instructions
It should only be used to prepare espresso, cappuccino and coffee (max. 20 cups per day). Any other use may void your manufacturer's warranty. Miele cannot be held liable for damage resulting from incorrect or improper use or operation. -
Page 9: Technical Safety
Faulty components must only be The manufacturer cannot be held liable replaced by genuine Miele original for the consequences of an inadequate spare parts. The manufacturer can only earthing system (e.g. electric shock). -
Page 10: Correct Use
Warning and Safety instructions Correct use The appliance is only completely isolated from the electricity supply Caution! Danger of burning! The when: liquids dispensed are very hot. – the mains fuse is disconnected, Never look directly at the lighting or use optical instruments to look at it. - Page 11 Warning and Safety instructions Do not use milk with additives. Only use the descaling tablets Sugar additives will adhere to the milk supplied by Miele and follow the pipework and damage the machine instructions on the packet carefully. and cappuccinatore.
-
Page 12: Brief Description
Brief description The capsule carousel can hold up to 20 The machine features a system lock to coffee capsules. These 20 coffee prevent children from operating the capsules are divided between 5 machine. chambers. This means that the capsule The easy-to-use programming facility carousel can be filled with 5 different allows, amongst other things, the types of coffee. -
Page 13: Using The Coffee Machine - First Steps
Using the coffee machine - first steps ^ The arrow sensors are used to select The following notes should help you get to know your coffee machine before a programme option in the display. starting to use it. Touch the OK sensor when the option you want appears highlighted in the display. -
Page 14: Switching Off
Using the coffee machine - first steps When you use the machine for the very If everything has been entered first time, you will be prompted to correctly, Set up successful will select a language. appear in the display. ^ Touch the right or left arrow until the ^ Confirm this message by touching language you want appears in the the OK sensor. -
Page 15: Filling The Machine With Water And Coffee Capsules
Filling the machine with water and coffee capsules The coffee machine must be cleaned thoroughly (see "Cleaning and care") before you fill it with water and coffee capsules. It is vital that you programme in the water hardness level of your water (see "Customising your machine - Setting the water ^ Lift the water container up and pull it... -
Page 16: Filling The Capsule Carousel
Filling the machine with water and coffee capsules Filling the capsule carousel facing downwards. You can take the capsule carousel out by lifting it Do not put anything other than upwards to fill it. Nespresso coffee capsules in the capsule carousel. Please note that the individual Do not use coffee capsules which capsules sit loosely in the capsule... -
Page 17: Making Drinks
Making drinks Before preparing the first drink Important: the water piping must be rinsed through every day before the Filling the system with water first drink of the day is prepared. The machine is emptied completely Rinsing will take place automatically before it leaves the factory. -
Page 18: Double Portion
Making drinks Preparing hot milk, milk froth ^ Touch the OK sensor once. and cappuccino The drink you want will then run out of the spout. This machine comes with a cappuccinatore (milk frother) which You can programme the size makes it easy to prepare hot milk, milk of portion dispensed for froth and cappuccino. -
Page 19: Dispensing Froth Directly Into The Cup
Making drinks Do not set the valve between these Steam release is controlled by a two settings as this will cause the timer. If you do not get sufficient milk to splutter. froth in your cup and the steam jet has stopped releasing steam, Milk can be heated or frothed and please shut off the steam valve on... -
Page 20: Preparing Cappuccino
Making drinks Frothing milk in the cappuccinatore The steam valve must engage in the ^ Pull the spout out of the lid as far as it lower position in order to connect will go. properly with the cappuccinatore. ^ Turn the valve on the cappuccinatore ^ When you have enough froth in the clockwise as far as it will go. -
Page 21: Preparing Hot Milk
Making drinks Preparing hot milk After preparing milk/Interim cleaning If you want to use the cappuccinatore again before cleaning it thoroughly, e.g. because there is some milk left in the cappuccinatore, you can use the coffee machine to rinse the lid. This will remove any milk deposits. -
Page 22: User Profile Drinks
Making drinks User profile drinks After use With User profiles, you can create Before switching the drinks to suit your personal taste and machine off for any length of those of your guests. time, the pipework, brew system, spouts and steam valve need If you have set the machine up for a to be cleaned. -
Page 23: Settings: Customising Your Machine
Settings: Customising your machine It is easy to customise your machine to Timer: You can set or activate the suit your exact requirements. Timer here. The following options are available in the "Set" menu: Settings menu – Switch on at: The machine can be set to switch on at a specific time of To select the various programme day. -
Page 24: Selecting A Language
Settings: Customising your machine Selecting a language Maintenance: Carry out (see "Cleaning and care"). If you want to change the language Showroom prog.: Demo programme, used in the display, use the Settings menu and follow the flag symbol. ^ Select "Settings F" from the main Factory default: All settings can be reset to the factory default, and user menu, and then touch the OK sensor. -
Page 25: Setting The Time Of Day
Settings: Customising your machine Setting the time of day Clock format ^ Select "Settings F" from the main ^ Use the arrow sensors to select menu, and then touch the OK sensor. "Clock format". ^ Touch the right arrow sensor until ^ Use the right arrow to select a 24 h or "Time"... -
Page 26: Setting The Timer
Settings: Customising your machine Setting the timer If the machine is cold when it is ^ Select "Settings F" from the main switched on, it will carry out a short menu, and then touch the OK sensor. rinse automatically. ^ Touch the right arrow sensor until "Timer"... - Page 27 Settings: Customising your machine ^ First set the hour with one of the Activate arrow sensors. Touch the OK sensor. ^ Select "Activate" with the arrow ^ Then use the arrow sensors to set the sensors and touch the OK sensor. minutes.
-
Page 28: Setting The Steam System
Settings: Customising your machine Setting the Steam system Lighting: Setting the brightness The machine has two heating systems which allow you to dispense steam and You can set how bright the lighting coffee at the same time. To save should be on the machine: energy, the steam system can be ^ Select "Settings F"... -
Page 29: Lighting: Setting The Switch-Off Time
Settings: Customising your machine Lighting: Setting the switch-off ^ Touch the OK sensor whilst the machine is off. time ^ Select "Lighting", and then touch the The machine lights up when switched OK sensor. on. It switches off automatically after 15 minutes of inactivity to save energy. -
Page 30: Info (Showing The Number Of Drinks)
Settings: Customising your machine Info (showing the number of Safety (activating the System drinks) lock) The "Info" option enables you to check The machine can be locked to ensure how many drinks the machine has that it is not operated by unsupervised already dispensed or how many you children or persons who are can still dispense before it has to be... -
Page 31: Setting The Water Hardness
Settings: Customising your machine Setting the water hardness If the water is harder than For trouble-free operation of the coffee 40°d/7.0 mmol/l, limescale will build machine, and to ensure that the up more rapidy than with soft water. descaling reminder appears in the Descaling will need to be carried out display at the appropriate time, it is more regularly than stated to... -
Page 32: Setting The Display
Settings: Customising your machine Setting the volume (keypad ^ Touch one of the arrow sensors to set the water hardness, and then touch tone, buzzer) the OK sensor. You can choose for a tone to sound The water hardness level selected is each time a sensor is touched. -
Page 33: Resetting The Factory Default Settings
Settings: Customising your machine Resetting the factory default Factory default settings (the coffee machine is delivered with the settings following settings) The "factory default" setting is used to – Steam system (On) reset the various settings back to the default status. –... - Page 34 Settings: Customising your machine User profiles You can delete all user profiles except for the standard one under "User Profiles". ^ Select "Reset" under "User profiles", and touch the OK sensor. User profiles are then deleted. If you select "Reset" by mistake, switch the coffee machine off: Resetting to the factory defaults will not be carried out.
-
Page 35: Allocating And Saving A Coffee Type
Allocating and saving a coffee type There are 16 different types of If the chamber has not been allocated Nespresso coffee available for use in with a type of coffee a question mark this machine (as well as occasional will appear after the coffee bean "special"... -
Page 36: Select Type
Allocating and saving a coffee type ^ Use the arrow sensors to select the It is best to take the capsule carousel out of the machine so that you can see character you require. which type of coffee you have put into ^ Confirm the character by pressing each chamber more easily. -
Page 37: Change Type
Allocating and saving a coffee type Change type You can use this option to select the coffee type that you would like to change. ^ Touch one of the arrow sensors to highlight "Change type", and touch the OK sensor. Now proceed as described in "Rename type". -
Page 38: Programming The Amount (Setting The Portion Sizes)
Programming the amount (Setting the portion sizes) The flavour of the coffee produced Programming the portion size via the depends on the type of coffee, how OK sensor finely the beans are ground and the ^ Place the appropriate cup for the quantity of water used. -
Page 39: Programming The Amount Via "Settings
Programming the amount (Setting the portion sizes) Programming the amount via Setting portion sizes for different "Settings" User profiles ^ Place the appropriate cup for the In addition to the standard amount you want to programme user profile you can also set under the appropriate spout. -
Page 40: Setting Up User Profiles
Setting up User profiles Selecting a User profile To cater for different tastes and preferences, you can enter up to 9 ^ Select the User profile you want with individual User profiles. Each User the arrow sensors and touch the OK profile can also be allocated its own sensor. -
Page 41: Changing A User Profile
Setting up User profiles Changing a User profile ^ Use the arrow sensors to select the character you require. Once you have selected the "Change" ^ Confirm the character by pressing option and confirmed your selection the OK button. with OK, ^ Select the User profile, and touch the The characters you have chosen will appear in the top line of the display. -
Page 42: Revert
Setting up User profiles Revert When switched on You can programme the machine so Each time the machine is switched on it that it reverts to the Standard User will automatically select the Standard profile after you have made each drink, user profile regardless of which user or so that it continues to operate using profile was set before the machine was... -
Page 43: Cleaning And Care
Cleaning and care Overview Clean the coffee machine regularly to avoid a build-up of bacteria. Time interval What do I have to do? Rinse the lid of the cappuccinatore Each time milk is used to make a drink, if more than one hour has passed since the last drink was made Rinse the system (pipework) -
Page 44: Rinsing The System
Rinsing the system Miele branded cleaning and conditioning products are available Before switching the machine off for from Miele or via the internet at any length of time, the pipework, brew www.miele-shop.com (depending on system, spouts and steam valve need country). -
Page 45: Water Container
Cleaning and care Water container Empty the water container daily and fill with fresh, cold tap water just before use. When cleaning, make sure that there is no soiling in the area around the valve. Otherwise the container will not sit correctly and this could result ^ Clean inside the waste container in water leaking from the machine. -
Page 46: Drip Tray
Cleaning and care Drip tray There is a sensor in the drip tray which causes a message to appear in the display when the drip tray is full and needs to be emptied. Remove the tray and empty and clean it when this message appears. -
Page 47: Grille With Drip Tray Cover
Cleaning and care Grille with drip tray cover ^ Lift the carousel runners up (a), and pull forwards to remove b. ^ Take the grille and drip tray cover out ^ Clean the capsule carousel and and wash them. carousel runners with hot water and a little washing-up liquid, or in the The plastic grille must only be dishwasher and dry with a cloth. -
Page 48: Coffee Outlet Cover
Cleaning and care Coffee outlet cover Interior and machine front ^ Open the front of the machine. Switch the machine off with the master switch (top lefthand). Danger of injury. ^ First take out all removable parts and then clean the interior and the machine front with a mild solution of hot water and washing-up liquid. -
Page 49: Capsule Plate
(Make sure you use the correct tablets - approx. 1 cm diameter, pack of 10). Cleaning tablets are available from your Miele Chartered Agent, Miele, via the internet at www.miele-shop.com (depending on country), or from Nespresso. -
Page 50: Cappuccinatore (Milk Frother)
Cleaning and care Cappuccinatore (milk frother) Ensure that all parts have been The cappuccinatore can be dismantled reassembled correctly and that into several parts to clean it properly. It there is no gap between the two is very important to clean the parts parts of the lid. -
Page 51: Machine Front
Cleaning and care Machine front Avoid the following on all types of front: If soiling is not removed promptly it – cleaning agents containing soda, could cause the surface of the amonia, acids or chlorides, machine to alter or discolour. Remove any soiling immediately. -
Page 52: Maintenance
The capsule hopper in the brew unit needs to be replaced after about 15,000 cups of coffee. Replacement capsule hoppers are available from Miele. Settings F K1 K2 K3 K4 K5 L o n G k ^ Select "Settings F" from the Main ^ Using the special tool (supplied) as menu, and then touch the OK sensor. -
Page 53: Descaling The Machine
No. of available from your Miele Chartered portions until descaling: 50. Agent, the Miele or via the internet at This message will now appear www.miele-shop.com (depending on (counting down) after each drink country). - Page 54 Descaling the machine The display will guide you through the whole procedure. Please follow the instructions to, for example, empty the drip tray, fill the water container etc. The descaling programme cannot be cancelled once you have touched the OK sensor. The ^ When prompted, remove the capsule programme has to be completed through to the end.
-
Page 55: Descaling When Not Prompted By A Message
Descaling the machine Descaling when not prompted ^ When a message asking you to fill the water container with fresh tap by a message water appears in the display, you If you want to carry out descaling should remove the container and before being prompted to do so by the rinse it out thoroughly with clean machine,... -
Page 56: Problem Solving Guide
This time contacting the Miele. depends on the switch off time which has been programmed. Note: A call-out charge will be applied... - Page 57 Problem solving guide . . . the machine does not switch on . . . the time of day needs to be reset. even though the "Switch on at" The time of day needs to be reset if the setting for the timer has been machine has been switched off with the activated.
- Page 58 Problem solving guide . . . no water comes out of the steam . . . you cannot create steam and or hot water spout. coffee or espresso at the same time. ^ Has the steam heating system been The water container has not been correctly positioned inside the machine.
- Page 59 ... the milk is not hot enough. ^ If this fault message continues to ^ Have the cups and system been appear, please call Miele. pre-warmed? The smaller and thicker the cup, the . . . the machine does not rinse more important it is to pre-warm it.
- Page 60 ^ If this fault message continues to The descaling programme cannot be appear in the display, please call Miele, quoting the fault code. cancelled once you have touched the OK sensor. The programme has to be completed through to the end. This is a...
- Page 61 If the fault message appears in the recognise the capsule chambers as display again, contact Miele. well as the recess in the floor. Wipe everything dry using a soft cloth..the message "Check capsule...
- Page 62 Problem solving guide . . . "Fault -75" appears in the display. The coffee capsule is lying on the capsule plate. The sensors in the interior of the waste ^ Open the front of the machine. container are dirty. ^ Pull out the waste container and Press the master switch in the clean the interior, paying particular machine at the top left to...
- Page 63 ^ Close the machine front and follow the ^ Close the machine front and follow the instructions given in the right hand instructions given in the right hand display. display. If the fault indicator appears in the display again, contact Miele.
- Page 64 . . . "Fault -73" or "Fault -74" or "Fault - 77" appears in the display. ^ Follow the instructions given in the display. ^ Switch the machine off and then back on again. ^ If the fault message appears in the display again, contact Miele.
-
Page 65: After Sales Service
– your Miele Chartered Agent – Miele The telephone number and address for Miele is given on the back page. When contacting your Chartered Agent or Miele, please quote the model and serial number of your appliance. This information is given on the data plate inside your appliance. -
Page 66: Electrical Connection
Electrical connection All electrical work should be carried out Important only by a suitably competent person, in The wires in the mains lead are strict accordance with national and coloured in accordance with the local safety regulations. following code: The machine is supplied with a mains Green/yellow = earth cable with moulded plug for connection Blue... -
Page 67: Installation
Installation Building-in and combination options This machine is designed for installation in a tall unit or in a wall unit. -
Page 68: Installation
Installation It can also be combined with other Miele built-in appliances. If the coffee machine is to be built in above another appliance, there must be a full-width, closed shelf between the appliances (except when it is combined with a Miele system drawer). - Page 69 Installation ^ Connect the machine to the electricity supply. ^ Push it all the way into the niche until you feel resistance. ^ Open the front of the machine, and partially tighten the side socket screws. ^ Carefully turn the lower socket screws a to centre the machine in the niche.
- Page 72 Alteration rights reserved / 1811 M.-Nr. 07 477 170 / 05 CVA 3660...
Need help?
Do you have a question about the CVA 3660 and is the answer not in the manual?
Questions and answers