Reiner jetstamp 792 User Manual
Hide thumbs
Also See for jetstamp 792:
- Operating instructions manual (27 pages) ,
- Operating manual (73 pages) ,
- Short instructions (88 pages)
Table of Contents
Advertisement
Quick Links
jetStamp 792/792 MP
B
3
C
10
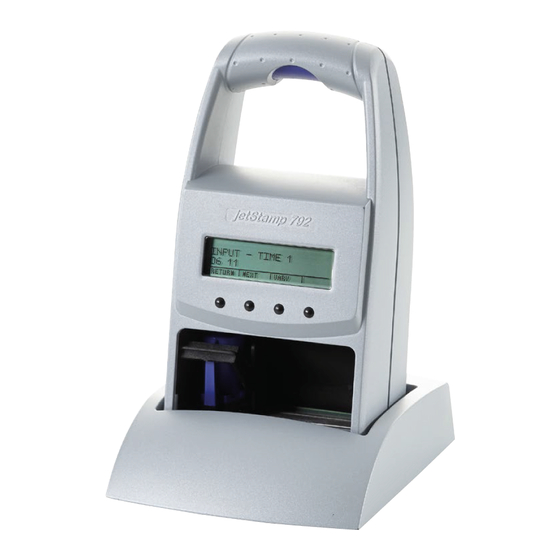
Operating elements
1
Trigger
2
Connection socket (rear)
3
Reset button (back of the stamp)
4
Base station
5
Locking tab
6
Cartridge
7
Locking rail
8
Keypad
9
Display
10
Ink cartridge handle
44
2
7
D
15
14
E
17
11
Mini-USB-socket
12
Adapter
13
Connection voltage supply
14
Connection electric stamp
15
Green LED
16
Nozzles
17
Small felt pad
18
Protective film for cartridge
19
Cartridge contacts
11
12
13
18
10
16
6
19
Advertisement
Table of Contents

Related Manuals for Reiner jetstamp 792


Summary of Contents for Reiner jetstamp 792
-
Page 1: Operating Elements
792/792 MP Operating elements Trigger Mini-USB-socket Connection socket (rear) Adapter Reset button (back of the stamp) Connection voltage supply Base station Connection electric stamp Locking tab Green LED Cartridge Nozzles Locking rail Small felt pad Keypad Protective film for cartridge... -
Page 2: Display And Button Functions
792/792 MP Display and button functions The display is divided into the following three zones: The number of the currently selected imprint (P : 01 ... P : 29) Numberer repetition value (e.g R : 01/01) Selected imprint Top line: Pretext and number... -
Page 3: Table Of Contents
1.8. Selecting pretext ..................55 1.9. Printing ....................55 1.10. Installing 790 PCset easy-Software ...............56 1.10.1. System Requirements ..............56 1.10.2. Installing Software.................56 2. Using the jetStamp 792/792MP – Normal operation 2.1. Numberer ....................57 2.1.1. Leading zero setting ...............57 2.1.2. Incremental/Decremental ...............57 2.1.3. Skip value ..................58 2.1.4. - Page 4 3.12. Password [NO/TXT] ..................69 3.13. Password [PRINT] ..................70 3.14. Password Set-up ..................70 4. Software Application 790 PCset easy 4.1. Preparing jetStamp 792 for 790 PCset easy .............71 4.2. Starting the Software ................71 4.3. Check connection ..................71 4.4. Operating Interface ...................72 4.4.1.
- Page 5 792/792 MP 5. Maintenance 5.1. Replace Cartridge ..................77 5.2. Clean Cartridge Contacts ................77 5.3. Clean Nozzles ...................78 5.3.1. Automatic Nozzle Cleaning ...............78 5.3.2. Manual Nozzle Cleaning ..............78 5.4. Selecting Cleaning Interval .................78 5.5. Cleaning print carriage ................79 5.6. Clean Housing ..................79 6.
-
Page 6: Important Information
792/792 MP Important information Before using the jetStamp 792/792MP for the first time, the operating manual must be read through, paying careful attention to the safety advice. In this way, you can avoid uncertain- ties and their accompanying safety risks when working with the electronic stamp, for the sake of your own safety and to prevent damage to the device. -
Page 7: Safety Notes
Only have repairs performed by trained specialists. Safe handling of cartridges WARNING Danger of blinding at contact of the ink with the eyes. Do not point the jetStamp 792’s nozzles towards the face of persons! CAUTION Health risks if ink is swallowed. Don’t swallow! -
Page 8: Preparation And Set-Up
Only connect the device to the PC after the 790 PCset easy software has been installed (see “Installing 790 PCset easy-Software”, page 56). Connect jetStamp 792 to the connection electric stamp of the adapter Connect mains unit to the connection voltage supply of the adapter Push mains unit into the socket. -
Page 9: Selecting Language
792/792 MP 1.4. Selecting language See “Selecting language”, page 66. 1.5. Stored imprints Number P : 01 to P : 25 are pre-set imprints (see “Overview of saved imprints”, page 53), which contain individual print fields such as “text prefix” (see page 55), “numberer”... -
Page 10: Overview Of Stored Imprints
792/792 MP 1.7. Overview of stored imprints Imprints P : 01 to P : 04 = Pretext + Date P : 01 P : 02 P : 01 P : 02 EING. 29. FEB 2020 EING. 29 . 02 . 2020... - Page 11 792/792 MP Imprints P : 11 to P : 14 = Numberer + Pretext + Date P : 11 P : 12 P : 11 R : 01 / 01 P : 12 R : 01 / 01 00000000 00000000 EING.
-
Page 12: Selecting Pretext
[RETURN] twice. The main menu appears. 1.9. Printing WARNING Danger of blinding at contact of the ink with the eyes. Do not point the jetStamp 792’s nozzles towards the face of persons! Print imprints Fig. Set desired imprint. -
Page 13: Installing 790 Pcset Easy-Software
792/792 MP 1.10. Installing 790 PCset easy-Software 1.10.1. System Requirements Supported REINER devices - jetStamp 790 - jetStamp 792 Hardware - PC with Pentium processor (also compatible) or higher - Graphics adapter with a min. resolution of 800 × 600 pixels (at least 256 colours;... -
Page 14: Using The Jetstamp 792/792Mp - Normal Operation
(see page 21) in which a numberer is contained must be selected (see “Selecting imprints”, page 63). A second numberer can be inserted by a specialist vendor or the REINER support in customer-specific imprints (see “Customer-specific imprints”, page 62). 2.1.1. Leading zero setting Leading zeros can be suppressed or printed, e.g 5 or 00000005. -
Page 15: Skip Value
792/792 MP If a second numberer is required, customer-specific imprints in the range from P : 26 to P : 29 must be selected (see “Selecting imprint”, page 63). Proceed as in Menu access (see page 45). Press [NEXT] until “MODE NUM 2” appears. -
Page 16: Repetition
792/792 MP 2.1.4. Repetition Defines the number of times an imprint is repeated. If, for example, the value “03” is set, the numberer prints the same number three times before counting further. Press [MODE] until [NO/TXT] appears in the display menu bar. -
Page 17: Limit Values (Numberer)
792/792 MP 2.1.6. Limit values (numberer) Definition of the limit values that the numberer counts from and to, e.g. starting at 10, stopping at 20 and starting again from 10. Setting limit values Press [MODE] until [COUNT] appears in the display menu bar. -
Page 18: Favourites Set-Up
792/792 MP 2.2. Favourites Set-up Using this function, you can reduce the 29 programmed imprints to the number that you actually require, e.g. only four visible imprints. In this way, you can switch more quickly between the individual imprints. -
Page 19: Customer-Specific Imprints
792/792 MP 2.3. Customer-specific imprints Customer-specific imprints, P : 26 to P : 29, can be created and transferred with the 790 PCset easy. – or – Individual texts with a maximum of two lines can be created. Each line can contain a maximum of 20 characters. -
Page 20: Set-Up Module - Detailed Access
792/792 MP 3. Set-up Module – Detailed access 3.1. Menu Entry The Setup-Module has two sub-sections. “SETUP - MODULE UPDATE” can only be used in connection with the 790 PCset easy. “SETUP - MODULE SETTINGS” further extensive settings that influence the imprint and handling can be carried out. -
Page 21: Setting Date And Time
792/792 MP 3.3. Setting date and time Stored imprint P : 01 to P : 04 or P : 11 to P : 25 or customer-specific imprints (see page 21) in which a time or date is contained must be selected (see “Selecting imprints”, page 63). -
Page 22: Double Print
The duration until possible drying of the ink at the nozzles depends on the ambience temperature and humidity. At the corresponding configuration, the jetStamp 792 performs self-cleaning of the nozzles at regular intervals. Small amounts of ink are ejected here. -
Page 23: Selecting Language
792/792 MP 3.6. Selecting language Proceed as in menu access (see page 45). Press [NEXT] until “LANGUAGE” appears. To adjust the language setting, press [VARY]. To increase the number value, press [INC]. To decrease the number value, press [DEC]. -
Page 24: Summertime
792/792 MP 3.8. Summertime Proceed as in menu access (see page 45). Press [NEXT] until “SUMMERTIME” appears. Press [VARY]. To increase the number value, press [INC]. To decrease the number value, press [DEC]. 0 = No summertime change 1 = European summertime change from 1996... -
Page 25: Password [Setup]
792/792 MP 3.10. Password [SETUP] Blocks access to the Setup-Module with a password and protects it against misuse. The factory-set password is 2468. Proceed as in menu access (see page 45). Press [NEXT] until “PASSW SETUP” appears. Press [VARY]. -
Page 26: Password [No/Txt]
792/792 MP To deactivate password input, press [OFF]. To move directly to the next menu item, press [RETURN] once. – or – To save changes and to return to the main menu, press [RETURN] three times. The main menu appears. -
Page 27: Password [Print]
792/792 MP 3.13. Password [PRINT] Blocks access to stamping with a password and protects it against misuse. The factory-set password is 2468. Proceed as in menu access (see page 45). Press [NEXT] until “PASSW PRINT” appears. Press [VARY]. To activate the password input, press [ON]. -
Page 28: Software Application 790 Pcset Easy
The 790 PCset easy software is started. 4.3. Check connection To check whether the PC is correctly connected to the jetStamp 792, click “Info” in the menu “Help”. If the window “Info about 790 PCset easy” appears, the PC is connected to the jetStamp 792 correctly. -
Page 29: Operating Interface
792/792 MP 4.4. Operating Interface The operating interface is structured in four areas: Menu bar Symbol bar 2 lines for design of the imprints Preview Menu bar Transfer Symbol bar Exit Imprints Arrows Preview Transfer of external imprints... -
Page 30: Menu Commands
P : 26 to P : 29 for configuration. P : 26 to P : 29 Transfer Transfer imprints P : 26 to P : 29 to the jetStamp 792. Exit Terminate programme. 4.4.2. Objects Imprints are assembled from objects of the four object groups described below. -
Page 31: Menu Bar
Load imprints saved with 790 PCset easy for processing. Save as Save imprints. Transfer Transfer currently displayed imprints to the jetStamp 792. Exit Terminate programme. Port settings Settings for connection of the PC to the jetStamp 792. Help Calling online help. Info Information on the connected jetStamp 792. -
Page 32: Example Workflow: Generate Imprint
The lines of the example imprint now should look as in the following figure: This leads to the following constellation in the preview 4.5.3. Preparing jetStamp 792 for 790 PCset easy See „Preparing jetStamp 792 for 790 PCset easy“, page 71. -
Page 33: Transfer Imprints To The Jetstamp 792
SM-UPDATE STAMP PICTURE RETURN The imprints P : 26 to P : 29 were saved in the jetStamp 792 and may be printed. To return to the main menu, push [RETURN] thrice more. Main menu appears. -
Page 34: Maintenance
Keep cartridge out of the reach of children! Replace Cartridge Fig. take jetStamp 792 from base station Press [MODE] until [INKJET] appears in the display menu bar. Press [INKJET]. The print carriage moves into a central position. Push the locking rail as far back as it will go. -
Page 35: Clean Nozzles
(see “Selecting cleaning interval”, page 65). 5.3.1. Automatic Nozzle Cleaning WARNING Danger of blinding at contact of the ink with the eyes. Do not point the jetStamp 792’s nozzles towards the face of persons! Trigger automatic cleaning mechanism Fig. -
Page 36: Cleaning Print Carriage
CAUTION Danger of electric shock when liquids enter the inside of the device. Pull the mains adapter from the socket. Inform specialist dealer or REINER service. NOTICE Aggressive cleaning agents may damage the housing surface. Do not use abrasives and plastic-dissolving detergents for cleaning. -
Page 37: Troubleshooting
792/792 MP 6. Troubleshooting 6.1. Operating and fault messages Display Fault cause Fault correction Dark display/ Display fault Press the Reset button Lines in the display IMPRINT BLOCKED Print triggering is blocked Press [QUIT] ERROR 04 Memory error [QUIT] drücken... -
Page 38: Rating Plate
792/792 MP 7. Technical data 7.1. Rating plate Please take note of the information shown on the rating plate before connecting the device. The rating plate is located on the bottom of the jetStamp 792. Explanation: Mod. = Modell (Model) = Artikelnummer (Serial Number) GEPR. -
Page 39: Technical Data
792/792 MP 7.2. Technical data Technical data Stamping time approx. 0.7 seconds Stamping cycle > 2 seconds Print capacity per cartridge approx. 300,000 characters Dimensions, stamp only (W x H x D in mm) 96 x 77 x 170... -
Page 40: Transport And Disposal
792/792 MP 7.3. Transport and disposal Transport You should retain the jetStamp 792 packaging as it can be used to protect the product if it needs to be transported. Disposal Directive 2002/96/EC WEEE: Old devices must not be disposed of in the common household waste but in a specified acceptance point for recycling of electrical and electronic devices. -
Page 41: Contact
E-Mail: reiner@reiner.de www.reiner.de © 2014 Ernst Reiner GmbH & Co. KG All rights reserved. Translation, reprint and other reproduction of these operating instructions, even in parts and no matter the form, shall require our express written consent. We reserve the right to make content changes to these operating instructions without notice. -
Page 42: Index
792/792 MP 10. Index Password [NO/TXT] ......69 Password [PRINT] ......70 Accessories .........83 Password Set-up ......70 Password [SETUP] ......68 Block/unblock print triggering ....67 Pretext ..........55 Printing ..........55 Clean Housing ........79 Cleaning interval ........65 Rating plate ........81 Cleaning print carriage ......79 Replace Cartridge .........77...
Need help?
Do you have a question about the jetstamp 792 and is the answer not in the manual?
Questions and answers