Table of Contents
Advertisement
Available languages
Available languages
Quick Links
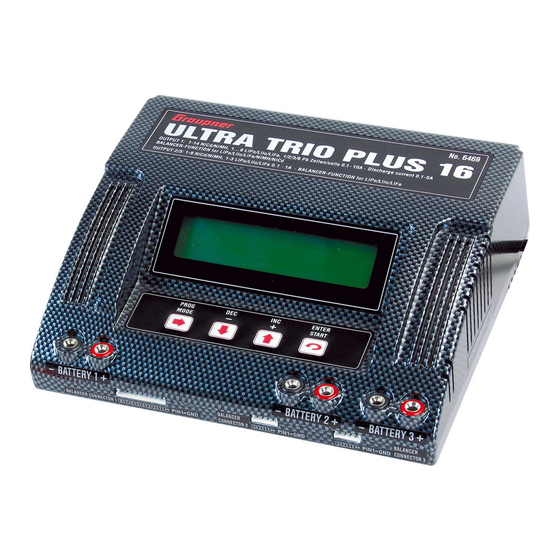
Best.-Nr. 6469
Order No.6469
Réf N°.6469
BEDIENUNGSANLEITUNG
OPERATING MANUAL
INSTRUCTIONS D´UTILISATION
ULTRA TRIO PLUS 16
Mikroprozessorgesteuertes Hochleistungs-Schnelllade-,
Entlade-, und Formierungsgerät für NiCd- / NiMH-, LiPo-/LiIo-/LiMn-/LiFe- und Pb-Akkus
Ladestrom bis 10 A, Entladestrom bis 5 A
Eingebauter Balancer für Li-Akkus und NiMH/NiCd-Akkus
Micro-processor controlled high-performance fast charger, discharger
and battery conditioner for Ni-Cd / Ni-MH, LiPo / LiIo / LiMn / LiFe and lead-acid batteries
Max. charge current 10 A, max. discharge current 5 A
Balancer function for Li-batteries and NiMH/NiCd-batteries
Chargeur rapide à grande puissance piloté par micro-processeur pour la charge rapide, la décharge
et le cyclage des accus NiCd, NiMH, LiPo/LiIo/LiMn/LiFe et des accus Pb
Courant de charge jusqu'à 10 A, courant de décharge jusqu'à 5 A
Balancer intégré pour accus LiPo et NiMH/NiCd
DEUTSCH Seite 2
ENGLISH page 28
FRANÇAIS page 54
ITALIANO pagina 80
G R A U P N E R GmbH & Co. KG D - 7 3 2 3 0 K I R C H H E I M / T E C K G E R M A N Y
PN.PE-01
Keine Haftung für Druckfehler! Änderungen vorbehalten!
1
Advertisement
Chapters
Table of Contents

Related Manuals for GRAUPNER ULTRA TRIO PLUS 16


Summary of Contents for GRAUPNER ULTRA TRIO PLUS 16
- Page 1 Order No.6469 Réf N°.6469 BEDIENUNGSANLEITUNG OPERATING MANUAL INSTRUCTIONS D´UTILISATION ULTRA TRIO PLUS 16 Mikroprozessorgesteuertes Hochleistungs-Schnelllade-, Entlade-, und Formierungsgerät für NiCd- / NiMH-, LiPo-/LiIo-/LiMn-/LiFe- und Pb-Akkus Ladestrom bis 10 A, Entladestrom bis 5 A Eingebauter Balancer für Li-Akkus und NiMH/NiCd-Akkus Micro-processor controlled high-performance fast charger, discharger and battery conditioner for Ni-Cd / Ni-MH, LiPo / LiIo / LiMn / LiFe and lead-acid batteries Max.
-
Page 2: Table Of Contents
Inhaltsverzeichnis Kapitel Seite 1. Allgemeines 2. Warn- und Sicherheitshinweise, bitte unbedingt beachten! 3. Allgemeine Betriebshinweise 4. Empfohlene Ladekabel, Polaritäten 5. Bedienelemente, Bedienung, Ladestart 6. Lade- und Entladeprogramme 7. Programmstruktur 8. Auswahl der Ladeprogrammgruppe 9. Inbetriebnahme 10. Starten des Lade-Entladevorgangs 11. Nickel-Cadmium (NiCd) - Ladeprogramme 12. -
Page 3: Warn- Und Sicherheitshinweise, Bitte Unbedingt Beachten
Sicherheits- und Warnweise Das Ladegerät vor Staub, Feuchtigkeit, Regen, Hitze (z. B. direkte Sonneneinstrahlung) und Vibration schützen. Nur zur Verwendung im Trockenen! Nicht für Kinder unter 14 Jahren, kein Spielzeug! Die Schlitze im Gehäuse dienen der Kühlung des Geräts und dürfen nicht abgedeckt oder verschlossen werden. -
Page 4: Allgemeine Betriebshinweise
3. Allgemeine Betriebshinweise Laden von Akkus Beim Laden wird dem Akku eine bestimmte Strommenge zugeführt, welche sich aus dem Produkt aus Ladestrom x Ladezeit ergibt. Der maximal zulässige Ladestrom ist vom jeweiligen Akku-Typ abhängig und ist den Datenangaben des Akkuherstellers zu entnehmen. Nur bei ausdrücklich als schnellladefähig bezeichneten Akkus darf der Normalladestrom überschrit- ten werden. -
Page 5: Empfohlene Ladekabel, Polaritäten
Verwendung und Wartung des Ladegerätes können von der Fa. GRAUPNER nicht überwacht werden. Daher über nimmt die Fa. GRAUPNER keinerlei Haftung für Verlu ste, Schäden oder Kosten, die sich aus fehlerhafter Verwendung und Betrieb ergeben oder in irgendei ner Weise damit zusammenhängen. -
Page 6: Lade- Und Entladeprogramme
6. Lade- und Entladeprogramme (Ausgang 1) Die verschiedenen Möglichkeiten des Ladegeräts sind in 4 Programm-Gruppen aufgeteilt, die Sie in nach- folgend aufgeführter Reihenfolge mit der PROG-MODE-Taste (2 sek. drücken) anwählen können. Ni-Cd-Akku-Programme: Aufl aden, Formieren, Entladen zur Ermittlung der Kapazitätsmenge, Restka- pazität oder zur Zellenselektion. -
Page 7: Auswahl Der Ladeprogrammgruppe
G r a u p n e r _ _ _ _ _ _ _ _ _ _ _ _ _ _ _ _ Der ULTRA TRIO PLUS 16 meldet sich mit seinem Namen. U L T R A T R I O P L U S 16 _ _ _ _ _ _ _ _ _ _ _ _ _ _ _ _ 3 sek. -
Page 8: Starten Des Lade-Entladevorgangs
10. Starten des Lade- Entladevorgangs Ausgang 1 3 sek. Zum Laden-Entladen bzw. Formieren, wählen Sie das ge- L i P o - M a n u e l l _ _ _ _ _ _ _ _ _ _ _ _ _ _ _ _ wünschte Programm wie nachfolgend beschrieben aus und _ _ _ _ _ _ _ _ _ _ _ _ _ _ _ _ stellen die passenden Werte dazu ein. - Page 9 10. Starten des Ladevorgangs Ausgang 2 und 3 Drücken Sie die Taste Output Select einmal für Ausgang [2] oder zweimal für Ausgang [3]. Schließen Sie dann den 2 pol. Anschlussstecker des Akkus an den Ladegerätausgang - BATTERY + richtig gepolt mit Hilfe 3 sek.
-
Page 10: Nickel-Cadmium (Nicd) - Ladeprogramme
11. NiCd-Programme (Ausgang 1) NiCd NiCd NiCd NiCd NiCd MODE MODE MODE MODE MODE Entladebalancier- AUTOMATIK- Formierungs- MANUELL- Entladeprogramm programm Programm programm Programm NiCd MODE delta-peak Abschaltspannung Komfortable Ladeprogramme für die Aufl adung von im Modellbau üblichen Nickel-Cadmium-Akkus. Ist das Lade-/Entlade-Programm beendet, so erscheint bis zum Abklemmen des Akkus das Ladeprogramm abwechselnd mit dem Schriftzug “*ENDE*”... - Page 11 NiCd-Formierungs-Programm Dieses Programm dient zur Optimierung von Kapazität und Formierung einer Batterie. ENTER Mit der INC oder DEC Taste stellen Sie oben rechts ein, ob das Formierungsprogramm mit dem Laden oder Entladen beginnen oder soll. Anschließend stellen Sie die Zyklenzahl von 1-5 ein (Bei DEC DEC z.B.
-
Page 12: Nickel-Metall-Hydrid (Nimh) - Ladeprogramme
_ _ _ _ _ _ _ _ _ _ _ _ _ _ _ _ Bsp.: NiMH 6N-4200, max. Ladestrom 8,4 A, empfohlener Schnellladestrom für Graupner-Akkus 4,2 A. Senderakkus müssen auf max. 2 A Ladestrom begrenzt werden! Beachten Sie auch die Anleitungen bzw. den max. Ladestrom... - Page 13 2 sek. Laden Sie die Akkus auf keinen Fall mit mehr als 2C! Bsp.: NiMH 6N-4200, max. Ladestrom 8,4A, empfohlener Schnellladestrom für Graupner-Akkus 4,2A. N i M H - M a n L : 2 . 5 A _ _ _ _ _ _ _ _ _ _ _ _ _ _ _ _ Senderakkus müssen auf max.
- Page 14 NiMH-Entladebalancier-Programm N i M H B a l a n c e r - _ _ _ _ _ _ _ _ _ _ _ _ _ _ _ _ Dieses Programm dient zur Angleichung der Zellenspannungen _ _ _ _ _ _ _ _ _ _ _ _ _ _ _ _ der einzelnen Akkuzellen für Akkupacks mit 2-8 Zellen.
-
Page 15: Lithiumionen (Liio)/ Lithiumpolymer (Lipo)/ Limn/ Life - Ladeprogramme
13. Lithium-Programme (Ausgang 1) Die Ladeprogramme sind nur zum Laden und Entladen von LiFePO (LiFe) -Akkus mit einer Zellen- spannung von 3,3 V/Zelle, Lithium Ionen-Akkus mit einer Zellennennspannung von 3,6 V/Zelle, Lithium Polymer- und Lithium Mangan-Akkus mit einer Zellen Nennspannung von 3,7 V/Zelle geeignet. Lithium-Akkus zeichnen sich vor allem durch ihre, im Vergleich zu anderen Akkutypen, wesentlich höhere Energiedichte aus. - Page 16 Lithium-Manuell-Programm Bei diesem Programm wird der Akku mit dem eingestellten Ladestrom aufgeladen. L i P o - M a n u e l l _ _ _ _ _ _ _ _ _ _ _ _ _ _ _ _ Vor dem Anstecken des zu ladenden Akkus wird mit den INC _ _ _ _ _ _ _ _ _ _ _ _ _ _ _ _ / DEC-Tasten der Ladestrom (0,1...10,0 A, links im Display)
- Page 17 Lithium-Lager-Programm Dieses Programm dient dazu, die Akkus auf den bestmöglichen L i P o L a g e r p r o g . _ _ _ _ _ _ _ _ _ _ _ _ _ _ _ _ lagerfähigen Ladezustand zu laden oder entladen.
-
Page 18: Blei (Pb) - Ladeprogramme
14. Pb-Programme (Ausgang 1) MODE MODE MANUELL- Entladeprogramm Programm Das Programm ist nur zum Laden und Entladen von Blei-Schwefelsäure- und Blei-Gel-Akkus mit genau 2, 4, 6, und 12 V und (1, 2, 3, 6 Zellen) geeignet. Achtung: Blei-Batterien mit anderen Nennspannungen werden vom Gerät nicht erkannt und dürfen nicht angeschlossen werden. - Page 19 Wundern Sie sich jedoch nicht, wenn der von Ihnen eingestellte Ladestrom nicht erreicht wird, denn das Ladeprogramm überwacht ständig die Batteriespannung und verhindert so ein Übergasen des Akkus. Der Akku wird nun bis zum Erreichen von etwa 2,3 bis 2,35 Volt pro Zelle mit den maximal mögli- chen Strömen geladen.
-
Page 20: Displayanzeigen
15. Displayanzeigen Lade- / Entladezeit min.:s. Programm Ausgang 1 Kapazität in mAh Ausgang 1 Ausgang 1 M a n . 1 2 : 5 6 0 0 3 2 1 _ _ _ _ _ _ _ _ _ _ _ _ _ _ _ _ 0 0 0 0 m A h 0 0 0 0 m A h _ _ _ _ _ _ _ _ _ _ _ _ _ _ _ _... -
Page 21: Anzeige Der Einzelzellenspannungen
Fertigmeldung Ist ein Lade/Entladeprogramm abgearbeitet, so erscheint E N D E _ _ _ _ _ _ _ _ _ _ _ _ _ _ _ _ im Display abwechselnd mit der Programmbezeichnung der _ _ _ _ _ _ _ _ _ _ _ _ _ _ _ _ Schriftzug *ENDE*. -
Page 22: Fehler- Und Warnmeldungen
17. Fehler- und Warnmeldungen Das Ladegerät ist mit einer Vielzahl an Schutz- und Überwachungs einrichtungen zur Kontrolle der ein- zelnen Funktionen und der Geräteelektronik ausgestattet. Eine Überschreitung von Grenzwerten führt in einigen Fällen zur automatischen Reduzierung der Geräteeinstellungen (z.B. Lade- oder Entladestrom) oder zur Abschaltung des Ladevorganges (z.B. -
Page 23: Pc-Schnittstelle
Für die Darstellung von Lade-/Entladekurven und für Firmware-Updates wird ein USB-Kabel benö- tigt. Laden Sie sich bei www.graupner.de unter Produktsuche: 6469 die Software des entsprechenden USB- Seriell-Treiber CP210x_Drivers.exe für dieses Ladegerät herunter und installieren Sie den Treiber. Stecken Sie das USB-Kabel in die PC-Schnittstelle des Ladegerätes an. Schließen Sie das USB-Kabel an eine frei USB-Schnittstelle an den PC an. -
Page 24: Reinigung Und Wartung
19. Reinigung und Wartung Das Ladegerät arbeitet wartungsfrei und benötigt daher keinerlei Wartungsarbeiten. Bitte schützen Sie es jedoch in Ihrem eigenen Interesse unbedingt vor Staub, Schmutz und Feuchtigkeit! Zur Reinigung das Ladegerät von Autobatterie und Akku trennen und nur mit einem trockenen Lappen (keine Reinigungsmittel verwenden!) leicht abreiben. -
Page 25: Technische Daten
21. Technische Daten Akku Ausgang 1: Ladeströme / Leistung 100 mA bis 10.0 A / max. 120 W mit Netzanschluss 100~240VAC 100 mA bis 10.0 A / max. 150 W mit 12...15 V DC-Anschluss Entladeströme / Leistung 100 mA - 5 A / max. 40 W Ni-Cd &... -
Page 26: Hinweise Zum Umweltschutz, Herstellererklärung
Sollten sich Mängel an Material oder Verarbeitung an einem von uns in der Bundesrepublik Deutschland vertriebenen, durch einen Verbraucher (§ 13 BGB) erworbenen Gegenstand zeigen, übernehmen wir, die Fa. Graupner GmbH & Co KG, Kirchheim/Teck im nachstehenden Umfang die Mängelbeseitigung für den Gegenstand. - Page 27 Ware auf seine Kosten an die o.g. Adresse einzusenden. Die Einsendung hat an folgende Adresse zu erfolgen: Fa. Graupner GmbH & CO KG, Serviceabteilung, Henriettenstr.94 -96, D 73230 Kirchheim/Teck Der Käufer soll dabei den Material- oder Verarbeitungsfehler oder die Symptome des Fehlers so konkret benennen, dass eine Überprüfung unserer Garantiepfl...
-
Page 28: Introduction
In the ULTRA TRIO PLUS 16 you have acquired a mature product with an excellent performance. It incorporates the latest semi-conductor technology, controlled by a high-performance RISC micro- processor, to provide superior charging characteristics combined with simple operation and optimum reliability. -
Page 29: Warnings And Safety Notes, Please Read And Observe
2. Warnings and safety notes This product isn‘t designed for use by children under the age of 14, it isn‘t a toy! Protect the charger from dust, damp, rain, heat (e.g. direct sunshine) and vibration. It should only be operated in dry indoor conditions. -
Page 30: General Notes On Using The Charger
However, a transmitter battery protected in this way can only be charged by the ULTRA TRIO PLUS 16 if the diode is by-passed. Please read your transmitter operating instructions for information on how to do this. The stated maximum charge current for the transmitter battery must never be exceeded. -
Page 31: Recommended Charge Leads, Polarity
Liability exclusion As manufacturers, we at GRAUPNER are not in a position to ensure that you observe the correct methods of operation when installing, using and maintaining this charger. For this reason we are obliged to deny all liability for loss, damage or costs which are incurred due to the incompetent or incorrect use and operation of our products, or which are connected with such operation in any way. -
Page 32: Charge And Discharge Programs
6. Charge and discharge programs (Output 1) The various facilities of the charger are divided up into four program groups which you can select by holding the PROG-MODE button pressed in for two seconds. The sequence is shown in the fl ow chart below. Ni-Cd battery programs: charging, conditioning, discharging to determine capacity or residual capacity, or to select cells. -
Page 33: Selecting The Charge Program Group
9. Using the charger for the fi rst time When the INC and DEC buttons are pressed simultaneously and the ULTRA TRIO PLUS 16 is initially connected to a 12 V DC car battery or power supply or a 100~240V AC (min. 15A) mains socket, the unit goes to the language select menu, otherwise it runs through the information routine which provides you with a brief summary of the essential user settings. -
Page 34: Starting The Charge / Discharge Process
10. Starting the charge / discharge process Output 1 For charging / discharging, or conditioning a pack, select the 3 sec. desired program as described below, and then set suitable L i P o m a n u a l _ _ _ _ _ _ _ _ _ _ _ _ _ _ _ _ values. - Page 35 10. Starting the charge process Output 2 and 3 Press button Output Select once to switch to terminal [2] or twice for terminal [3]. For charging / discharging, or conditioning a pack, select the 3 sec. desired program as described below, and then set suitable T y p e O U T P U T [ 2 ] _ _ _ _ _ _ _ _ _ _ _ _ _ _ _ _...
-
Page 36: Nickel-Cadmium (Ni-Cd) Charge Programs
11. Ni-Cd programs (Output 1) NiCd NiCd NiCd NiCd NiCd MODE MODE MODE MODE MODE discharge balan- AUTOMATIC- cycle MANUAL- discharge cing program program program program program NiCd MODE delta-peak trigger voltage A set of convenient charge programs for recharging Nickel-Cadmium batteries, as commonly used for modelling purposes. - Page 37 NiCd conditioning program ENTER This program is designed to optimise the capacity of a battery, and balance the state of its component cells.At top right you can set use the INC or DEC buttons to determine whether the conditioning program is to start with a charge or discharge DEC DEC cycle.
-
Page 38: Nickel-Metal-Hydride (Ni-Mh) Charge Programs
NiCd-Delta-Peak (- Peak) trigger voltage The automatic charge termination circuit N i C d d e l t a - p e a k - _ _ _ _ _ _ _ _ _ _ _ _ _ _ _ _ (battery full detection) works on the proven _ _ _ _ _ _ _ _ _ _ _ _ _ _ _ _ Delta Peak principle (also known as the... - Page 39 NiMh manual program Select this program when you simply wish to recharge a battery N i M h m a n u a l _ _ _ _ _ _ _ _ _ _ _ _ _ _ _ _ using the set charge current.
- Page 40 NiMh discharge balancing program N i M h b a l a n c e c u t _ _ _ _ _ _ _ _ _ _ _ _ _ _ _ _ The discharge balancing program does discharge and balance _ _ _ _ _ _ _ _ _ _ _ _ _ _ _ _ up to 8 cells of a battery pack.
- Page 41 13. Lithium programs (Output 1) These programs are only suitable for charging and discharging LiFePO batteries with a voltage of 3.3 V / Cell, Lithium-Ion batteries with a voltage of 3.6 V / cell, and Lithium-Polymer and Lithium-Manganese batteries with a voltage of 3.7 V / cell. The outstanding feature of Lithium batteries is their much higher capacity compared to other battery types.
- Page 42 Lithium manual program This program charges the battery using the capacity (charge L i P o m a n u a l _ _ _ _ _ _ _ _ _ _ _ _ _ _ _ _ current) which you set. _ _ _ _ _ _ _ _ _ _ _ _ _ _ _ _ Before you initiate the actual program you must set the charging current (range 0.1A...10.0 A, left of the screen) and the capacity...
- Page 43 Lithium cell count T y p e O U T P U T[ 1 ] _ _ _ _ _ _ _ _ _ _ _ _ _ _ _ _ When you have connected the battery to the charger, hold L i P o = 3 c e l l s _ _ _ _ _ _ _ _ _ _ _ _ _ _ _ _ the START button pressed in for about two seconds and the...
-
Page 44: Lead-Acid (Pb) Charge Programs
14. Pb (lead-acid) programs (Output 1) MODE MODE MANUAL- discharge program program This program is designed for charging and discharging lead / sulphuric acid and lead / gel batteries with nominal voltages of exactly 2, 4, 6 and 12 V (1, 2, 3 and 6 cells). Caution: the charger will not recognize lead-acid batteries with other nominal voltages, and such bat- teries must not be connected to it. - Page 45 The ULTRA TRIO PLUS 16 now charges the battery using the maximum possible current until its voltage rises to around 2.3 to 2.35 Volts per cell. The charger then switches to a lower current to bring the battery gently up to full charge;...
-
Page 46: Screen Displays, Cycle Data Display
16. On-screen monitor displays The ULTRA TRIO PLUS 16 incorporates a wide range of protective and monitoring systems designed to check the charger’s functions and monitor the state of its electronics. If any of the unit’s critical limit values is exceeded, the charge process is switched off. - Page 47 Ready message When a charge or discharge program comes to an end, the E N D _ _ _ _ _ _ _ _ _ _ _ _ _ _ _ _ screen displays the message END, alternating with the pro- _ _ _ _ _ _ _ _ _ _ _ _ _ _ _ _ gram name.
-
Page 48: Error Messages And Warnings
17. Error messages and warnings The ULTRAMAT 16 incorporates a wide range of protective and monitoring systems designed to check the charger’s functions and monitor the state of its electronics. If any of the unit’s limit values are exceeded, the charger responds accordingly: in some cases the unit’s settings are automatically reduced (e.g. -
Page 49: Pc Interface
Install this driver fi rst. You will also need a USB cable. Connect the USB lead to the charger and to a free USB port on your PC. PC software can be downloaded at www.graupner.de or www.logview.info. This software enables you to display battery curves and much more. -
Page 50: Cleaning And Maintenance
18. Cleaning and maintenance The charger is entirely maintenance-free in use, and requires no servicing of any kind. However, it is in your own interests to protect the unit from dust, dirt and damp. To clean the charger, disconnect it from the car battery and any other battery, and wipe it clean with a dry cloth (don’t use cleaning agents!). -
Page 51: Specifi Cation
20. Specifi cation Battery Output 1: Charge currents / power 100 mA to 10.0 A / max. 120 W with internal power supply 100 mA to 10.0 A / max. 150 W with external 12...15V DC power supply Discharge currents / power 100 mA to 50 A / max. -
Page 52: Environnemental Protection Notes
20. Specifi cation Environnemental Protection Notes When this product comes to the end of its useful life, you must not dispose of it in the or- dinary domestic waste. The correct method of disposal is to take it to your local collection point for recycling electrical and electronic equipment. - Page 53 If material defects or manufacturing faults should arise in a product distributed by us in the Federal Republic of Ger- many and purchased by a consumer (§ 13 BGB), we, Graupner GmbH & Co. KG, D-73230 Kirchheim/Teck, Germany, acknowledge the obligation to correct those defects within the limitations described below.
-
Page 54: Généralités
fi abilité optimale, que l’on peut trouver seulement avec des appareils nettement plus coûteux, ont été obtenues. Avec le chargeur ULTRA TRIO PLUS 16, presque tous les accus utilisés en modélisme pourront être chargés: les accus à électrodes frittées au cadmium-Nickel (NiCd), les accus hybrides au Nickel-Métal (NiMH), les accus au Lithium-Polymer (LiPo)/LiMn, les accus au Lithium-Ion (Lilo), les accus au LiFe- (LiFe) et les accus au plomb (Pb) à... -
Page 55: Avertissements Et Conseils De Sécurité, À Observer Impérativement
Eviter les courts-circuits entre la sortie de charge et l’accu ou la carrosserie de la voiture ; le chargeur ULTRA TRIO PLUS 16 n’est pas protégé contre cela ! Pour cette raison, ne jamais poser l’appareil directement sur la carrosserie de la voiture. -
Page 56: Conseils Généraux D'utilisation
3. Conseils généraux d‘ utilisation Charge des accus Pour charger un accu, il doit emmagasiner une certaine quantité de courant qui est le produit donné par Courant de charge x Temps de charge. Le courant de charge maximal admissible dépend de chaque type d’accu et il est à... -
Page 57: Cordons De Charge Conseillés, Polarités
Le respect des instructions d’utilisation, ainsi que les méthodes d’installation, de fonctionnement et d’entretien de ce chargeur ne peuvent pas être surveillés par la Firme Graupner. En conséquence, nous déclinons toute responsabilité concernant la perte, les dommages et les frais résultants d’une utilisation incorrecte ainsi que notre participation aux dédommagements d’une façon quelconque. -
Page 58: Programmes De Charge Et De Décharge
6. Programmes de charge et de décharge (Sortie 1) Les différentes possibilités du chargeur sont réparties en 4 groupes de programmes qui pourront être sélectionnés dans l’ordre indiqué à la suite avec la touche PROG-MODE (pression durant 2 sec.). Programme accus NiCd : Charge, cyclage, décharge pour la détermination de la capacité emmagasiné, de la capacité... -
Page 59: Sélection Des Groupes De Programmes De Charge
G r a u p n e r _ _ _ _ _ _ _ _ _ _ _ _ _ _ _ _ L’ULTRA TRIO PLUS 16 affi che son nom. U L T R A T R I O P L U S 1 6 _ _ _ _ _ _ _ _ _ _ _ _ _ _ _ _ Après 3 secondes, le timer de sécurité... -
Page 60: Départ Des Processus De Charge
10. Départ du processus de charge/décharge (Sortie 1) Pour la charge/décharge et le cyclage, sélectionnez le 3 sec. programme désiré comme décrit à la suite et placez les valeurs adaptées. L i P o - M a n u e l _ _ _ _ _ _ _ _ _ _ _ _ _ _ _ _ _ _ _ _ _ _ _ _ _ _ _ _ _ _ _ _ Relier, si existante, la prise Balancer de l’accu sur l’entrée du... - Page 61 10. Départ du processus de charge/décharge (Sortie 2 et 3) Appuyez la touche Output Select une fois pour la sortie [2], deux fois pour la sortie [3]. Pour la charge/décharge et le cyclage, sélectionnez le 3 sec. programme désiré comme décrit à la suite et placez les valeurs T y p e S o r t i e [ 2 ]...
-
Page 62: Programme De Charge Nickel-Cadium (Nicd)
11. Programme NiCd (Sortie 1) NiCd NiCd NiCd NiCd NiCd MODE MODE MODE MODE MODE Programme de - Programme Programme Programme Programme charge du Balancer Automatique de cyclage Manuel de décharge NiCd MODE Coupure delta-peak Confortable programme pour la charge des accus au Nickel-Cadmium couramment utilisés en modélisme. Lorsque le programme de charge/décharge est terminé, l’inscription ‘’ENDE’’... - Page 63 Programme de cyclage NiCd Ce programme sert pour l’optimisation de la capacité et le ENTER cyclage d’une batterie. Fixer avec les touches INC ou DEC en haut et à droite si le programme doit commencer avec la charge ou avec la DEC DEC décharge.
-
Page 64: Programme De Charge Nickel-Métal-Hybride (Nimh)
Coupure Delta Peak (- Peak) N i C d D e l t a - P e a k - La coupure de charge automatique (Détec- _ _ _ _ _ _ _ _ _ _ _ _ _ _ _ _ tion pleine charge de l’accu) travaille selon _ _ _ _ _ _ _ _ _ _ _ _ _ _ _ _ le procédé... - Page 65 Exemple : Courant de charge maximum 8,4 A pour les accus NiMH 6N-4200, courant de charge rapide 4,2 A pour les accus Graupner. Le courant de charge sera limité à 2 A au maximum N i M h - M a n 2 .
- Page 66 Programme de décharge avec équilibrage des éléments pour accus NiMH Ce programme sert pour la coordination de la tension des différents éléments pour les packs d’accus de 2-8 éléments. Placer la tension de fi n de décharge du Balance 1.20…1.30 V N i M h T e n s i o n _ _ _ _ _ _ _ _ _ _ _ _ _ _ _ _...
- Page 67 13. Programme Lithium (Sortie 1) Ce programme de charge est adapté uniquement pour la charge et la décharge des accus au LiFePO (LiFe) avec une tension de 3,3 V/élément, des accus au Lithium-Ion avec une tension de 3,6 V/élément, des accus au Lithium-Polymer et au Lithium-Manganèse avec une tension de 3,7 V/élément. Les accus au Lithium se distinguent surtout par une plus forte capacité, par comparaison aux autres types d’accus.
- Page 68 Programme manuel Lithium Avec ce programme, l’accu sera chargé avec le courant L i P o - M a n u e l _ _ _ _ _ _ _ _ _ _ _ _ _ _ _ _ de charge réglé. _ _ _ _ _ _ _ _ _ _ _ _ _ _ _ _ Avant de connecter l’accu à...
- Page 69 Nombre d‘ éléments Lithium Après avoir connecté le Pack d’accus sur le charger et avoir * é l é m e n t s L i P o * * _ _ _ _ _ _ _ _ _ _ _ _ _ _ _ _ pressé...
-
Page 70: Programme De Charge Accus Au Plomb (Pb)
14. Programme Pb (Sortie 1) MODE MODE Programme Programme Manuel de décharge Ce programme est uniquement adapté pour la charge et la décharge des accus au plomb avec élec- trolyse liquide et gélifi ée avec exactement 2, 4, 6 et 12 V et 1, 2, 3, 6 éléments. Attention : Les batteries au plomb avec une autre tension nominale ne seront pas détectées par le chargeur et ne devront pas être connectées sur celui-ci. - Page 71 Ne pas cependant s’étonner si le courant de charge réglé n’est pas atteint, car le programme de charge surveille en permanence la tension de l’accu pour empêcher ainsi une surcharge . L’accu se chargé avec les courants maximum possibles seulement jusqu’à l’atteinte d’une tension de 2,3 à...
-
Page 72: Indications De L'affi Chage, Affi Chage Des Données De Cyclage
15. Indications de I‘affi chage Temps de charge/décharge Programme Capacité (mAh) (min.: sec.) Sortie 1 Sortie 1 Sortie 1 M a n . 1 2 : 5 6 0 0 3 2 1 _ _ _ _ _ _ _ _ _ _ _ _ _ _ _ _ 0 0 0 0 m A h 0 0 0 0 m A h _ _ _ _ _ _ _ _ _ _ _ _ _ _ _ _... -
Page 73: Ind. Séparée De La Tension Des Élé
Advertissement de fi n de charge Lorsqu’un programme de charge/décharge est terminé, F I N _ _ _ _ _ _ _ _ _ _ _ _ _ _ _ _ l’inscription ‘’FIN’’ s’échange avec la désignation du program- me sur l’affi chage. Le vibreur intégré émet en _ _ _ _ _ _ _ _ _ _ _ _ _ _ _ _ même temps un signal acoustique pour un temps limité. -
Page 74: Avertissements D'erreur
17. Avertissements d‘erreur Le chargeur est équipé d’une multitude de réglages de protection et de surveillance pour le contrôle de chacune des fonctions et de l’électronique de l’appareil. Un dépassement des valeurs limites conduit dans certains cas à la réduction automatique des réglages de l’appareil (par ex. courant de charge et de décharge) ou à... -
Page 75: Interface Pc
Téléchargez le logiciel du driver USB correspondant CP210x _Drivers.exe pour ce chargeur, avec www. graupner.de sous recherche de produits 6466, et installez le. . Connectez le cordon USB dans l’interface PC du chargeur et reliez le à une interface USB libre sur le PC. -
Page 76: Nettoyage Et Entretien
19. Nettoyage et entretien Ce chargeur travaille sans entretien et nécessite aucune surveillance particulière. Dans votre propre intérêt, protégez-le cependant de la poussière, des salissures et de l’humidité ! Pour nettoyer le chargeur, déconnectez-le de la batterie de voiture et de l’accu et essuyez-le avec un chiffon doux et sec (N’utilisez aucun produit de nettoyage !). -
Page 77: Caractéristiques Techniques
21. Caractéristiques techniques Accu Sortie 1: Courant de charge / Puissance 100 mA jusqu à 10,0 A / max. 120 W avec courant sector 100~240V AC 100 mA jusqu à 10,0 A / max. 150 W avec courant sector 11...15V DC connecteur Courant de décharge / Puissance 100 mA jusqu à... -
Page 78: Indications Quant À La Protection De L'environnement
Indications quant à la protection de l‘environnement, Déclaraton du fabricant ndications quant à la protection de l’environnement Ce produit à la fi n de sa durée de vie ne doit pas être mis à la poubelle, mais être remis à une collecte pour le recycle ment d’appareils électriques et électroniques. -
Page 79: Déclaration Du Fabricant
Lorsqu’un article que nous distribuons dans la République Fédérale d’Allemagne acquis par un consommateur (§ 13 BGB) présente un défaut de matière ou de fabrication, nous la Firme Graupner GmbH & Co. KG, Kirchheim Teck, prenons en charge la suppression du défaut de l’article dans les conditions ci après. - Page 80 Art. n. 6469 INSTRUZIONI PER L`USO ULTRA TRIO PLUS 16 Caricabatterie di grandi prestazioni, rapido, computerizzato per la carica, la scarica e la formattazione di celle NiCd / NiMH, LiPo / LiIo / LiMn / LiFe e al Piombo Corrente di carica fi no a 10 A , di scarica fi...
- Page 81 Con l’ULTRA TRIO PLUS 16 potrete ricaricare quasi tutti gli accumulatori usati dai modellisti al nichel cadmio (NiCd) sinterizzati, al nichel metal idrato (NiMH), ai polimeri di litio (LiPo), ai LiFePO (LiFe), agli ioni di litio (LiIo), al litio-biossido di manganese (LiMn) e al piombo con gel o acido.
-
Page 82: Precauzioni E Avvertenze Per La Sicurezza
Collegate il caricabatterie alla batteria dell’automobile direttamente con il cavo di alimentazione e le pinze di collegamento originali. Il motore del veicolo, fi nché il caricabatterie ULTRA TRIO PLUS 16 è collegato, dev’essere spento. La batteria dell’automobile, durante questo tempo, non dev’essere caricata da un altro caricabatterie! ... -
Page 83: Notizie Generali Per Il Funzionamento
(diodo). Ciò impedisce alla trasmittente di danneggiarsi in caso di inversione della polarità o di cortocircuiti con i terminali scoperti degli spinotti di ricarica. ricarica dell’accumulatore della trasmittente con l’ULTRA TRIO PLUS 16 è possibile solo bypas- sando tali protezioni. Seguite scrupolosamente le istruzioni della trasmittente! Non dev’essere mai... -
Page 84: Cavi Di Ricarica Consigliati, Polarità
L’osservanza delle istruzioni per il funzionamento ed il metodo d’installazione, utilizzoe manuten- zione non possono essere da noi controllati. Perciò la ditta Graupner declina ogni responsabilità per perdite, danni o costi derivanti da un utilizzo o un funzionamento errato o ad essi conseguenti. -
Page 85: Programmi Di Carica E Scarica
6. Programmi carica e scarica (Uscita 1) Le diverse possibilità del caricabatterie sono ripartite in due gruppi di programmi, che potete cegliere con il tasto PROG-MODE (tener premuto per 2 sec.) nella seguente sequenza. Programmi per accumulatori NiCd: carica, formattazione, scarica per determinare la capacità immagazzinata, il residuo della capacità... -
Page 86: Scelta Del Gruppo Di Programmi Di Carica
8. Scelta del gruppo del programma di carica (Uscita 1) Le possibilità di carica e scarica dell’ULTRA TRIO PLUS 16 sono NiCd suddivise in modo chiaro e logico in quattro gruppi di programmi. MODE Programma Per i diversi tipi di accumulatori : Nichel-Cadmio, Nichel-Metal Idrato,... -
Page 87: Avvio Del Processo Di Carica / Scarica
10. Avvio dei processi di carica / scarica (Uscita 1) Per la carica, la scarica e la formattazione scegliete il pro- 3 sec. gramma desiderato come descritto in seguito e impostate i L i P o - M a n u e l l _ _ _ _ _ _ _ _ _ _ _ _ _ _ _ _ valori adatti. - Page 88 10. Avvio dei processi di carica / scarica (Uscita 2 e 3) Premere il tasto Output Select una volta per l‘uscita [2], due volte per uscire [3]. 3 sec. Per la carica, la scarica e la formattazione scegliete il pro- T y p A U S G A N G [ 2 ] _ _ _ _ _ _ _ _ _ _ _ _ _ _ _ _...
- Page 89 11. Programmi NiCd (Uscita 1) NiCd NiCd NiCd NiCd NiCd MODE MODE MODE MODE MODE Progr. di scarica Programma Programma Programma Programma con equilibratura AUTOMATICC fermattazione MANUALE di scarica NiCd MODE Delta-peak Tens.riferim Programmi semplici da usare per la carica degli accumulatori NiCd solitamente usati nel modellis- mo.
- Page 90 NiCd-Programma di formattazione ENTER Questo programma serve per ottimizzare la capacità e la formattazione di un accumulatore. In alto a destra sul display impostate, con i tasti INC / DEC se il programma di format- DEC DEC tazione deve iniziare con la carica o la scarica. Quindi impo- state il numero di cicli da 1 a 5 (per es.
- Page 91 2C! Es.: NiMH 6N-4200, corrente di carica mass. 8,4 A, corrente di carica veloce consigliata per accumulatori Graupner 4,2 A. La corrente di carica per gli accumulatori delle trasmittenti deve essere limitata a 2 A mass.! Il processo di carica termina in accordo con i valori impostati per la tensione di spegnimento del delta peak.
- Page 92 NiMH-Programma manuale Con questo programma l’accumulatore viene caricato con la N i M H - M a n u e l l _ _ _ _ _ _ _ _ _ _ _ _ _ _ _ _ corrente di carica impostata. _ _ _ _ _ _ _ _ _ _ _ _ _ _ _ _ La corrente di carica massima può...
- Page 93 NiMH Tensione equilibratore Questo programma ser ve per equilibrare le tensio- N i M H B a l a n c e r - _ _ _ _ _ _ _ _ _ _ _ _ _ _ _ _ ni delle singole celle di pacchi batterie con 2-8 celle.
- Page 94 13. Programmi Litio (Uscita 1) Programmi sono adatti solo per la carica e la scarica di accumulatori agli di LiFePO (LiFe) con una tensione di 3,3 V/cella ed Ioni di litio con una tensione di 3,6 V/cella ed ai Polimeri di litio ed al Litio- Biossido di Manganese con una tensione nominale di 3,7 V/cella.
- Page 95 Litio-Programma manuale L i P o - M a n u e l l M e d i a n t e q u e s t o p r o gra m m a l ’ a c c u mu l a t o r e v i e - _ _ _ _ _ _ _ _ _ _ _ _ _ _ _ _ ne r icar icato con la corrente di car ica impostata.
- Page 96 Lithium-Programma stoccaggio Il presente programma serve a caricare o scaricare gli accu- L i P o L a g e r p r o g . _ _ _ _ _ _ _ _ _ _ _ _ _ _ _ _ mulatori in modo da garantire lo stato di carica migliore per lo stoccaggio.
- Page 97 14. Programmi Pb (Uscita 1) MODE MODE Programma Programma MANUALE di scarica Questi programmi servono per la carica e la scarica di un accumulatore al piombo, con acido solforico o gel, di 2, 4, 6 o 12 V precisi (1, 2, 3, 6, celle). Attenzione: Batterie al piombo con tensioni nominali diverse non vengono riconosciuti dal caricabatterie e quindi non devono essere collegati.
- Page 98 Con l’adattamento automatico della corrente, è possibile ottenere una carica più rapida con un tempo notevolmente inferiore alle 14 - 16 ore. Quando il processo di carica è completato, viene emesso E N D E _ _ _ _ _ _ _ _ _ _ _ _ _ _ _ _ un segnale acustico per un determinato intervallo di tempo.
- Page 99 15. Indicazioni del display Tempo di carica/scarica Programma Capacità (mAh) (min.: sec.) Uscita 1 Uscita 1 Uscita 1 M a n . 1 2 : 5 6 0 0 3 2 1 _ _ _ _ _ _ _ _ _ _ _ _ _ _ _ _ 0 0 0 0 m A h 0 0 0 0 m A h _ _ _ _ _ _ _ _ _ _ _ _ _ _ _ _...
- Page 100 Indicazione di carica completata Quando un programma di carica / scarica ha completato il suo E N D E _ _ _ _ _ _ _ _ _ _ _ _ _ _ _ _ processo, sul display appare, alternativamente alla descrizione _ _ _ _ _ _ _ _ _ _ _ _ _ _ _ _ del programma, la scritta „ENDE“...
-
Page 101: Segnalazioni Di Errore E Avvertenze
17. Segnalazioni di errore ed avvertenze Il caricabatterie è dotato di un grande numero di protezioni e di controlli per monitorare le singole funzioni ed i circuiti elettronici. Un superamento dei valori limite provoca in certi casi la riduzione automatica delle impostazioni del caricabatterie (per es. -
Page 102: Interfaccia Pc
18. Interfaccia PC Per la rappresentazione delle curve di carica/scarica è necessario un cavo USB. Scaricate nel sito www.graupner.de sotto il punto „Produktsuche“ (Product search/ Ricerca prodotto): 6469 il software del corrispondente driver seriale USB CP210x_Drivers.exe per questo caricabatterie e installate il driver. -
Page 103: Pulizia E Manutenzione
19. Pulizia e manutenzione Il caricabatterie funziona senza alcuna necessità di manutenzione. Nel vostro interesse proteggetelo da polvere, sporcizia e umidità. Per pulirlo, dopo averlo scollegato dalla batteria dell’auto, passate con delicatezza un panno asciutto (non usate detersivi!). 20. Indicazioni per il trattamento degli accumulatori •... -
Page 104: Caratteristiche Tecniche
21. Caratteristiche tecniche Uscita 1: Corrente di carica / potenza 100 mA - 10,0 A / max. 120 W (Tensione d‘ ingresso 100~240V 100mA - 10,0A / max. 150 W (Tensione d‘ ingresso 11...15V Corrente di scarica / potenza 100 mA - 5 A / max. 40 W Accumulatori Ni-Cd &... - Page 105 Nel caso in cui un oggetto, distribuito da parte nostra nella Repubblica Federale Tedesca ed acquistato da parte di un consumatore (§ 13 BGB), dovesse manifestare difetti di materiale o costruzione, i sot- toscritti, la ditta Graupner GmbH & Co KG, - Kirchheim/Teck, provvederanno al ripristino della conformità dell’oggetto secondo quanto di seguito esposto.
-
Page 106: Konformitätserklärung
EMV: EN 61000-3-2 / EN 61000-3-3 Für das folgend bezeichnete Erzeugnis EN 55014-1 / EN 55014-2 LVD: EN 60950-1 ULTRA TRIO PLUS 16; Best.-Nr. 6469 This declaration was produced by: wird hiermit bestätigt, dass es den wesentlichen Schutzanforderungen entspricht, die in der Richtli- nie des Rates zur Angleichung der Rechtsvorschrif- Graupner GmbH &... -
Page 107: Garantie
Garantie von Monaten warrantied for month garantie de mois Die Fa. Graupner GmbH & Co. KG, Henriettenstraße 94-96. Servicestellen / Service / Service après-vente 73230 Kirchheim/Teck gewährt ab dem Kaufdatum auf Graupner-Zentralservice Servicehotline (+49)(01805) 472876 Graupner GmbH & Co. KG dieses Produkt eine Garantie von 24 Monaten.