Table of Contents
Advertisement
Advertisement
Table of Contents

Summary of Contents for IMP SmartScoot
- Page 1 USERS INSTRUCTION MANUAL Version 1.8 IMP HOLDINGS, LLC WWW.SMARTSCOOT.COM...
-
Page 2: Warnings And Disclaimers
SmartScoot™ was designed to make every day mobility easy. However, there are certain risks that users should be aware of when operating a SmartScoot™ such as injury from loss of control, tipping over, collisions or falls. It is your responsibility to learn how to safely ride the SmartScoot™ to help reduce these risks. -
Page 3: Table Of Contents
Any questions regarding any information contained in this Manual or other questions in general should be sent in writing to info@SmartScoot.com or called in to our customer service representatives at (855) 726-6866 (855-SCOOT66). -
Page 4: Safety Instructions
• Do not carry passengers or exceed the maximum weight capacity. • Do not mount or dismount the SmartScoot™ unless it is resting at a complete stop, parking brake engaged and is turned off. • Comply with all local laws and regulations while operating the SmartScoot™. -
Page 5: Safety Warnings
SAFETY WARNINGS Reduce speeds through turns or while changing directions. The SmartScoot™ is designed to go over flat, paved or carpeted surfaces only. Do not attempt to go over curbs, through potholes, puddles or any other road hazard. You should not maneuver around these hazards, stop the scooter, dismount it and walk the scooter around the hazard. -
Page 6: Smartscoot Tm Features
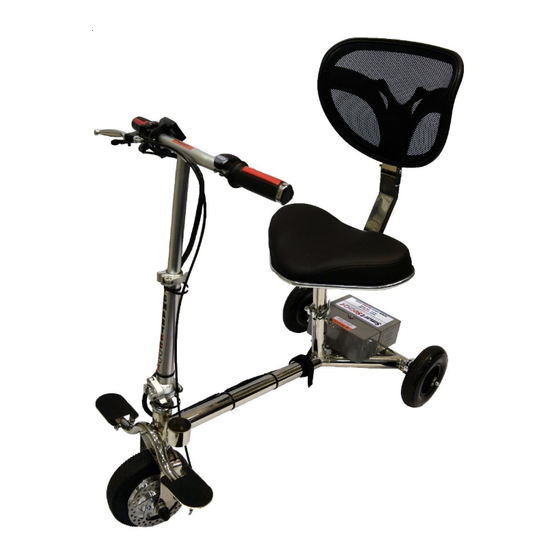
SMARTSCOOT™ FEATURES Control Panel Headlight Throttle Hand Brake Padded & Adjustable Seat (removable) Parking Brake Adjustable & Folding Steering Lithium Ion Battery Column (removable) 3 Position Adjustable Fold N Lock™ Technology Rear Wheels Padded Foot Rest Adjustable Seat Post Front Wheel Motor... -
Page 7: Unpacking Your Smartscoot
UNPACKING YOUR SMARTSCOOT™ The SmartScoot™ arrives is a strong dual walled carton. Carefully cut the packaging straps from the carton using scissors and then cut the packing tape to allow access. The scooter arrives fully folded. The package also includes the adjustable seat, battery charger and charging cord, removable basket, basket hardware, luggage rack and Allen wrenches. -
Page 8: Assembling The Smartscoot Tm
CONNECTING THE REAR WHEELS The rear wheels adjust to three different positions offering the user additional stability when using the SmartScoot™. The wider the wheel base, the more stable the scooter will be during use. PLEASE NOTE – Even though the wider wheel base offers more stability, it also makes it more difficult to go through doorways. - Page 9 4. Replace the locking pin into the top hole. Again, press down the small knob on the pin until the pin is through both holes in the post. Instructions for the seat level and seat back can be found in this Manual in the Adjusting Your SmartScoot™ section.
-
Page 10: Connecting The Battery
CONNECTING THE BATTERY Battery Socket 1. With the SmartScoot™ label facing on top and the battery label facing on the left side, carefully align and slide the battery pack downward making sure that it slides into place 2. Twist the top latch to secure the battery. -
Page 11: Adjusting Your Smartscoot Tm
ADJUSTING YOUR SMARTSCOOT™ With a handful of adjustable features, SmartScoot™ can accommodate almost any body type without compromising comfort or safety. The seat post and front steering column adjust vertically to fit the user’s height, while a mesh seat backing shifts forward or backward to provide the right amount of support. - Page 12 SEAT SECURITY To ensure seat security while driving or lifting the SmartScoot™ the seat must be securely attached to the unit. There are two steps required to ensuring seat security. 1. Tighten the clamp by pushing in the lever.
- Page 13 ADJUSTING THE REAR WHEELS The rear wheels adjust to three different positions offering the user additional stability when using the SmartScoot™. The wider the wheel base, the more stable the scooter will be during use. PLEASE NOTE – Even though the wider wheel base offers more stability, it also makes it more difficult to go through doorways.
-
Page 14: Folding And Lifting Your Scooter
FOLDING AND LIFTING YOUR SCOOTER SmartScoot™ was innovatively designed to be lightweight, foldable and easy to transport. The SmartScoot™ will fit in most cars and all SUV’s, trucks and vans. The scooter can be folded and unfolded quickly without the use of any tools. - Page 15 SmartScoot™ only weighs just under 40 pounds when fully assembled, making it lightweight and easy to lift. However, for users who still require an even lighter load, SmartScoot™ can break down quickly and easily into as many as three lighter pieces. The heaviest piece weighs only 27 pounds, and even better, no tools are required to disassemble the scooter.
-
Page 16: Operating Your Smartscoot Tm
Located on the upper left side of the control panel, push in the on/off button to turn on the SmartScoot™ and push the button in again to turn off the SmartScoot™. Turn off your SmartScoot™ when it is not being operated to help preserve the battery life. - Page 17 Always gently turn the throttle when moving from a stopped position to avoid front wheel spin. 7. Disc Brake The SmartScoot™ is equipped with a disc brake operated with the right hand. To slow or come to a complete stop, release the throttle and squeeze the brake inward. 8. Parking brake The parking brake is a small black lever located above the far left hand side of the brake.
-
Page 18: Getting Started - Learning To Driv
1. Adjust your SmartScoot™ as instructed in this Manual to fit your body comfortably. 2. Sit on the SmartScoot™ placing your hands on the handlebars and feet on the foot rests. 3. Turn on the SmartScoot™ by pushing the on/off button one time. This will place it in the lowest speed. - Page 19 While in reverse, limit turns or changes in directions. 7. Avoid steep inclines and hills. The SmartScoot™ is not designed to be driven up steep inclines or hills. However, the SmartScoot™ should be able to drive up all wheelchair ramps which comply with government standards.
-
Page 20: Getting About With Your Smartscoot Tm
GETTING ABOUT WITH YOUR SMARTSCOOT™ While riding your SmartScoot™ you will encounter many situations which will require that you understand the abilities of your scooter. The SmartScoot™ provides reasonable safety on flat and level surfaces but is not entirely fool proof on uneven, slanted or inclined surfaces. - Page 21 • If the scooter loses momentum, quickly apply the hand brake and put both feet on the ground. Get off the SmartScoot™ and walk the product either up or down the incline. • Go very slowly while driving down a ramp. In fact, you can drive down the ramp in neutral without using the throttle.
- Page 22 OUTDOOR USE The SmartScoot™ should only be ridden on smooth hard and flat surfaces. It is not designed for off-road conditions. Do not use the SmartScoot™ in rain or snow nor drive it through puddles of water. Slightly uneven surfaces should be approached at a reduced speed and in a direct frontal position and may require lifting or walking the scooter around the surface.
-
Page 23: Air Travel
You should identify yourself to the gate agents and ask them to confirm how your SmartScoot™ will be handled from the time you get onto the plane until the time you receive it upon reaching your destination. A gate check tag should be placed on the scooter and you should confirm that the scooter will be brought up to you on the jetway upon your arrival at your destination. -
Page 24: Smartscoot Tm Storage Accessories
SMARTSCOOT™ STORAGE ACCESSORIES SmartScoot™ is more than a mobility scooter. It is also a "helping hand". Our collapsible and removable front basket fits right on the handlebars, making SmartScoot™ a great tool for carrying groceries or other items that you may want to transport. Going on a trip? Our removable luggage bar can accommodate a carry-on type bag. -
Page 25: Battery And Battery Charging
BATTERY AND BATTERY CHARGING SmartScoot™ is powered by a 36 volt Lithium Ion battery. Depending on the conditions, the battery can reach up to 12 miles from a single charge. The rechargeable battery can be charged with the battery connected to the scooter or can be easily removed and charged at a different location. - Page 26 PLEASE NOTE - To prolong the battery life, recharge it at least once every three months. CAUTION – Only use the SmartScoot™ charging cord which comes packed with your SmartScoot™ to charge the SmartScoot™ as directed in this Manual. HOW TO INTERPRET THE BATTERY INDICATOR LIGHTS ON THE CONTROL PANEL The battery indicator has four levels indicated by red lights.
-
Page 27: Battery Care
Do not place the battery near a heat source, like a fireplace, heater, etc. WARNING – Do not use the SmartScoot™ in areas with potentially explosive atmospheres, including but not limited to, areas such as fueling areas, fuel or chemical transfer or storage facilities, or areas where the air contains chemical or particles, such as grain dust, or metal powders. -
Page 28: Product Specifications
PRODUCT SPECIFICATIONS Model S1200 Specifications Details 39” H x 38” L x 22” W Scooter Size Setup 30.5” H x 38” L x 22” W Scooter Size Folded with Seat 17” H x 38” L x 22” W Scooter Size Folded without Seat Scooter Weight Complete 39.5lbs Heaviest part = 27 lbs... -
Page 29: Limited Warranty
This limited warranty extends only to the original owner and is not transferable to anyone else. If a defect exists, IMP will, at its option and to the extent permitted by law either (1) provide components to repair the SmartScoot™ using new or refurbished parts at no charge to you; (2) exchange the SmartScoot™... - Page 30 Return Authorization within 3 days of delivery. Do not unpack or assemble the SmartScoot™. The scooter must be returned in its original box and in new and unused condition, accompanied by the original receipt. All other returns must be made within 14 days of delivery and only in “as new”...
-
Page 31: Troubleshooting And Maintenance
TROUBLESHOOTING AND MAINTENANCE Your SmartScoot™ has been designed to be almost maintenance and service free. SmartScoot™ uses self-lubricating bearings throughout the scooter and the frame is constructed using stainless steel. In addition, all parts can be can be cleaned with general cleaning agents. - Page 32 ACTUATOR MOVEMENT WHEN BRAKE LEVER IS DEPRESSED BRAKE LEVER ENGAGED ACTUATOR If the actuator is not fully engaged, (additional movement is possible by moving the actuator by hand when the brake lever is fully depressed) and the hand movement of the actuator causes the front wheel to become locked, then see Disc Brake Level Adjustment section below.
- Page 33 COMMENTS ON THE BATTERY Your SmartScoot™ comes with a top grade Lithium Ion battery to provide abundant power in a very light weight package. Like all rechargeable batteries, this battery will "wear out" over time and with usage.
Need help?
Do you have a question about the SmartScoot and is the answer not in the manual?
Questions and answers