Table of Contents
Advertisement
Available languages
Available languages
OPERATOR'S MANUAL
12 GALLON PORTABLE AIR COMPRESSOR
H15123TK
CUSTOMER SERVICE
1-866-242-4298
Your air compressor has been engineered and manufactured to Husky's high standard for dependability, ease of operation,
and operator safety. When properly cared for, it will give you years of rugged, trouble-free performance.
Thank you for buying a Husky product.
H15123TK OM Ver. 11/10
Advertisement
Chapters
Table of Contents

Related Manuals for Husky H15123TK


Summary of Contents for Husky H15123TK
- Page 1 CUSTOMER SERVICE 1-866-242-4298 Your air compressor has been engineered and manufactured to Husky’s high standard for dependability, ease of operation, and operator safety. When properly cared for, it will give you years of rugged, trouble-free performance. Thank you for buying a Husky product.
-
Page 2: Table Of Contents
PRODUCT FOR CONSUMER USE ONLY. Not intended for commercial use. If this compressor is altered in any way, existing warranties shall be voided. Husky disclaims any liabilities whatsoever for any loss, personal injury, or damage. -
Page 3: General Safety Rules
GENERAL SAFETY RULES Additional safety protection will be required in some environments. For example, the working area WARNING: may include exposure to a noise level which can lead to Read and understand all instructions. Failure to hearing damage. The employer and user must ensure follow all instructions listed below may result in electric that any necessary hearing protection is provided shock, fire, and/or serious personal injury. - Page 4 GENERAL SAFETY RULES Never point any tool toward yourself or others. Disconnect power supply, open drain valve to decompress tank and allow water to drain, and Keep the exterior of the air compressor dry, clean, allow air compressor to become cool to the touch and free from oil and grease.
-
Page 5: Specific Safety Rules
SPECIFIC SAFETY RULES Know your power tool. Read operator’s manual Always follow all safety rules recommended by the carefully. Learn its applications and limitations, as well manufacturer of your tool, in addition to all safety as the specific potential hazards related to this tool. rules for the air compressor. - Page 6 Do not adjust regulator to result in output pressure greater than marked maximum pressure of attachment. Do not use at pressure greater than the rated maximum pressure of this compressor. Always wear ear protection when using this tool. Failure to do Risk to hearing so may result in hearing loss.
-
Page 8: Electrical
SPEED AND WIRING The no-load speed of the electric motor varies by model and specification. The motor speed is not constant and decreases under a load or with lower voltage. For voltage, the wiring in a shop is as important as the motor’s horsepower rating. A line intended only for lights cannot properly carry a power tool motor. -
Page 9: Tools Needed
TOOLS NEEDED The following tools are needed in order to assemble the wheel kit. TWO ADJUSTABLE WRENCHES... -
Page 10: Features
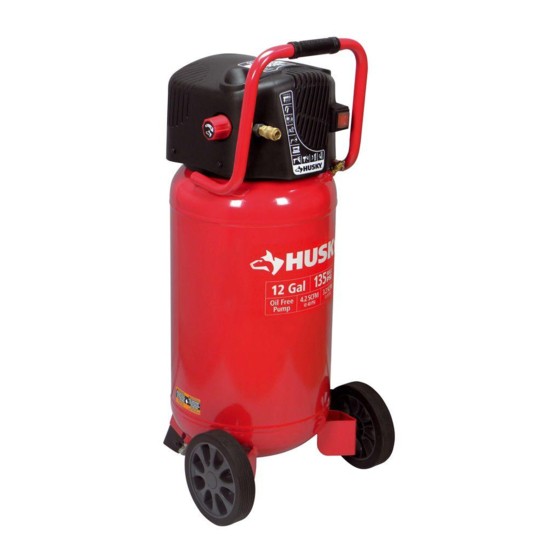
FEATURES PRODUCT SPECIFICATIONS Running Horsepower ..........1.5 HP Lubrication .............. Oil-Free Air Tank Capacity ............12 gal. Gauges ............1.5 in. diameter Air Pressure ............135 PSI max. Input....... 120 V, 60 Hz, AC only, 13.5 Amps Air Delivery ......... 3.2 SCFM @ 90 PSI Net Weight ..............54.4 lbs. -
Page 11: Assembly
FEATURES KNOW YOUR AIR COMPRESSOR PRESSURE REGULATOR KNOB See Figure 2. Use the pressure regulator knob to adjust the amount of Before attempting to use this product, familiarize yourself air being delivered through the hose. with all operating features and safety rules. REGULATOR PRESSURE GAUGE TOOL AND ACCESSORY KIT The current line pressure is displayed on the regulator... - Page 12 ASSEMBLY ASSEMBLING THE RUBBER FOOT AND WHEELS WASHER See Figure 3. Mount the rubber foot as shown in figure 3. Tighten firmly with an open-end wrench (not included) WHEEL PLUG to secure it in position. Mount the wheels as shown in figure 3. Tighten firmly with an open-end wrench (not included) to secure the wheels in position.
- Page 13 ASSEMBLY ASSEMBLY REGULATOR TANK BREAKING IN THE PUMP PRESSURE PRESSURE See Figure 4 - 5. GAUGE GAUGE PRESSURE REGULATOR Check and tighten all bolts, fittings, etc. KNOB Turn the pressure regulator knob fully clockwise to open the air flow. ON/OFF Place the switch in the OFF position and plug in the SWITCH power cord.
-
Page 14: Operation
OPERATION APPLICATIONS WARNING: Air compressors are utilized in a variety of air system Do not allow familiarity with tools to make you careless. applications. Match hoses, connectors, air tools, and Remember that a careless fraction of a second is accessories to the capabilities of the air compressor. sufficient to inflict serious injury. - Page 15 OPERATION DRAINING THE TANK See Figure 9 - 10. To help prevent tank corrosion and keep moisture out of the air used, the tank of the compressor should be drained daily. A correct use of the drain valve: Verify that the compressor is turned off. Holding the handle, tilt the compressor toward the drain DRAIN VALVE valve so that it’s set in a lower position.
-
Page 16: Maintenance
Inspect the tank yearly for rust, pin holes, or other imperfections that could cause it to become unsafe. WARNING: When servicing, use only identical Husky replacement parts. Use of any other parts may create a hazard or Avoid using solvents when cleaning plastic parts. Most cause product damage. -
Page 17: Troubleshooting
TROUBLESHOOTING Problem Possible Cause Solution Compressor will not run Tank has sufficient pressure. Compressor will turn on when tank pressure drops to cut-in pressure. No electrical power. Check to be sure unit is plugged in. Blown stop/house fuse. Replace shop/house fuse. Tripped shop/home breaker. -
Page 18: Brad/Stapler
BRAD/STAPLER lead to loss of control. WARNING: b) Do not force the tool. Use the correct tool for the application. The correct tool will do the job better and safer When using tools, basic precautions should always be at the rate for which the tool is designed. followed, including the following. - Page 19 BRAD/STAPLER WARNING: SPECIFIC SAFETY RULES a) If not used correctly and without suitable Remove finger from the trigger when not driving maintenance, the brad/stapler can cause serious injury. fasteners. Never carry the tool with finger on trigger, the b) Always wear goggles and ear plugs when using the tool is able to fire a fastener.
- Page 20 BRAD/STAPLER 2) Check that protector (A) of the brad/stapler is working correctly. Check that is free to move in and out without any obstruction (Fig. 13). 3) Release the outer part of cartridge (C) from the locked position, pressing lever (D) (Fig. 14). 4) Slide the outer part of cartridge (C) downwards (Fig.
-
Page 21: Brad/Stapler
Fig.20 WARNING: FASTENER AND REPLACEMENT PARTS Use only genuine Husky 18 gauge fasteners (or equivalent. Fasteners not identified for use with this tool by the tool manufacturer are able to result in a risk of injury to persons or tool damage when used in this tool). -
Page 22: Inflating Gun
INFLATING GUN SPECIFIC SAFETY RULES Do not direct the stream of compressed air towards people, pets or other animals. Never inflate the objects above the recommended inflation pressure as this may be dangerous and cause damage and/or injuries. OPERATION Technical data Fig.22 Model No.: 9045733 Max. -
Page 23: Siphon/Blow Gun
SIPHON/BLOW GUN A siphon gun is simply an air gun (Fig. 27) that sucks up liquid into the air stream and propels the mixture out the nozzle end. Use for spraying lubricating oils, cutting oils, and cooling oils. SPECIFIC SAFETY RULES Do not direct the stream of compressed air towards people, pets or other animals. - Page 24 SIPHON/BLOW GUN WARNING: WARNING: Misuse can cause death or serious injury. You must wear appropriate protective equipment when Do not exceed the maximum working pressure operating, servicing, or when in the operating area of the or temperature rating of the lowest rated system equipment to help protect you from serious injury, including component.
-
Page 25: Warranty
2 YEARS LIMITED WARRANTY If within two years from the date of purchase, this Husky air tool product fails due to a defect in materials or workmanship, please immediately contact Product Support at 1-866-242-4298 (8am to 5pm EST, M-F, except normal Holidays). Do not return the air tool to the store. - Page 26 OPERATOR’S MANUAL 12 GALLON PORTABLE AIR COMPRESSOR H15123TK CUSTOMER SERVICE 1-866-242-4298...
- Page 27 MANUAL DEL USUARIO COMPRESOR DE AIRE PORTÁTIL DE 46 LITROS (12 GALONES) H15123TK SERVICIO DE CLIENTE 1-866-242-4298...
- Page 28 Tal equipo adicional no ha sido examinado y no debe suponerse o deducirse ninguna conclusión con respecto al correcto uso del aire de respiración. Si se altera de cualquier forma este compresor, quedan anuladas todas las garantías presentes. Husky se exime de toda responsabilidad de cualquier tipo por cualquier pérdida, lesión corporal o daño material.
-
Page 29: Reglas De Seguridad Generales
REGLAS DE SEGURIDAD GENERALES Tanto el patrón como el operador deben asegurarse ADVERTENCIA: de que se use protección ocular adecuada. Recomendamos una careta protectora de visión Lea y comprenda todas las instrucciones. El amplia encima de los anteojos normales o de los incumplimiento de las instrucciones señaladas abajo anteojos de seguridad que ofrecen protección frontal puede causar descargas eléctricas, incendios y... -
Page 30: Reglas De Seguridad Específicas
REGLAS DE SEGURIDAD GENERALES Purgue lentamente todas las presiones internas del fluidos para frenos, gasolina, productos a base de sistema. El polvo y la basura pueden ser dañinos. petróleo ni solventes fuertes para limpiar la unidad. Guarde las herramientas que no estén en uso Con el cumplimiento de esta regla se reduce el riesgo fuera del alcance de los niños y de toda persona de deterioro del alojamiento de plástico de la unidad. -
Page 32: Símbolos
SÍMBOLOS Es posible que se empleen en esta herramienta algunos de los siguientes símbolos. Le suplicamos estudiarlos y aprender su significado. Una correcta interpretación de estos símbolos le permitirá utilizar mejor y de manera más segura la herramienta. SÍMBOLO NOMBRE DENOMINACIÓN/EXPLICACIÓN Volts Voltaje... - Page 33 SÍMBOLOS Las siguientes palabras de señalización y sus significados tienen el objeto de explicar los niveles de riesgo relacionados con este producto. SÍMBOLO SEÑAL SIGNIFICADO Indica una situación peligrosa inminente, la cual, si no se evita, causará PELIGRO: la muerte o lesiones serias. Indica una situación peligrosa posible, la cual, si no se evita, podría cau- ADVERTENCIA: sar la muerte o lesiones serias.
-
Page 34: Aspectos Eléctricos
ASPECTOS ELÉCTRICOS CORDONES DE EXTENSIÓN VELOCIDAD Y CABLEADO Sólo utilice cordones de extensión de tres conductores La velocidad en vacío del motor eléctrico varía por el modelo con clavijas de tres patillas y receptáculos de tres polos y la especificación. La velocidad del motor no es constante y que acepten la clavija del cordón del compresor. -
Page 35: Glosario De Términos
GLOSARIO DE TÉRMINOS Bomba NPT (Norma Nacional de Roscado de Tubos) NPT es un estándar norteamericano para roscas cónicas Es el dispositivo que produce el aire comprimido (NPT) o rectas (NPS) utilizadas para unir tubos y accesorios. mediante un pistón de vaivén contenido dentro del Debe utilizarse una cinta selladora de roscas para tener cilindro. -
Page 36: Especificaciones Del Producto
CARACTERÍSTICAS ESPECIFICACIONES DEL PRODUCTO Potencia de funcionamiento ........1,5 HP Lubricación ........Lubricación permanente Capacidad del tanque de aire......46 L (12 gal.) Manómetros......3,8 cm (1,5 pulg.) de diámetro Presión de aire ......930,8 kPa (135 psi), máx. Corriente de entrada..120 V, 60 Hz, 13.5 A, sólo corr. alt. Suministro de aire ... -
Page 37: Características
CARACTERÍSTICAS FAMILIARÍCESE CON EL COMPRESOR MOTOR UNIVERSAL DE LUBRICACIÓN Vea la figura 2. PERMANENTE Antes de intentar utilizar este producto, familiarícese con El compresor incorpora cojinetes lubricados todas las características de funcionamiento y normas de permanentemente. seguridad de la unidad. PERILLA DE REGULACIÓN DE PRESIÓN JUEGO DE ACCESORIOS Para ajustar la cantidad de aire suministrada a través de la... - Page 38 ARMADO MONTAJE DEL PIE DE GOMA Y LAS RUEDAS TUERCA Vea la figura 3. ARANDELA Monte el pie de goma como se indica en la figura 3. Apriete firmemente con una llave de extremo abierto (no incluida) para fijar en su posición. TAPÓN RUEDA Monte las ruedas como se indica en la figura 3.
- Page 39 ARMADO USO INICIAL DE LA BOMBA MANÓMETRO Vea las figuras 4 y 5. REGULADOR MANÓMETRO DEL TANQUE PERILLA DE Revise y apriete todos los pernos, adaptadores, etc. REGULACIÓN Gire completamente a la derecha la perilla de regulación DE PRESIÓN de presión para abrir el flujo de aire. INTERRUPTOR Coloque el interruptor en la posición de apagado (O) y ENCENDIDO/...
-
Page 40: Funcionamiento
FUNCIONAMIENTO USOS Los compresores de aire se utilizan en una veriedad de sistemas de ADVERTENCIA: suministro de aire. Las mangueras, conectores, herramientas de aire y No permita que su familarización con las herramientas lo accesorios deben corresponder a la capacidad del compresor de aire. vuelva descuidado. - Page 41 FUNCIONAMIENTO DRENADO DEL TANQUE Vea las figuras 9 y 10. Como ayuda para impedir la corrosión del tanque y mantener el aire libre de humedad, debe drenarse diariamente el tanque del compresor. Uso correcto de la válvula de drenaje: Verificar que el compresor esté apagado. Sujetándolo por la manilla, inclinar el compresor VÁLVULA DE DRENAJE hacia la válvula de drenaje de tal manera que éste se...
-
Page 42: Mantenimiento
Al dar servicio a la unidad, sólo utilice piezas de tipos de solventes comerciales y pueden resultar dañados. repuesto Husky idénticas. El empleo de piezas Utilice paños limpios para eliminar la suciedad, el polvo, el diferentes puede causar un peligro o dañar el aceite, la grasa, etc. -
Page 43: Solución De Problemas
SOLUCIÓN DE PROBLEMAS Problema Causa Solución El compresor no arranca El tanque tiene suficiente presión. El compresor se enciende cuando la presión del tanque desciende a la presión de ananque. No hay energía elétrica. Asegurase de que la unidad esté enchufada. Fusibles de casa/taller fundidos. -
Page 44: Clavadora/Grapadora
CLAVADORA/GRAPADORA USO Y CUIDADO DE LA HERRAMIENTA a) Use abrazaderas u otra forma práctica para afianzar y ADVERTENCIA: apoyar la pieza de trabajo a una plataforma estable. Sujetar la Cuando use el producto, tome siempre las precauciones pieza con las manos o apoyarla contra el cuerpo no proporciona la básicas, incluidas las siguientes. - Page 45 CLAVADORA/GRAPADORA REGLAS DE SEGURIDAD ESPECÍFICAS l) Desconecte la fuente de suministro de aire y elimine a) Si no se usa correctamente o si el mantenimiento no la tensión del gatillo antes de tratar de sacar cualquier es correcto, la clavadora/grapadora puede ocasionar sujetador atascado, ya que la herramienta podría lesiones graves.
- Page 46 CLAVADORA/GRAPADORA ADVERTENCIA: No cargue nunca el cartucho sin verificar primero que el protector (A) funcione correctamente. No conecte nunca la clavadora/grapadora al compresor sin verificar primero que el protector funcione correctamente (A). No use la herramienta si opera sin apretar el gatillo. Se pueden producir lesiones personales.
- Page 47 PARA REPARAR LA HERRAMIENTA La herramienta debe ser reparada únicamente por personal calificado, y deben usar piezas de repuesto y accesorios originales Husky, o piezas y accesorios que funcionen de manera equivalente. Después del uso, guarde la herramienta neumática en un ambiente seco y limpio.
-
Page 48: Pistola De Inflado
PISTOLA DE INFLADO REGLAS DE SEGURIDAD ESPECÍFICAS No dirija el chorro de aire comprimido hacia personas, animales domésticos u otros animales. No infle los objetos con una presión de inflado superior a la recomendada porque puede ser peligroso y causar daños y/o lesiones. -
Page 49: Pistola De Aire Tipo Sifón
PISTOLA DE AIRE TIPO SIFÓN Una pistola de aire tipo “sifón” es simplemente una pistola de aire (Fig. 25) que aspira los líquidos hacia la corriente de aire y expulsa la mezcla por la boquilla. Se utiliza para la pulverización de aceites lubrificantes, aceites de corte y aceites refrigerantes. - Page 50 PISTOLA DE AIRE TIPO SIFÓN ADVERTENCIA: ADVERTENCIA: Un mal uso puede causar la muerte o lesiones graves. Utilizar la indumentaria de protección adecuada durante No superar la presión máxima de funcionamiento ni las operaciones, el mantenimiento, o en la zona en la que la temperatura máxima del componente con menor se encuentra el equipo para protegerse de daños graves, presión del sistema.
-
Page 51: Garantía
COBERTURA DE LA GARANTÍA LIMITADA DE DOS AÑOS Esta garantía cubre los defectos de fabricación o de materiales del compresor de aire HUSKY por un periodo de 2 años a partir de la fecha de compra. Esta garantía es específi ca para este compresor de aire. Las garantías de los otros productos HUSKY pueden variar. - Page 52 MANUAL DEL USUARIO COMPRESOR DE AIRE PORTÁTIL DE 46 LITROS (12 GALONES) H15123TK SERVICIO DE CLIENTE 1-866-242-4298 9039384/B...
Need help?
Do you have a question about the H15123TK and is the answer not in the manual?
Questions and answers