Advertisement
Quick Links
OBSIDIAN SERIES
®
250D
OBSIDIAN SERIES
®
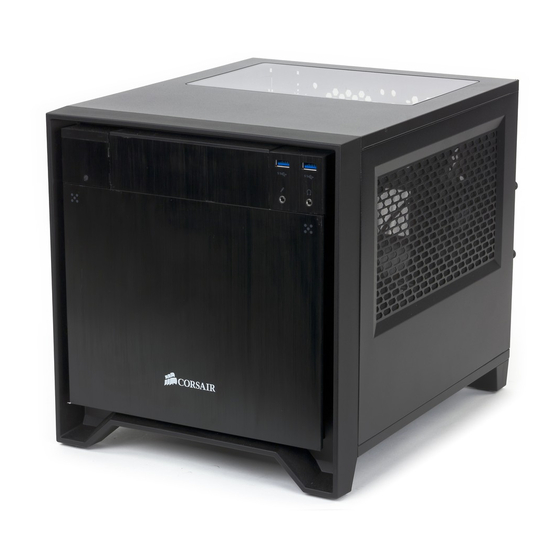
OBSIDIAN SERIES 250D Mini ITX PC CASE
46221 Landing Parkway • Fremont • California • 94538 • USA | corsair.com
© 2013 Corsair Components, Inc.
All rights reserved. Corsair, the sails logo and Obsidian Series are
registered trademarks of Corsair in the United States and/or other
countries. All other trademarks are the property of their respective
owners. Product may vary slightly from those pictured.
INSTALLATION GUIDE n GUIDE D'INSTALLATION n INSTALLATIONSANLEITUNG
PN: 49-001214 rev AA
GUIDA ALL'INSTALLAZIONE n Guía de instalación n РУКОВОДСТВО ПО УСТАНОВКЕ
安装指南 n 取扱説明書
Advertisement

Related Manuals for Corsair 250d


Summary of Contents for Corsair 250d
- Page 1 OBSIDIAN SERIES ® OBSIDIAN SERIES 250D Mini ITX PC CASE 46221 Landing Parkway • Fremont • California • 94538 • USA | corsair.com © 2013 Corsair Components, Inc. All rights reserved. Corsair, the sails logo and Obsidian Series are registered trademarks of Corsair in the United States and/or other countries.
- Page 2 Vorderseite zeichnet sich durch componenti ad alte prestazioni. Obsidian The 250D is a great choice if you want que subtile qui a fait la réputation des das markante, doch subtile Design 250D è ideale per le massime prestazioni full size performance in a small space.
- Page 3 障をきたさずに構築したい場合は、Obsidian flexibilidad o rendimiento, Obsidian гибкостью или производительностью, 250D 正是的答案。尽管它从外面看起来小, シリーズ 250Dがその答えです。外見は小型で Series 250D es lo que necesita. Aunque корпус Obsidian Series 250D — это ваш 但是 250D 具有容纳全尺寸 5.25" 光驱、全长 すが、250Dにはフルサイズの5.25インチ光学 su exterior es pequeño, el chasis 250D выбор. Несмотря на компактный внешний...
- Page 4 Obsidian シリーズ ® 250D Mini ITX PC Case Obsidian 250D avec un Mini-ITX-PC-Gehäuse 250D Mini ITX OC con 250D Mini ITX OC con 250D Mini ITX с одним Mini ITX OC 机箱,带一 ミニ ITX OC ケース、A- ® with one AF120L rear ventilateur d’évacuation...
- Page 5 CONTENTS n CONTENU n LIEFERUMFANG n CONTENUTO CONTENIDO n КОМПЛЕКТАЦИЯ n 包装内零组件 n パッケージの内容 MBD/HDD screws Short fan screws SSD/ODD screws Cable ties Vis MBD/Disque dur Vis de ventilateur courtes Vis SSD/Lecteur optique Attaches de câble MBD/HDD -Schrauben Kurze Lüfterschrauben SSD/ODD -Schrauben Kabelbinder Viti per scheda madre/...
- Page 6 (x1) Corsair AF120L rear exhaust fan 1 ventilateur d’évacuation arrière Corsair AF120L 1 rückseitiger Corsair AF120L Abluftventilator 1 ventola di scarico posteriore da 120mm Corsair AF120L (x1) ventilador de salida trasero Corsair AF120L (x1) вытяжной вентилятор Corsair AF120L на задней панели...
- Page 7 OBSIDIAN SERIES 250D Mini ITX PC CASE OBSIDIAN SERIES 250D Mini ITX PC CASE ® ® Vented side panels Dual 3.5" and 2.5" tool-free drive bays Panneaux latéraux à évents Double baie pour lecteurs 3,5 et 2,5 pouces, à montage sans outil Seitenabdeckung mit Belüftungsöffnungen...
- Page 8 > To remove the top panel, pull the panel back and lift up. > To remove the side panel, slide the panel back. Note: Corsair recommends removing both side panels and setting them aside when building your system to avoid accidental damages.
-
Page 9: Installing The Motherboard
Installing the motherboard Installing the power supply (PSU) > Install your motherboard’s I/O shield (see your motherboard’s manual for guidance). > Unscrew and remove the PSU mounting back plate. > Align the motherboard with the standoffs in the case. > Slide in the PSU from the back of the case. >... - Page 10 Installing the PCI-E-PCI card(s) > Slide the PCI bracket cover up by removing the thumbscrews. > Remove the corresponding slot cover(s). > Unscrew the optical drive bay bracket. > Install the PCI card. > Seat the PCI bracket cover and secure the PCI card with screws. Instalación de la fuente de alimentación (PSU) Установка...
- Page 11 Installing a 5.25" drive/devices (ODD) > Remove the front panel 5.25" drive bay cover. > Insert the ODD into the drive bay until the tool-free latch clicks, securing the drive. > To remove, push the tool-free tab to release the ODD drive and remove. Instalación de las tarjetas PCI-E/PCI Установка...
- Page 12 Installing a 3.5" HDD/ 2.5" SSD > Remove the HDD/SSD backplate from the back of the case. > Remove the tool-free 3.5" HDD or 2.5" SSD tray from the drive cage. > Insert the HDD into the HDD tray or SSD into the SSD tray. >...
- Page 13 Removing the front and bottom dust filters > To remove the front panel dust filter, first remove the solid front panel by pushing the top corners of the aluminum cover. > The front solid panel will pop out for access to the front dust filter. >...
-
Page 14: Installing The Front I/O Connectors
Attach case fan cables to motherboard headers Installing the front I/O connectors > See your motherboard’s manual for fan header locations. > See your motherboard’s manual for front panel header locations and pin-outs. Branchement des câbles du ventilateur sur les fiches Conecte los cables de ventiladores de la caja a los Installation des connecteurs E/S avant Instalación de los conectores de E/S frontales...
Need help?
Do you have a question about the 250d and is the answer not in the manual?
Questions and answers