Table of Contents
Advertisement
Quick Links
Advertisement
Table of Contents

Subscribe to Our Youtube Channel
Related Manuals for Docomo so-02c


Summary of Contents for Docomo so-02c
- Page 1 INSTRUCTION MANUAL ’11.6...
- Page 2 ● A SIM unlock charge is separately required. ● If you use a UIM other than by DOCOMO, available services and functions will be limited. DOCOMO is not liable to any failures or malfunctions. ● For details of SIM unlock, refer to NTT DOCOMO website.
-
Page 3: Accessories And Main Options
Accessories and main Safety/Handling precautions (In Japanese options only) ・ Battery Pack SO05 Supplied accessories ・ SO-02C (with warranty and Back Cover SO15) ・ AC Adapter Cable SO03 (with warranty) <AC adapter> <microUSB cable> ・ microSDHC card (32GB)* (Sample) ・ Quick Start Guide (In Japanese only) クイック... -
Page 4: About Manuals Of So-02C
・ Reproduction or reprint of all or part of this manual without prior permission is prohibited. Similarly to this manual, operations and ・ Important information for SO-02C is posted in the settings of each function are explained. following website. Be sure to check before using. - Page 5 ・ Please note that "SO-02C" is called the "FOMA Operation descriptions terminal" in this manual. In this manual, each key operations are described with p, x, y, t, m, k. And selection operations of the icons or function items on the touch panel are described as follows.
-
Page 6: Table Of Contents
About manuals of SO-02C ........ - Page 7 ・ Viewing the setting menu ............88 ・ Wireless & networks ...............88 ・ Call settings................96 ・ Sound ..................96 ・ Display ...................98 ・ Location & security..............99 ・ Applications .................104 Settings ・ Accounts & sync ..............106 →P.88 ・ Privacy..................110 ・ Storage.................110 ・ Language & keyboard ............111 ・...
- Page 8 ・ Using Android Market ............166 ・ Using docomo market............166 ・ Timescape ................167 ・ About location services............171 ・ 1Seg ..................177 Applications ・ FM radio ................183 →P.166 ・ Osaifu-Keitai.................184 ・ Calendar................188 ・ Clock/Alarm................189 ・ OfficeSuite ................191 ・ Other applications..............192 ・ Overview of International roaming (WORLD WING) ....194 Overseas use ・...
-
Page 9: Notes On Usage
・ Setting the phone to silent mode does not some overseas networks. For using mute sounds (playback of video or music, overseas, please visit a docomo Shop near alarm, etc.) other than the ringtone, you. DOCOMO exchanges UIM (FOMA operation sound, and notification sounds. - Page 10 ・ If your FOMA terminal is lost, change your each account password to invalidate authentication using a PC to prevent other persons from using Google services such as Google Talk, Gmail, Android Market, etc., Facebook, Twitter and mixi. ・ The FOMA terminal supports only sp-mode, mopera U and Business mopera Internet.
-
Page 11: Safety Precautions (Always Follow These Directions)
■ The following symbols indicate specific Safety Precautions (Always directions. follow these directions) Indicates prohibited actions. Don’t ■ For safe and proper use of the FOMA terminal, please read the "Safety Precautions" prior to Indicates not to disassemble. use. Keep the Manual in a safe place for future No disassembly reference. -
Page 12: Handling The Foma Terminal, Battery Pack, Ac Adapter Cable, And Uim (General)
(Osaifu-Keitai lock) is activated, deactivate it before turning OFF the terminal.) Use the battery pack and AC adapter cable for the FOMA terminal specified by DOCOMO. Failure to do so may cause fire, burns, injury or electric shock. Contents/Precautions... -
Page 13: Handling The Foma Terminal
WARNING CAUTION If you notice anything unusual about the Be careful especially when you use the FOMA terminal, battery pack, AC adapter FOMA terminal while it has been cable, or UIM such as an unusual odor, continuously connected to the AC adapter overheating, discoloration or deformation cable for a long period of time. - Page 14 WARNING WARNING Do not turn on the photo light with the Power off the FOMA terminal in a place lighting luminescence part close to the eyes. where the use is prohibited such as in Especially to shoot infants or young children, airplane or hospital.
- Page 15 WARNING CAUTION If you are wearing any electronic medical Do not swing the FOMA terminal around by equipment, check with the relevant medical holding the antenna or strap. electronic equipment manufacturer or vendor The FOMA terminal may hit you or others Don’t whether the operation may be affected by and cause accident such as injury.
-
Page 16: Handling The Battery Pack
Don’t (docomo Shop, etc.) after insulating it by Don’t affixing an adhesive tape on the terminal of it Do not stick a nail into the battery pack, hit it or follow the instructions of the local with a hammer, or step on it. -
Page 17: Handling The Ac Adapter Cable
CAUTION WARNING Do not use or charge the wet battery pack. Do not short-circuit the microUSB plug while it is connected to the power outlet. Do not Doing so may cause battery pack to ignite, touch the microUSB plug with your hands, explode, overheat or leak. -
Page 18: Handling The Uim
6. Handling the FOMA terminal WARNING near electronic medical When you connect the AC adapter to the equipment power outlet, insert it firmly. Failure to do so may cause fire, burns or ■ The following instructions observe the electric shock. guidelines of the Electromagnetic Compatibility Conference, Japan to protect Hold the AC adapter, not the microUSB... -
Page 19: Material List
Surface WARNING Part Material treatment If you use an implantable cardiac pacemaker Exterior case PC resin or implantable cardioverter defibrillator, keep (connector of the FOMA terminal more than 22 cm away the microUSB from the implant at all times. connection jack, The radio waves from the FOMA terminal headset may affect the operation of implantable... -
Page 20: Handling Precautions
・ Clean the terminals occasionally with a Surface Part Material dry cotton swab. treatment If the jack is soiled, connection gets worse and 1Seg antenna PC resin it may cause power to be turned off or cover insufficient battery charge, so clean the jack with a dry cotton swab etc. - Page 21 Doing so may cause data loss or malfunction. keep it safely. ・ Do not let magnetic cards, etc. come Under no condition will DOCOMO be held close to the FOMA terminal. liable for any damaged or lost data saved in the The magnetic data in cash cards, credit cards, FOMA terminal.
- Page 22 ■ Battery pack precautions ■ AC adapter cable precautions ・ The battery pack is a consumable ・ Charge the battery pack in an accessory. environment with the proper ambient temperature (5°C to 35°C). Even if the operating time of the FOMA terminal varies depending on the operating conditions ・...
- Page 23 FOMA terminal. using the Bluetooth function. ・ Take an expended UIM to sales outlet ・ Please be aware that DOCOMO is not such as docomo Shop for proper responsible for data leak when making disposal in order to protect the data communications using Bluetooth.
- Page 24 ■ Wireless LAN (WLAN) precautions : The full band between 2400 MHz and 2483.5 MHz is used and the ・ Wireless LAN (WLAN) exchanges band of the mobile identification information using radio waves, and device can be avoided. allows you to freely establish LAN Available channels vary depending on the connection if you are within an area country.
- Page 25 ・ 2.4 GHz device cautions ■ FeliCa reader/writer function The operating frequency band of the WLAN precautions device is used by industrial, scientific, ・ FeliCa reader/writer function of FOMA consumer and medical equipment including terminal uses weak waves requiring no home electric appliances such as microwave licenses for radio stations.
- Page 26 ・ Be careful when using the FOMA terminal while driving. Using a handheld mobile phone while driving will result in a penalty. However, absolutely necessary cases such as rescue of a sick person or maintaining public's safety are exempted. ・ Use FeliCa reader/writer function only in Japan.
-
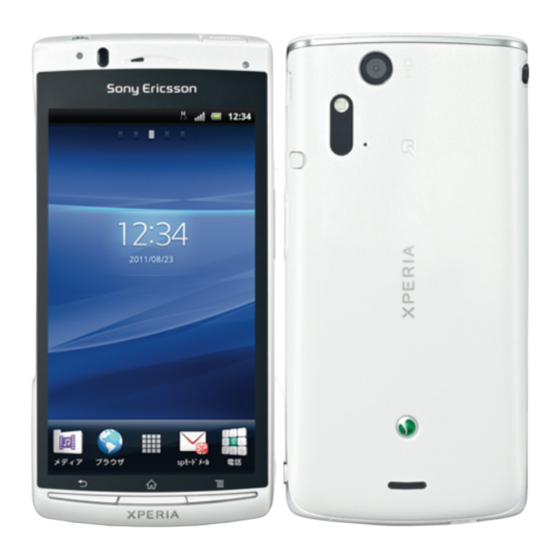
Page 27: Part Names And Functions
Part names and functions ij k l f g h a Light sensor: Used for auto controlling of the q Strap hole r Speaker screen brightness. b Proximity sensor: Turns on or off the touch screen s Microphone t 1Seg antenna to prevent misoperation during a call. -
Page 28: Uim
・ In this FOMA terminal, the UIM (blue) is not available. If you have the UIM (blue), bring it to the nearest docomo Shop to replace. ・ When inserting/removing the UIM, make sure to power off the FOMA terminal. Do not connect the AC Adapter cable. -
Page 29: Microsd Card
Remove the battery pack, and Removing UIM insert straight the UIM all the way into the slot with the metal part (IC) Press the UIM with your fingertip facing down. and remove it sliding forward. ・ Insert it with the corner cut ahead. ・... - Page 30 ❖ Check the orientation of microSD Information ・ Make sure to attach the back cover before using. card to insert it slowly straight into The microSD card cannot be recognized if the FOMA terminal until it clicks. back cover is not attached. ・...
-
Page 31: Charging
Check the direction of the back Removing the back cover. cover, and attach to the FOMA Insert the microSD card straight terminal body ( ), press each part into the slot all the way until it marked as shown and make sure clicks. - Page 32 Green means Battery pack life the remaining battery level reaches more than 90%. To check the battery level, press Use the battery pack for SO-02C, SO05. t from the Home screen, then tap ・ The battery pack is a consumable [Settings]...
-
Page 33: Attaching The Battery Pack
Do not charge the battery pack for Check the orientation of charging jack of the battery pack, insert it in a long time (several days) the direction of the arrow ( ・ If you remain charging the FOMA terminal aligning the notches of the FOMA for a long time, the power supply starts from terminal and battery pack. -
Page 34: Removing The Battery Pack
Check the direction of the back Removing the battery pack cover, and attach to the FOMA terminal body ( ), press each part Remove the back cover, put your marked as shown and make sure tip of thumb (nail) into the groove that there are not any spaces of the FOMA terminal, hold the between the body and cover (... -
Page 35: Charging With A Pc
When the charging is completed, When the charging is completed, remove the microUSB plug of the remove the microUSB plug of the microUSB cable from the FOMA microUSB cable from the FOMA terminal. terminal. Remove the AC Adapter from the Remove the USB plug of the power outlet. -
Page 36: Turning Power On And Off
Deactivate the key lock. microUSB plug ・ For deactivating the key lock, see "Unlocking the keys" (P.35). Notification LED ❖ Information ・ The first time you turn on, "Setup guide" (P.35) appears. ・ If you activate the screen lock or SIM card lock, a PIN code entry screen appears when turning power on. -
Page 37: Initial Settings (Setup Guide)
❖ Information Initial settings (Setup guide) ・ For details on settings for turning the backlight off and the duration of time before the key lock When you turn on the FOMA terminal for the activation, see "Adjusting the idle time before the screen turns off"... -
Page 38: Status Bar
Tap [Next]. Status bar ・ Tap [View] to check how to use the application Timescape. A status bar appears at the top of the screen. Tap [Next]. In the status bar, the FOMA terminal status ・ Tap [Import] [Yes] to import and notification are displayed. -
Page 39: Notification Icons
Sending and Silent mode Problem with SMS Playing a track downloading via (vibration) ON message delivery FOMA HIGH- New instant 1Seg activated SPEED message GPRS available Sound OFF New Facebook FM radio in use (Ringtone volume 0) message Sending and Speakerphone ON Uploading data to USB connected... -
Page 40: Notification Panel
Software update Media server Opening/Closing the notification or connection request Notification panel updating software notification Update notification Client device (when update of the connected to Media installed market server Notification panel application is notified) Osaifu-Keitai Red: Error locked messages Yellow: Warning messages Making or receiving Problem with sync... -
Page 41: Notification Led
Notification LED Basic operations Notification LED provides information on the Basic hardware key operation FOMA terminal status, incoming/receiving, etc. LED status Status Indication The battery is charging when the remaining battery level is less than 10 %. x Back ・ Go back to the previous screen. Flashing red The battery level is not enough Or close a dialog box, menu, or... -
Page 42: Using The Touch Screen
Operations on the touch screen Using the touch screen ■ Precautions on using touch screen Touch an item such as icon or menu with your finger lightly and release it. ・ Touch screen is designed for being touched ・ Double-tap means tapping twice lightly with fingers. - Page 43 ■ Pinch Selecting items quickly from a Touch the screen with two fingers and list widen (pinch-out) or narrow (pinch-in) the fingers' distance. Some lists have Japanese syllabary and On some screens, pinch-out to zoom in alphabetic index on the right side of the and pinch-in to zoom out.
- Page 44 Marking or unmarking options You can switch on/off of the option settings by marking or unmarking the checkboxes or radio buttons. ・ To switch on/off of the option setting, tap the checkbox or radio button. ■ Checkboxes Marked Unmarked ■ Radio buttons Marked Unmarked...
-
Page 45: Home Screen
Home screen The Home screen is the starting point of the FOMA terminal. You can personalize the Home screen by adding or moving, for example, application shortcuts and widgets, or changing the wallpaper. The Home screen can be extended with two screens for the left and right. a Widget: Status switch b Wallpaper c Shortcuts (applications) -
Page 46: Switching The Home Screen
Adding a shortcut on the Home Switching the Home screen screen Flick the Home screen to left or In "Add to home screen" menu, tap right. [Shortcuts]. ・ The Home screen switches. Select a shortcut you want to add. ❖ Information ・... - Page 47 Home screen Display tips of the Home screen Status switch Display the battery level (%), tips operation. setting buttons for turning on Airplane mode, Bluetooth Infrared Display options for [Send] / function, GPS function, Wi-Fi [Receive] via infrared function, and for switching communication.
-
Page 48: Changing Wallpaper
Adding a folder to the Home Tap entry box of [Folder name] and enter a folder name, and tap screen [Done]. In "Add to home screen" menu, tap ・ To change the folder icon, tap a folder [Folder]. from [Select folder icon]. Select the folder icon you want to Changing wallpaper add. -
Page 49: Searching Information In The Foma Terminal And Web
Moving an icon on the Home Searching information in screen the FOMA terminal and From the Home screen, touch and web pages hold an icon until the FOMA Enter a word in the search box to browse the terminal vibrates. information in the FOMA terminal or on the Keep touching the icon and drag it. -
Page 50: Applications Screen
Search settings Applications screen You can set search engines to use for Quick You can access the applications installed in search box or set search objectives in the the FOMA terminal using the Applications FOMA terminal. screen. From the Home screen, tap then tap [Google Search]. - Page 51 Applications The applications displayed on the Applications screen by default are as follows. Icon Application Description Page Instruction Manual Display the FOMA terminal instruction manual. You can start a function you want to use from the explanation. Melody Call The other party can hear a melody while the phone rings. You can listen to music, and buy to set it.
- Page 52 Use a service to check information on the currently played P.153 music. YouTube Playback videos around the world or upload recorded videos. P.149 spモードメール Send/receive mails using i-mode mail address (@docomo.ne.jp). P.121 (sp-mode mail) Infrared Send and receive infrared data. P.159 Before Using the Handset Continued on next page...
- Page 53 地図アプリ An application which supports your outing using map, (Map Application) navigation, transfer information, etc. provided by docomo map navigation. This application is available for a certain trial period. Google Search Search information in the FOMA terminal and web pages from P.47...
- Page 54 AC adapter. Clock Display clock and set an alarm, etc. P.189 docomo market Access to the docomo market in which you can search P.166 applications and videos. APPNAVI Introduce applications for Android terminals. You can search applications from categories, rankings, etc.
- Page 55 Icon Application Description Page 楽天オークション Search fashion items, etc. listed on Rakuten auction site easily. (Rakuten auction) Campaign Navi View campaign information for Xperia. G ガイド番組表 View ground-based broadcasting, BS digital broadcasting. (Program list) Searching programs by key words or categories is available. BeeTV BeeTV is a dedicated broadcasting station for moble phones.
-
Page 56: Character Entry
・ To add the Applications screen, drag the icon to Sorting applications the rightmost screen. You can sort the applications displayed on Opening the recently used the Applications screen from the "Sorting" menu. applications window On the Applications screen, tap You can view and access recently used applications from this window. -
Page 57: Software Keyboard
■ QWERTY keyboard Default input Select a language for text entry. Japanese characters can be entered in Select to enter language other than Japanese. "Romaji input" mode. Japanese Select to enter Japanese. keyboard On a character entry screen, touch and hold the text box. Tap [Input method] [Chinese Portrait... -
Page 58: Entering Characters On The Qwerty Keyboard
❖ ■ Japanese syllabary keyboard Information Japanese characters can be entered in ・ The QWERTY keyboard is set by default. Also, "Popup on key press", "Auto capitalization", "Word "Kana input" mode using keys arranged suggestion" and "Error correction" are set to on. according to the Japanese syllabary. - Page 59 Icon Function Icon Function Each time you tap this icon, a list of Appears before conversion is fixed. pictograms (only for sp mode mail) Tap to switch conversion methods to " 直変換". one-byte symbols, two-byte symbols and smileys can be switched. In alphanumerics input mode, tap to A list of plug-in applications appears switch upper case and lower case.
- Page 60 Unmark the checkbox of the key Tap [OK]. you want to hide. ❖ Information Tap [OK]. ・ Press t in Step 3 and tap [Reset] [OK] to restore to the default. Changing symbols Selecting an assistant keyboard ・ You can change symbols (12) displayed in When you enter in Hiragana/Kanji input mode (Symbol assistant area) to the ones using the QWERTY keyboard, you can...
- Page 61 ■ Key highlight while typing Entering characters on the 12 Widen frequent using key and highlight key keyboard the key that is predicted for the next entry. Use the 12 key keyboard to enter Japanese characters in "Kana input" mode. The main functions of the touch- keys ・...
- Page 62 Settings of key entry Icon Function Appears before conversion is fixed to ■ Flick input switch conversion methods Flick up/down/left/right to enter ("予測変換", "直変換 "). characters in each column of kana Display the previous character syllabary. (opposite order). Appears after conversion is fixed to return to text before conversion.
-
Page 63: Entering Characters On The Japanese Syllabary Keyboard
b Tap [Language & keyboard] → Entering characters on the [Japanese keyboard]. Japanese syllabary keyboard c Unmark the checkbox of [Flick input]. You can use the software keys arranged according to the Japanese syllabary to enter ■ Toggle entry Japanese characters in "Kana input" mode. Tap the same key continuously to enter the assigned character. -
Page 64: Settings Of Entering Characters
Icon Function Editing text Move the cursor* to the left. While entering characters, touch and hold the Touch and hold to move continuously. text box to display the "Edit text" menu and Or change the range for conversion. edit entered text. Move the cursor* to the right. -
Page 65: Settings Of Japanese Keyboard
Tap [Default input]/[Japanese Popup on key Set to popup the key you have keyboard]/[Chinese keyboard]. press tapped at the time of key tapping. ・ The settings screen for each keyboard appears. Tap an item Auto Set to capitalize automatically capitalization the top letter you enter in displayed on the screen to set. - Page 66 Setting Auto space Word suggestion settings ・ When selecting English word suggestion, The Word suggestion function shows Auto space enters a space next to the predicted conversion candidates when you entered character. However, space is not enter Japanese/English characters. Mark the entered automatically in the mail address or checkbox of Word suggestion checkbox to URL input fields.
- Page 67 From the Home screen, press t Tap [My words Japanese]/[My words English]. and tap [Settings] [Language & keyboard]. Press t, then tap [Add]. Tap [Japanese keyboard] Tap the character input box for [Backup & restore]. "Reading" and fill it out, then tap [次へ...
- Page 68 ❖ Information Using plug-in application "定型 ・ When you tap each category, a list of registered 文 (Fixed phrase)" phrases appears. Tap a phrase to edit/delete. ・ To restore the default phrases, in the category list, You can quote phrases with the plug-in press t, then tap [初期化...
-
Page 69: Calling/Network Services
From the Home screen, tap Making/Receiving calls [Phone]. Enter the emergency number and Making a call tap [Call]. ・ If a wrong number is entered, tap From the Home screen, tap on the right of the phone number field [Phone]. to delete the number. -
Page 70: Making An International Call
For details on WORLD CALL, refer to mobile phone number. Also, make a point to call in a stationary position to prevent the call from being DOCOMO International Services website. dropped. Do not power off the FOMA terminal for From the Home screen, tap at least 10 minutes after the emergency call just in [Phone]. -
Page 71: Receiving A Call
Receiving a call Using Stereo Headset with Microphone While receiving a call, touch (left) and drag it to (right). You can make or answer a call with Stereo Headset with Microphone (Sample) ❖ Information connecting to the FOMA terminal. ・ If you are using regular headphones without a microphone, you need to speak to the microphone of the FOMA terminal. -
Page 72: Call Options
❖ ■ Receiving a call Information ・ You can also press p to mute the ringtone for an While receiving a call, press the incoming call. switch of Stereo Headset with ・ To change ringtone volume other than when Microphone. receiving, press up or down of m on the Home screen to adjust the ringtone volume. -
Page 73: Call Log
・ Tap [Create new contact] to display a the status bar. screen for selection of the saving locations appears. You can select Drag the status bar downwards. Phone contact or docomo account as Tap [Missed call]. the saving location. Edit the contact details and tap [Done]. -
Page 74: Contacts
❖ Information Contacts list screen ・ You can delete only one contact by touching and holding a contact to delete on the call log list, then On the contacts list screen, you can view tapping [Delete from call log]. details of your contacts. You can add a contact picture, and display updating status information of Social Networking Service Contacts... -
Page 75: Managing Contacts
[New Make a call to saved phone number. contact]. "Info" filter (P.77) screen of the contact Tap [docomo]/[Phone contact]. appears. ・ When you set Google account etc., it Create and send message (SMS). appears as a saving location. -
Page 76: Linking Contacts
Tap to display "Info" filter on the contacts list screen to set screen. display items, saving location (docomo, Tap [Edit]. phone contact) and whether to show or hide ・ By tapping (Add field) on the for each account. -
Page 77: Deleting Contacts
Deleting contacts Enter the new information or make the changes you want. On the contacts list screen (P.72), ・ By tapping (Add field) on the press t, then tap [Delete editing screen, you can add contacts]. information to enter. Mark the contacts you want to When you are done, tap [Done]. - Page 78 Select sending method and follow Setting a photo to a contact the onscreen instructions. On the contacts list screen (P.72), ❖ Information tap the contact. ・ To use Bluetooth function, tap [Turn on] to activate Tap [Edit]. Bluetooth function, search destination Bluetooth devices, and send data.
- Page 79 ■ Setting to show or hide updating Displaying contacts status information information for the Social On the contacts list screen (P.72), Networking Service (SNS) press t, and tap [Settings] [Show status updates]. If you have an account set for a Social Networking Service (SNS) (P.107), you can ・...
- Page 80 [Memory card]. You can export/import contacts from/to microSD card or UIM. This is useful, for Tap [docomo]/[Phone contact]. example, when you want to transfer the ・ When you set Google account etc., it contact information to another phone. appears as an import destination.
- Page 81 FOMA terminal by using microSD card. You can also copy the Contacts data ❖ Information registered in Google account to docomo ・ When you copy a contact to the UIM, only the account. contact name and the first number is saved. This is due to limited memory on a UIM.
- Page 82 ピー (Copy to account)" tab On the " エクスポート (Export)" tab screen, tap a Google account you screen, tap [開始 (Start)]. want to copy. ・ The Contacts data saved in docomo account is saved onto the microSD Tap [上書き (Overwrite)]/ card. [追加 (Add)].
-
Page 83: Network Services
Available Network Services Voice Mail Service You can use the following DOCOMO network The Voice Mail Service takes messages for services on the FOMA terminal. For details on you, as long as it answers a call with the... - Page 84 Basic flow of the Voice Mail Setting Voice Mail Service Service From the Home screen, press t and tap [Settings]. Activate the Voice Mail Service. Tap [Call settings] [Network ▼ service setting]. Your FOMA terminal receives a call. Tap [Voicemail]. ▼...
-
Page 85: Call Waiting
Playing the voice message Check messages* Check if a new message is stored. After checking, the When the SMS notification "NTT completion message appears. DoCoMo VM:XX" appears, tap Notification Set whether to alert you of a [New message] from the settings new message with the tone or vibration. -
Page 86: Setting Call Waiting
Setting Call Waiting Switch to the first call. ・ To end the later call, tap [End call]. From the Home screen, press t The later call is terminated and and tap [Settings]. switched to the first call. ・ To put the later call on hold, tap Tap [Call settings] [Network [Switch to this call]. -
Page 87: Call Forwarding Service
Putting the current call on hold and Call Forwarding Service making a call to another party The Call Forwarding Service forwards a voice During a call, tap [Contacts]/ call to a preset forwarding number when you [Dialpad]. are in a location without the radio wave, the FOMA terminal is powered off, or you do not Enter the other party's phone answer the call within the preset ring time. - Page 88 Call charge for the Call Forwarding Tap [Call Forwarding]. ・ Select items you want to use. Service Activate Call Enter the forwarding number and Caller Forwarding ring time, then tap [OK] to activate the Call Forwarding Service. The caller is charged for a call fee. Change Mark the checkbox and enter the forwarding...
-
Page 89: Caller Id Notification
Setting on/off of the Call Tap [Call settings] [Network service setting]. Forwarding guidance Tap [Caller ID Notification]. From the Home screen, tap ・ Select items you want to use. [Phone]. Activate Caller Enter the Network security code, [1] [4] [2] [9] Tap [Call]. -
Page 90: Viewing The Setting Menu
Viewing the setting menu Wireless & networks From the Home screen, press The FOMA terminal automatically switches between 2G and 3G networks depending on availability. Tap [Settings]. Airplane mode P.90 ■ Setting menu Wi-Fi/Wi-Fi settings P.91 Sony Ericsson Connect the FOMA Bluetooth/Bluetooth settings P.161 terminal to another device... - Page 91 [OK]. Tap [APN] and enter the access sp-mode point name and tap [OK]. sp-mode is ISP for NTT DOCOMO Tap and enter all other information smartphone. In addition to accessing required by your network operator. Internet, you can use the mail service using Press t, then tap [Save].
-
Page 92: Airplane Mode
・ Subscription to packet flat-rate service is required mopera U for using "mopera U ( スマートフォン定額) (mopera U (Smartphone flat-rate))". For details on mopera U is ISP of NTT DOCOMO's Internet mopera U (Smartphone flat-rate), refer to NTT connection. If you have subscribed to DOCOMO website. - Page 93 ■ Reception interference caused by About Wi-Fi Bluetooth devices Bluetooth devices and wireless LAN Using the Wi-Fi function, you can connect to devices use the same frequency band an access point for your home, company (2.4GHz). If you use Bluetooth devices network or public wireless LAN services to near a wireless LAN device, reception use mail and Internet.
- Page 94 ■ Wi-Fi network status icons on status Connecting to a Wi-Fi network The following icons appear according to From the Settings screen (P.88), the Wi-Fi network connection status. tap [Wireless & networks] [Wi-Fi settings]. Appears when connected to Wi-Fi network. ・...
- Page 95 Setting the Wi-Fi network Advanced Wi-Fi settings notification to ON Before you add a Wi-Fi network manually, you Confirm that Wi-Fi is turned on, need to turn on the Wi-Fi setting. (P.91) and then on the Settings screen (P.88), tap [Wireless & networks] Adding a Wi-Fi network manually [Wi-Fi settings].
- Page 96 Viewing detailed information on a Tap [Wi-Fi sleep policy]. connected Wi-Fi network Tap any of [When screen turns off]/ [Never when plugged in]/[Never]. From the Settings screen (P.88), tap [Wireless & networks] [Wi-Fi Using a static IP address settings]. Tap the Wi-Fi network that you are You can set up the FOMA terminal to connect currently connected to.
- Page 97 Press t, then tap [Save]. Connecting to a VPN (Virtual ・ A new VPN is added in the list on VPN Private Network) settings screen. ❖ Virtual Private Network (VPN) is a technology Information to connect to the information in a protected ・...
-
Page 98: Call Settings
Disconnecting a VPN Sound Open the Notification panel, tap Set ringtones, operation sound, vibrator, etc. the VPN connecting notification. ・ Tap a connecting VPN to disconnect. Silent mode P.96 Vibrate P.97 Volume P.97 Call settings Phone ringtone P.97 Notification ringtone P.98 You can use the network services and search Audible touch tones P.98 for available networks. -
Page 99: Setting The Vibrator
❖ ❖ Information Information ・ Alternatively, from the Settings screen (P.88), you ・ By default, Notification volume is adjusted to the can tap [Sound] and mark [Silent mode] to set same as Ringtone volume. To adjust Ringtone and silent mode. Notification separately, unmark [Use incoming call ・... -
Page 100: Display
❖ Information Display ・ To set a ringtone other than the ones stored by default, you can also set from "Music library". Set brightness, orientation of the screen, etc. Selecting a notification ringtone Mobile BRAVIA To view photos or movies Engine colorfully and beautifully, set From the Settings screen (P.88),... -
Page 101: Location & Security
Changing orientation of the Adjusting the idle time before screen the screen turns off You can set the screen orientation to change From the Settings screen (P.88), automatically between landscape and tap [Display] [Screen timeout]. portrait view when you turn the FOMA Select a time option before the terminal sideways/paleways. - Page 102 Make use of the handed at the subscription in the FOMA terminal using an appropriate security docomo Shop. If you did not subscribe code according to the purpose. other than docomo Shop, you must bring your official identification (such as...
-
Page 103: Network Security Code
PIN code on the former docomo Network Services at reception of terminal. If you did not change the setting, your request in docomo Shop or at docomo the code is "0000". Information Center. It can be set any number ・... -
Page 104: Screen Lock
Entering the PIN code when Screen lock powered on You can secure your data by requiring a On the PIN code entry screen, screen unlock pattern every time the FOMA enter the PIN code of the UIM. terminal is turned on or every time it is activated from sleep mode. -
Page 105: Locking The Screen
・ When you tap [Password], follow the Unlock the key lock, then enter the screen unlock pattern. onscreen instructions to enter 4 or ・ Enter preset screen unlock pattern, more characters including alphabets. PIN or password. Changing the screen unlock ❖... -
Page 106: Applications
■ If you set "PIN"/"Password" Permitting downloading Please contact a docomo Shop. unknown source's application Canceling screen lock Before you can download unknown source's You can cancel screen lock pattern after you applications, set the FOMA terminal to enable set. -
Page 107: Managing Your Applications
❖ Shutting down an application Information ・ Alternatively, you can tap from the home If a pop-up window that indicates the screen [Downloads] to check applications. application does not reply appears, you can ・ Applications downloaded from Android Market do force quit the application. -
Page 108: Accounts & Sync
Tap [Clear data]. Keeping the screen ON while Tap [OK]. charging From the Settings screen (P.88), Deleting an installed application tap [Applications] ・ Before deleting installed application, back [Development]. up contents related to the application that Mark [Stay awake] checkbox. you want to save including data saved in the application. -
Page 109: Setting Google Account
Setting Google account Sync Gmail Synchronize Mail logs used in Gmail account with Gmail on the You can create a Google account on your FOMA terminal. FOMA terminal and use Google services Sync Calendar Synchronize calendar information such as Gmail, Google Talk, Google such as schedule, etc., stored in Calendar, Android Market, etc. - Page 110 ■ docomo account "Accounts & sync" screen in the setting menu. Tap ・ docomo account helps you to use a Facebook icon, (Sony Ericsson Facebook for "Phonebook backup" service (P.51) mobile), and tap the following items to synchronize provided by NTT DOCOMO.
-
Page 111: Data Synchronization
Deleting a service account Tap [Auto-sync] [OK]. ・ [Auto-sync] checkbox is marked. From the Settings screen (P.88), Tap an online service whose tap [Accounts & sync] and select a account is set. service account you want to delete. Tap to mark an item for automatic synchronization. -
Page 112: Privacy
Tap [Cancel sync]. Tap [Erase everything]. ・ By tapping [Erase everything], the FOMA terminal restarts automatically. Privacy ❖ Note ・ While restarting or resetting the FOMA terminal, Restore the FOMA terminal to default. wait for a while. Note that, if you remove the battery pack while restarting or resetting, it may cause Factory data Reset the FOMA terminal. -
Page 113: Language & Keyboard
Increasing the free volume of the Managing memory FOMA terminal and a microSD card Formatting a microSD card If the FOMA terminal has a small memory, you can do the following to increase the From the Settings screen (P.88), available memory: tap [Storage] [Unmount SD ・... -
Page 114: Voice Input & Output
・ If you choose the wrong language and cannot read Pico TTS Make settings for installed voice the menu texts, go to synthesis engine. http://www.sonyericsson.co.jp/so-02c/faq.html for help. Accessibility Voice input & output You can set call end operation and user... -
Page 115: Date & Time
❖ Information Date & time ・ Correction of the time differences may not be performed correctly depending on the overseas You can change the date and time in the telecommunication carrier. In that case, set time zone manually (P.113). FOMA terminal. To set date, time zone and time manually, unmark "Automatic"... -
Page 116: About Phone
Setting the time format About phone From the Settings screen (P.88), You can check your own phone number, tap [Date & time] and mark/unmark signal level, legal information, etc. [Use 24-hour format] checkbox. ・ Mark the checkbox to shift to 24-hour Software update P.210 format, and unmark to shift to 12-hour... -
Page 117: Email
・ If you set an Exchange ActiveSync Email account, name entry field does not appear. First, finish the account You can create an email account provided by setting and set the name from mopera U mail, a POP3 or IMAP compatible "Changing the settings for an email email account provided by general service account"... - Page 118 ・ If you enter an alphabet or a name, Tap [Send]. email address options appear from ❖ Information the contacts beginning with the ・ You can save the message as a draft by tapping entered character. [Save draft]. Also, when you move to the other ・...
- Page 119 ・ If you set "Inbox check frequency" in Account Portrait and in portrait view or settings (P.118) to an item other than "Never", and if landscape landscape view to cut the Inbox to you are using the pay-as-you-go data show the selected mail body. communication, you may be charged every time you check your email.
-
Page 120: Replying To Or Forwarding Emails
Replying to or forwarding Deleting an email message emails From the Home screen, tap then tap [Email]. From the Home screen, tap ・ When an account list appears, tap then tap [Email]. and select an email account whose ・ When an account list appears, tap email you want to delete. - Page 121 Press t, then tap [Account Adding an extra email account settings]. ・ You can set the following options. From the Home screen, tap then tap [Email]. Account Change account name. ・ When a screen other than account list, name press t and tap [Accounts]. Your name Change your name (sender name).
- Page 122 Tap [Done]. Using mopera U mail ・ Inbox for set email account appears. mopera U users (for the setting, see "Setting ❖ Information mopera U" (P.90)) can use mopera U Mail. ・ If you need to make the settings manually, contact In mopera U Mail, POP mail and IMAP mail your email service provider or system administrator are available.
-
Page 123: Sp-Mode Mail
・ If you do not select it, go to Step 8. On the security selection screen, You can send/receive mails using i-mode mark the security radio button to mail address (@docomo.ne.jp). be used. You can use pictogram and Deco-mail. Mails can be received automatically. For details on Confirm the entry, then tap [Next]. -
Page 124: Using Gmail
Using Gmail Message (SMS) If you have a Google account, you can send/ You can send and receive text messages up receive emails by using Gmail on your FOMA to 70 two-byte characters (160 one-byte terminal. If you have no Google account, see characters) to/from other terminal. - Page 125 ・ You can also send/receive text messages to/from From the Home screen, tap customers of overseas network operators other then tap [Messaging]. than DOCOMO. See "Mobile Phone User's Guide [International Services]" or the DOCOMO Select a thread whose phone International Services website.
-
Page 126: Deleting A Message
Adjusting messages (SMS) Deleting a message settings From the Home screen, tap then tap [Messaging]. From the Home screen, tap then tap [Messaging]. Tap a thread to select. Press t, then tap [Settings]. Touch and hold a message you ・ You can set the following options. want to delete. -
Page 127: Google Talk (Chat)
Google Talk (Chat) Using Browser You can use Google Talk instant messaging Opening Browser to chat with friends. To use Google Talk, you need to make settings of your Google From the Home screen, tap account. For details, see "Setting Google [Browser]. -
Page 128: Exiting Browser
Going back to the previous page Closing a browser window Press x. On the Browser screen, press t, then tap [Windows]. on the browser window Exiting Browser you want to close. Press y. Zooming in/out a web page ・ All open windows are closed and Browser ends. - Page 129 Searching for text within a web Take your finger away from the screen and tap the selected text. page ・ After copying text is completed, a While viewing a web page, press message "Text copied to clipboard." t, then tap [More] [Find on appears.
-
Page 130: Managing Bookmarks And History
Setting the home page ・ Browser recognizes some phone numbers that allow you to call the On the Browser screen, press phone number. Tap the phone number t, tap [More] [Settings]. to call. ・ When you download a file by "Save Tap [Set home page], enter URL link"... - Page 131 ■ Thumbnail view Opening a bookmark Tap [ ★ Add] on the upper left of the On the Browser screen, press screen Edit the name of bookmark, if t, then tap [Bookmarks]. required, and tap [OK]. Tap the bookmark you want to ■...
- Page 132 Clearing history On the Browser screen, press t, then tap [Bookmarks] [History] tab. Press t, then tap [Clear history]. ・ When you delete the history, a list in "Most visited" tab is also deleted. ❖ Information ・ To delete temporary internet file such as cache, on the Browser screen, press t and tap [More] [Settings] and then set each item from "Privacy settings"...
-
Page 133: Using The Camera
■About the Copyright and Portrait rights Using the camera Objects, such as movies, still images, and sounds, recorded using the FOMA terminal are prohibited You can take a photo or record a video either by the copyright law from use without consent of the by tapping the screen or by using the camera copyright holders, unless intended for personal use or any other purpose permitted by law. -
Page 134: Taking Photos
g View or play recently taken photos or recorded Shooting screen and key videos. ・ You can operate the followings by tapping icon operations displayed at the bottom of the screen while ■ Still image shooting screen viewing. : Share : Register (still camera) : Crop (video camera) P.140 : Delete... -
Page 135: Using Zoom
Tap the screen. Using zoom ・ The photo is taken as soon as focus is Press m. set. The photo is automatically saved in the microSD card. ❖ Information ❖ Information ・ When "Resolution" (P.136) is set to "8M" or "6M", zoom is not available. - Page 136 Press k down until it stops. Setting face detection ・ The photo is automatically saved in Press and hold k for over a the microSD card. second. ・ If the still image shooting screen does Smile detection not appear, tap Smile detection allows you to capture a face On the shooting screen, press just as it smiles.
- Page 137 Taking a photo using smile Changing the capturing detection settings With Smile detection set, point the Press and hold k for over a camera at your subject. second. ・ Each detected face is framed (up to 5 ・ If the still image shooting screen does faces).
-
Page 138: Still Camera Settings
Still camera settings Item Icon Description Resolution 2MP 4:3 2 megapixel image size Item Icon Description with 4:3 aspect ratio. Capturing Select the shooting method. Suitable for viewing on mode normal size screen. Normal A standard shooting mode 2 megapixel image size 16:9 with 16:9 aspect ratio. - Page 139 Item Icon Description Item Icon Description Flash Fill flash Always turn on the flash Scenes Night Shoot a crisp and clear regardless of the scene night scene. To take brightness. advantage of night scene, shooting without The flash does not turn the flash is recommended.
- Page 140 Item Icon Description Item Icon Description Scenes Use for shooting text or P.133 Document graphics. It allows to Exposure capture a clear, bright, value and easy to read text. White The white balance setting adjusts the Focus Set focus controls. Use when balance color balance according to the light mode...
-
Page 141: Recording Videos
Item Icon Description Item Icon Description Metering Spot Measure photometry only Geotagging Shooting location cannot at the center of the be viewed on a map. shooting screen to adjust Shutter Select a sound which is heard when the exposure. sound taking a photo. - Page 142 Using the camera key (k) to Cropping movie record a video Tap the recently recorded history displayed Press and hold k for over a at the right or bottom of the shooting screen second. to display movie, and then tap to crop the ・...
- Page 143 Video recording settings Changing the recording settings Item Icon Description Scenes Use Scenes to quickly set up the Press and hold k for over a camera for various scene conditions. second. Adjust color shade or ・ If the movie recording screen does brightness automatically.
- Page 144 Item Icon Description Item Icon Description Video size HD 720p HD format with 16:9 Photo Use the photo light to shoot when aspect ratio. 1280× 720 light lighting conditions are poor or when pixels there is a backlight. Full Full Wide VGA format The photo light turns on.
- Page 145 Item Icon Description Item Icon Description Metering Measure the brightness on the Self-timer Use it to record group videos where shooting screen to determine a well- everyone can be in the video. Because balanced exposure automatically. the camera can be fixed without holding with hands, you can avoid Center Put emphasis at the...
-
Page 146: Playing Multimedia Content
❖ Note Copyright protected content ・ Some settings cannot be used in combination with one another. Avoid copyright infringements when you handle photos taken with the FOMA terminal, e.g. copy/edit. In addition, avoid rights Playing multimedia content infringements of portraits by using these photos without consent, altering them or by You can play music files on "Music"... -
Page 147: Viewing Photos/Videos With Gallery
❖ Information Using Stereo Headset with ・ When you listen to Music player/FM radio with Microphone Stereo Headset with Microphone connecting to the FOMA terminal, you can switch on/off by pressing Connect the plug of Stereo the switch of Stereo Headset with Microphone. Headset with Microphone However, operation may differ depending on the conditions of use. - Page 148 From the Home screen, tap ■ Album list screen [Gallery]. ・ The following album list screen appears by default. Camera Photos and videos taken with the FOMA terminal ・ It does not appear when no photo nor video is taken. picture Album of sample pictures video...
-
Page 149: Viewing Photos
❖ ・ Tap [Select All]/[Deselect All] at the Information top of the screen to select/cancel the ・ For shared files, file size and the file type are not particularly limited, but may be limited by the files in the album at a time. application to transfer. -
Page 150: Playing A Video
e [Menu] key: Operate the viewing file by tapping ■ Video viewing screen of Gallery "Share", "Delete", "More" at the bottom of the screen. ❖ Information ・ From the photo viewing screen for the Facebook album, you can post comments or " いいね (Like)" onto Facebook. -
Page 151: Playing Video With Youtube
Playing YouTube movies in high Playing video with YouTube quality YouTube is a free online video streaming While playing a video, double-tap service. You can play, search for and upload the screen to switch to the videos. landscape screen. ・ A packet communication charge is applied when downloading or uploading video Tap the screen to display the play content using 3G network. -
Page 152: Connecting The Foma Terminal To Tv To Watch Photos And Videos
・ Removing an HDMI cable severs connection, Connecting the FOMA however, TV may remain to HDMI input mode. Follow the instructions on the TV to switch to digital terminal to TV to watch terrestrial television mode, etc. photos and videos ・... - Page 153 ■ Music player screen ・ On the track list of each category, select "Send several"/"Delete several" from the menu. ❖ Information ・ You can return to the Home screen to perform another operation while listening to the Music player in the background. To return to the playback screen of the Music player, from the Home screen, [Music], or drag down the status bar and tap the current track name in the ongoing item.
- Page 154 Tap [Send]. Playlist Select sending method and send. In Music player, playlists named "Newly ❖ added", "Most played" and "Never played", Information are automatically created. You can also ・ For shared (to be sent) files, file size and the file create new playlists with your desired tracks.
-
Page 155: Trackid
Tap [Playlists]. Searching for the track ・ The following playlists appear by information default. Start TrackID, then hold the FOMA Newly added Display the list of tracks newly terminal towards the music source. added. Most played Display the list of frequently played Tap [Record]. -
Page 156: Handling A File
Handling a file Transferring and moving data Files in the FOMA terminal should be operated on the file handling application. For You can transfer and move images, music example, to delete files saved in the microSD data and some other data. Sharing some card, use the deletion function of the data may not be permitted due to copyright. - Page 157 Tap [Skip]. ・ If you install PC Companion, you can use the following applications on a PC for managing media ・ The FOMA terminal is connected to a files, creating backup files, etc. when connecting PC in "Media transfer mode (MTP)", the FOMA terminal and the PC.
- Page 158 ■ Mass storage mode (MSC) Tap [Connect phone memory card]. ・ "Phone memory card connected" Drag the status bar downwards. appears in the status bar. ・ When "Connect your phone" is displayed, go to Step 4. When "Phone Drag and drop data that you have selected between the FOMA memory card connected"...
- Page 159 ・ From the Home screen of the FOMA terminal, press t and tap [Settings], [Sony Ericsson] Make sure that "SO-02C" is [Connectivity] to display "Host name" (PC name) displayed as a portable device on in the "Trusted devices for wireless media transfer"...
- Page 160 On the Installer screen of PC, Using Media Go select "English (U.K.)" or "English (U.S.)" click "Install". The Media Go computer application helps ・ After this step, follow the instructions you transfer and manage media content in on the screen. the FOMA terminal and computer.
-
Page 161: Using Infrared Communication
Using Infrared 20 cm or less communication You can send/receive data of contacts, Within ±15 photos or moving pictures you take to/from degrees from devices supporting infrared communication the center function such as FOMA terminals. ・ The communication range for infrared communication is 20 cm or less. - Page 162 ・ is displayed in the status bar during infrared All contacts Enter authentication communication. passcode to send. ・ Capacity of up to 2MB of data of contacts, Myself, Picture Select an image from an photos, moving pictures and music can be sent album in the Gallery and and received.
-
Page 163: Using Bluetooth Function
Receiving data via infrared Using Bluetooth function communication The Bluetooth function creates a wireless From the Home screen, tap connection to other Bluetooth devices, for then tap [Infrared] [Receive]/ example, handsfree devices. A range within [Receive several]. 10 meters, with no solid objects in between, ・... - Page 164 ・ Keep the Bluetooth device over 10 Entering the FOMA terminal's meters away from a wireless LAN name device. ・ Within 10 meters, turn off either the You can name the FOMA terminal. The name Bluetooth device or the wireless LAN appears on Bluetooth devices when you use device.
- Page 165 Tap a Bluetooth device name to Once you have made pair setting for your phone and a Bluetooth device, the setting is pair with the FOMA terminal. saved. When making pair setting for the If necessary, enter the passkey FOMA terminal and a Bluetooth device, you (PIN).
-
Page 166: Bluetooth Device
Touch and hold a Bluetooth device Touch and hold the currently name that you are going to connected Bluetooth device name. ・ The device with "Connected to phone connect. ・ Touch and hold a device with "Pair audio"/"Connected to media audio"/ with this device"... -
Page 167: Sharing Files With Dlna Devices Via Media Server
❖ Information ・ When the FOMA terminal is only set to pair with Bluetooth device (not connected), "Unpair" appears. Sharing files with DLNA devices via Media server With Media server, you can share media files with other client (DLNA: Digital Living Network Alliance) devices using Wi-Fi function. -
Page 168: Using Android Market
・ NTT DOCOMO is not liable for malfunctions, if any, which you can download and install on the caused by the application you installed. In such FOMA terminal. -
Page 169: Timescape Tm
SMS, Facebook, Twitter or mixi updates, etc. ・ NTT DOCOMO is not liable for any disadvantage caused by introduced websites on docomo market in chronological order. You can see a tile or the acquired information from the website. - Page 170 ・ If you do not have a mixi account, you can create a Timescape screen new account at http://mixi.jp. ・ You can check the update of set Facebook, Twitter or mixi by Timescape. Setting up Timescape ・ The first time you start Timescape, a setup wizard will guide you the necessary steps to set up account.
- Page 171 Posting to Facebook, Twitter, mixi Filter icons from Timescape Filter Icon Displayed tile In the Timescape screen, press All tiles t and tap [Update status]. Received SMS Mark the service you want to post Missed calls and tap [Continue]. Updates from your Twitter contacts Enter the text and tap [Post].
- Page 172 Viewing a tile information The infinite button in On the Timescape screen, tap a Timescape tile. When you tap a tile, (infinite button) may appear in the upper right corner. By tapping Calling back from Timescape when , you can view the communication log by you have a missed call registered information in the contacts or tile On the Timescape screen, tap the...
-
Page 173: About Location Services
DOCOMO is not liable for any damage About location services caused by abnormality of the system. ・ Note that DOCOMO shall have no liabilities There are two ways to find your location, for any purely economic loss including using Mobile networks with Wi-Fi (Wireless those due to missing a chance to check the network) or GPS. - Page 174 Internet, and see "Wireless U.S. Department of Defense. & networks" (P.88). ・ NTT DOCOMO is not liable for navigation services ・ Some wireless communications products or for the accuracy of location services. (mobile phone, data detectors and some others) block satellite signals and also causes instability of signal reception.
- Page 175 Enabling GPS function Using Google Map From the Home screen, press t The Google Maps application lets you view and tap [Settings]. your current location, find other locations and calculate routes. When you start the Google Tap [Location & security]. Maps application, your approximate location Mark [Use GPS satellites] is shown using information from nearby...
-
Page 176: Using Street View
Detecting the current location on a Fill out the search box. ・ You can enter addresses, city names, business types and institution names On the map screen, tap (for example, London and art ・ The blinking blue arrow shows the museum). - Page 177 ・ With (Places) on the map, select a category Wikipedia appears. such as "Restaurants", "Cafe", etc. to search and to display a Wikipedia article show it on the map. You can add the search related to the location. categories. Transit Lines Show route information. Zooming in or out on a map Receiving guides to zoom in or out on a...
-
Page 178: Joining Latitude
If your search type is Transit, tap a Confirming your friend's route in the list. current location with Google ・ A route is displayed if you search in Latitude car or walk option. Tap to display a route on the map. Google Latitude enables you to check where ❖... -
Page 179: Applications ・ 1Seg
Opening Latitude There are 2 types of information displayed in the data broadcasting area: "Data If you join Latitude, you can confirm where a broadcasting" and "Data broadcasting site". friend is, and check update with opening the "Data broadcasting" is displayed using screen. - Page 180 ❖ ・ Tunnel, underground or far back from a Information ・ Please note the followings when you operate 1Seg building where airwaves are weak or do not antenna. reach - When changing the direction of the 1Seg antenna, hold a part close to the root of the 1Seg 1Seg antenna antenna and check the direction.
- Page 181 ■ 1Seg screen Watching 1Seg program From the Home screen, tap and then tap [1Seg]. Tap [Activate 1Seg]. ・ 1Seg watching screen appears. Tap 1Seg watching screen (full screen) the image to temporarily view program information such as channel, broadcast station name, program name, multi-channel formation (multiple services), etc.
- Page 182 d Switch screen view: Switch screen between full ・ To exit 1Seg, press x on the 1Seg watching screen data broadcasting and 1Seg program with screen. data broadcasting (only for vertical view). e Advanced settings Setting 1Seg f DOWN selection/UP selection: Select previous or next channel you are currently watching.
-
Page 183: Using Tvlink
Saving TVlinks Reset Initialize the confirmation screen confirmation display. On the 1Seg watching screen (data status broadcasting) (P.179), select TVlink Back to data BC Display data broadcasting. to store. Tune service You can select a sub-channel ・ After this step, follow the onscreen when several programs instructions to operate. - Page 184 Tap [Channel list] to select a list Delete Delete several stored TVlinks. from registered channel lists. selected Mark TVlink to delete and press t, tap [Delete data?] [YES]. ・ The broadcasting service area is changed. ❖ Information ■ Using menus on the channel list ・...
-
Page 185: Fm Radio
Tap a remote number you want to FM radio save to. Press x, then tap [Yes]. You can listen to FM broadcast with the FOMA terminal. Tuning can be made automatically or manually, and you can Making User setting register your favorite channels to Favorites. To use FM radio, use a handsfree device, You can set, initialize, and reset watching such as Stereo Headset with Microphone... -
Page 186: Osaifu-Keitai
Press t, then tap [Search for c Move downward to select next favorite. d Channel assigned to favorite channels]. e On/Off of FM radio ・ The search ends when radio waves f Channel point displayed in a good radio wave are received. - Page 187 ・ If the data in the IC card is lost, modified or mark damaged by any means related to Osaifu- Keitai compatible service such as malfunction or model change, DOCOMO ・ When holding mark over an IC card assumes no responsibility for the loss of reader, make sure not to hit the FOMA data.
- Page 188 ・ Slowly move the FOMA terminal to hold Locking Osaifu-Keitai function mark over the IC card reader. ・ If mark is not recognized even when Use "おサイフケータイ ロック設定 (Osaifu- holding over the IC card reader, try slightly Keitai lock setting)" to restrict the use of picking the FOMA terminal up off the reader, Osaifu-Keitai function and related services.
- Page 189 (Mobile Phone User's Guide [sp-mode holding Osaifu-Keitai with credit information <Smartphone>]) (in Japanese only)" or set or the iD-compatible card over the IC DOCOMO Market. card reader in stores. Because up to 2 types ❖ Information of credit information can be registered in ・...
-
Page 190: Calendar
・ While using " おサイフケータイ ロック設定 Setting the calendar view (Osaifu-Keitai lock settings)" , you cannot obtain ToruCa with an IC card reader. From the Home screen, tap ・ If you set 重複チェック (Duplication check) to then tap [Calendar]. "ON", obtaining the same ToruCa redundantly is not available. -
Page 191: Clock/Alarm
Tap [Done]. Tap [Snooze all]/[Dismiss all]. ・ If you have any schedules on hold, they appear on the same screen. Displaying a calendar schedule ・ If you tap [Snooze all], all the From the Home screen, tap calendars can be put on snooze 5 then tap [Calendar]. -
Page 192: Setting The Alarm
From the Home screen, tap Setting the alarm Tap [Clock]. From the Home screen, tap The Clock screen appears. then tap [Alarms]. ・ The alarm list screen appears. ・ Alternatively, tap on the clock screen to display the alarm clock list. Tap [Add alarm]. -
Page 193: Officesuite
Turning the alarm on/off Deleting the alarm On the alarms list screen, tap On the alarms list screen, tap an ・ If you set the alarm on, green line alarm to delete. under lights on and appears in Tap [Delete]. the status bar. -
Page 194: Other Applications
Media Discovery Other applications Use Media Discovery to display lists of The following applications are preinstalled in videos or music tracks shared on Facebook. the FOMA terminal to use the various You can also view a list of videos and tracks services on the Web. - Page 195 mora touch mora touch is an application which allows you to access music downloading service for Android terminal. To use the application, from the Home screen, tap and then tap [mora touch] to connect the dedicated site. You can operate after creating a new account or using your existing account.
-
Page 196: Overseas Use
(WORLD WING) countries/area and network operator, refer to "Mobile Phone User's Guide [International With the international roaming (WORLD Services]" or DOCOMO International Services WING), you can use the FOMA terminal Website. without changing phone number or mail address in the service area of the overseas Available Services network operator affiliated with DOCOMO. -
Page 197: Before Using
Advance preparation Before using Network service settings Before leaving Japan If you subscribe to network services, you can use network services such as Voice Mail To use the FOMA terminal overseas, check Service, Call Forwarding Service, Caller ID the following in Japan. Notification Service, etc., even overseas. - Page 198 To use this service, subscription of packet flat-rate service is required. For details, refer to "Mobile Phone User's Guide [International Services]" or DOCOMO International Services Website. Display In the status bar, the type of your operator's network are displayed.
-
Page 199: After Returning To Japan
About inquiries Making setting for international ・ For loss or theft of the FOMA terminal or UIM, immediately contact DOCOMO from When you start the international roaming or the spot to take the necessary steps for move out of your operator's network, you suspending the use. -
Page 200: Making/Receiving Calls In The Country You Stay
From "Available networks", tap a Activating data roaming network to use. From the Home screen, press t ・ To display available networks, tap and tap [Settings]. [Search networks]. Tap [Wireless & networks] ❖ Information [Mobile networks]. ・ If you set a network manually, the FOMA terminal is not reconnected to another network automatically Mark [Data roaming] checkbox. -
Page 201: You Stay
Making a call to outside country Making a call within the country you stay (including Japan) you stay You can make a call from overseas using the You can make a call by entering the phone international roaming service. number of the other party's land-line phone or ・... - Page 202 ・ To have the other party make a call from Receiving a call in the country the outside Japan to the FOMA terminal you stay in the country you stay You have to receive a call through Japan You can receive a call using the international no matter where you are;...
-
Page 203: Optional And Related Devices
"Repairs" the last page of For details, please contact a sales outlet such this manual (in Japanese only) or as docomo Shop. DOCOMO-specified repair office. For details on optional devices, see the user's manual of each device. - Page 204 ・ If you execute calls, communications ・ The operating time of the battery pack P.30 or other function operations while varies depending on the operating charging, the FOMA terminal may environment and the secular become hot and the battery status icon degradation of the battery pack.
-
Page 205: Phone Call
・ Due to the crossing of radio waves, at The clock is not on time. the crowded public places, calls/mails ・ The clock time may become wrong P.113 are crossed and the connection status while turning on the power for a long may not be good. - Page 206 P.143 operator are available, referring to "Mobile Phone User's Guide ■ 1Seg [International Services]" or DOCOMO International Services website. 1Seg watching is unavailable. ・ Try to change the network settings or ・ Are you out of terrestrial digital TV overseas network operator settings.
-
Page 207: Bluetooth Function
■ Bluetooth function No caller ID is notified/A notified caller ID is different from that of the caller/Functions for FOMA terminal cannot be connected to a using contents saved in phonebook or those Bluetooth communication device/A Bluetooth using Caller ID notification do not operate. communication device cannot be found from ・... -
Page 208: Warranty And After Sales Services
Error messages Warranty and After Sales Services No service ・ The FOMA terminal is out of service area, or Warranty the received signal is too weak. Move to a location where radio signal can be reached. ・ Make sure that the warranty is received with ・... -
Page 209: Foma Terminal
(damage of liquid crystal, connector, If repair is required resultingly etc) will only be repaired at the owner's Bring the FOMA terminal to the DOCOMO- expense, even if the warranty period is specified repair office. However, it must be still effective. - Page 210 ■ Note that repair may be refused in ■ Parts stock period the following cases: The functional parts necessary to repair ・ When some water problem is the FOMA terminal will be basically acknowledged by the repair office (e.g. available for a minimum of six years after water leak seal is reacted).
- Page 211 FOMA terminal may be changed or lost when you change the model or have repairs done to the FOMA terminal. DOCOMO shall have no liability for any change or loss of any kind. Under some circumstances, DOCOMO may replace your FOMA terminal with its equivalent instead of repairing it.
-
Page 212: Updating Software
From the Home screen, press t Updating software and tap [Settings]. Tap [About phone] [Software You can update the FOMA terminal to the update]. most recent software for optimal performance and to get the latest enhancements. Tap [Update now]. ❖ Note Tap [OK]. - Page 213 Searching software update When PC Companion is not automatically installed on your PC You can search the latest software update Use the supplied microUSB cable automatically on regular basis. If software to connect the FOMA terminal to a update is searched, appears on the status bar.
-
Page 214: Main Specifications
Main specifications Size Approx. 4.2 inches Number of 480 dots×854 dots ■ FOMA terminal (Full wide VGA) dots Product name SO-02C Image Type Camera: CMOS sensor Approx. 127 mm (H) × pickup Size Size Camera: 1/3.2 inches approx. 62 mm (W)×... -
Page 215: Battery Pack
・ Continuous stand-by time is an estimate of Wireless LAN (WLAN) Compliant with the stand-by time when radio signal IEEE802.11b/g/n (Corresponding reception is normal. frequency band to In certain circumstances, the stand-by time IEEE802.11n: 2.4 GHz) may drop to as low as half the time shown Bluetooth Supported Compliant with Bluetooth... -
Page 216: Specific Absorption Rate Of Mobile Phone, Etc
Specific Absorption Rate (SAR) Sound MP3, 3GPP, MP4, AMR, AMRWB, SMF, XMF, WAV, iMelody, RTTTL/RTX, of Mobile Phones OTA, Ogg vorbis This model FOMA SO-02C mobile phone Still image JPEG, GIF, PNG, BMP complies with Japanese technical regulations Video 3GPP, MP4... - Page 217 Businesses Website: when used with a carrying case or a http://www.arib-emf.org/index02.html (in wearable accessory approved by NTT Japanese only) DOCOMO or the manufacturer * . In case you NTT DOCOMO, INC. Website: are not using the approved accessory, http://www.nttdocomo.co.jp/english/product/ please use a product that does not contain...
- Page 218 EXPOSURE TO RADIO WAVES. for use by the ear is 0.76 W/kg*, and when The SO-02C mobile phones have been worn on the body is 1.04 W/kg* for speech designed to comply with applicable safety and 1.16 W/kg* for data calls.
- Page 219 Europe adopted requirement for safe exposure*. The tests are performed in positions and locations This mobile phone model SO-02C has been (i.e., by the ear and worn on the body) as designed to comply with applicable safety required by the FCC for each model. The requirements for exposure to radio waves.
- Page 220 For more information on SAR, please refer to permitted levels of radio wave exposure for the safety chapter in the User's Guide. the general population. The levels include a SAR data information for residents in safety margin designed to assure the safety countries that have adopted the SAR limit of all persons, regardless of age and health, recommended by the International...
-
Page 221: Efficient Use
■ Recommendations for care and safe by the FCC for each model. For body worn operation, this phone has been tested and use of our products ・ Handle with care and keep in a clean meets FCC RF exposure guidelines when the handset is positioned a minimum of 15 mm and dust-free place. - Page 222 ■ ・ Discontinue use of electronic devices, or Power supply (Charger) disable the radio transmitting Connect the charger to power sources as functionality of the device, where marked on the product. Do not use required or requested to do so. outdoors or in damp areas.
- Page 223 ■ ■ Battery Personal medical devices New or idle batteries can have short-term Mobile phones may affect implanted reduced capacity. Fully charge the medical equipment. Reduce risk of battery before initial use. Use for the interference by keeping a minimum intended purpose only.
- Page 224 ■ GPS/Location based functions ■ Antenna Some products provide GPS/Location Use of antenna devices not marketed by based functions. Location determining Sony Ericsson could damage the phone, functionality is provided "As is" and "With reduce performance, and produce SAR all faults". Sony Ericsson does not make levels above the established limits.
- Page 225 ■ be well below this value. There is no proof Malware of difference in safety based on Malware (short for malicious software) is difference in SAR value. software that can harm the mobile phone Products with radio transmitters sold in or other computers.
- Page 226 ■ Disposal of old electrical and ■ Memory card electronic equipment If the product comes complete with a Electronic equipment and removable memory card, it is generally batteries should not be included as compatible with the handset purchased household waste but should be left at an but may not be compatible with other appropriate collection point for recycling.
- Page 227 ・ Do not strike, bend, or drop the memory ・ Recorded data may be damaged or lost card. when you remove the memory card or ・ Do not attempt to disassemble or modify memory card adapter, turn off the power the memory card.
-
Page 228: Fcc Statement For The Usa
If this equipment does cause harmful FCC Statement for the USA interference to radio or television reception, which can be determined by turning the This device complies with Part 15 equipment off and on, the user is encouraged of the FCC rules. Operation is to try to correct the interference by one or subject to the following two more of the following measures:... -
Page 229: End User Licence Agreement
We fulfill the requirements of the R&TTE Declaration of Conformity for Directive (1999/5/EC). SO-02C We, Sony Ericsson Mobile End User Licence Communications AB of Nya Vattentornet Agreement SE-221 88 Lund, Sweden declare under our sole responsibility that our product Sony Ericsson type AAD-3880112-BV... -
Page 230: About Open Source Software
This licence exists throughout the useful life About Open Source of this Device. It can be terminated by Software transferring your rights to the Device to a third party in writing. Failure to comply with any of these terms and About Open Source Software conditions will terminate the licence immediately. -
Page 231: Export Controls And Regulations
CALL", "ToruCa", "mopera", "mopera U" and About the Copyright and Portrait "iD" are trademarks or registered rights trademarks of NTT DOCOMO, INC. Copyrighted contents you recorded or ・ "Bluetooth" is a registered trademark of obtained from sites or Internet home pages Bluetooth SIG. - Page 232 ・ "Liquid Identity" logo, "Xperia", "PlayNow", ・ "3GPP" is a trademark or registered "Timescape" and "TrackID" are trademarks trademark of ETSI. ・ "Google" and "Google" logo, "Android" and or registered trademarks of Sony Ericsson Mobile Communications AB. "Android" logo, "Android Market" and ・...
- Page 233 ・ This product is protected by certain ・ This product is licensed under the MPEG-4 intellectual property rights of Microsoft. Use visual and AVC patent portfolio license for the or distribution of such technology outside of personal and non-commercial use of a this product is prohibited without a license consumer for (i) encoding video in from Microsoft.
- Page 234 ・ End-user license agreement for Sun Java Platform, Micro Edition. 1. Restrictions: Software is confidential copyrighted information of Sun and title to all copies is retained by Sun and/or its licensors. Customer shall not modify, decompile, disassemble, decrypt, extract, or otherwise reverse engineer Software.
-
Page 235: Index
Index About phone ..........114 Backlight Access point Turn off ............99 Initialize ............89 Turn on ..........35, 106 Settings ............88 Battery pack .............31 Accessibility ........... 112 BeeTV ...............53 Account settings Bluetooth............161 Facebook ........... 107 Device name..........162 Google ............107 Pair setting ..........162 Accounts &... - Page 236 Auto-sync............109 Record videos ..........139 Date & time .............113 Settings (Still camera) ........ 136 Display..............98 Settings (Video recording) ......141 docomo market..........166 Smile detection .......... 134 Take photos..........132 Campaign Navi ..........53 Character entry Ear speaker volume..........70 Character mode ....... 56, 59, 61 eco mode............53...
- Page 237 Initial settings ..........115 Receive ............116 Hardware key............39 Reply ............118 HDMI...............150 Save attachment file........117 Home screen ............43 Send............115 Email account Add ............119 i-Channel ............52 Change ............118 Index letter............41 Remove ............120 Infrared communication........159 Emergency call ..........67 Infrared data port........25, 159 Evernote ............
- Page 238 Map Application..........51 Network connection settings ......88 McDonald’s ............53 Network Mode ..........198 Media Discovery ..........192 News & Weather ..........51 Media Go ............158 Notification icon ..........37 Install............158 Notification LED ..........39 Playlist ............152 Notification panel..........38 Transfer data ..........158 Notification sound..........98 Media Remote..........
- Page 239 Status icon ............36 Stereo Headset with Microphone ..69, 145, 183 Radio button............. 42 Storage ............110 Rakuten auction ..........53 Record videos..........139 Remaining battery level ......30, 114 Take photos ............132 Reset .............. 110 Timescape ............167 Ringtone settings ..........97 Filter ............169 Ringtone volume ........
- Page 240 Numerics UIM............. 20, 26 1Seg ............25, 177 PIN ............. 101 Initial setting..........178 USB connection ........33, 154 TVlink ............181 Mount ............155 Watch 1Seg ..........179 User dictionary..........64 1Seg antenna ........25, 178 Back up and restore........65 12 key keyboard ..........59 My words English .........
- Page 241 My docomo (http://www.mydocomo.com/) ⇒ 各種お申込・お手続き (Various applications/procedures) *In Japanese only * "docomo ID and password" are required for use. * Please contact "General Inquiries" described on the last page of this manual if you forget or do not have "docomo ID and password".
- Page 242 ●If you lose your FOMA terminal or have it stolen, immediately take the steps necessary for suspending the use of the FOMA terminal. ●If the FOMA terminal you purchased is damaged, bring your FOMA terminal to a repair counter specified by DOCOMO after returning to Japan.
Need help?
Do you have a question about the so-02c and is the answer not in the manual?
Questions and answers