Table of Contents

Related Manuals for Velleman CAMIP4N


Summary of Contents for Velleman CAMIP4N
-
Page 1: Table Of Contents
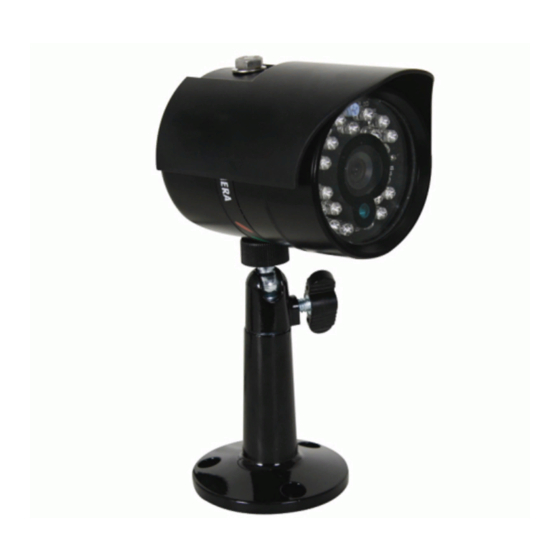
CAMIP4N REAL PLUG AND PLAY IP COLOUR CAMERA REAL PLUG-AND-PLAY IP-KLEURENCAMERA CAMÉRA COULEUR IP REAL PLUG-AND-PLAY CÁMARA COLOR IP REAL PLUG-AND-PLAY REAL PLUG-AND-PLAY IP-FARBKAMERA USER MANUAL GEBRUIKERSHANDLEIDING NOTICE D’EMPLOI MANUAL DEL USUARIO BEDIENUNGSANLEITUNG ... - Page 2 CAMIP4N Table 1 1 lens lens objectif óptica Objektiv 2 IR LEDs IR-leds DEL IR LEDs IR IR-LEDs 3 light sensor lichtsensor capteur sensor Lichtsensor 4 sunshield zonnekap pare-soleil capa antisolar Sonnenblende 5 camera bolt gewricht articulation articulación Gelenk 6 position bolt...
-
Page 3: User Manual
If in doubt, contact your local waste disposal authorities. Thank you for choosing Velleman! Please read the manual thoroughly before bringing this device into service. If the device was damaged in transit, do not install or use it and contact your dealer. Damage caused by disregard of certain guidelines in this manual is not covered by the warranty and the dealer will not accept responsibility for any ensuing defects or problems. -
Page 4: Software Installation
CAMIP4N Rev. 01 • Use the mounting bracket [7] to determine the location of the mounting holes. Drill the holes and secure the bracket [7] using 3 screws. • Attach the camera to the mounting bracket [7] with the camera bolt [5]. The camera has two mounting holes, make sure to use the one that provides an upright image. - Page 5 CAMIP4N Rev. 01 • Click < Back to change settings or Next > to start the installation. • If Framework 2.0 (or higher) was already installed, a message is displayed. Click OK to continue installation of the CamView software. • The Installation Finished window appears. Click on Finish.
- Page 6 CAMIP4N Rev. 01 7. Software configuration 7.1 General • To start the CamView software, locate the CamView icon on the desktop and click on it, or go to Start → Programs → CamView. Title bar shows software version, date, time and available disk space.
- Page 7 CAMIP4N Rev. 01 7.2 Auto Search • In order to use Auto Search, a camera must be connected to the same LAN (Local Area Network) as the computer. Double-click on the Auto Search directory or right-click on Auto Search and left-click again on Auto search to start searching the network.
- Page 8 CAMIP4N Rev. 01 Model current firmware version IP CAM ID camera identification number Registration status is camera registered with CamView software or not. Network type shows current network type Video user number of people that currently access the camera Video resolution...
- Page 9 CAMIP4N Rev. 01 Note: both DHCP/manual IP setting and PPPoE can be selected together. However, PPPoE will have priority and will be used when possible. • Select Video Settings to configure the video set-up. On this page, it is also possible to retrieve or set the password which is required to get access to the video images.
- Page 10 CAMIP4N Rev. 01 Note: 3GPP/ISMA is using RTSP protocol for 3G mobile phones to display the video stream from some network devices, including IP cameras. This camera supports the RTSP protocol and video/audio codec needed by 3GPP/ISMA. Users only need to access the address rtsp://ip_cam_address/CAM_ID.password on the 3G mobile phone to access the video stream of the IP camera.
- Page 11 CAMIP4N Rev. 01 • The Email/ftp and NAS schedule can be enabled via the Scheduling page. • To change administrator settings, go to the Admin - Admin login page. Change the administrator password regularly to increase security. Note: always remember the admin password; it is not possible to configure the camera without it.
- Page 12 CAMIP4N Rev. 01 • The firmware filename can be found by browsing to the ftp-site (ftp:60.250.194.78), username upgrade and password upgrade. Scroll through the available list and locate the correct version. The name must start with VS316-gen. • To reboot the camera, go to the reboot page and click on Reboot.
- Page 13 CAMIP4N Rev. 01 • First click on the desired playback-window, then right-click on the desired camera and left-click on Play on selected window. The images are shown in the desired area. • Click on ID/Password settings to edit camera name.
- Page 14 CAMIP4N Rev. 01 • Change the 3GPP settings by selecting the 3GPP settings option. • After adjusting the settings, click the Update button. The administrators’ account and password are required. • To update the firmware, click on firmware upgrade (see §7.3 Web configuration – Upgrade page) •...
- Page 15 CAMIP4N Rev. 01 7.6 CamView Software options 7.6.1 Settings • Click on the settings button ( ) to enter the settings menu: Directories Recording • Enter the directory where the recorded files must be stored. • Enter a disk space lower limit.
- Page 16 CAMIP4N Rev. 01 7.6.2 CamPlay • Click on the camplay button ( ) to enter the CamPlay software, or locate the desktop item and double click on it: • Title bar: Shows software version, date, time, available disk space, minimize and exit button.
- Page 17 CAMIP4N Rev. 01 Snapshot: take snapshot during play-back Mute/un-mute sound playback Zoom out – original size - in Note: maximum zoom-in resolution is 640x480; maximal zoom-out is the original video resolution. • Playback time bar: drag the pointer to select start of play-back point.
-
Page 18: Uninstall Camview
CAMIP4N Rev. 01 Recording/playing conflict: • to determine the priority between current and scheduled camera. When selecting ‘Record/Play as scheduled’, at the scheduled time the scheduled camera will start playing or recording. Select ‘Give up that scheduled recording/playing’ to ignore the schedule and keep playing/recording the current camera. - Page 19 CAMIP4N Rev. 01 • Click Next >. If the CamView or similar software will be installed, keep all files. • Click Finish to close the uninstaller. 8. 3GGP software installation • mCamView is the software that is required to view the IP Camera images using an ID and password.
-
Page 20: Troubleshooting
CAMIP4N Rev. 01 9. Troubleshooting Important note: The video quality depends on the video parameter settings and the network quality. To have a • better video quality, select higher resolution and higher frame rates. This is no problem when viewing videos locally in the same network. When watching a video remotely through the Internet however, it is important to know the bandwidth of the Internet connection (Internet speed). -
Page 21: Technical Specifications
420g Use this device with original accessories only. Velleman nv cannot be held responsible in the event of damage or injury resulted from (incorrect) use of this device. For more info concerning this product, please visit our website www.velleman.eu. The information in this manual is subject to change without prior notice. -
Page 22: Gebruikershandleiding
Bestel eventuele reserveonderdelen bij uw dealer. 3. Algemene richtlijnen ® Raadpleeg de Velleman service- en kwaliteitsgarantie achteraan deze handleiding. • Bescherm de camera tegen schokken. Vermijd brute kracht tijdens de bediening. • Bescherm tegen extreme temperaturen, stof en vochtigheid. - Page 23 CAMIP4N Rev. 01 plafond: plaats de zonnekap [4] tussen de camera en de beugel [7]. Muurmontage: bevestig de zonnekap [4] bovenaan de camera met de meegeleverde bout en sluitring. • Richt de camera naar de bewakingszone en draai de klemschroef [6] vast.
- Page 24 CAMIP4N Rev. 01 • Klik op < Back indien u wijzigingen wilt aanbrengen of klik op Next > om verder te gaan. • Indien Framework 2.0 (of hoger) al op de computer geïnstalleerd was, krijgt u volgend bericht. Klik op OK om CamView verder te installeren.
- Page 25 CAMIP4N Rev. 01 7. Softwareconfiguratie 7.1 Algemeen • Start CamView door op de shortcut te klikken of klik op Start → Programs → CamView. In de titelbalk staan softwareversie, datum, tijd en beschikbare schijfruimte. lijst met beschikbare camera’s met statusaanduiding display lijst met camera’s gevonden via...
- Page 26 CAMIP4N Rev. 01 7.2 Auto Search • Deze functie is enkel beschikbaar indien de camera en de computer op hetzelfde LAN-netwerk zijn aangesloten. Open de directory Auto Search om het netwerk te zoeken. Opmerking: Routers en firewalls kunnen de toegang tot de IP-camera blokkeren. Neem in dit geval contact op met uw netwerkprovider.
- Page 27 CAMIP4N Rev. 01 Model huidige firmwareversie IP CAM ID ID-nummer van de camera Registration status registratiestatus Network type huidig netwerktype Video user aantal gebruikers die op de camera zijn aangesloten Video resolution huidige beeldresolutie Video bandwidth huidige bandbreedte Email/ftp Alarm...
- Page 28 CAMIP4N Rev. 01 Opmerking: Zowel DHCP/handmatige IP-configuratie als PPPoE zijn selecteerbaar. De camera verkiest echter PPPoE. • Video Settings: configuratie video. Op deze pagina kunt u het paswoord instellen of opvragen dat u toegang geeft tot de videobeelden. Opmerking: Het originele paswoord kunt u vinden op de meegeleverde ID/Password-kaart. Wijzig om veiligheidsredenen het paswoord van de camera.
- Page 29 CAMIP4N Rev. 01 camera hoeft verder geen instellingen. Het ingeven van het RTSP-adres verschilt van toestel tot toestel. Neem contact op met de fabrikant van de 3G-telefoon voor meer details. De beeldkwaliteit en –resolutie zijn dezelfde als die in het menu Video Settings.
- Page 30 CAMIP4N Rev. 01 • Ga naar Scheduling om Email/ftp en NAS in te schakelen. • Wijzig de administratorinstellingen onder Admin – Admin login. Het is aan te raden het administratorpaswoord regelmatig te wijzigen. Opmerking: Noteer het administratorpaswoord. Zonder dit paswoord kunt u de camera niet instellen.
- Page 31 Laat de camera enkel upgraden door een informaticus. Schakel de camera nooit uit tijdens de upgrade. Velleman Components nv, de fabrikant en de verdeler zijn niet aansprakelijk voor problemen of beschadiging na een upgrade. • De bestandsnaam van de firmware is beschikbaar op de FTP-site (ftp:60.250.194.78), upgrade bestandsnaam en upgrade paswoord.
- Page 32 CAMIP4N Rev. 01 GEEL: de camera is online maar reageert niet (bv. verkeerde routerinstellingen) GROEN: de camera is online en reageert (de beelden worden eventueel geblokkeerd door de firewall) • De status wordt elke 30 seconden automatisch ververst. Klik op Refresh status om de status handmatig te verversen.
- Page 33 CAMIP4N Rev. 01 Bandwidth Sharpness Bandbreedte van 64k tot 1,5 M. Stel in volgens de Stel de beeldscherpte in. uploadbandbreedte. Een hogere bandbreedte geeft Low light sensitivity een beeld van een hogere kwaliteit. Stel de gevoeligheid van de camera in bij Video Setting zwak omgevinglicht.
- Page 34 CAMIP4N Rev. 01 • Klik met de rechtermuisknop in een scherm om volgende opties weer te geven: Full window: Volledige schermweergave. Auto reconnect: Automatisch herstel van de verbinding. Stop: Uitschakeling. Pause: Pauzeren. Motion recording: Inschakelen van opname na beweging. Properties…: Camera-instellingen (framesnelheid, bandbreedte, klok).
- Page 35 CAMIP4N Rev. 01 Startup options settings • Vink het bovenste vakje aan om CamView automatisch bij het opstarten van Windows op te starten. • Vink het onderste vakje aan om bij het opstarten van CamView naar de laatste instellingen terug te keren.
- Page 36 CAMIP4N Rev. 01 stoppen traag afspelen doorspoelen snapshot mute uitzoomen – originele afmetingen – inzoomen Opmerking: De maximale beeldresolutie bij het inzoomen is 640x480, bij het uitzoomen is de originele beeldresolutie. • Tijdsbalk: Verschuif de pointer indien gewenst. 7.6.3 Scheduling •...
- Page 37 CAMIP4N Rev. 01 Recording/Playing Conflict • Hier kunt u bepalen welke opnamemodus u verkiest: Record/Play as scheduled: De camera start de opname of het afspelen op het geprogrammeerde tijdstip. Give up that scheduled recording/playing: De camera blijft afspelen/opnemen ongeacht de programmering.
- Page 38 CAMIP4N Rev. 01 • Klik op Next >. Vink de gewenste opties aan en klik op Next >. • Klik op Finish om de deïnstallatie te voltooien. 8. Installatie van 3GGP-software • Met mCamView kunt u, met behulp van een ID en een paswoord, de beelden van de IP-camera bekijken.
- Page 39 CAMIP4N Rev. 01 9. Problemen en oplossingen Belangrijke opmerking: De kwaliteit van de beelden hangt af van de instellingen en de kwaliteit van het netwerk. Voor • een hogere beeldkwaliteit, selecteer een hogere resolutie en framesnelheid. Het afspelen van een videobestand op een lokaal netwerk zou geen problemen moeten opleveren.
- Page 40 420 g Gebruik dit toestel enkel met originele accessoires. Velleman nv is niet aansprakelijk voor schade of kwetsuren bij (verkeerd) gebruik van dit toestel. Voor meer informatie over dit product, zie www.velleman.eu. De informatie in deze handleiding kan te allen tijde worden gewijzigd zonder voorafgaande kennisgeving.
-
Page 41: Notice D'emploi
Commander des pièces de rechange éventuelles chez votre revendeur. 3. Directives générales ® Se référer à la garantie de service et de qualité Velleman en fin de notice. • Protéger contre les chocs et le traiter avec circonspection pendant l’opération. - Page 42 CAMIP4N Rev. 01 • Connecter la fiche BNC [B] à un moniteur (non inclus) et/ou à un réseau ordinateur à l’aide de la fiche RJ45 [A]. En cas de questions, contacter votre fournisseur de réseau local. 6. Installation du logiciel •...
- Page 43 CAMIP4N Rev. 01 • Cliquer sur < Back pour retourner à la fenêtre précédente et cliquer sur Next > pour continuer. • Le message ci-dessous surgit lorsque Framework 2.0 (ou plus) est déjà installé sur l’ordinateur. Cliquer sur OK pour continuer l’installation de CamView.
- Page 44 CAMIP4N Rev. 01 La barre de titre affiche la version du logiciel, la date, l’heure et l’espace disque dur disponible. liste des caméras disponibles avec leur statut affichage liste des caméras retrouvées à l’aide de la fonction de recherche automatique Auto Search configuration panneau de contrôle pour...
- Page 45 CAMIP4N Rev. 01 • Le nom d’utilisateur par défaut admin ne nécessite pas de mot de passe. • La page d’information s’affiche après la validation du nom d’utilisateur et du mot de passe. Model version du firmware IP CAM ID numéro d’identification de la caméra...
- Page 46 CAMIP4N Rev. 01 • Network : Configuration du réseau. Le protocole par défaut est DHCP (Dynamic Host Configuration Protocol) qui assurera un adressage IP automatique. Contacter votre administrateur réseau si le protocole DHCP n’est pas disponible. • Advanced Network : Configuration de la connexion PPPoE (ADSL). Saisir le nom d’utilisateur et le mot de passe.
- Page 47 CAMIP4N Rev. 01 Remarque : Tout comme la technologie 3GPP/ISMA, la caméra télécharge les images en utilisant le protocole RTSP et le codec vidéo/audio. Il suffit de taper l’adresse rtsp://ip_cam_address/CAM_ID.password dans le téléphone 3G. La caméra IP ne nécessite pas de configuration supplémentaire. La saisie de l’adresse RSTP peut changer selon le type de téléphone.
- Page 48 CAMIP4N Rev. 01 • Accéder à la page NAS Settings pour configurer le système NAS (Network Attached Storage). • Accéder à la page Scheduling pour activer les fonctions Email/ftp et NAS. • Modifier la configuration de l’administrateur sous Admin – Admin login. Il est conseillé de modifier régulièrement le mot de passe de l’administrateur.
- Page 49 Confier la mise à jour de la caméra à un informaticien qualifié. Ne jamais éteindre la caméra pendant le téléchargement du firmware. SA Velleman Components, le fabricant et le revendeur ne seront aucunement responsables de dommages survenus au téléchargement de firmware.
- Page 50 CAMIP4N Rev. 01 7.4 Camera List • Une fois la caméra configurée, elle doit être ajoutée à la liste Camera List. Cliquer avec le bouton droit de la souris sur Camera List et ensuite cliquer sur New Camera. Remarque : Une caméra qui ne se trouve pas sous Camera List ne sera pas disponible depuis Internet.
- Page 51 CAMIP4N Rev. 01 Bandwidth Video color Largeur de bande de 64k à 1,5 M. Sélectionner la Sélectionner une image en couleur ou en largeur de bande selon la largeur en amont. Une noir et blanc. largeur de bande supérieure contribue à une qualité...
- Page 52 CAMIP4N Rev. 01 • Cliquer sur Update et saisir le nom d’utilisateur et le mot de passe. • Cliquer sur Firmware upgrade pour mettre à jour le firmware (voir §7.3 Configuration web – Upgrade) • Cliquer sur Delete pour supprimer une caméra de la liste.
- Page 53 CAMIP4N Rev. 01 7.6 Options dans CamView 7.6.1 Settings • Cliquer sur le bouton de configuration ( ) pour afficher le menu : Directories settings Recording • Sélectionner le répertoire de sauvegarde des fichiers d’enregistrement. • Entrer l’espace disque dur minimal.
- Page 54 CAMIP4N Rev. 01 7.6.2 CamPlay • Cliquer sur le bouton CamPlay ( ) pour lancer le logiciel ou cliquer double sur l’icône sur le bureau : • La barre de titre affiche : la version du logiciel, la date, l’heure, l’espace disque dur disponible, la case de minimisation et la case pour quitter l’application.
- Page 55 CAMIP4N Rev. 01 avance rapide capture d’image activation/désactivation du son zoom en avant – image – zoom en arrière Remarque : La résolution maximale du zoom en avant est de 640x480 ; la résolution maximale du zoom en arrière est la résolution d’origine de l’image.
- Page 56 CAMIP4N Rev. 01 Recording/playing conflict : • Sélection du mode d’enregistrement : Record/Play as scheduled : La caméra commence l’enregistrement à l’horaire programmée. Give up that scheduled recording/playing : La caméra continue la lecture/l’enregistrement quel que soit le mode programmé.
- Page 57 CAMIP4N Rev. 01 • Cliquer sur Finish pour compléter la désinstallation. 8. Installation du logiciel 3GGP • mCamView est le logiciel nécessaire pour visionner les images de la caméra à l’aide de l’adresse IP et d’un mot de passe. • La caméra ne nécessite pas d’adresse IP publique.
- Page 58 CAMIP4N Rev. 01 9. Problèmes et solutions Remarque importante : La qualité de l’image est tributaire des configurations et de la qualité du réseau. Pour une qualité • d’image supérieure, sélectionner une résolution et une vitesse d’image supérieures. Le visionnage des images sur un réseau local ne posera généralement aucun problème.
- Page 59 420 g N’employer cet appareil qu’avec des accessoires d’origine. SA Velleman ne sera aucunement responsable de dommages ou lésions survenus à un usage (incorrect) de cet appareil. Pour plus d’information concernant cet article, visitez notre site web www.velleman.eu. Toutes les informations présentées dans cette notice peuvent être modifiées sans notification préalable.
-
Page 60: Manual Del Usuario
Si tiene dudas, contacte con las autoridades locales para residuos. ¡Gracias por haber comprado la CAMIP4N! Lea atentamente las instrucciones del manual antes de usarla. Si el aparato ha sufrido algún daño en el transporte no lo instale y póngase en contacto con su distribuidor. - Page 61 CAMIP4N Rev. 01 • Conecte el conector BNC [B] a un monitor (no incl.) y/o a una red ordenador con el conector RJ45 [A]. En caso de preguntas, contacte con su proveedor de red local. 6. Instalar el software • Esta cámara se entrega con un CD-ROM que incluye el software CamView. Introduzca el CD-ROM en el reproductor de CD (véase §9 Especificaciones).
- Page 62 CAMIP4N Rev. 01 • Haga clic en < Back para volver a la pantalla anterior y haga clic en Next > para continuar. • El siguiente mensaje aparece si Framework 2.0 (o superior) ya ha sido instalado en el ordenador.
- Page 63 CAMIP4N Rev. 01 La barra de título visualiza la versión del software, la fecha, la hora y el espacio en el disco duro disponible. lista de las cámaras disponibles con visualización del estado visualización lista de las cámaras encontradas con la función de búsqueda automática Auto Search...
- Page 64 CAMIP4N Rev. 01 • El nombre de usuario por defecto admin no necesita una contraseña. • La página de información se visualiza después de haber introducido un nombre de usuario y una contraseña válidos. Model versión del firmware IP CAM ID número de identificación de la cámara...
- Page 65 CAMIP4N Rev. 01 • Network: Configuración de la red. El protocolo por defecto es DHCP (Dynamic Host Configuración Protocol) y recibe automáticamente una dirección IP. Contacte con su proveedor de red si el protocolo DHCP no está disponible. • Advanced Network: Configuración de la conexión PPPoE (ADSL). Introduzca el nombre de usuario y la contraseña.
- Page 66 CAMIP4N Rev. 01 Nota: Las últimas cifras de la dirección URL constan del número de identificación de la cámara y la contraseña. Estas cifras son únicas para cada cámara. Nota: Al igual que la tecnología 3GPP/ISMA, la cámara descarga las imágenes al utilizar el protocolo RTSP y el codec vídeo/audio.
- Page 67 CAMIP4N Rev. 01 • Entre en la página NAS Settings para configurar el sistema NAS (Network Attached Storage). • Entre en la página Scheduling para activar las funciones Email/ftp y NAS. • Modifique la configuración del administrador bajo Admin - Admin login. Modifique la contraseña del administrador regularmente.
- Page 68 Nunca desactive la cámara durante la descarga del firmware. Velleman Components NV, el fabricante ni el distribuidor serán responsable de daños causados por el descarga del firmware. • El nombre del firmware está disponible en el servidor FTP (ftp:60.250.194.78) (nombre de usuario upgrade y contraseña upgrade).
- Page 69 CAMIP4N Rev. 01 7.4 Lista de cámaras • Después de haber ajustado la cámara, añádala a la lista Camera List. Haga clic en Camera List con el botón derecho del ratón y luego haga clic en New Camera. Nota: Una cámara que no está bajo Camera List no estará disponible en Internet.
- Page 70 CAMIP4N Rev. 01 Bandwidth Video color Ancho de banda de 64k a 1,5 M. Seleccione el ancho Seleccione una imagen de color o una de banda según el ancho de banda upload. Un ancho imagen blanco y negro. de bande superior contribuye a una mejora calidad de Brightness la imagen.
- Page 71 CAMIP4N Rev. 01 • Haga clic en Update e introduzca el nombre de usuario y la contraseña. • Haga clic en Firmware upgrade para instalar una versión mejorada del firmware (véase §7.3 Configuración web – Upgrade) • Haga clic en Delete para borrar una cámara de la lista.
- Page 72 CAMIP4N Rev. 01 7.6 Opciones en CamView 7.6.1 Ajustes • Haga clic en el botón de configuración ( ) para visualizar el menú: Directories Recording • Seleccione el directorio donde quiere guardar los ficheros grabados. • Introduzca el espacio de disco duro mín.
- Page 73 CAMIP4N Rev. 01 7.6.2 CamPlay • Haga clic en el botón CamPlay ( ) para activar el software o haga clic dos veces en el icono del escritorio: • La barra de título: La barra de título visualiza la versión del software, la fecha, la hora, el espacio en el disco duro disponible, el botón de minimización y el botón para salir de la aplicación.
- Page 74 CAMIP4N Rev. 01 avanzar captura de imagen sileciar alejar – imagen original – acercar Note: La resolución máx. de la función ‘acercar’ es de 640x480; la resolución máx. de la función ‘alejar’ es la resolución original de la imagen. •...
- Page 75 CAMIP4N Rev. 01 Recording/playing conflict: • Para seleccionar el modo de grabación: Record/Play as scheduled: La cámara empieza la grabación a la hora programada. Give up that scheduled recording/playing: La cámara continúa la reproducción/ grabación sea cual sea el modo programado.
- Page 76 CAMIP4N Rev. 01 • Haga clic en Finish para terminar la desinstalación. 8. 3GGP software installation • mCamView is the software that is required to view the IP Camera images using an ID and password. • No public IP address is needed for the IP camera.
- Page 77 CAMIP4N Rev. 01 9. Solución de problemas Nota importante: La calidad de imagen depende de los ajustes y la calidad de la red. Para una calidad de imagen • superior, seleccione una resolución y una velocidad de imagen más altas. La reproducción en una red local generalmente no causa problemas.
- Page 78 © DERECHOS DE AUTOR Velleman NV dispone de los derechos de autor para este manual del usuario. Todos los derechos mundiales reservados. Está estrictamente prohibido reproducir, traducir, copiar, editar y guardar este manual del usuario o partes de ello sin previo permiso escrito del derecho habiente.
-
Page 79: Bedienungsanleitung
Öffnen Sie diese Kamera NICHT. Es gibt keine zu wartenden Teile. Bestellen Sie eventuelle Ersatzteile bei Ihrem Fachhändler. 3. Allgemeine Richtlinien Siehe Velleman® Service- und Qualitätsgarantie am Ende dieser Bedienungsanleitung. • Vermeiden Sie Erschütterungen. Vermeiden Sie rohe Gewalt während der Installation und Bedienung des Gerätes. - Page 80 CAMIP4N Rev. 01 • Befestigen Sie die Kamera mit der Schraube am Gelenk [5] an der Halterung [7]. Die Kamera hat zwei Montagelöcher: ein Montageloch für die Deckenmontage und ein Montageloch für die Wandmontage. Deckenmontage: installieren Sie die Sonnenblende [4] zwischen der Kamera und der Halterung [7].
- Page 81 CAMIP4N Rev. 01 • Klicken Sie auf < Back wenn Sie die Einstellungen ändern möchten oder klicken Sie auf Next > um weiterzugehen. • Wenn Framework 2.0 (oder höher) schon installiert ist, erscheint folgende Nachricht. Klicken Sie auf OK um CamView weiter zu installieren.
- Page 82 CAMIP4N Rev. 01 7. Konfiguration der Software 7.1 Allgemein • Starten Sie CamView, indem Sie auf die Verknüpfung klicken oder klicken Sie auf Start → Programs → CamView. Die Titelleiste zeigt die Softwareversion, das Datum, die Uhrzeit und den verfügbaren Speicherplatz Liste mit verfügbaren Kameras...
- Page 83 CAMIP4N Rev. 01 Displays: klicken Sie die Ikone an und wählen Sie ein 1-, 4-, 6-, 9-, 13-, 16- oder 21-stelliges Display (jedes Kameradisplay ist separat einstellbar) 7.2 Auto Search • Diese Funktion steht nur zur Verfügung wenn die Kamera und der PC mit demselben LAN- Netzwerk verbunden sind.
- Page 84 CAMIP4N Rev. 01 Model aktuelle Firmware-Version IP CAM ID ID-Nummer der Kamera Registration status Registrierungsstatus Network tippen Siee aktueller Netzwerktyp Video user Anzahl Benutzer, die mit der Kamera verbunden sind Video resolution aktuelle Bildauflösung Video bandwidth aktuelle Bandbreite Email/ftp Alarm...
- Page 85 CAMIP4N Rev. 01 • Advanced Network: Konfiguration des PPPoE-Anschlusses (ADSL). Geben Sie den Benutzername und das Passwort ein. Bemerkung: Sowohl die DHCP/manuelle IP-Konfiguration als auch PPPoE können ausgewählt werden. Die Kamera bevorzugt aber PPPoE. • Video Settings: Konfiguration Video. Auf dieser Seite können Sie auch das Passwort, das Ihnen Zugang zu den Videobildern gibt, einstellen oder abfragen.
- Page 86 CAMIP4N Rev. 01 Bemerkung: Genauso wie 3GPP/ISMA verwendet diese Kamera das RTSP-Protokoll und Video- /Audiocodec, um die Bilder herunterzuladen. Sie brauchen also nur die Adresse rtsp://ip_cam_address/CAM_ID.password in das 3G-Mobiltelefon einzugeben. Die IP-Kamera braucht keine weiter Einstellungen. Die RTSP-Adresse ist für jedes Gerät anders.Für mehr Informationen, setzen Sie sich mit dem Fabrikanten des 3G-...
- Page 87 CAMIP4N Rev. 01 • Gehen Sie zu NAS Settings um das NAS-System (Network Attached Storage) zu konfigurieren. • Gehen Sie zu Scheduling um Email/ftp und NAS einzuschalten. • Ändern Sie die Administratoreinstellungen unter Admin – Admin login. Ändern Sie das Administratorpasswort regelmäßig.
- Page 88 Lassen Sie ein Upgrade der Kamera nur von einem Informatiker durchführen. Schalten Sie die Kamera nie aus während des Upgrades. Weder Velleman NV noch der Händler übernehmen Haftung für Probleme oder Folgeschäden eines Upgrades. • Der Dateiname der Firmware steht auf der FTP-Site (ftp:60.250.194.78), upgrade Dateiname und upgrade Passwort zur Verfügung.
- Page 89 CAMIP4N Rev. 01 7.4 Kameraliste • Die Kamera ist jetzt konfiguriert. Fügen Sie diese nun der Liste hinzu. Klicken Sie mit der rechten Maustaste auf Camera List und klicken Sie danach auf New Kamera. Bemerkung: Wenn Sie die Kamera nicht der Liste hinzufügen, ist diese nicht weltweit verfügbar.
- Page 90 CAMIP4N Rev. 01 • Klicken Sie auf Video settings um die Video-Einstellungen der Kamera zu ändern. Bandwidth Sharpness Bandbreite von 64k bis 1,5 M. Stellen Sie gemäß der Stellen Sie die Bildschärfe ein. Upload-Bandbreite ein. Eine höhere Bandbreite zeigt Low light sensitivity ein Bild von höherer Qualität.
- Page 91 CAMIP4N Rev. 01 • Klicken Sie danach auf Update und geben Sie den Namen und das Passwort ein. • Klicken Sie auf Firmware upgrade um die Firmware zu aktualisieren (Siehe §7.3 WebKonfiguration – Upgrade). • Klicken Sie auf Delete um die Kamera aus der Liste zu löschen.
- Page 92 CAMIP4N Rev. 01 7.6.1 Settings • Klicken Sie auf die Taste ( ) um das Konfigurationsmenü anzuzeigen: Directories Recording • Wählen Sie das Datenverzeichnis, wo Sie Dateien speichern möchten, aus. • Geben Sie den Mindestspeicherplatz ein. • Wählen Sie den Aufnahmemodus bei vollem Speicher aus: überschreiben (Circular recrording) oder stoppen.
- Page 93 CAMIP4N Rev. 01 7.6.2 CamPlay • Klicken Sie die CamPlay-Taste ( ) oder klicken Sie zwei Mal die Ikone der Arbeitsoberfläche, um CamPlay zu starten: • Titelleiste: Die Titelleiste zeigt die Softwareversion, das Datum, die Uhrzeit, den verfügbaren Speicherplatz, Minimiertaste und die Taste zum Verlassen der Applikation.
- Page 94 CAMIP4N Rev. 01 vorspulen Schnappschuss stumm schalten herauszoomen – eigentliche Bildgröße - heranzoomen Note: Die max. Bildauflösung beim heranzoomen ist 640x480, Die max. Bildauflösung beim herauszoomen ist. • Zeitbalken: Verschieben Sie den Cursor wenn nötig. 7.6.3 Schedulig • Klicken Sie eine Kamera der Liste an und danach die Programmiertaste ( ) um das Menü...
- Page 95 CAMIP4N Rev. 01 programmierten Zeitpunkt. Give up that scheduled recording/playing: Die Kamera bleibt abspielen/aufnehmen ungeachtet der Programmierung. 7.6.4 Sprache • Klicken Sie auf die Sprachtaste ( ) um die Sprache auszuwählen: 7.6.5 All - button • Klicken Sie auf All ( ) um alle Kameras gleichzeitig zu bedienen: 7.7 CamView deinstallieren...
- Page 96 CAMIP4N Rev. 01 • Klicken Sie auf Next >. Kreuzen Sie die gewünschten Optionen an und klicken Sie auf Next >. • Klicken Sie auf Finish um das Deinstallieren zu beenden. 8. 3GGP software installation • mCamView is the software that is required to view the IP Camera images using an ID and password.
- Page 97 CAMIP4N Rev. 01 9. Problemlösung Wichtige Bemerkung: Die Bildqualität hängt von den Einstellungen und die Qualität vom Netz ab. Für eine höhere • Bildqualität, wählen Sie eine höhere Auflösung und Bildgeschwindigkeit aus. Das Abspielen einer Videodatei auf einem lokalen Netz erfolgt normalerweise problemlos. Beim Fernabspielen einer Videodatei über das Internet spielt die Bandbreite vom Internetanschluss aber eine wichtige Rolle.
- Page 98 Ø 73 x 85 mm Gewicht 420 g Verwenden Sie dieses Gerät nur mit originellen Zubehörteilen. Velleman NV übernimmt keine Haftung für Schaden oder Verletzungen bei (falscher) Anwendung dieses Gerätes. Für mehr Informationen zu diesem Produkt, siehe www.velleman.eu. Alle Änderungen ohne vorherige Ankündigung vorbehalten.
- Page 99 Velleman®. Afin de garantir la qualité, nous soumettons régulièrement nos • Articles to be repaired must be delivered to your Velleman® dealer, produits à des contrôles de qualité supplémentaires, tant par solidly packed (preferably in the original packaging), and be notre propre service qualité...
- Page 100 Anwendung, schlechte Wartung, Velleman® ; zweckentfremdete Anwendung oder Nichtbeachtung von - se calcula gastos de transporte de y a Velleman® si el aparato Benutzerhinweisen in der Bedienungsanleitung. ya no está cubierto por la garantía. - Schäden infolge einer kommerziellen, professionellen oder •...