Dynascan PMR446 Instruction Manual
Portable two-way radio
Hide thumbs
Also See for PMR446:
- Instruction manual (122 pages) ,
- Instruction manual (16 pages) ,
- Instruction manual (26 pages)
Table of Contents
Advertisement
Quick Links
Licence-free PMR446 two-way radio for instant free communication
This equipment is marked with the symbol for the selective relative classification of the waste of
electric and electronic equipment. This means that his product must be disposed of at a designated
collection point for the recycling of waste electrical and electronic equipment according to the
European Directive 2012/19/EU, with the intention of being either recycled or dismantled in order
to reduce any impact on the environment. For more information, please contact your distributor,
reseller or the local or regional administration.
Electronic products that have not been disposed of in this way are potentially dangerous for the
environment and public health due to the possible presence of dangerous substances.
PMR446 Portable
Two-Way Radio
Instruction
Manual
Dynascan 1D
Advertisement
Table of Contents

Related Manuals for Dynascan PMR446


Summary of Contents for Dynascan PMR446
- Page 1 Manual Dynascan 1D Licence-free PMR446 two-way radio for instant free communication This equipment is marked with the symbol for the selective relative classification of the waste of electric and electronic equipment. This means that his product must be disposed of at a designated...
-
Page 2: Table Of Contents
Installing/removing the battery pack ii. Charging the battery iii. Installing the headset (optional) iv. Installing the belt clip v. Installing the lanyard 6. Your Dynascan 1D 7. Basic operation i. Power on/off ii. Channel select iii. Volume adjust iv. Transmit 8. -
Page 3: Introduction
1. INTRODUCTION: Thank you for purchasing this PMR446 two-way radio, we are confident that you will be very pleased with the quality and performance of this radio. Please read this manual completely in order to avoid damage to the equipment or incorrect use. - Page 4 In the case that any liquid leaks from the radio battery pack, do not touch it. It may cause damage to your skin. If the liquid comes into contact with your skin, rinse with plenty of cold water. Never use this radio in places where the use of radio equipment is prohibited, such as aboard aircrafts, in airports, ports, gas and petrochemical stations, near to electric medical equipment, etc.
-
Page 5: Products Supplied
Open the package contents carefully. We recommend confirming that all the articles listed in the following table are present. If you find that the product or any of its accessories are missing or damaged, please contact your reseller or distributor. PMR446 portable radio Li-Ion battery pack AC/DC adapter Desktop charger 3.7 V/1800 mAh... -
Page 6: Optional Accessories
4. OPTIONAL ACCESSORIES: Consult with your reseller or distributor for information on the accessories available for this PMR446 two-way radio. 5. GETTING STARTED: INSTALLING/REMOVING THE BATTERY PACK: The battery pack is located at the rear of the radio. To install it, simply insert the battery pack into the bottom of the radio and press on the top until it is securely fixed with the latch. -
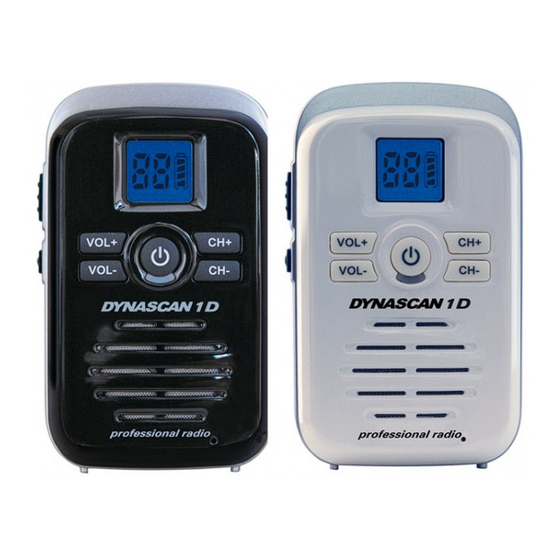
Page 7: Your Dynascan 1D
6. YOUR DYNASCAN 1D 7. BASIC OPERATION: POWER ON/OFF: Power ON: Press the [ ] key for about 3 seconds to turn ON the radio. A beep will sound and the LCD screen will be displayed. Power OFF: Press the [ ] key for about 3 seconds to turn OFF the radio. -
Page 8: Transmit
TRANSMIT: Press and hold the [PTT] key and talk in the direction of the radio microphone in a normal voice tone. The LED indicator will be illuminated in a red colour. Release the [PTT] to receive. 8. SHORTCUT MENU OPERATION: Follow this procedure to program the side key to operate one of the following functions: Note: When the [... -
Page 9: Channel Scanning
CHANNEL SCANNING: When you program the side key as a channel scanning function, press the side key to start scanning and press the key again to stop. Press the [CH+] and [CH-] keys to change the scanning direction when in scanning mode. The LED indicator will flash green when scanning. -
Page 10: Time Out Alert (Toa)
time limit (which is pre-set by programming software), the radio will stop transmitting and an alarm will sound. To stop the alarm, release the [PTT] button and the radio will return to reception or standby mode. TIME OUT ALERT (TOA): When the transmission time is about to reach the time limit, a tone will sound to alert you. -
Page 11: Channels And Frequencies
CHANNELS AND FREQUENCIES CHANNEL (CH) FREQUENCY (MHz) 446.00625 446.01875 446.03125 446.04375 446.05625 446.06875 446.08125 446.09375 11. TROUBLESHOOTING PROBLEM POSSIBLE CAUSE/SOLUTION The radio will not turn on The battery pack may have run out of charge. Recharge or replace the battery pack. The battery pack may not be inserted correctly.
Need help?
Do you have a question about the PMR446 and is the answer not in the manual?
Questions and answers