Advertisement
Getting started with your DJ Console 4-Mx
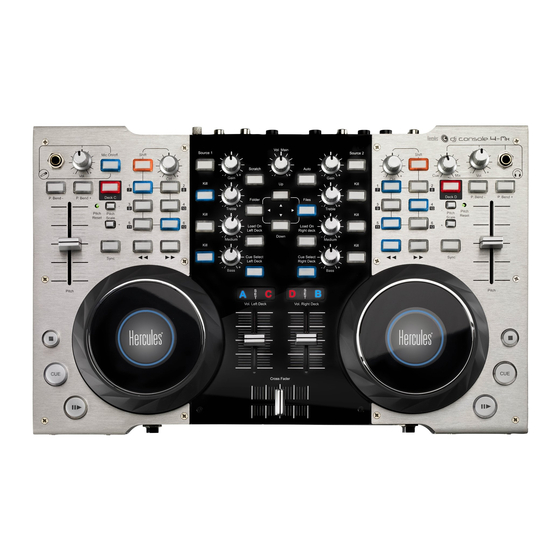
UK/US AFTER UNPACKING YOUR DJ CONSOLE 4-MX
1 – Turn the jog wheel locks (on the underside of your console) to the Unlock position (): otherwise you won't be able to press the jog wheels
down, which means that you won't be able to scratch.
2 – Make a note of the VirtualDJ 7 LE 4-Mx serial number () found on a sticker on the underside of your console, and install DJ Console 4-Mx
as indicated in the user manual.
3 – Remove the transparent film protecting the top surface of each jog wheel ().
4 – Connect your speakers and headphones to the corresponding connectors on your DJ Console 4-Mx.
F
APRES LE DEBALLAGE DE VOTRE DJ CONSOLE 4-MX
1 – Placez les verrous des jog wheels (au dos de votre console) sur la position Unlock (), sinon vous ne pourrez pas exercer de pression sur
les jog wheels et ne pourrez pas scratcher.
2 – Notez le numéro de série de VirtualDJ 7 LE 4-Mx () placé sous le boîtier et installez DJ Console 4-Mx comme indiqué dans le manuel de
l'utilisateur.
3 – Retirez le film transparent de protection qui recouvre les jog wheels ().
4 – Branchez vos enceintes et votre casque sur les prises audio de la DJ Console 4-Mx.
D
NACHDEM SIE IHRE DJ CONSOLE 4-MX AUSGEPACKT HABEN
1 – Drehen Sie die Jogwheel-Sperren (an der Unterseite Ihrer Konsole) auf die Unlock-Position (): Andernfalls können Sie die Jogwheels
nicht niederdrücken, was bedeutet, daß Sie nicht scratchen können.
2 – Notieren Sie sich die VirtualDJ 7 LE 4-Mx-Seriennummer (), die Sie auf einem Sticker auf der Unterseite Ihrer Konsole finden und
installieren die DJ Console 4-Mx wie im Benutzerhandbuch angegeben.
3 – Entfernen Sie den transparenten Schutzfilm von der Oberfläche jedes Jogwheels ().
4 – Schließen Sie Ihre Lautsprecher und Ihren Kopfhörer an die entsprechenden Anschlüsse Ihrer DJ Console 4-Mx an.
NL
NADAT U UW DJ CONSOLE 4-MX HEBT UITGEPAKT
1 – Draai de vergrendelingen van de jogwielen (aan de onderkant van de console) naar de positie Unlock (): als u dit niet doet, kunt u de
jogwielen niet indrukken en dus ook niet scratchen.
2 – Noteer het serienummer van de VirtualDJ 7 LE 4-Mx (). U vindt dit serienummer op de sticker op de onderkant van de console. Installeer
vervolgens DJ Console 4-Mx volgens de instructies in de handleiding.
3 – Verwijder de transparante beschermlaag van de bovenkant van de jogwielen ().
4 – Sluit de luidsprekers en de koptelefoon aan op de juiste aansluitingen op uw DJ Console 4-Mx.
I
DOPO AVER ESTRATTO DALLA SCATOLA LA TUA DJ CONSOLE 4-MX
1 – Sposta i blocchi delle manopole rotanti (posto nella parte inferiore della console) in posizione Unlock (): altrimenti, non riuscirai a premere
le manopole rotanti, il che ti impedirebbe di scratchare.
2 – Prendi nota del numero di serie di VirtualDJ 7 LE 4-Mx (), riportato su un adesivo presente nella parte inferiore della tua console,
dopodiché installa DJ Console 4-Mx, così come descritto nel manuale d'uso.
3 – Rimuovi la pellicola protettiva trasparente presente sulla parte superiore di ogni manopola rotante ().
4 – Collega le tue cuffie e i tuoi altoparlanti agli appositi connettori della tua DJ Console 4-Mx.
Advertisement
Table of Contents

Related Manuals for Hercules 4-Mx


Summary of Contents for Hercules 4-Mx
- Page 1 2 – Make a note of the VirtualDJ 7 LE 4-Mx serial number () found on a sticker on the underside of your console, and install DJ Console 4-Mx as indicated in the user manual.
- Page 2 2 – Anota el número de serie de VirtualDJ 7 LE 4-Mx () que se encuentra en una pegatina en la cara inferior de la consola, e instala DJ Console 4-Mx según se indica en el manual del usuario.
- Page 3 UK/US TO MIX WITH YOUR DJ CONSOLE 4-MX ON 4 DECKS When using the “deck switch” function (switch Deck A / Deck C, or switch Deck B / Deck D), you must first move all of the gradual controls on the deck in question (volume faders, pitch faders, gain knobs, and EQ knobs, as indicated in the illustration above) to the positions shown in the VirtualDJ software interface, prior to switching decks.
- Page 4 соответствовать положению, обозначенному в интерфейсе программы VirtualDJ. ΕΛΛΗΝΙΚΑ ΓΙΑ ΜΙΞΗ ΜΕ ΤΗΝ ΚΟΝΣΟΛΑ DJ CONSOLE 4-MX ΣΕ 4 ΠΛΑΤΟ Όταν χρησιμοποιείτε τη λειτουργία «deck switch» (διακόπτης Πλατό A / Πλατό C, ή διακόπτης Πλατό B / Πλατό D), πρέπει πρώτα να...
Need help?
Do you have a question about the 4-Mx and is the answer not in the manual?
Questions and answers