
Related Manuals for schwa-medico EMP 4 PRO


Summary of Contents for schwa-medico EMP 4 PRO
- Page 1 EMP 4 PRO Four-channel transcutaneous muscle and nerve stimulator Art.-Nr. 200506 Art.-No. 104061 Instruction Manual Art.-No. 101447-V01...
-
Page 2: Table Of Contents
Technical specifications ......5 Information on total Pulse form ..........5 stimulation duration .........16 Settings, modifications and repairs ..16 Description of the EMP 4 PRO ....6 Description of the display ......6 Warranty ..........16 Display of electrical current form ....7 Guarantee..........16 Operating the EMP 4 PRO ......7 Maintenance and cleaning ......16... -
Page 3: General Information
(not less than 10 °C or more than 40 °C or a relative humidity of more than 90 %). • Do not use the EMP 4 PRO if it is not working properly or if it has been damaged in any way. -
Page 4: Side Effects
EMP 4 PRO • Patients subject to seizure disorder / epilepsy • Patients with skin disorders in the vicinity of the electrodes • Patients with malignant diseases in the region of application Side effects • Pain caused by the stimulation: The stimulation can be perceived as uncomfortable/ painful if the electric current is too intensive or if the electrodes have been positioned unfavorably. -
Page 5: Technical Specifications
EMP 4 PRO This product works with a nickel metal hydride rechargeable battery. The rechargeable battery must be recycled. At the end of the working life of the rechargeable battery you must dispose of it separately at an appropriate... -
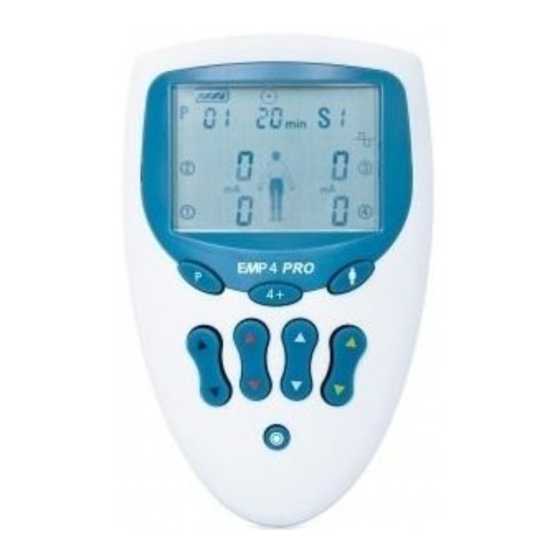
Page 6: Description Of The Emp 4 Pro
EMP 4 PRO Description of the EMP 4 PRO 1. Display 2. P key: program selection key 3. 4 + key: program start key and simultaneous increase of all channels key: selection of stimulation area / Pause + EDIT function for USER programs 5. -
Page 7: Display Of Electrical Current Form
Using the battery New devices: The battery is already inserted in new devices. Please fully charge the battery before first use of the EMP 4 PRO. Otherwise: Open the battery compartment, plug the battery into the connector inside the compartment (upside right), place the battery in the compartment, close the compartment. -
Page 8: Battery Level
Connecting the cables and the electrodes • Connect the electrodes with the cable(s) (always 2 electrodes per cable). • Connect the cables to the EMP 4 PRO on socket no. 9. • Place the electrodes on the desired area (see electrode placement). -
Page 9: Selecting An Area Of Stimulation
EMP 4 PRO Selecting an area of stimulation Depending on the selected program you can choose between upper and lower limbs. The body symbol on the display is half colored, depending on the selected limbs. The pulse width is increased for lower limbs. -
Page 10: Pausing The Stimulation
The end of stimulation is indicated by a double acoustic signal. Switching OFF the EMP 4 PRO Press the key to switch OFF the device. This is indicated by an acoustic signal. The device switches OFF automatically if: •... -
Page 11: Electrode Recognition For Enhanced Safety
EMP 4 PRO Electrode recognition for enhanced safety The EMP 4 PRO constantly monitors the correct connection of electrodes and cables. The EMP 4 PRO automatically stops the stimulation if: • an electrode detaches itself from the skin • electrodes are not attached correctly in pairs •... -
Page 12: Overview Pre-Set Programs
EMP 4 PRO Overview pre-set programs No. PROGRAMS FOR PAIN MANAGEMENT No. PROGRAMS FOR REHABILITATION Gate Control 80 Hz* Combination: active elbow joint motion + pain management Gate Control 100 Hz* Combination: active knee joint motion Endorphine 2 Hz*... -
Page 13: Programs For Upper And Lower Limbs
See Page 9. User programs for own settings The EMP 4 PRO has 8 user programs. Each user program corresponds to a type of stimulation and consists of one single sequence. The stimulation time can be set between 10 and 90 minutes. -
Page 14: Overview User Programs
EMP 4 PRO Overview user programs USER Program type Possible parameters TENS continuous mode • Frequency (1-100 Hz) • Impulse width (50-250 μs) • Stimulation time (10-90 min) Frequency modulation • Lowest frequency: from 1 to 100 Hz • Highest frequency: from the lowest frequency + 10 Hz to 100 Hz •... -
Page 15: Setting Parameters For User Programs
EMP 4 PRO USER Program type Possible parameters 2+2 mode For channels 1 and 2: Ch. 1 & 2: EMS • Frequency (half of frequency from Ch. 3 & 4: TENS channel 3 and 4) • Impulse width (50-200 μs) •... -
Page 16: Acoustic Signal
Press the P key to get back to the standard mode. Settings, modifications and repairs The manufacturer is only responsible for the safety and performance of the EMP 4 PRO when settings, adjustments, alterations and repairs are carried out by authorized persons and when the EMP 4 PRO is used in accordance with the operating instructions. -
Page 17: Maintenance And Cleaning
EMP 4 PRO Maintenance and cleaning No special cleaning or care agents are required for the EMP 4 PRO. Clean the unit with a soft, fluff-free cloth. Please ensure that no moisture permeates the unit. If moisture does permeate the unit, a technical check must be carried out before re-use. -
Page 18: Accessories
EMP 4 PRO Accessories The following accessories can be combined with the EMP 4 PRO. Stimex self-adhesive electrodes Art. No. Article Pieces 281000 Stimex 32 mm round 282000 Stimex 50 mm round 283400 Stimex 50x50 mm 281032 Stimex 50x50 mm... -
Page 19: Medicoback
120 - 130 cm Stimex garment electrodes: gloves and socks The gloves and socks used in combination with the EMP 4 PRO provide stimulation of the entire hand and/or foot and ankle and avoid the sometimes tiresome attachment of self-adhesive electrodes on the hand or the foot. -
Page 20: Vaginal Probes
EMP 4 PRO Vaginal probes To be used with URO programs only Art.-No. Article Pieces 101471 Vaginal probe V21B (type 7) V21B 25 mm Ø length Länge 95 mm Cables 104765 Pair of electrode cables type 7 (black) 104766 Pair of electrode cables type 7 (red) -
Page 21: Principle Of Dynamic Stimulation
EMP 4 PRO • Muscle fatigue: A tired muscle will only tolerate a lower intensity. • Age of electrodes: Self-adhesive electrodes do not last forever. You can use them up for up to 60 stimulation sessions. This depends on the quality of the electrodes but also on the skin of the user. - Page 22 EMP 4 PRO Channel 1 Channel 2 Channel 3 Channel 4 Vertical movement Channel 1 Channel 4 E.g. back, legs Channel 2 Channel 3 Falling In order to apply a falling wave, the channels must be Channel 3 Channel 2...
-
Page 23: Short Instruction Use
EMP 4 PRO Short instruction use 1. Connect the cables with the electrodes. 2. Plug in the cables into the sockets of the EMP 4 PRO. 3. Place the electrodes on the skin. 4. Select a program by pressing the P key. -
Page 24: Electrode Positioning
EMP 4 PRO Electrode positioning Electrode positioning for pain therapy (P1 to P7, P10 to P20) Neck Trapezius Deltoid Elbow Knee r = red (anode) b = blue (cathode) - Page 25 EMP 4 PRO Sciatic pain, Ischialgia Ankle Wrist r = red (anode) b = blue (cathode)
- Page 26 EMP 4 PRO Electrode positioning for pain therapy using dynamic stimulation Back Lower back r = red (anode) b = blue (cathode)
- Page 27 EMP 4 PRO Electrode positioning for rehabilitation (P21 to P37), vascular disease (P38 + P41), sports (P42 to P47), fitness (P49 to P51), aesthetics (P53 to P55) Hand flexor Hand extensor Biceps Trapezius Back Latissimus r = red (anode)
- Page 28 EMP 4 PRO Stomach muscle Gluteus Quadriceps Flexor Foot flexor Foot extensor r = red (anode) b = blue (cathode)
- Page 29 EMP 4 PRO Electrode positioning for urological rehabilitation (P33 to P36) Positioning on the pubic bone Anode (red) Cathode (blue) Anode (red) Cathode (blue) Training with a probe Vaginal probe Anal probe Positioning on the perineum Place the anode (red) on the pubic bone...
- Page 30 EMP 4 PRO Electrode positioning for anti-cellulitis treatment using dynamic stimulation (P52) Gluteus Stomach muscle Thigh r = red (anode) b = blue (cathode)
- Page 31 EMP 4 PRO Electrode positioning for vascular desease (P39 + P48), relaxation (P56 to P60), dynamic stimulation (P65 + P66) Flexor Calf Flexor and calf Back Quadriceps Low back r = red (anode) b = blue (cathode)
- Page 32 · Export Department Wetzlarer Strasse 41-43 · 35630 Ehringshausen · Germany Tel. +49 6443 8333-113 · Fax +49 6443 8333-119 Email export@schwa-medico.de · www.schwa-medico.com Manufacturer: Pierenkemper GmbH Hoernsheimer Eck 19 · 35578 Wetzlar · Germany Art.-Nr. 451600-0339...
Need help?
Do you have a question about the EMP 4 PRO and is the answer not in the manual?
Questions and answers